- Automatic switching between ChatGPT and Bing depending on request.
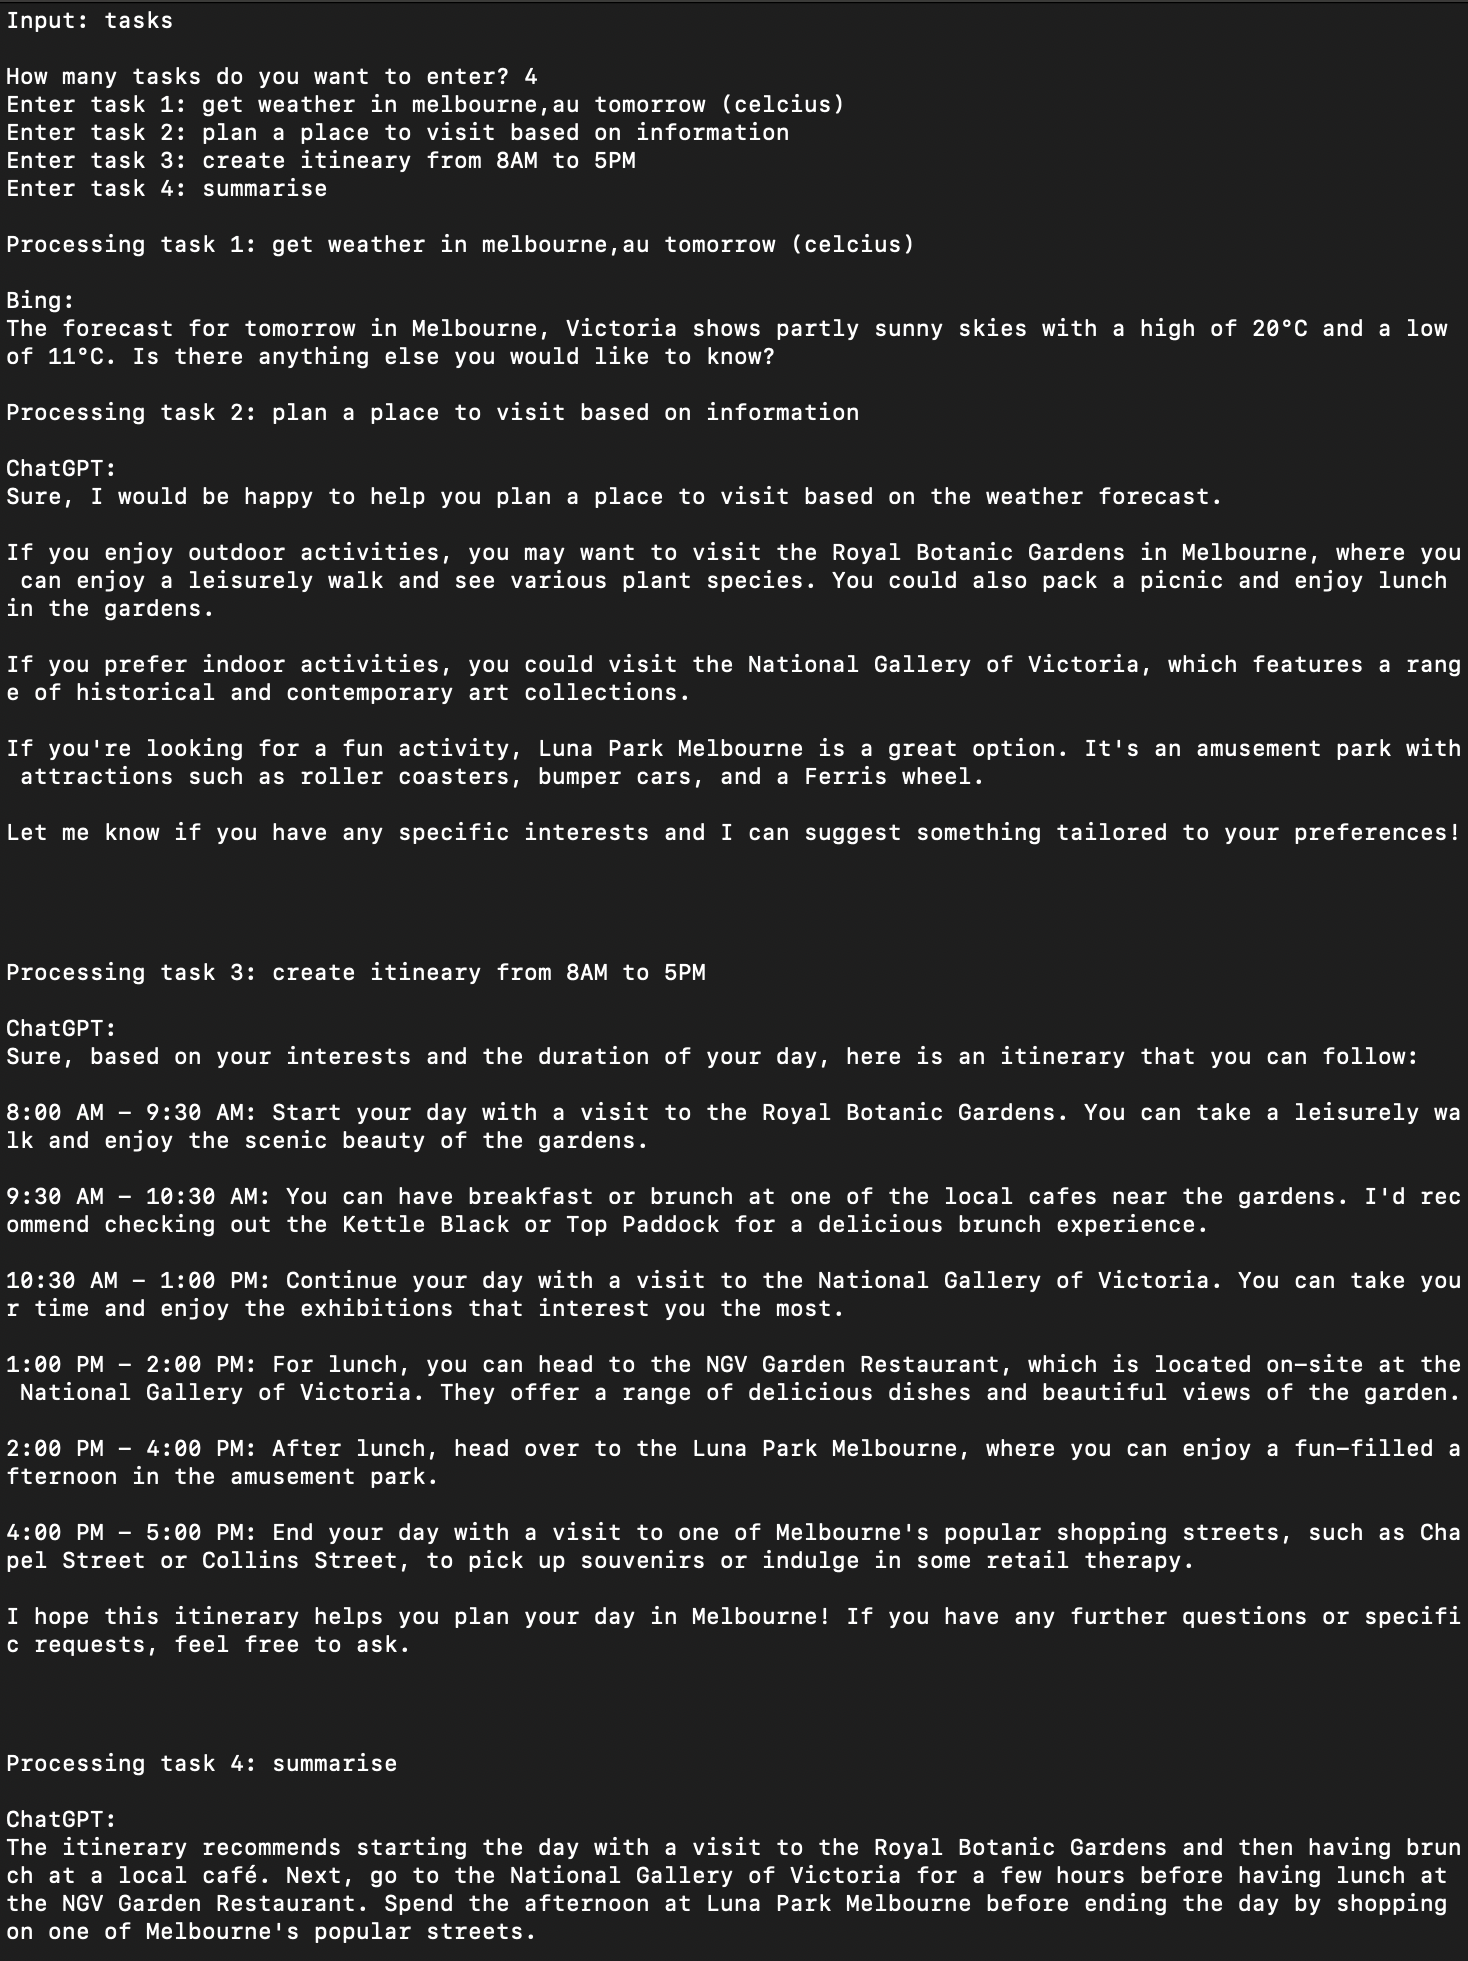
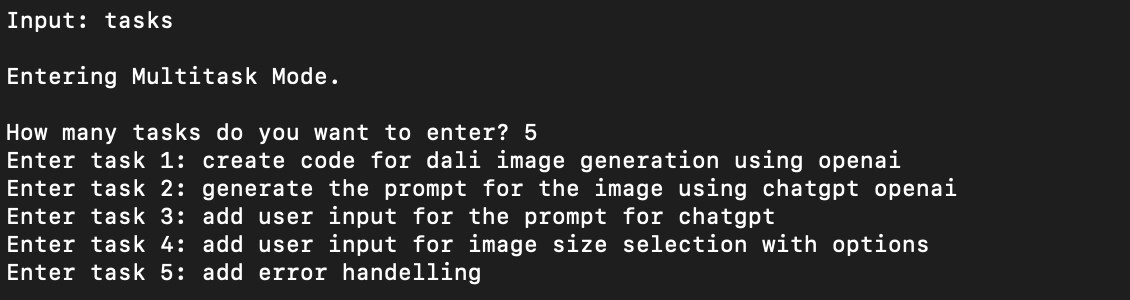
- Multitask mode to execute as many tasks as required with access to information acquired from a prior task.
- Multi-step Python code generation and creation of .py file as output'.
- Execute and debug option for Python code. Supports automatic installation of missing modules.
- Multi-step HTML code generation and creation of .html file as output'.
- Generation of images utilising ChatGPT and DALL•E API.
- Options for switching between gpt-3.5-turbo and gpt-4.
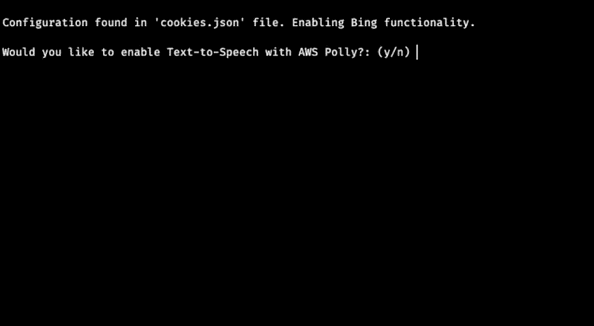
- Text to speech support with AWS Polly (Neural Engine).
- Pre-built ChatGPT roles.
- Searching and scraping articles on Wikipeadia and google.
Use the following options in gpt-plus for additional functionality:
Use 'tasks' to enter multitask mode.
Use 'read clipboard' to access text from clipboard.
Use 'import python' while in python developer role to import python files from input folder.
Use '--debug' at the end of a prompt or after 'import python' to execute code and debug (in python developer role).
Use 'import html' to import html while in web developer role to import html files from the input folder.
Use 'ask gpt' to request response specifically from ChatGPT.
Use 'ask bing' to request response specifically from Bing.
Use 'search web' for searching the internet.
Use 'search wiki' for searching Wikipedia.
Use '!recall to access the full conversation history instead of only accessing previous conversation (default to reduce token usage).
Use '!clear' to clear current history and move to a new topic.
Use '!reset' to clear history and reset program.
Use '!shutdown' to exit program.
Additionally, gpt-plus will auto switch to Bing mode if in scenarios where ChatGPT is unable to access the latest information.
- Install Python 3.10.10, checking "Add Python to PATH".
- Install git
sudo apt install wget git python3 python3-venv python3-pipsudo dnf install wget git python3 python3-venv python3-pipsudo pacman -S wget git python3 python3-venv python3-pipInstall brew
/bin/bash -c "$(curl -fsSL https://raw.githubusercontent.com/Homebrew/install/HEAD/install.sh)"Install python and git
brew install python@3.10 gitOnce above steps are completed clone gpt-plus using following commands. gpt-plus directory will be cloned to the current path of command prompt or terminal.
git clone https://github.com/hareenl/gpt-plus.git
cd gpt-plusAdd ChatGPT functionality by following the steps below:
- Visit OpenAI to generate an API Key.
- Navigate to the gpt-plus directory in terminal or file browser.
- Rename the .env.template file located in gpt-plus folder to .env and add API key to the file.
# .env
OPENAI_API_KEY=sk-abcdefghijklmnopqrstuvwxyz123456To add Bing functionality to gpt-plus, steps are as follows:
- Install the cookie editor extension for Chrome/Edge or Firefox
- Go to bing.com (Login to page)
- Open the extension
- Click "Export" on the bottom right, then "Export as JSON" (This saves your cookies to clipboard)
- Rename cookies.json.template file in gpt-plus folder to cookies.json
- Paste your cookies into a file cookies.json
Read additional details on EdgeGPT
Add AWS Polly support for Text-to-Speech by filling in the AWS Access and Secret keys in the .env file. If this step is completed, the console will provide an option to enable Text-to-Speech when initialised.
# .env
OPENAI_API_KEY=sk-abcdefghijklmnopqrstuvwxyz123456
AWS_ACCESS_KEY_ID=ABCDEFGHIJK123456
AWS_SECRET_ACCESS_KEY=abcdefghijklmnop1234start-gpt.bat
chmod +x start-gpt.sh
./start-gpt.shFollowing prompt will import text from clipboard and summarise text.
read clipboard and summarise in 100 words
The following prompt will recall the full session history and allow recalling of events.
!recall weather in melbourne on saturday
Following prompt will generate code, save the code to 'output/generated_code.py', execute code and debug. If errors are found they will be fixed and the debugging process will repeat till the code is error free.
create code for openai dali image generation using requests module --debug
Following prompt will import a python file of selection located in the 'input' folder, optimise and then debug the code.
import python and optimise --debug
Following prompt will generate a webpage and save the page generated to 'output/generated_webpage.html'.
create webpage with a button in the centre of the screen.
Following prompt will import a html file of selection located in the 'input' folder and optimise the code.
import html and optimise
The generated code is exported as 'generated_code.py' in the 'output' folder. Code below is based on above prompt input in Multitask mode.
# Import the necessary libraries
import openai
import requests
import json

# Set up the API endpoint and token
openai.api_key = "<YOUR_API_KEY>"
endpoint = "https://api.openai.com/v1/images/generations"

# Take user input for the prompt generation
prompt_str = input("Enter a prompt to generate an image: ")

# Ask the user for image size selection
size_options = ["256x256", "512x512", "1024x1024"]
print("Choose an image size:")
for i, size_option in enumerate(size_options):
	print(f"{i+1}. {size_option}")

# Use a try-except block to handle errors if the user enters an invalid option
while True:
	try:
		size_index = int(input()) - 1
		size = size_options[size_index]
		break
	except:
		print("Invalid option. Please try again.")

# Set up the prompt generation parameters
model_engine = "davinci"
prompt = openai.Completion.create(
engine=model_engine,
prompt=prompt_str,
max_tokens=50,
n=1,
stop=None,
temperature=0.5
)

# Set the image parameters
model = "image-alpha-001"
prompt_text = prompt["choices"][0]["text"].strip()
response_format = "url"    # This will return a JSON object containing the URL of the generated image

# Set up the API request headers and body
headers = {
"Content-Type": "application/json",
"Authorization": f"Bearer {openai.api_key}"
}

data = {
"model": model,
"prompt": prompt_text,
"size": size,
"response_format": response_format
}

# Send the API request and print the result
try:
	response = requests.post(endpoint, headers=headers, data=json.dumps(data))
	response_dict = json.loads(response.text)
	print(response_dict["data"][0]["url"])
except:
	print("API request failed. Please try again.")