Only use this fork when you want to control
typedef struct{
   int16_t steer;
   int16_t speed;
   uint32_t crc;
} Serialcommand;
and/or read
typedef struct{
   int16_t iSpeedL;		// 100* km/h
   int16_t iSpeedR;		// 100* km/h
   uint16_t iHallSkippedL;
   uint16_t iHallSkippedR;
   uint16_t iTemp;		// °C
   uint16_t iVolt;		// 100* V
   int16_t iAmpL;		// 100* A
   int16_t iAmpR;		// 100* A
   uint32_t crc;
} SerialFeedback;
via uart !
- Simply select this repo in my online compiler https://pionierland.de/hoverhack
- Choose a default configuration or edit config.h and main.c as you like
- Hit the compile button :-)
have a look at the Arduino example code:
https://github.com/RoboDurden/hoverboard-firmware-hack/blob/master/hoverserial.ino
built on https://github.com/p-h-a-i-l/hoverboard-firmware-hack readme mainly from the original from https://github.com/NiklasFauth/hoverboard-firmware-hack


![]()

This repo contains open source firmware for generic Hoverboard Mainboards. The firmware you can find here allows you to use your Hoverboard Hardware (like the Mainboard, Motors and Battery) for cool projects like driving armchairs, person-tracking transportation robots and every other application you can imagine that requires controlling the Motors.
If you want an overview of what you can do with this firmware, here is a ~40min video of a talk about this project: https://media.ccc.de/v/gpn18-95-howto-moving-objects
Here are detailed build instructions for some finished projects. If possible, a prebuild firmware release is available for these usecases, so you don't need to compile the firmware yourself
TranspOtter: https://github.com/NiklasFauth/hoverboard-firmware-hack/wiki/Build-Instruction:-TranspOtter
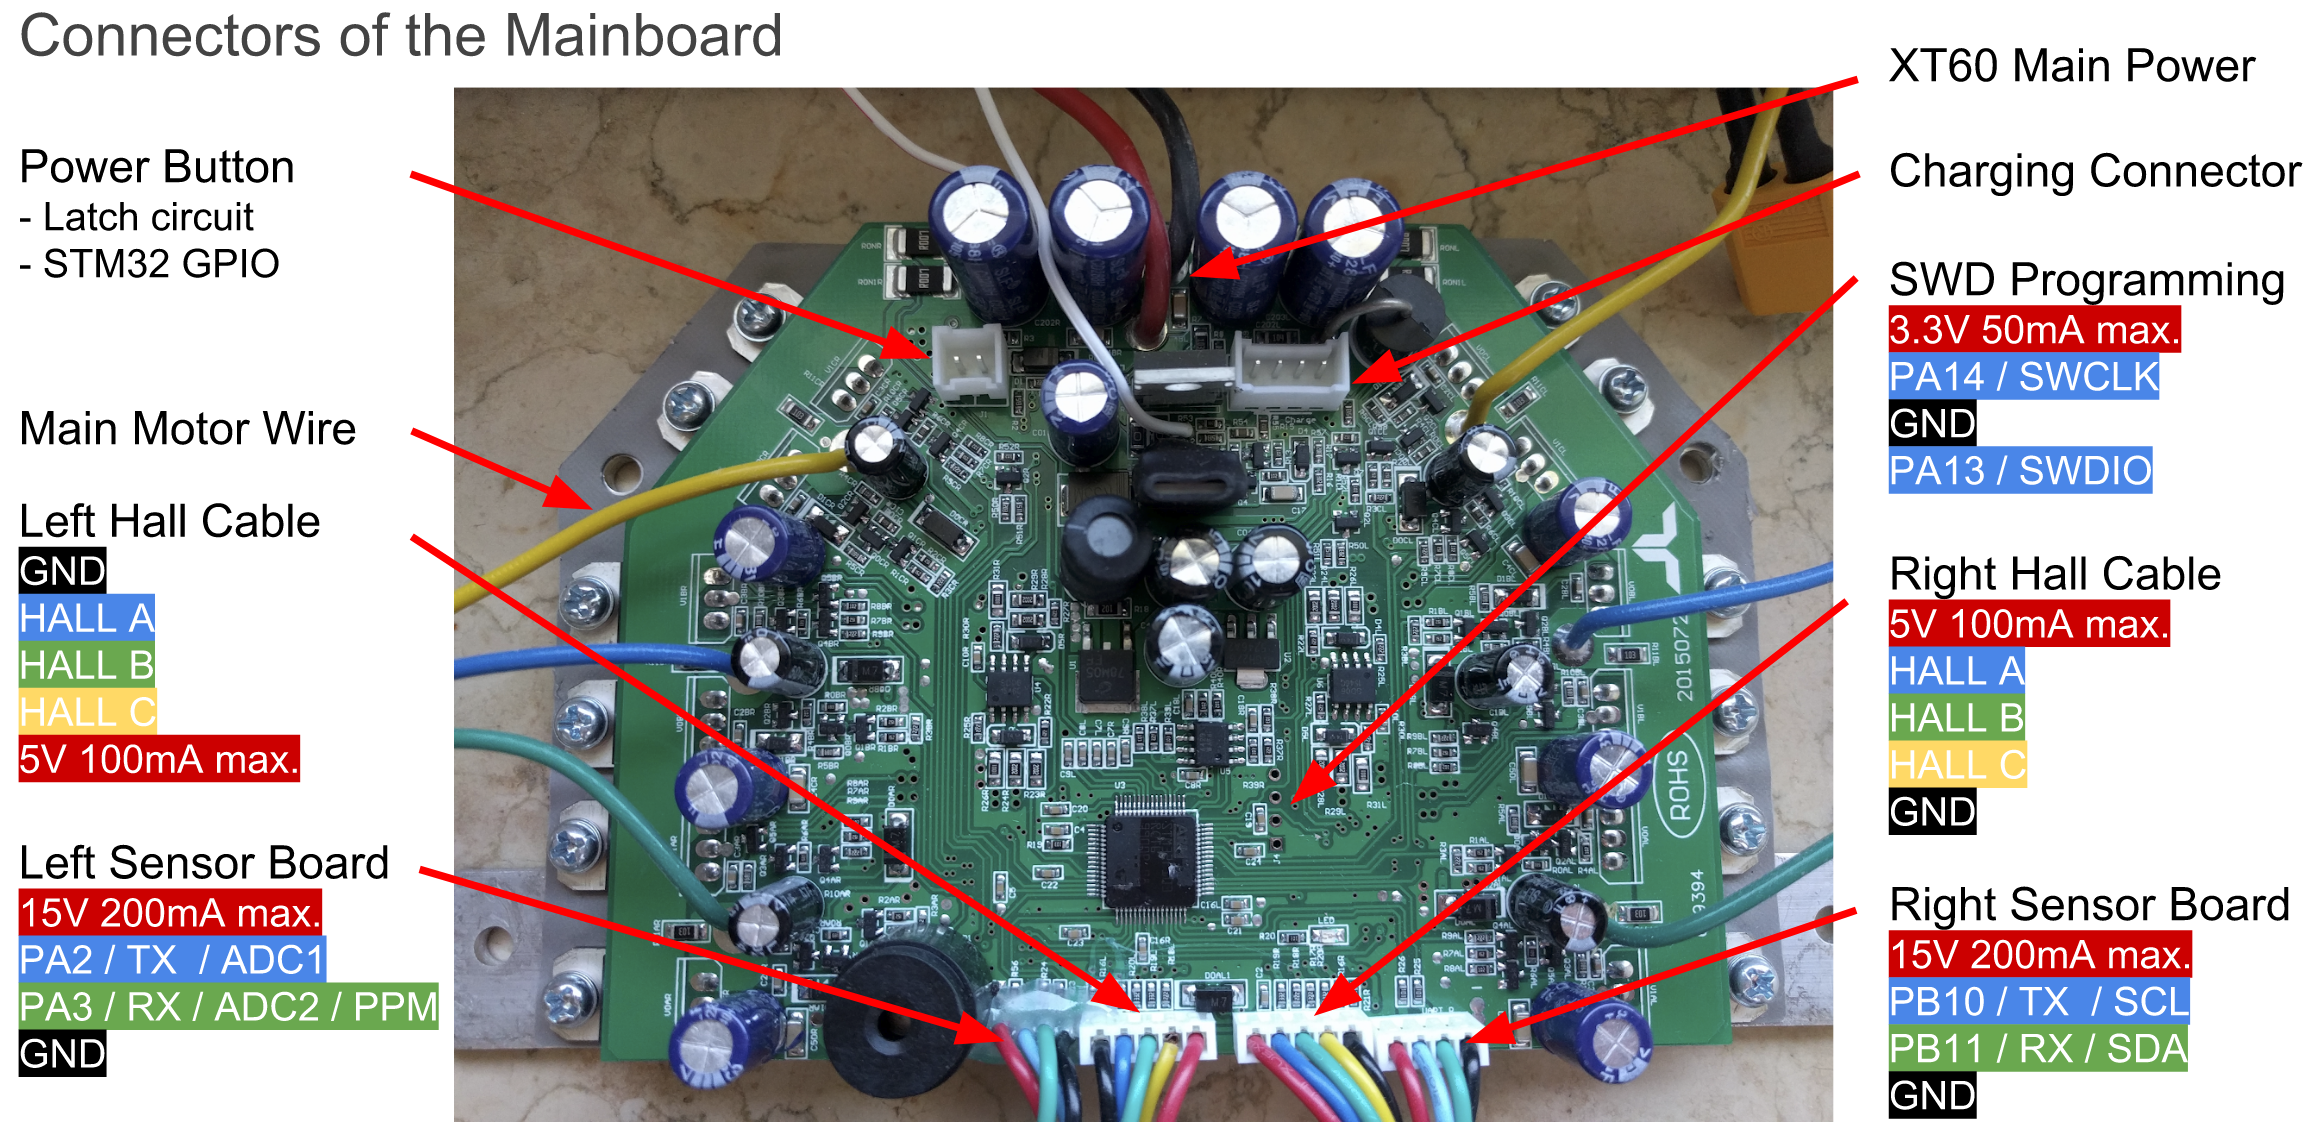
The original Hardware supports two 4-pin cables that originally were connected to the two sensor boards. They break out GND, 12/15V and USART2&3 of the Hoverboard mainboard. Both USART2 & 3 can be used for UART and I2C, PA2&3 can be used as 12bit ADCs.
The reverse-engineered schematics of the mainboard can be found here: http://vocke.tv/lib/exe/fetch.php?media=20150722_hoverboard_sch.pdf
Plenty of input Methods can be used to control the board. You can configure your preferred Method in config.h.
Probably the most reliable Method. 2 Potis can be connected to one of the old sensor board connections. Make sure to reference the Poti voltages to 3.3V, not 12V or 15V. The gametrak Controller in the TranspOtter project is an examample for analog input.
Pulse Pause Modulated Signals.
A nunchuck, which communicates via I2C can be connected to the board. Have a look into the troubleshooting section if you have trouble with the Nunchucks.
A complete protocol is implemented to communicate with the board. Have a look at protocol.c to find out how it works. Sample code to send speed and steer:
setHoverboardPWM(200,50); // sends 200 as speed and 50 steer
typedef struct MsgToHoverboard_t{
  unsigned char SOM;  // 0x02
  unsigned char len;  // len is len of ALL bytes to follow, including CS
  unsigned char cmd;  // 'W'
  unsigned char code; // code of value to write
  int16_t base_pwm;   // absolute value ranging from -1000 to 1000 .. base_pwm plus/minus steer is the raw PWM value
  int16_t steer;      // absolute value ranging from -1000 to 1000 .. wether steer is added or substracted depends on the side R/L
  unsigned char CS;   // checksumm
};

typedef union UART_Packet_t{
  MsgToHoverboard_t msgToHover;
  byte UART_Packet[sizeof(MsgToHoverboard_t)];
};

void setHoverboardPWM( int16_t base_pwm, int16_t steer )
{
  UART_Packet_t ups;

  ups.msgToHover.SOM = 2 ;  // PROTOCOL_SOM; //Start of Message;
  ups.msgToHover.len = 7;   // payload + SC only
  ups.msgToHover.cmd  = 'W'; // PROTOCOL_CMD_WRITEVAL;  // Write value
  ups.msgToHover.code = 0x07; // speed data from params array
  ups.msgToHover.base_pwm = base_pwm;
  ups.msgToHover.steer = steer;
  ups.msgToHover.CS = 0;

  for (int i = 0; i < ups.msgToHover.len; i++){
    ups.msgToHover.CS -= ups.UART_Packet[i+1];
  }

  Serial1.write(ups.UART_Packet,sizeof(UART_Packet_t));
}
a project which makes use of the protocol (ESP32) can be found at https://github.com/p-h-a-i-l/hoverboard-control
To build the firmware, just type "make". Make sure you have specified your gcc-arm-none-eabi binary (version 7 works, there is a version that does not!) location in the Makefile ("PREFIX = ...").
The firmware will also build (and flash) very easily from platform.io, plaformio.ini file included. Simply open the folder in the IDE of choice (vscode or Atom), and press the 'PlatformIO:Build' or the 'PlatformIO:Upload' button (bottom left in vscode).
(Note: if you have no buttons, use Debug/Add Configuration, and select 'PlatformIO Debugger'; seems to kick it into life).
Right to the STM32, there is a debugging header with GND, 3V3, SWDIO and SWCLK. Connect GND, SWDIO and SWCLK to your SWD programmer, like the ST-Link found on many STM devboards.
Make sure you hold the powerbutton or connect a jumper to the power button pins while flashing the firmware, as the STM might release the power latch and switches itself off during flashing. Battery > 36V have to be connected while flashing.
To flash the STM32, use the ST-Flash utility (https://github.com/texane/stlink).
If you never flashed your mainboard before, the STM is probably locked. To unlock the flash, use the following OpenOCD command:
openocd -f interface/stlink-v2.cfg -f target/stm32f1x.cfg -c init -c "reset halt" -c "stm32f1x unlock 0"
If that does not work:
openocd -f interface/stlink-v2.cfg -f target/stm32f1x.cfg -c init -c "reset halt" -c "mww 0x40022004 0x45670123" -c "mww 0x40022004 0xCDEF89AB" -c "mww 0x40022008 0x45670123" -c "mww 0x40022008 0xCDEF89AB" -c "mww 0x40022010 0x220" -c "mww 0x40022010 0x260" -c "sleep 100" -c "mww 0x40022010 0x230" -c "mwh 0x1ffff800 0x5AA5" -c "sleep 1000" -c "mww 0x40022010 0x2220" -c "sleep 100" -c "mdw 0x40022010" -c "mdw 0x4002201c" -c "mdw 0x1ffff800" -c targets -c "halt" -c "stm32f1x unlock 0"
openocd -f interface/stlink-v2.cfg -f target/stm32f1x.cfg -c init -c "reset halt" -c "mww 0x40022004 0x45670123" -c "mww 0x40022004 0xCDEF89AB" -c "mww 0x40022008 0x45670123" -c "mww 0x40022008 0xCDEF89AB" -c targets -c "halt" -c "stm32f1x unlock 0"
Or use the Windows ST-Link utility.
Then you can simply flash the firmware:
st-flash --reset write build/hover.bin 0x8000000
First, check that power is connected and voltage is >36V while flashing. If the board draws more than 100mA in idle, it's probably broken.
If the motors do something, but don't rotate smooth and quietly, try to use an alternative phase mapping. Usually, color-correct mapping (blue to blue, green to green, yellow to yellow) works fine. However, some hoverboards have a different layout then others, and this might be the reason your motor isn't spinning.
Nunchuck not working: Use the right one of the 2 types of nunchucks. Use i2c pullups.
Nunchuck or PPM working bad: The i2c bus and PPM signal are very sensitive to emv distortions of the motor controller. They get stronger the faster you are. Keep cables short, use shielded cable, use ferrits, stabilize voltage in nunchuck or reviever, add i2c pullups. To many errors leads to very high accelerations which triggers the protection board within the battery to shut everything down.
Most robust way for input is to use the ADC and potis. It works well even on 1m unshielded cable. Solder ~100k Ohm resistors between ADC-inputs and gnd directly on the mainboard. Use potis as pullups to 3.3V.
Have a look at the config.h in the Inc directory. That's where you configure to firmware to match your project. Currently supported: Wii Nunchuck, analog potentiometer and PPM-Sum signal from a RC remote. If you need additional features like a boost button, have a look at the while(1) loop in the main.c
- bobbycar-optimized firmware based on this one with driving modes, acceleration ramps and some other features
- wheel chair controlled with a joystick or using a CC2650 sensortag to control it over bluetooth with pitch/roll.