Quick Start Guide
The RGBtoHDMI interface is a high quality HDMI video converter for retro computers. The interface comprises a Raspberry Pi Zero and a specially designed "Hat" containing a small CPLD. Custom firmware on the Raspberry Pi, in conjunction with the CPLD, is able to precisely sample a wide range of non-standard video formats to give a pixel-perfect rendition. It was originally designed for the BBC Micro, but has now been extended to support a wide range of systems through the use of Profiles.
There are currently three different hardware implementations of RGBtoHDMI:
- The original 2018 3 bits per pixel "Beeb" RGBtoHDMI (hoglet):
- The original 2019 4 bits per pixel "Atom" RGBtoHDMI (hoglet):
- The new 2020 12 bits per pixel "Generic" RGBtoHDMI with optional analog front end (IanB):
All of these are supported by a common software release for the Pi.
For more details on the available hardware, see the Hardware Guide.
See the Cables section for details on wiring up supported computers.
This section covers the software installation and initial setup of RGBtoHDMI.
Using a PC or MAC:
- Start with a blank Micro SD Card (it should be FAT32 formatted)
- Download the latest release zip file from here
- Unzip this to the SD Card (so all the files are in the root directory of the SD Card)
- Safely remove the SD Card from the PC
- Insert the SD Card into the Raspberry Pi
If you want to ugrade to the latest software, wipe the SD card first, do not overwrite the existing install.
Do not use old saved profiles with the new install as they are not guaranteed to be compatible.
There are 3 buttons on the interface, SW1, SW2 and SW3. Each button performs two functions, one when pressing briefly and one when holding down for a longer period:
SW1:
Short press = Call up menu
Long press = toggle scanlines (if available) on/off
SW2:
Short press = Screen capture (File is written to SD card)
Long press = Toggle NTSC artifact colours on/off
SW3:
When NTSC artifacts are enabled, SW3 short press cycles though the four NTSC artifact phases
When Manual timing sets are enabled, SW3 short press switches between set 1 and set 2
If neither of the above are enabled, SW3 short press enables (if disabled) or refreshes the genlock
Long press = Calibrate sampling position
When the menu is on screen:
SW1: Select menu option or enter editing mode for the selected parameter
SW2: Cursor Down or increase selected parameter
SW3: Cursor Up of decrease selected parameter
Pressing SW2 and SW3 together will take a screencap with the menu on screen
A fourth button SW4 can be used to reset the Pi but only if an additional 2 pin header is fitted on the Pi zero.
The software can be switched into single button menu operation and this is primarily for use with c0pperdragon's internal Amiga upgrade so only the HDMI connector and a single button have to be routed ouside of the case.
This operates as follows:
SW1:
Short press = Screen capture (File is written to SD card)
Long press = Call up menu
When in the menu:
Short press = Cursor Down or increase selected parameter
Long press = Select menu option or enter editing mode for the selected parameter
An additional menu option at the bottom of the main menu called "Button Reverse" is available and enabling that reverses the direction of the short press.
This option is tedious to use for anything complicated but does allow adjustment of every parameter from a single button.
Switch on the Monitor first and select the HDMI input
Switch on the Source Computer
If this is the first time powering up a newly built board you will be presented with the CPLD recovery menu and you should select an appropriate CPLD for your board, clicking a second time to confirm programming:

See the Supported Computers section for a list of supported computers and which CPLD firmware and interface they require
For more details see CPLD Programming
Once the CPLD has been programmed, after a few seconds you should see the startup screen of your computer, however it may be jittery, have wrong colours or rolling as the profile will not have been setup yet:

There is a slight possibility that you will get no output at all including no menus because the EDID erroneously indicates the monitor supports 50Hz and you have connected a 50Hz source. If that happens you should hold down SW1 during power up/reset to disable 50Hz support until you can set the resolution setting correctly (see below).
The first time RGBtoHDMI is used, it's necessary to configure a few settings:
- the Profile for the source system
and optionally: - the output Resolution that best matches the monitor you are using
- the output Refresh rate that best matches the computer you are using
- the Scaling option (this impacts image quality)
This is done through a series of on-screen menus operated by the three buttons on the "Hat":
- a Menu/Select button (SW1)
- an Up button (SW2)
- a Down button (SW3)
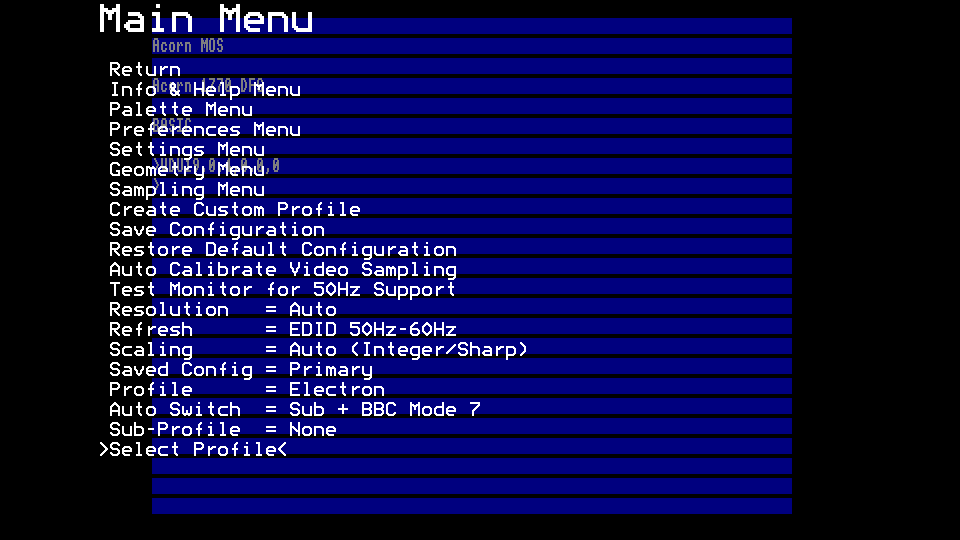
Start by pressing SW1 to bring up the Main Menu:

You need to select the profile for your computer:
Each "Profile" optimises the system for a particular source (e.g. a BBC Micro or a ZX81). When you select a Profile, many of the settings on the other menus (especially Geometry and Sampling) will change to reflect the video format of that source. This allows the user to quickly configure the system, without needing to understand the technical details of each system.
Move the cursor to the Select Profile line
Press Menu to enter the Select Profile menu and move the cursor to the manufacturer category you require.

Press Menu again to enter the machine menu, move the cursor to the required computer and press Menu again to select.
Some profiles will be prefixed with (BBC), (RGB) or (YUV) and that means the CPLD requires reprogramming to use that profile.
If you choose a profile without a prefix it will be selected immediately and you will return to the main menu.
If you select a profile with a prefix, the CPLD will automatically be reprogrammed with the appropriate firmware and the system will reboot and select the desired profile.

If you are using a BBC Master 128 make sure the *TV setting in the CMOS (which controls the vertical position of the image) is set to 0 (using *CONFIGURE TV 0,0 ) otherwise you might get the top or bottom of the image cropped off
The "Resolution" setting controls the video resolution the Pi outputs to your monitor.

The resolution setting is set to "Auto" on first power up and in many cases it can be left on that setting.
This setting will generate the screen output according to the Extended Display and Identification Data present in your monitor which should specify the default resolution of your monitor.
The "Refresh" setting controls the refresh rate of the video signal the Pi outputs to your monitor.

The refresh setting is set to "EDID 50Hz-60Hz" on first power up and in many cases it can be left on that setting.
This setting will generate the screen refresh rate according to the Extended Display and Identification Data present in your monitor.
If your monitor indicates it has 50Hz support then the output will automatically switch to 50Hz if you connect a 50Hz source (e.g. BBC micro).
If your monitor doesn't indicate 50Hz support then the output will remain at 60Hz even with 50Hz sources and a warning will be displayed because this will result in jerky motion and screen tears on any smooth scrolling.
However many monitors will actually support 50Hz even though their EDID indicates otherwise so if you are using a 50Hz source computer the first thing to do is select the "Test Monitor for 50Hz support" option:

This option will only work if you have a 50Hz source connected and you will get an error message if you have a 60Hz source connected.
If you get a message indicating 50Hz support is already enabled and the resolution is set to the correct value then you don't need to do anything else and can leave the setting on "EDID 50Hz-60Hz"
If you don't get the above message, follow the on screen instructions to proceed with the test.
If you get a stable screen output after the test has run then it means your monitor supports 50Hz even though it's EDID indicates otherwise and you should change the refresh to "Force 50Hz-60Hz" which will automatically switch the output as appropriate from 60Hz to 50Hz and ignore the EDID setting.
Use SW2/SW3 to move the >< cursor down to the Refresh setting:
Press SW1 again and use SW2/SW3 to cycle through the possible values to select "Force 50Hz-60Hz".
If you get a blank screen after running the test, it means your monitor doesn't support 50Hz and you should press reset to recover the image. This means the genlock led will be flashing continuously as it will never be able to lock and you can stop that by going into the settings menu and changing the "Genlock Mode" to Off.
If the EDID has selected the wrong resolution or if you want to manually try some 50Hz resolutions, you can manually select a resolution and refresh rate by cycling through the options and you should choose a resolution that matches your monitor's native physical resolution. For example, if you have a Full-HD monitor, pick 1920x1080. The refresh rate (50Hz or 60Hz) should ideally match your source machine, so for a BBC Micro pick 50Hz. Then press SW1 to confirm the selection:
The refresh rates act as follows:
EDID 50Hz-60Hz - Sets the refresh to 50Hz if the source is 50Hz and the EDID indicates it will work otherwise output 60Hz.
Force 50Hz-60Hz - Always forces the refresh output to 50Hz or 60Hz as appropriate depending on the source.
Force 50Hz-Any - Always forces the refresh output to 50Hz, 60Hz or greater as appropriate depending on the source.
60Hz - Sets the refresh always to 60Hz
50Hz - Sets the refresh always to 50Hz
After changing resolution or refresh you may see a message at the top indicating a reboot is required and this will happen when you exit the menu.
NOTE: It is important to use the physical resolution of the lcd pixels on your monitor, not the claimed maximum resolution the monitor supports otherwise you will get a double dose of scaling, once in the Pi and once in the monitor.
e.g. on ebay you can find many small monitors that default to displaying 1920x1080 in their EDID info but if you look at the specifications in detail, they will have a much lower physical resolution like 1024x600 or even 800x480 and it is this lower physical resolution you must select for the best quality results.
The "Scaling" setting controls how the source image is up-scaled to the required output resolution and you can usually leave this on the Auto setting.
A number of options are available:
- Auto
- Integer / Sharp
- Integer / Soft
- Integer / Softer
- Interpolate 4:3 / Soft
- Interpolate 4:3 / Softer
- Interpolate Full / Soft
- Interpolate Full / Softer
"Integer" scaling will map each input pixel to an integer number of output pixels (e.g. 2x4) and this gives a very sharp image. It may, however, result in black borders around the source image. If there is no suitable integer relationship between the source resolution and the monitor resolution you may end up with a small or distorted image with very large black borders.
The best results for Integer scaling with higher resolution computers like BBC, Amstrad CPC or IBM PC are obtained with monitors of 1920x1080, 1920x1200, 1680x1050 or 1600x1200 resolution. If you are using a monitor with a lower resolution the "Interpolate 4:3" options (see below) are recommended and will be automatically selected by "Auto" mode.
Integer scaling may be suitable at lower monitor resolutions if you are using a source with a lower resolution like the ZX80/81, Spectrum, Atom or Dragon/Tandy.
"Interpolate 4:3" scaling reduces or eliminates any black borders by allowing scaling by a non-integer number of pixels using interpolation, while still preserving the source aspect ratio. However, if the source is 4:3 and the monitor is 16:9, there will still be vertical black bars on either side of the source image.
"Interpolate Full" allows arbitrary scaling without any attempt to preserve aspect ratio. The source image will fill all of the display, but will likely appear too stretched if the monitor is not 4:3.
The above "Interpolate" scaling is the equivalent of the scaling that other converters and monitors themselves use when supplied with an image that is smaller than the monitor resolution.
The actual re-scaling is performed by the GPU on the Pi, which supports several different algorithms. The "Sharp" / "Soft" / "Softer" refer to which algorithm is used by the GPU. Note: changes to this setting will not be visible until after the system has rebooted.
The default scaling setting is "Auto" and the currently auto selected scaling option is displayed in brackets after the "Auto".

The Auto option will normally select "Integer / Sharp" unless there isn't a good integer relationship between the source resolution and the monitor resolution, in which case it will select "Interpolate 4:3 / Soft".
After changing the Resolution and/or Scaling settings, you need to allow the system to reboot for these changes to take effect.
This will happen automatically when you exit the Main Menu by selecting the Return option:

Note most older monitors do not support 50Hz refresh rates but newer ones usually do. At least some older 4:3 1600x1200 monitors made by HP support 50Hz.
If for some reason you end up with a blank screen (because the resolution or refresh rate you chose was not compatible with your monitor), you can restore the default Resolution by holding down the Menu button (SW1) as the Pi boots. Hold the button down until you see a text message indicating recovery mode, then release it.
Once the system has rebooted, there is one final step you can perform: Auto Calibration of the sampling phase. This optimises the pixel sampling for the exact timing of your particular computer by adjusting the sampling phase.
If the sampling phase is set incorrectly you will end up with noisy / flickering pixels.
Calibration is best performed in the highest resolution mode, with a reasonable about of text and/or multi colour graphics on the screen and the image must be static while the calibration is performed (flashing cursors are automatically ignored).
You should always run the calibration on the BBC micro.

Bring up the main menu again and select the Auto Calibration option:

Note: On most systems you only need to perform Auto Calibration once. However, on the BBC micro, you should perform Auto Calibration twice: once in MODE 0 (or 3), and again in MODE 7. This is because MODE 7 use different pixel clock to the other modes.
If you get problems in MODE 7 with certain combinations of foreground & background colours you should always run the Auto calibration with those being displayed. This is a BBC mode7 test program that displays all possible colour combinations to aid with calibration: mode7 test program
Similarly on the PC you should perform the calibration in CGA and EGA modes if required.
Sometimes auto calibration is unable to produce an optimum result e.g:
On some IBM PC CGA cards the text and graphics pixel clocks are out of phase which means that an auto calibration performed in text mode might produce an unsatisfactory noisy result in graphics mode and vice-versa. In such a case you can manually adjust the Sampling Phase setting in the sampling menu to a compromise value that works with both.

In teletext mode 7 on the BBC micro there are additional adjustments A Phase to F Phase.
Teletext manual adjustment should be performed as follows:
Set the multiplier to x12
Adjust the sampling phase for the best overall result then adjust the individual A-F Phases to see what effect they have on any remaining noise.
You can also change the half pixel shift setting and repeat the above if required.
Finally you can try again with the multiplier set to x16 but which is even more accurate but that might not work as it overclocks the cpld so you might get streaking, blank screens or much more noise.

When the analog addon board is fitted, the following additional "DAC" menu options are displayed:

The DACs are used to set the thresholds for comparators which allow several levels of RGB to be discriminated and generally can be left at their default values.
However if there is enough variation in the voltage levels of the computer's video output you may need to make minor adjustments for a noise free result. (Such adjustments will usually only need to be done once)
Adjust the DAC values by a small amount plus or minus to eliminate any noise
The computers most likely to require minor adjustment are:
Spectrum 48K
Any 6847 based system like Atom, Tandy Color Computer or Dragon.
After performing Auto Calibration you will prompted to press Menu to save the new setting.
You can also use the "Save Configuration" option to make that or any other changes permanent:

Finally, select Return to close the menu:

Each Profile represents a reasonable starting point for that system type, but you may want to make further changes. For example, turning on visible scan lines, selecting a border colour, or changing the default palette.
If you make additional changes, and you want these to be permenant, then you need to repeat the "Save Configuration" action. This will update the current Profile to include these changes·
Note: The "Save Configuration" action applies only to the current profile. If you use several machines (with different profiles) and wanted to enable visible scan lines in all of them, you would need to make the change and repeat "Save Configuration" on each profile in turn.
If at any time you want to revert back to the original version of the current Profile (with all of your changes removed), then select the "Restore Default Configuration" action. Again, this affects only the current Profile.
You can save up to five different configurations for each profile by altering the "Saved Config" option before using "Save Configuration" The "Saved Config" options are "Primary", "Alt1", "Alt2", "Alt3", "Alt4". e.g.if you changed "Saved Config" to "Alt1", then enabled scanlines and green screen output and used the "Save Configuration" option then everytime you selected Alt1 in that profile those options would be enabled and selecting the Primary would revert back to the original configuration.
The HDMI mode setting can be used to change the output from DVI Compatible to full HDMI which can be required by some capture cards
The following documentation is available (or will be soon):