Starting and or Ending Dates Times for Recurring Events
Let's suppose you want an event to run jobs hourly, but you only want it to start on a certain date/time, and then also stop on a certain date/time. Here is how to make this happen:
First, create yourself a Cronicle API Key. You will need this to issue commands to Cronicle via the REST API. Don't worry, you won't need to write any code for this. We'll be using the built-in HTTP Request Plugin.
For this example we'll assume your API key is: 0095f5b664b93304d5f8b1a61df605fb, but yours will be different.
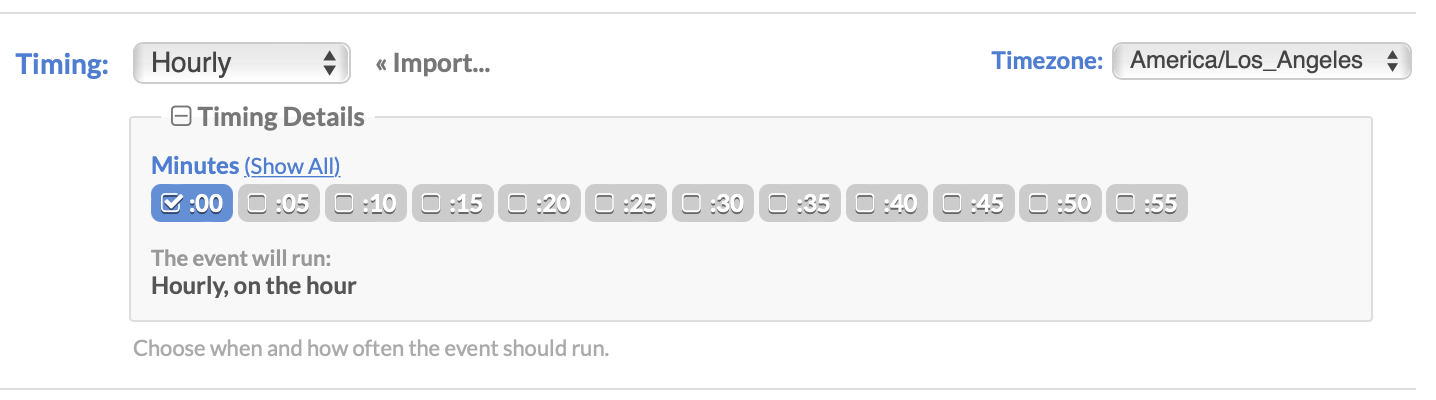
Now, set up your main event in the schedule to run hourly, or at whatever frequency you want:
But make sure you disable the event at the top of the page, so it doesn't actually start running jobs until our future start date/time (which we will setup next):

Now, save your event. Please take note of the auto-assigned Event ID at the top of the page (if you are creating the event for the first time, you will have to save and re-edit it to see the ID):
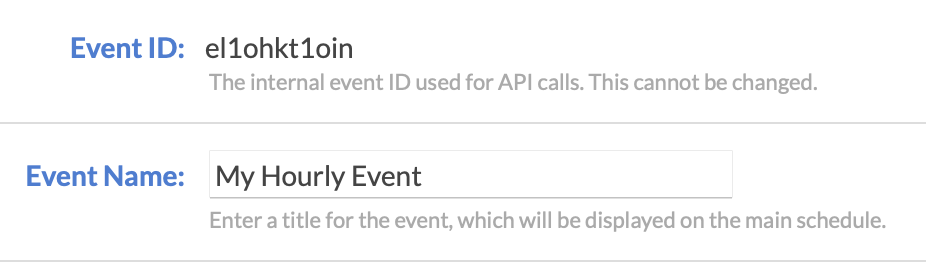
For this example we'll assume your event ID is: el1ohkt1oin, but yours will be different.
Next, go back to the schedule and start a brand new event. Give this one a name like "My Event Start Date/Time", and select your Cronicle primary server as the target to run the event:

Obviously the hostname will vary here. Make sure you select your own Cronicle primary server.
Now, select the built-in HTTP Request Plugin:
We need to configure this Plugin to send a HTTP request to the Cronicle primary server (itself), so construct a URL like this:
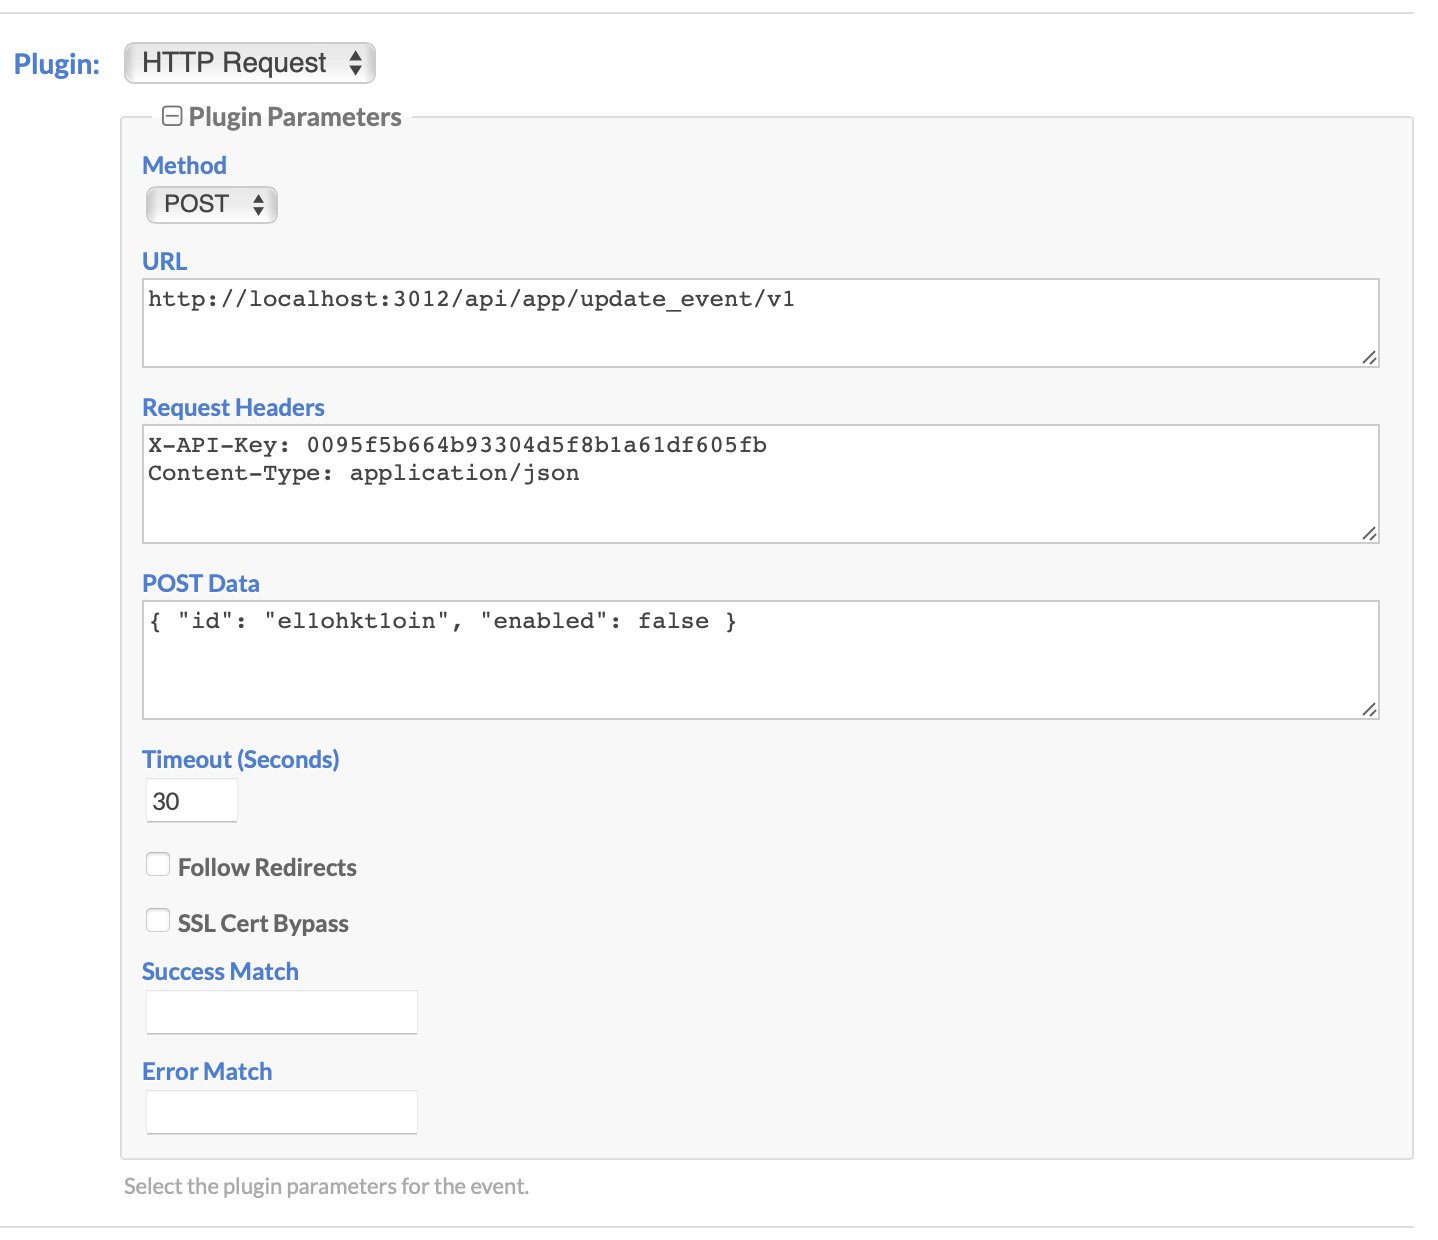
http://localhost:3012/api/app/update_event/v1
This is the API endpoint for the update_event API call, and as you can see, the server host is localhost:3012. We'll be targeting this event to run on the Cronicle primary server, so it can just send the HTTP request to itself (localhost), on the same server. This assumes your Cronicle installation is running on the default port (3012). If not, please change this URL accordingly.
Now, let's authenticate the request by adding our API Key that we created earlier. There are a number of different ways to do this, but let's do it via a HTTP Request Header. Let's also take this opportunity to set the Content-Type header to application/json:
X-API-Key: 0095f5b664b93304d5f8b1a61df605fb
Content-Type: application/json
Now, set the Request Method to "POST", and set the POST Data to this:
{ "id": "el1ohkt1oin", "enabled": true }
Change the el1ohkt1oin ID to your own main event ID that you took note of above.
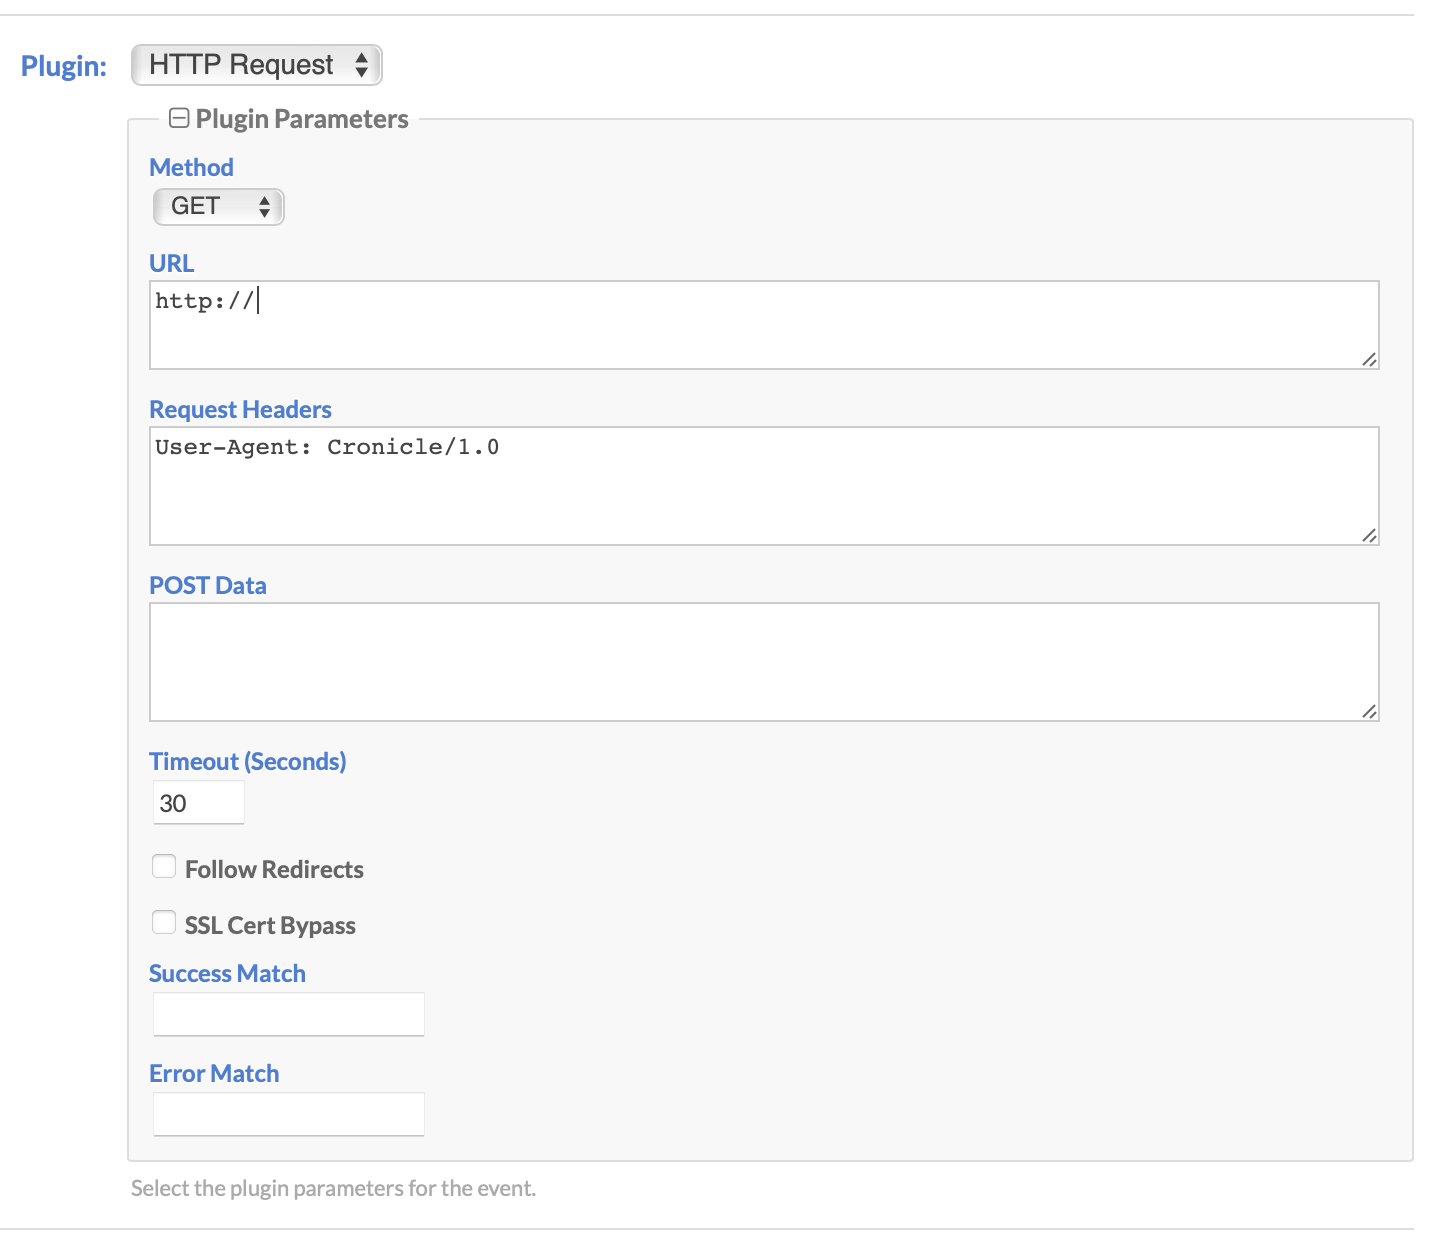
What we're doing here is telling Cronicle to update the event with ID el1ohkt1oin (our main hourly event which is currently disabled), and set its enabled property to true. This will enable it and the scheduler will then start running jobs for it at the next scheduled interval (hourly, or whatever we selected before). This is the same as if a user edited the event in the UI, checked the enabled checkbox, then saved the event. We're just doing it programmatically. The full HTTP Request Plugin parameter set should look like this:

Next, for the timing on our starter event, select Custom from the menu and then choose the exact date and time which the HTTP event should run. This is how you set your "starting" date/time for your main event. Make sure this only runs once. Example:
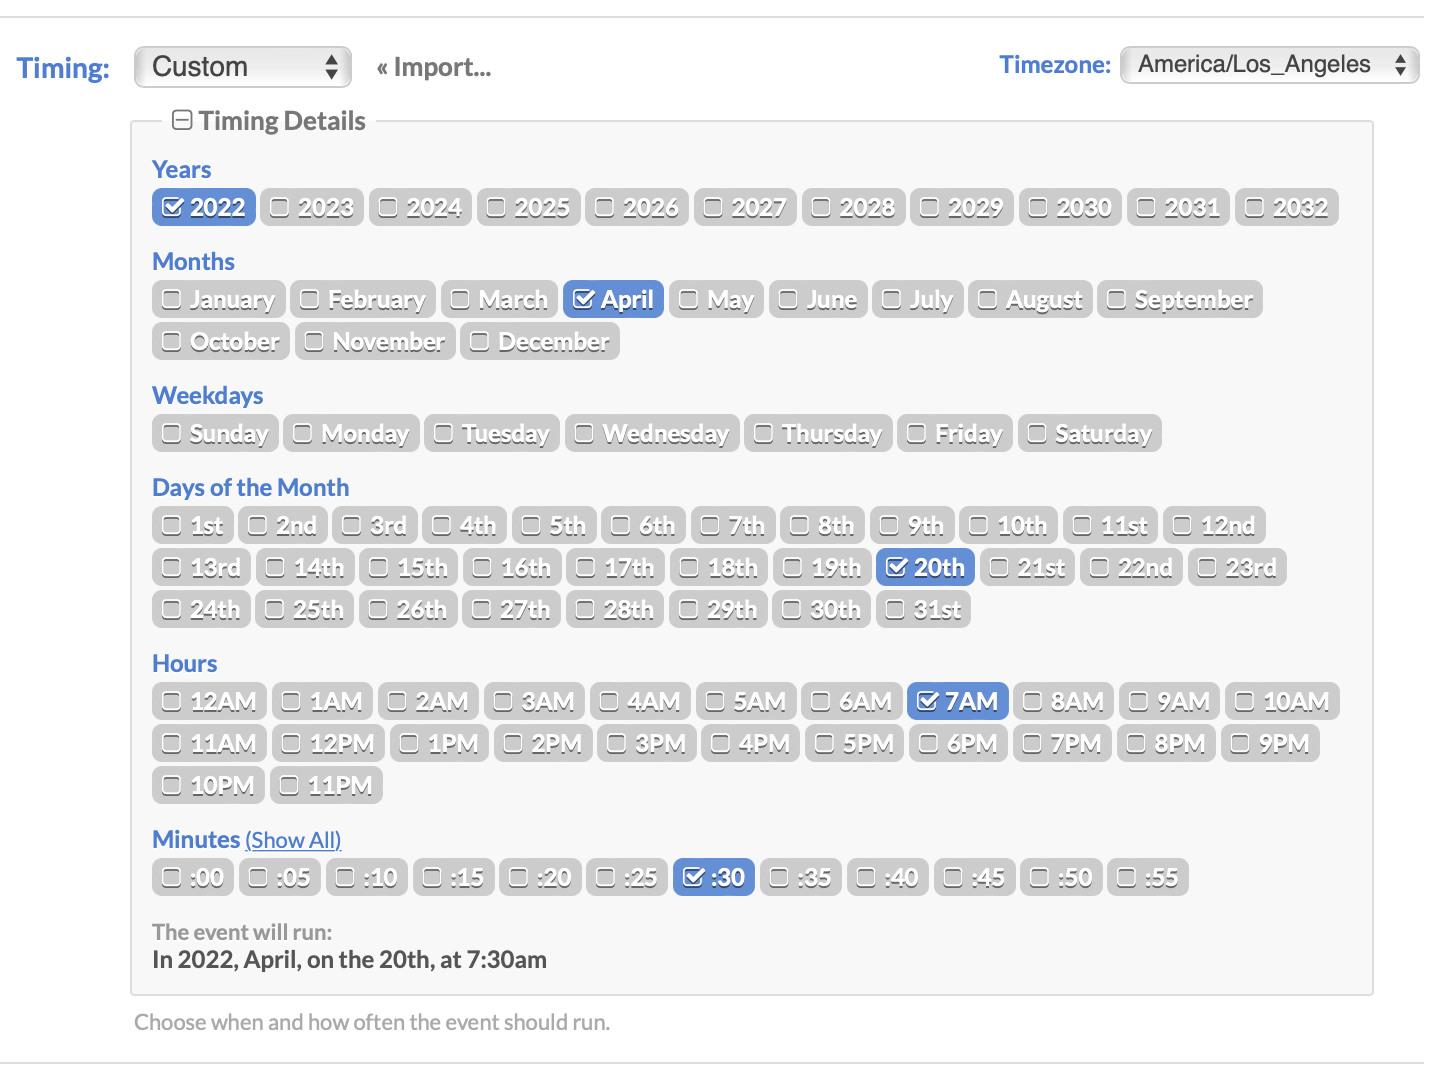
So in this case on April 20, 2022 @ 7:30 AM, this starter event will run, and fire off the HTTP request which enables our main event. Save the starter event, and you're done!
But wait, what about an ending date/time? How do we turn this thing off? It's basically the same exact process, except we'll be setting the enabled property to false this time...
So, go back to the schedule and start a brand new event. Give this one a name like "My Event End Date/Time", and select your Cronicle primary server as the target to run the event:
Obviously the hostname will vary here. Make sure you select your own Cronicle primary server.
Now, select the built-in HTTP Request Plugin:
We need to configure this Plugin to send a HTTP request to the Cronicle primary server (itself), so construct a URL like this:
http://localhost:3012/api/app/update_event/v1
This is the API endpoint for the update_event API call, and as you can see, the server host is localhost:3012. We'll be targeting this event to run on the Cronicle primary server, so it can just send the HTTP request to itself (localhost), on the same server. This assumes your Cronicle installation is running on the default port (3012). If not, please change this URL accordingly.
Now, let's authenticate the request by adding our API Key that we created earlier. There are a number of different ways to do this, but let's do it via a HTTP Request Header. Let's also take this opportunity to set the Content-Type header to application/json:
X-API-Key: 0095f5b664b93304d5f8b1a61df605fb
Content-Type: application/json
Now, set the Request Method to "POST", and set the POST Data to this:
{ "id": "el1ohkt1oin", "enabled": false }
Change the el1ohkt1oin ID to your own main event ID that you took note of above.
What we're doing here is telling Cronicle to update the event with ID el1ohkt1oin (our main hourly event), and set its enabled property back to false. This will disable it and the scheduler will stop running jobs. This is the same as if a user edited the event in the UI, unchecked the enabled checkbox, then saved the event. We're just doing it programmatically. The full HTTP Request Plugin parameter set should look like this:
Next, for the timing on our end event, select Custom from the menu and then choose the exact date and time which the HTTP event should run. This is how you set your "ending" date/time for your main event (when you want it to stop). Make sure this only runs once. Example:
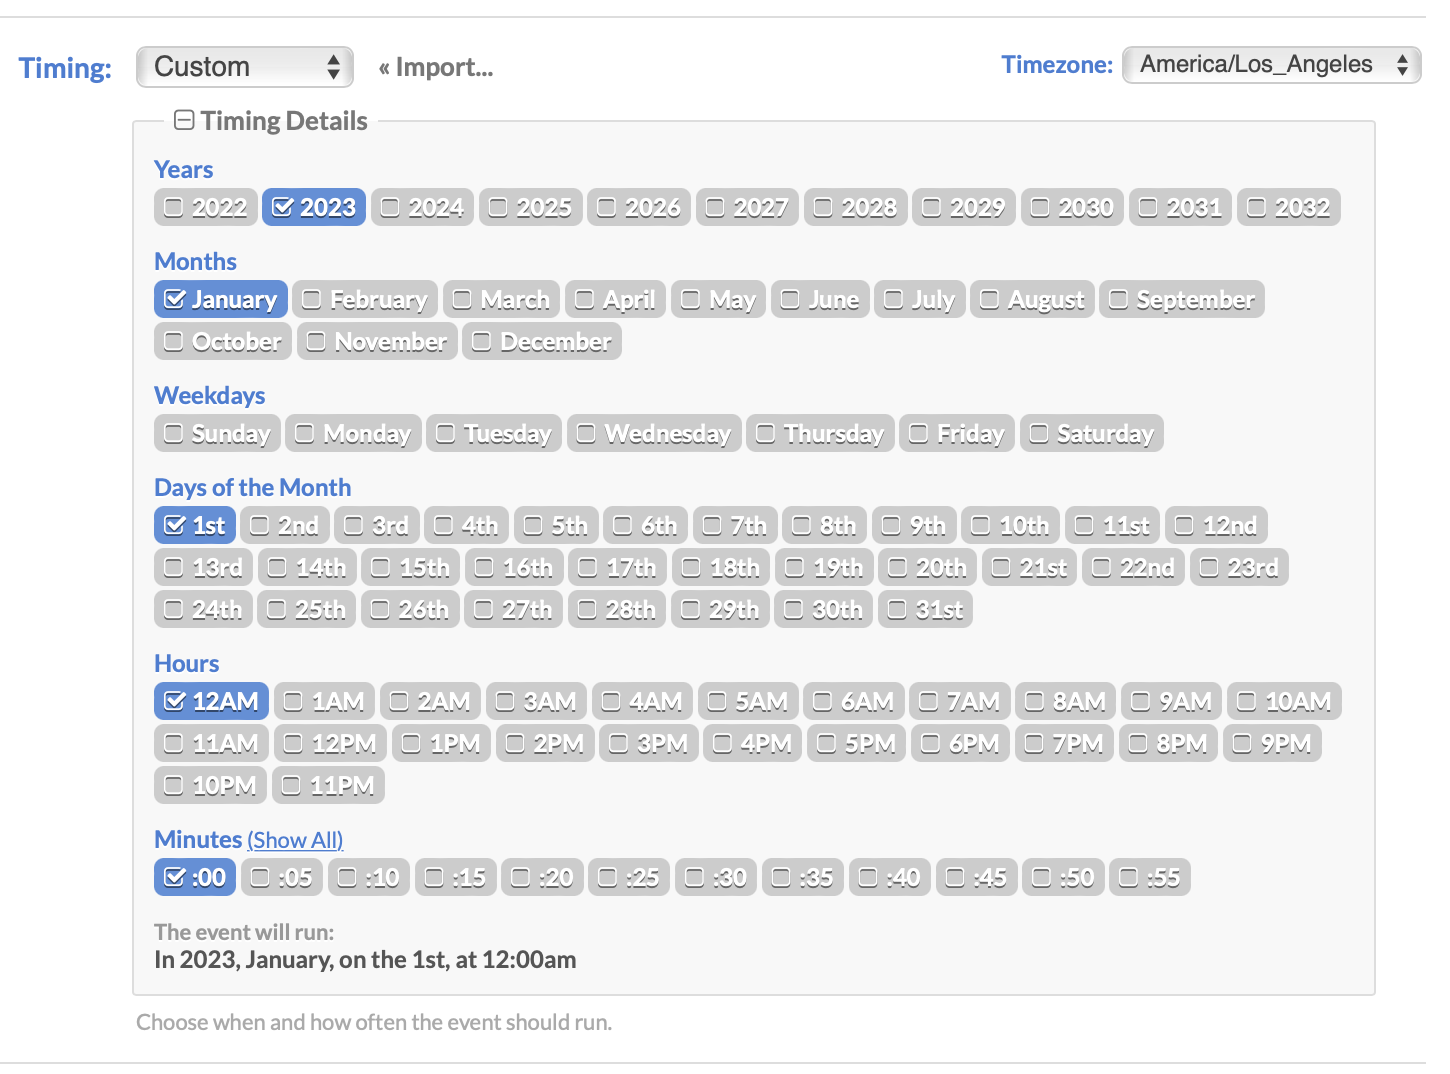
So in this case on January 1, 2023 @ midnight, this end event will run, and fire off the HTTP request which disables our main event. Save the event, and you're done!
You now have an hourly event with a custom start and end date/time.