Agent
NeedleAgent is an open source iOS app complementary to needle, the iOS security testing framework. It allows needle to programmatically perform tasks natively on the device eliminating the need for third party tools. The agent plays the role of a server which listens for TCP connections coming from needle (or any other TCP client).
The agent has certain messages (opcodes) that it will respond to, and, like needle, it is designed to be easily extensible: adding an opcode to the agent only requires one method to be written.
The code of the Agent is hosted on Github: https://github.com/mwrlabs/needle-agent
The architecture of the agent is based on a client-server model.
The agent acts as a server which waits for messages (called "opcodes") from clients.
The Agent has several opcodes it responds to, with each opcode corresponding to a method implemented within the agent. An opcode consists of the name of the method and 0 or more arguments, delimited by spaces. Opcodes must be terminated by a CRLF (\r\n) and this must be managed by the client (for example SUM 1 2\r\n).
The response from the agent varies depending on the command that is run but there will always be at least one message sent back that ends with a CRLF. Assume that only one CRLF terminated message will be sent back unless otherwise specified in the opcode documentation.
When a client connects to the agent, a socket object is created to handle the connection and to deal with sending and receiving messages. All messages received are sent to the command handler: this is where parsing of opcodes and arguments happens, as well as delegation to the helper classes to get the response messages.
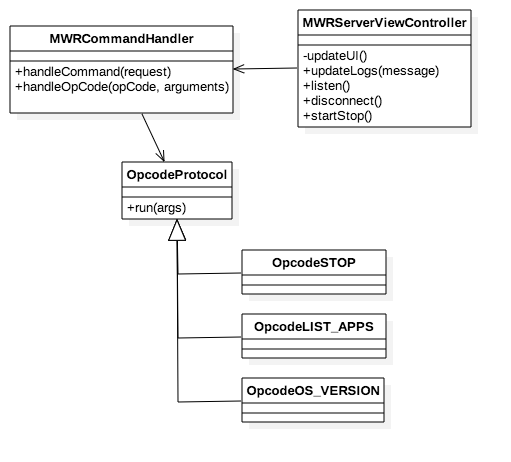
The list of Opcodes currently supported by the agent is shown in the following image:
The agent is mainly written in Objective-C but some functionality is implemented in C. The UI is made using iOS storyboards.
Adding in a new opcode can be as simple as creating a new class. These are the requirements for a new opcode method:
-
The name of the class should match the convention:
OpcodeNAME, whereNAMEmust be the name of the opcode in all caps (e.g.,OpcodeSTOP.m). Needle agent will convert any opcodes that are input into all caps so it is more forgiving over user input and this makes opcode methods stand out from other methods. -
The class must implement the
runmethod- which takes exactly one argument of type
NSArray*._: this will contain the arguments and options for the opcode - and which must return an
NSString*_: this message will be formatted and sent back to the client.
- which takes exactly one argument of type
NeedleAgent receives input as a string and will split it on each set of whitespace characters into an array of strings. It then uses the first string as the opcode and the subsequent strings are sent as arguments to the method.
In this example we will write a method that can perform a calculation on two numbers.
Create a new Objective-C file called OpcodeCALC.m, which extends OpcodeProtocol.h and implements the +(NSString *)run:(NSArray *)args method:
//
//  OpcodeOS_VERSION.m
//  needleAgent
//
#import "OpcodeProtocol.h"

@interface OpcodeOS_VERSION : NSObject <OPCODE>
@end


@implementation OpcodeOS_VERSION

+(NSString *)run:(NSArray *)args
{
    NSLog(@"Performing a calculation");
    float num1 = [arguments[0] floatValue];
    float num2 = [arguments[1] floatValue];
    float res = num1 + num2;

    NSString * responseString =  [NSString stringWithFormat:@"%f%@", res, COMMAND_OUTPUT_END];
    return responseString;
}
@endXcode and an Apple developer account are required to build the agent. cocoa pods are also needed to install the project dependencies.
$ git clone https://github.com/mwrlabs/needle-agent.git
$ cd needleAgent
$ pod install
Open needleAgent.xcworkspace with Xcode.
- Add the developer account to Xcode by going to
Xcode -> preferences, then enter the account details by pressing the+on the left hand side of the account tab - Click on the
needleAgentproject file, then select the developer account from earlier in the team dropdown in the general tab - Plug the device in and it should appear at the top left of Xcode. Press play to run the agent.