Proof-Of-Concept of a Web application managing the rooms of our department in INSA campus.
First, let's have a look at the architecture depicted below:
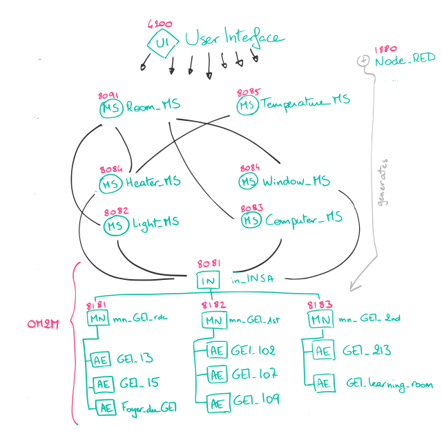
A service oriented architecture
The microservices manage the smart building, whose actuators and sensors are connected through an IoT Middleware, OM2M. We will first deploy them, then the actual microservices, and eventually, the user interface.
To deploy such an project, first, the OM2M environment has to be set up. One Infrastructre Node (IN, for the whole INSA) and three Middle Nodes (MN)--there is a gateway for each floor of the "GEI" 's building--, are here considered. They can be launched as local servers from the folder OM2M of this project:
- the IN first
- then the MNs, by running either the
start.batorstart.shof their respective folders, depending on your machine (Windows or Linux).
They will use ports:
- http://localhost:8081: in_cse (in_INSA)
- http://localhost:8181: mn_cse_rdc (mn_GEI_rdc, rdc standing for groundfloor)
- http://localhost:8182: mn_cse_1st (mn_GEI_1st)
- http://localhost:8183: mn_cse_2nd (mn_GEI_2nd)
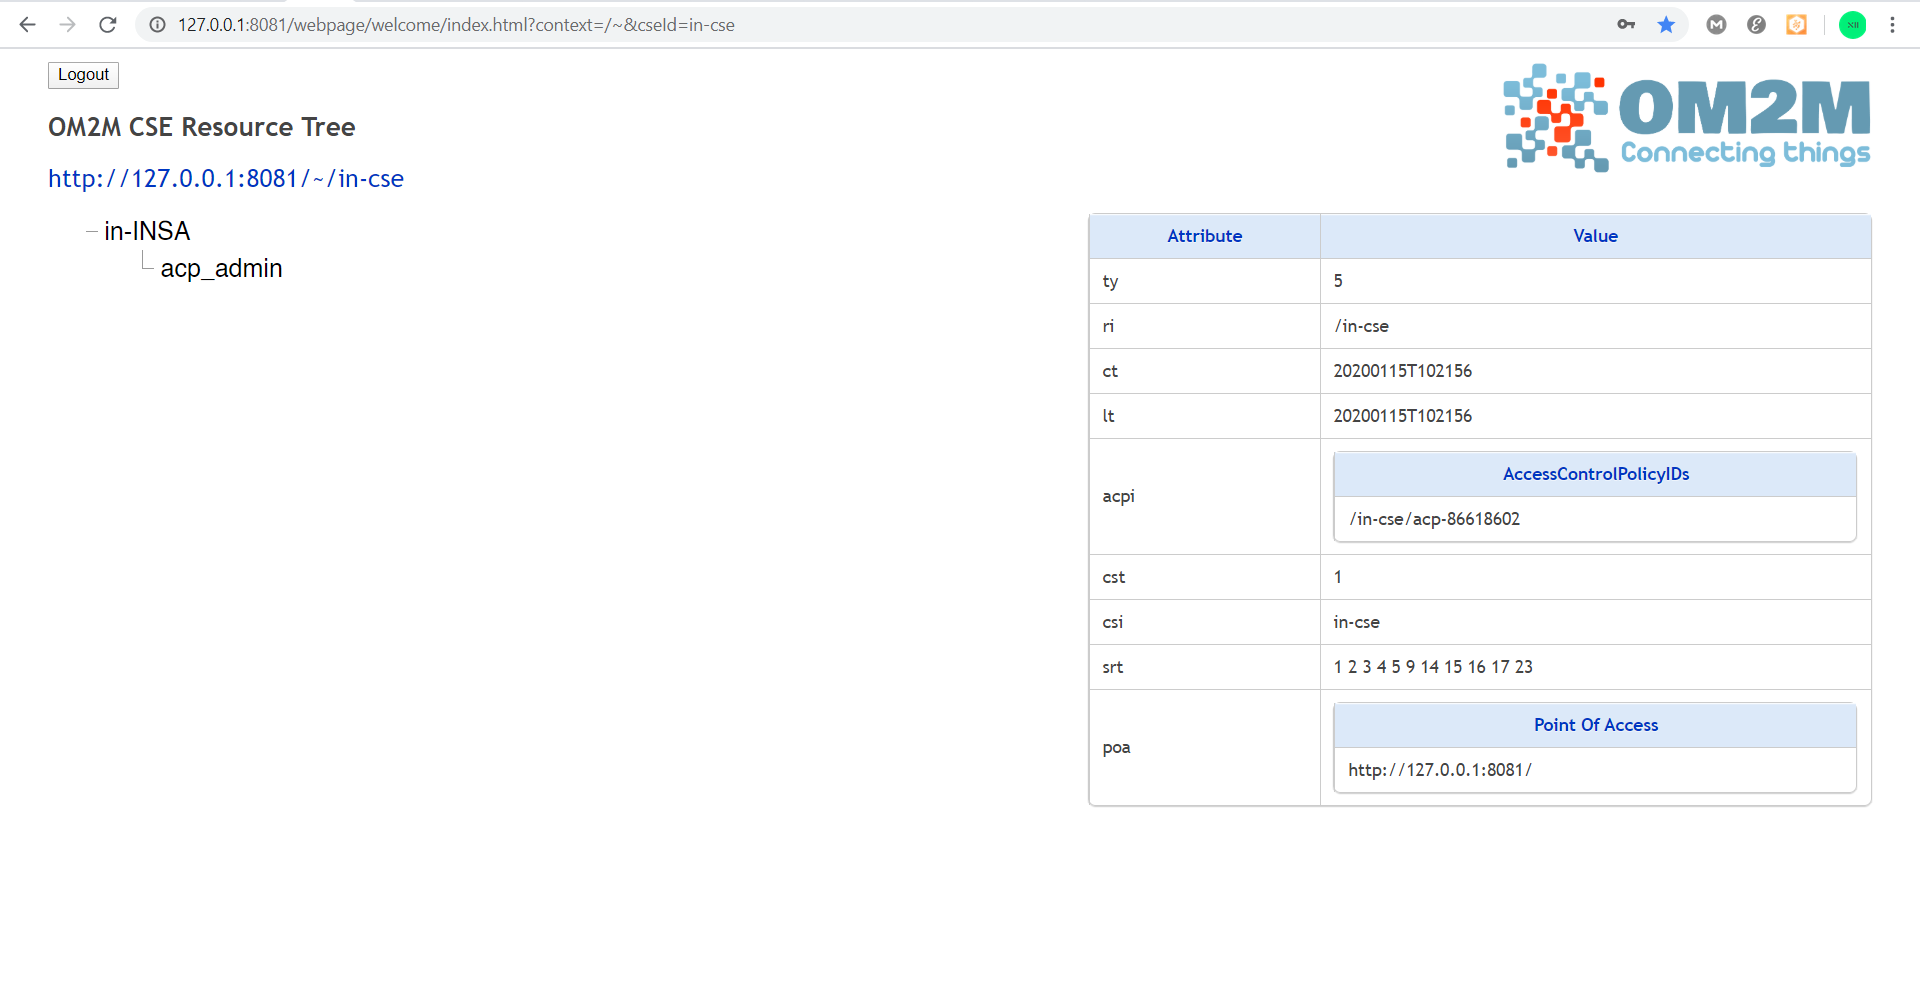
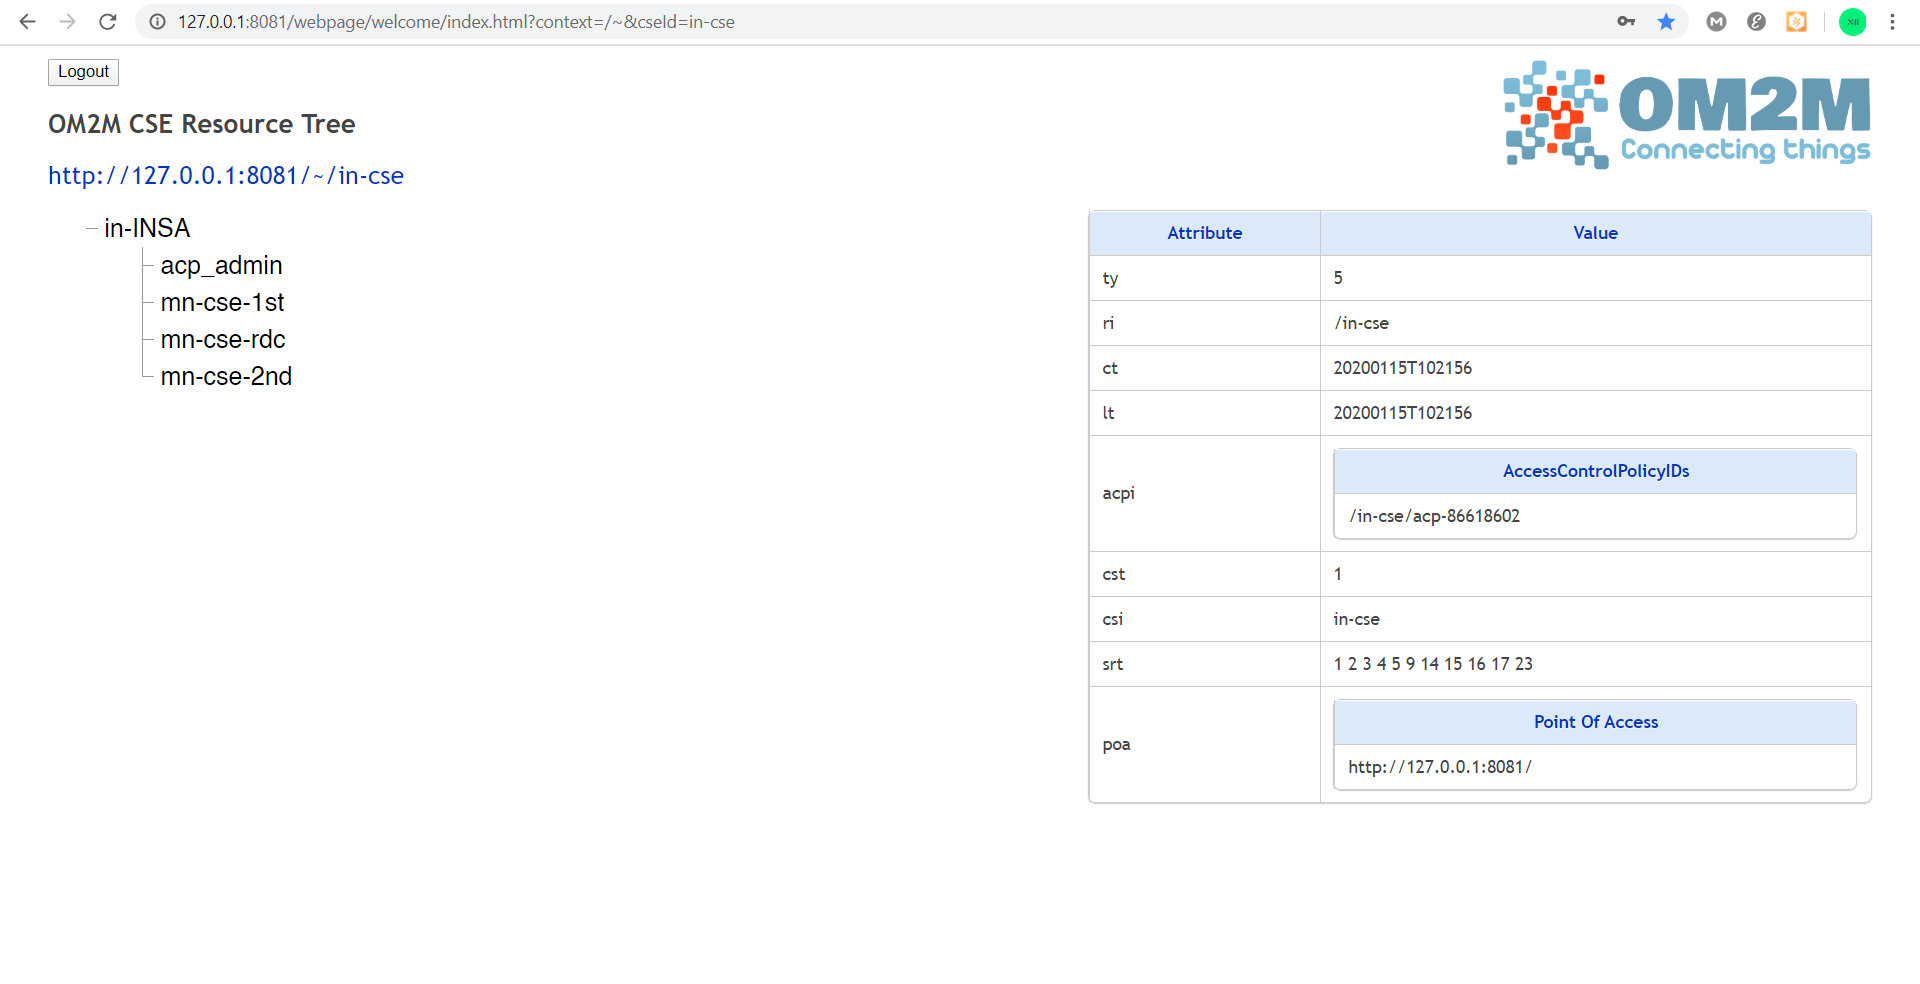
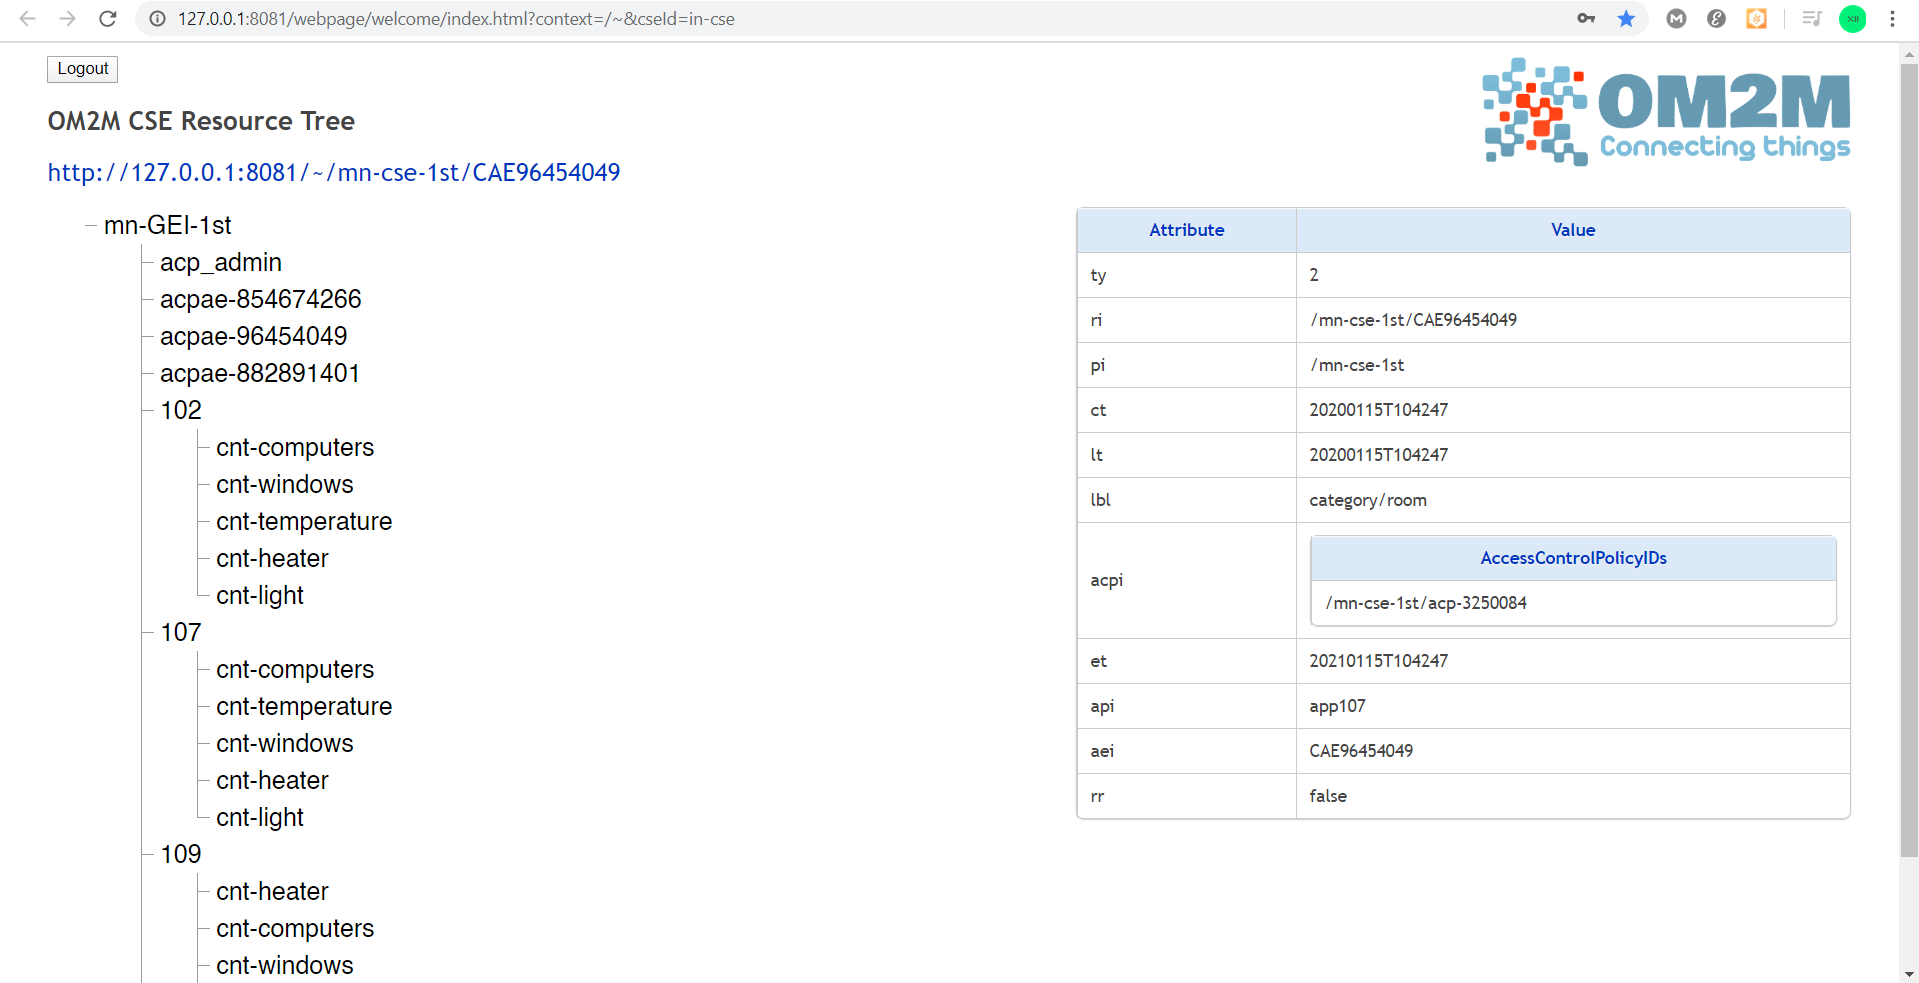
OM2M provides a useful user interface to visualize the different nodes and entities of the architecture, and their Applications Entities and Content Instances here : http://127.0.0.1:8081/webpage/welcome/index.html?context=/~&cseId=in-cse
Here, an overview of this interface after running the IN, and then after running the MNs.
Then, Application Entities (AE) have to be created, one for each of the room that the system will manage. OM2M allow us to control and store the state of actuators and sensors in containers (CNT), and the successive values of each instance of them are stored as containers' instances (CIN): we will consider four actuators, definied based on some realistic and usefull considerations: light (managing smartly the lights of the building will allow to prevent manual switching off at night), computer (switching off all computers at night, switching them on before the begining of practical works...), heaters (because students and teachers like to work in warm comfortable environments), and window, a container for an actuator that do not close and open windows (complicate to put in practice, and not that usefull), but the shutters of the windows, since electrical shutters do exist and would be able to replace fastidius opening and closing of hundreds of them each day over all the campus. Plus, a sensor (thermometer) for each room is also planed in our project. Those AE will be generated for now using Node-RED. The database of the MNs on the repository already contain AEs, but in order to use Node-RED, install it, then run node-red in your terminal, to serve it and be able to use its graphical user interface here http://localhost:1880.
Here is the Node-RED project used to generate AEs and containers across OM2M.
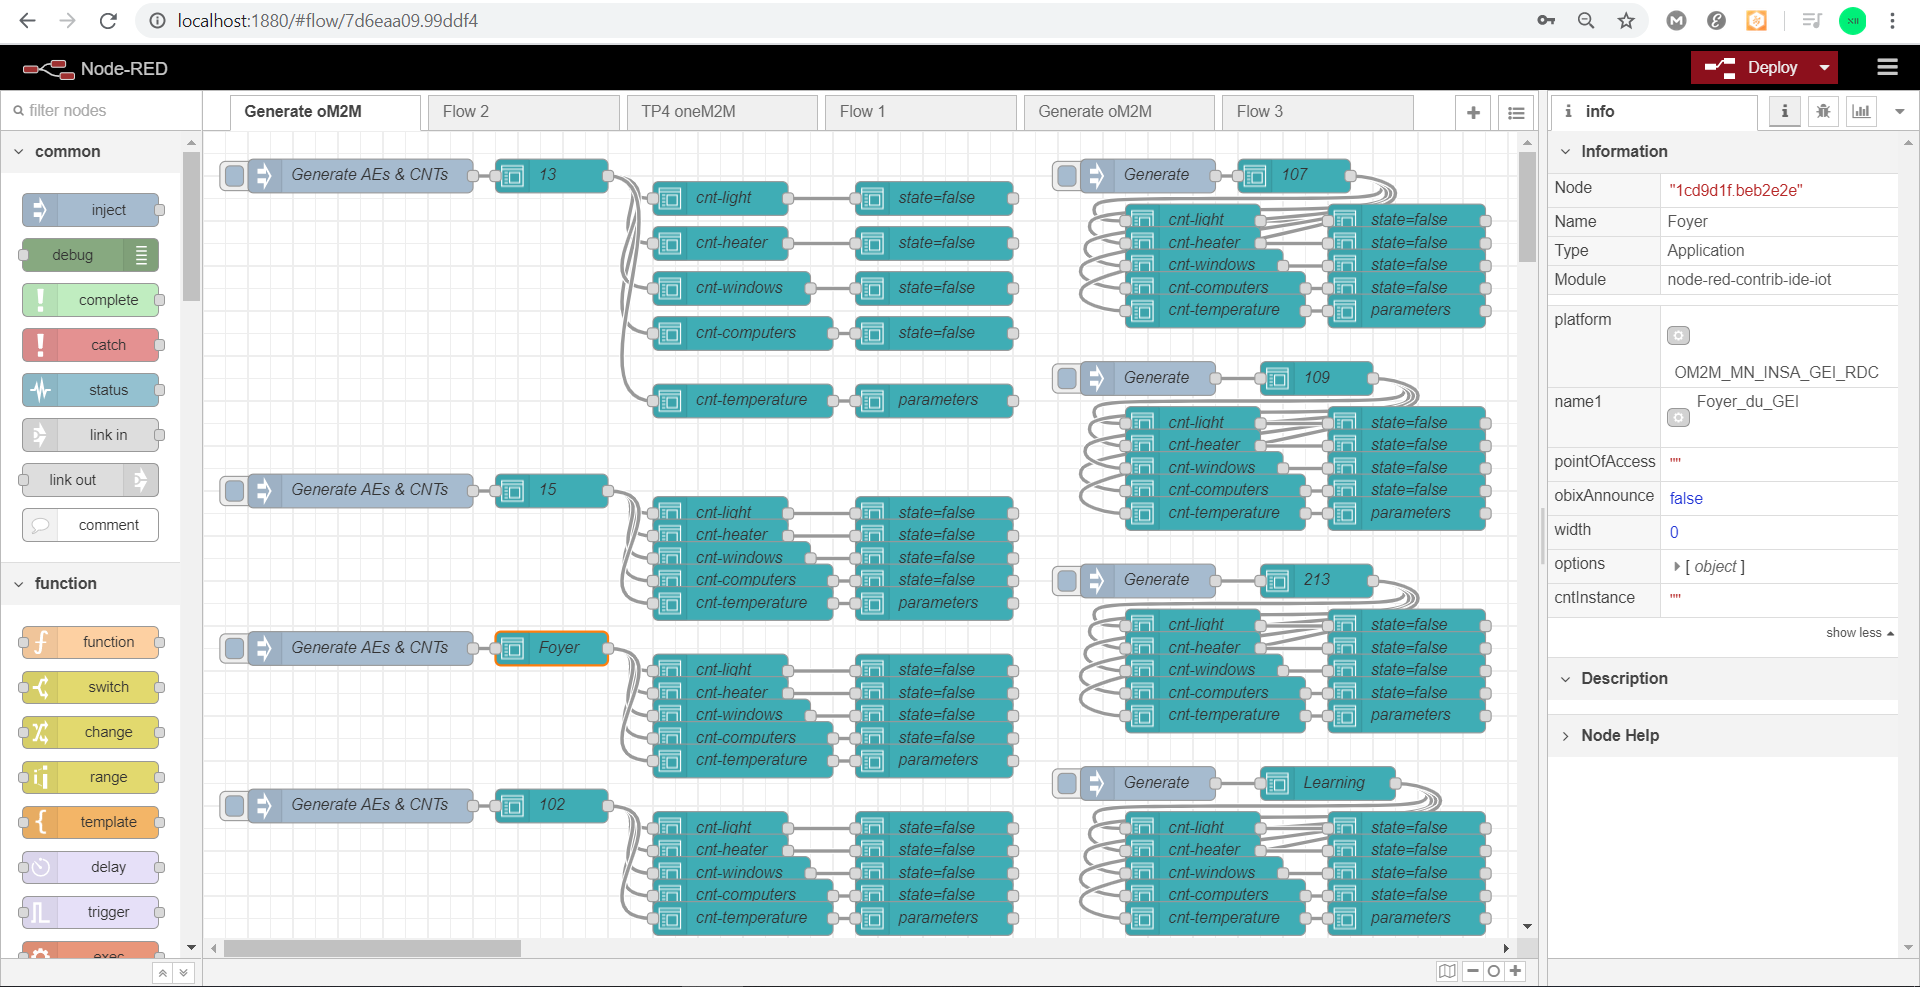
Back on OM2M webpage, we can see the AEs and their containers:
Once that done, microservices can be launched: we developed them using the framework Spring Boot, in order to ease their deployment during the developement. Each has to be imported in Eclipse Java EE IDE (as developpers, we used its version Neon.3). Then for each, the [names]MS / src / main / java / fr / insa / [names]MS / [Names]MsApplication.java simply needs to be Run As > Java Application. By first launching the RoomsMS, you could already see in the User Interface (UI) the different rooms, without the actuators (displayed when the corresponding MS are reachable). The other MSs rely on OM2M database (and on RoomMS to reach it), so they will not work properly without them. The MSs use those ports:
- http://localhost:9081: RoomsMS
- http://localhost:8082: LightsMS
- http://localhost:8083: ComputersMS
- http://localhost:8084: HeatersMS
- http://localhost:8085: WindowsMS
- http://localhost:8086: TemperatureMS // This one is not developped yet
Usefull tips
On Windows, to stop a microservice still running in background (if you cannot launch a new MS because the port is already in use), you can use
netstat -a -o -nto find its PID's number (based on its port) and then kill the process with
taskkill /F /PID <PIDnumber>(on Linux, people already know how to do it)
Finally, the User Interface (UI) can be deployed. It is developped using the framework angular. This project was generated with Angular CLI version 7.0.6.
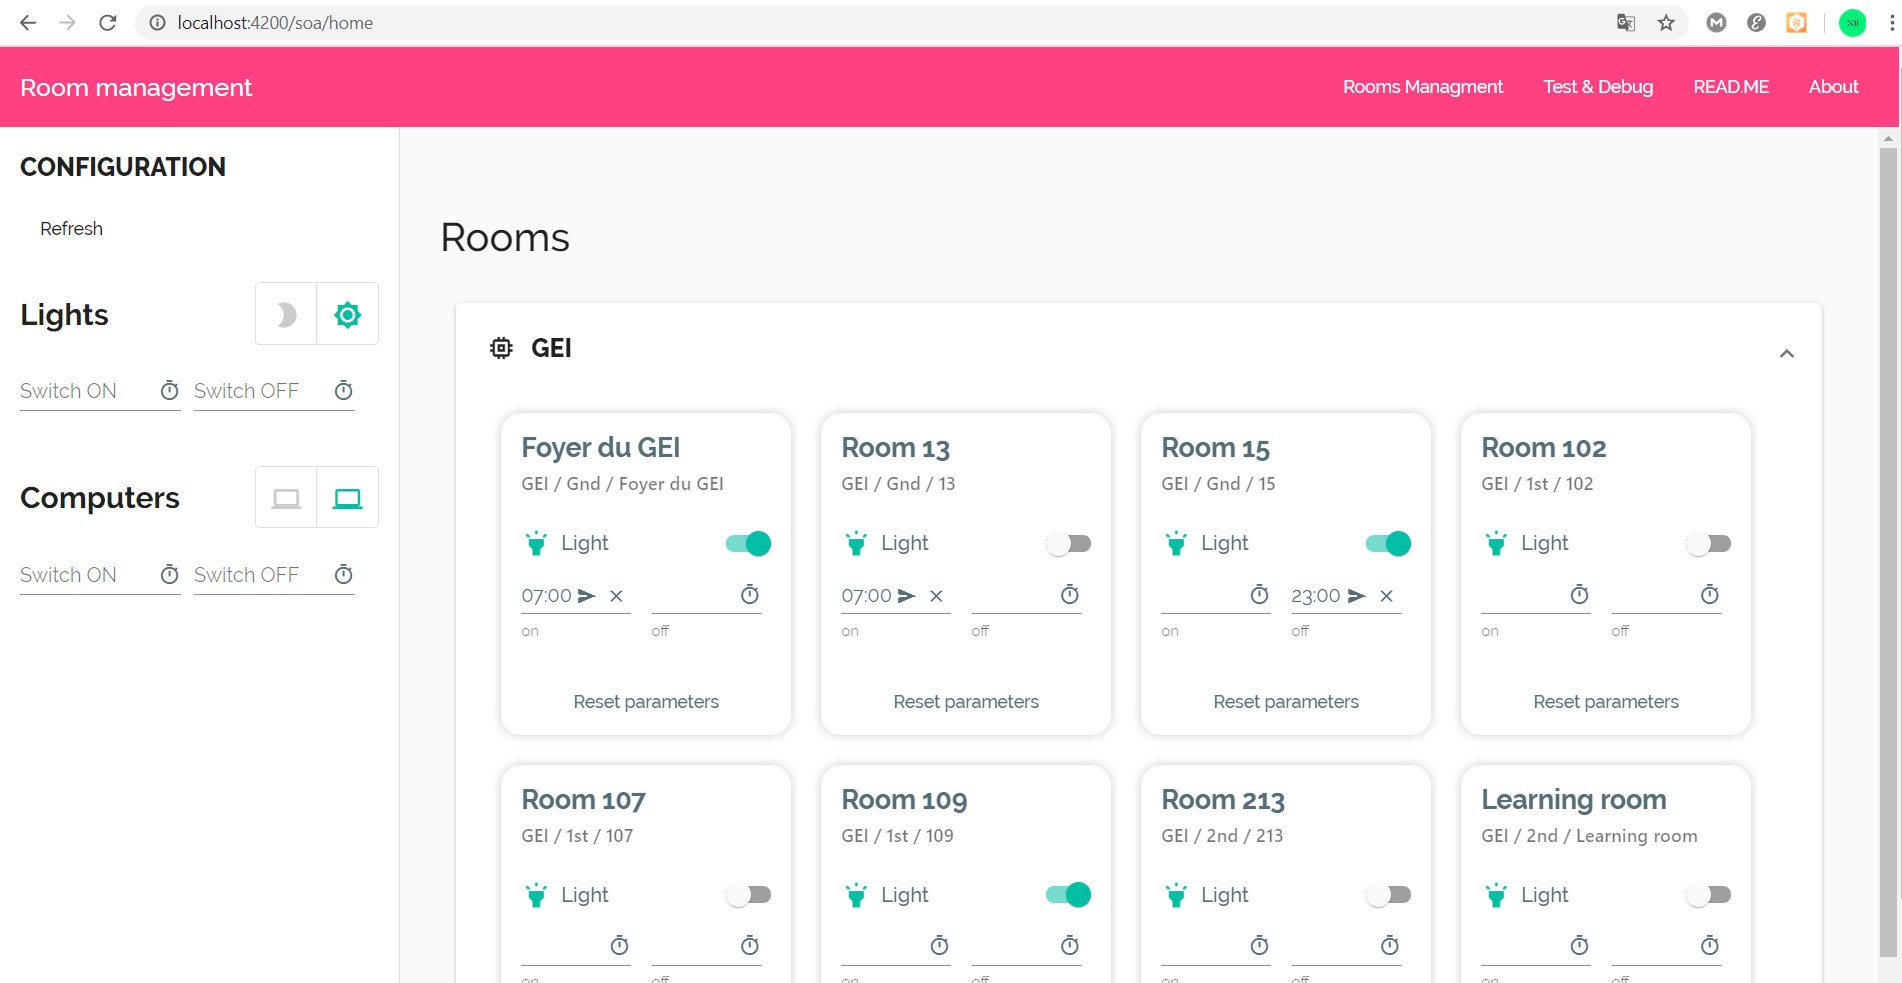
From inside the Angular project (room-management-UI), run ng serve for a dev server. Navigate to http://localhost:4200/. The app will automatically reload if you change any of the source files.
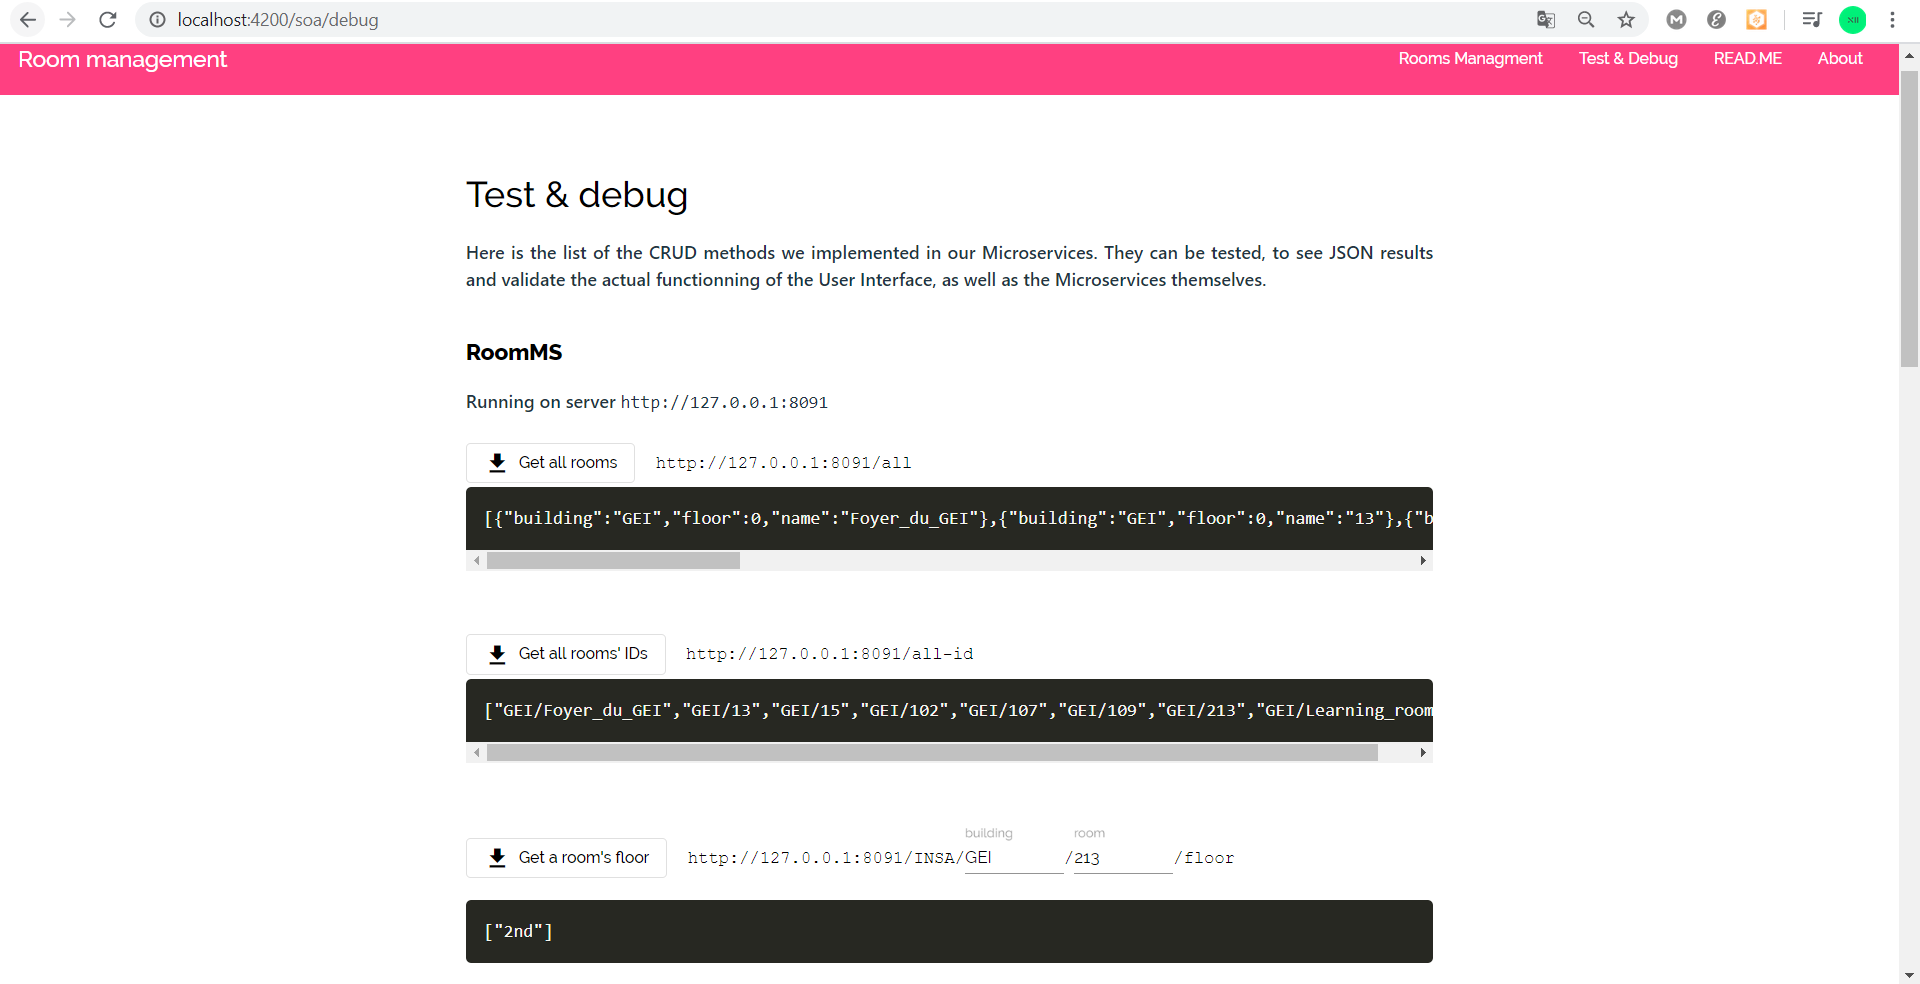
Four tabs can be found in the app. The first one provide the actual RoomManagement pannel, with individual and global control of rooms. The second provides an overview of the REST requests implemented in our MSs, and some ways to run and test them. Third contains this READ.me and last one a short explanation on the context of this developement, and the purpose of the app.
Code scaffolding
Run ng generate component component-name to generate a new component. You can also use ng generate directive|pipe|service|class|guard|interface|enum|module.
Build
Run ng build to build the project. The build artifacts will be stored in the dist/ directory. Use the --prod flag for a production build.
Running unit tests
Run ng test to execute the unit tests via Karma.
Running end-to-end tests
Run ng e2e to execute the end-to-end tests via Protractor.
Further help
To get more help on the Angular CLI use ng help or go check out the Angular CLI README.