ontopProMappingsTab
valid for Ontop Version 1
The ontop Mappings tab is the main tab in -ontopPro- and it used for building an OBDA model. The tab can be enabled using the menu item Window -> Tabs -> ontop Mappings. The interface consists of three sub-tabs: Datasource Manager, Mapping Manager and Mapping Assistant.
The Datasource Manager is the first sub-tab of the ontop Mappings tab. Using this tab you will be able to manage data source declarations.

Your OBDA model will consist of one data source declaration. The source must be a JDBC data source and you must provide the usual JDBC connection parameters for them:
- The JDBC URL string.
- The database username,
- The database password, and
- The JDBC driver.
TIP: To become familiar with JDBC Drivers or JDBC connections please read the information we have on the JDBC page.
TIP: You can have access to non-relational data bases, e.g., XML, CSV, Excel, etc., by means of data federation tools, e.g., Teiid (see our tutorial), or JDBC bridges (e.g., the JDBC-ODBC bridges, and Excel ODBC). Note that performance in these configurations will depend on the execution performance of the source of your choice.
The Mapping Manager is where you will spent most time. Using the Mapping manager you can create and manage the mappings axioms for your data sources.

TIP: Here we only describe the functionality of -ontopPro- w.r.t. declaring sources and mappings. For a full description of the syntax and meaning of mappings see our document on mappings.
All mappings are composed by a mappingID, a target and a source.

To create a new mapping for a data source simply click the + Create button.This will display the following dialog:

Using this dialog you can edit all the components of the mapping. You may also test the SQL query you want to use for your mapping.
Note that the dialog will not allow you to write a wrong target, meaning that the syntax of the target template is wrong, or if the target template refers to classes or properties that are not defined in the ontology. Note that the dialog will not validate the SQL query automatically.
TIP: You may use the shortcut CONTROL + ENTER instead of clicking the Accept button and CONTROL + T to test the SQL query.
When creating the target of a mapping you can use full URI templates or abbreviated ones using prefix definitions. By default the mapping editor allows you to use the following prefixes:
xsd:     http://www.w3.org/2001/XMLSchema#
rdf:     http://www.w3.org/1999/02/22-rdf-syntax-ns#
rdfs:    http://www.w3.org/2000/01/rdf-schema#
:      YOUR_ONTOLOGYS_BASE_URI
Note that the default prefix (:) is always pointing to your ontology's base URI as defined by Protege. In addition to these prefixes, you may define any other prefixes in Protege's Prefix Manager tab, all of these will be available for you to use in your mappings.
Updating/Editing/Modifying a mapping: An existing mapping can be updated by double-clicking on it, or selecting it and pressing the space bar.
Deleting mappings: To delete a mapping(s) you should select it and click BACKSPACE or DEL. Note that there is no undo function for this operation.
Copying a mapping: Sometimes it is convenient to duplicate a mapping, for example, when you want to create a new mapping that is a variation of an existing mapping. To do this, simply select the mapping you want to copy and click the "Copy" button. This will add the new mapping with a fresh id to the bottom of the list.
TIP: You may select multiple mappings using the usual shortcuts (CONTROL + CLICK, SHIFT + CLICK).
When the list of mappings becomes large it may become difficult to manage. To ease this situation we offer browse and search functionality through filters.
A filter is an expression that indicates which mappings to show. There are six types of filters:
- Text Filter: Matches the given string to the text in the mapping id, target query or source query (Expression: text).
- Target String Filter: Matches the given string only in the target template (Expression: target).
- Source String Filter: Matches the given string only in the source query (Expression: source).
- Function Filter: Matches the given string only in the URI templates of your mappings (Expression: funct).
- Predicate Filter: Matches the given string only in the Classes and Properties of the mappings (Expression: pred).
- ID Filter: Matches the given string to the mapping id (Expression: id).

Searching. More sophisticated search is possible by creating the filter string manually. It is possible to put more than one search keyword by separating them using a comma. Users can also combine different filters to create a narrow result by separating them using a semi-colon. Use the check box "Apply Filters" to disable/enable this filtering feature.
Examples:
- To find arbitrary string in the mapping list (the text expression is optional here).
book, editor
- To find mappings that has a mapping id "Book"
id:Book
- A combination of different filters.
book, author; pred:name
A right click over the mapping list will bring out a list of operations that you can execute over your mapping. Included in these operations are:
- Validate SQL This will validate the SQL queries in each of the selected mappings by executing each of them. A summary of the execution of the queries will be shown in the end. Note that the execution will be limited to make sure only one tuple is returned, however, this operation may take some time.
[[attachments/ontopProMappingsTab/validate-sql.png| width=400px]]
- Execute SQL This will open a new dialog where the result of executing the SQL query of the selected mapping will be displayed.
-ontopPro is aware of the changes you make to your ontology, since some of these affect your mappings. In particular, ontopPro listens to the following event:
- Class/Property elimination. If you delete a Class or Property from your ontology, all the triple patterns in the target templates of your mappings that involve that Class or Property will be deleted too. Note that if as a consequence, the target template becomes empty, the affected mapping(s) will be completely removed.
- Refactoring - Entity renaming. If you rename one or more entities in the ontology, all triple patterns in the target template of your mappings will be automatically updated.
Starting from version 1.7 (Build 2178), -ontopPro- plugin introduces a new mapping editor panel called the Mapping Assistant. This new feature is a utility tool to help users making mappings easier and faster. This wiki page will give you an overview to each component and a step-by-step guide how to create a mapping using this new tool.

There are four main components in the Mapping Assistant:
- Data source selector: Use the drop box to choose the data source that you are going to use (only in versions before 1.17).
- SQL query editor: Write down the SQL query that is going to be the source query in the mapping.
- Data preview: Review the rows/data coming from the SQL query to assure the correctness of your data linking.
- Data linking panel: Link the column names to the ontology descriptions and create mappings.
This guide will show you how to create three mappings for Book Tutorial, namely:
- Create class mapping Book and data property mapping title.
- Create data property mapping genre with defined data type
- Create object property mapping writtenBy.
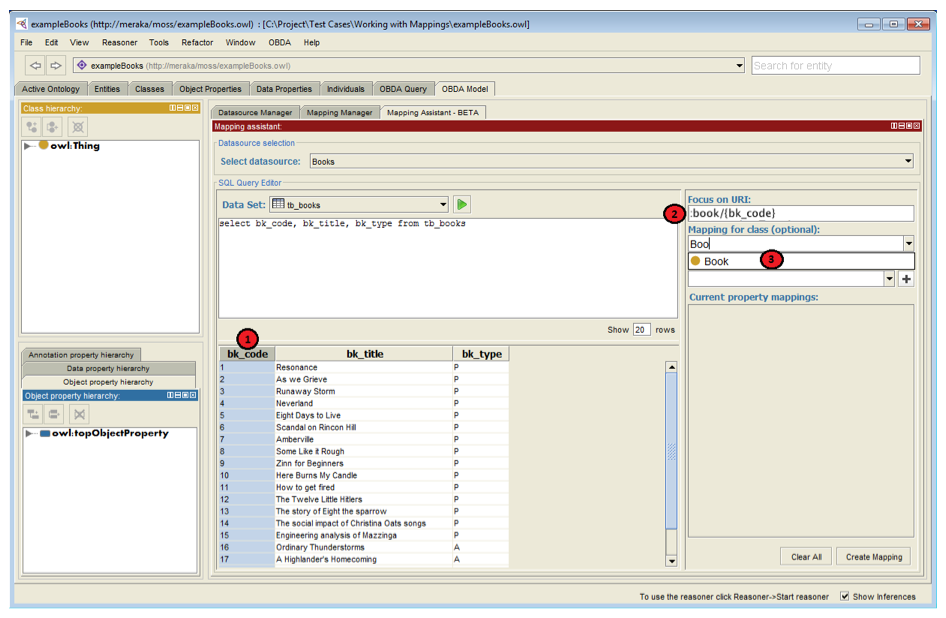
This section will show you how to create a class mapping and data property mapping.
But before we start, let me introduce some of the features for populating the data set. If you are using a version fo ontop before 1.17 point your mouse cursor to Data source selector and select a data source (see image below). The action will fill up the Data Set combo box immediately with table names from the data source.

If you select one of the table name then the editor will print a complete standard SQL SELECT query and the Data Preview panel immediately presents you the rows. You can adjust the number of previewed rows at the corner right side. By default, the data preview panel shows only the first 20 rows.

Now let we start having the mapping for class Book. From the Data Set choose table tb_books.
-
Step 1-2: Click on the bk_code column header in the data preview table. The name will be immediately copied to the Focus on URI field as part of the URI template. Please note that to make this action works, the cursor must be active inside the text field.
- Step 3: Type the name of the class Book in the Mapping for class text field.
To create the data property mapping title, the step is similar:
-
Step 1: Type the name of the property title and press [ENTER] (or click the
 plus button). A new property mapping item will appear in the Current property mappings list.
-
Step 2-3: Again click on the bk_title column header and the name will be immediately copied to the property mapping item's text field. Notice that the item has an extra Data type selector component at the top right corner. We will use this component in the second mapping creation.
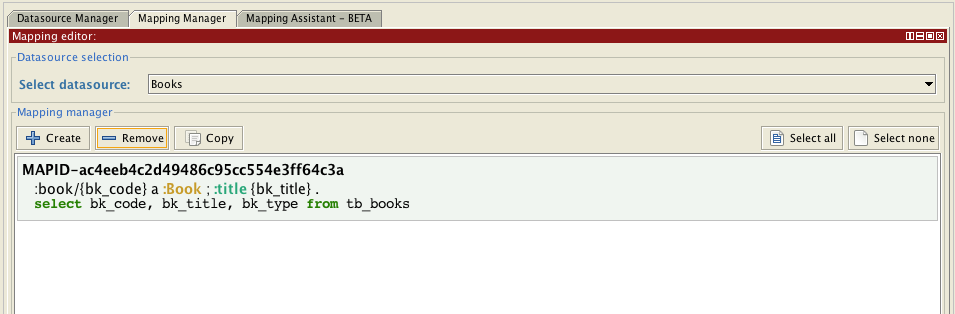
- Step 4: Select the Create Mapping button to store the new mapping.

Go to the Mapping Manager tab to check the newly created mapping.
We are going to link another data property genre and with specifying the data type.
- Step 1: Choose table tb_bk_gen in the Data Set.
- Step 2-3: Click on the id_bk column header to copy the name to Focus on URI field.
- Step 4: Write the data property genre and press [ENTER]. Notice that we don't specify again class Book in Mapping for class.
- Step 5-6: Click on the gen_name column header to copy the name to property mapping item's field.
- Step 7: Select xsd:string in the Data type selector to specify the data type for this attribute. Using this option it will override the type of data provided both by the database schema and ontology. In this case, "xsd:string" will be the ultimate data type for object predicate gen_name.
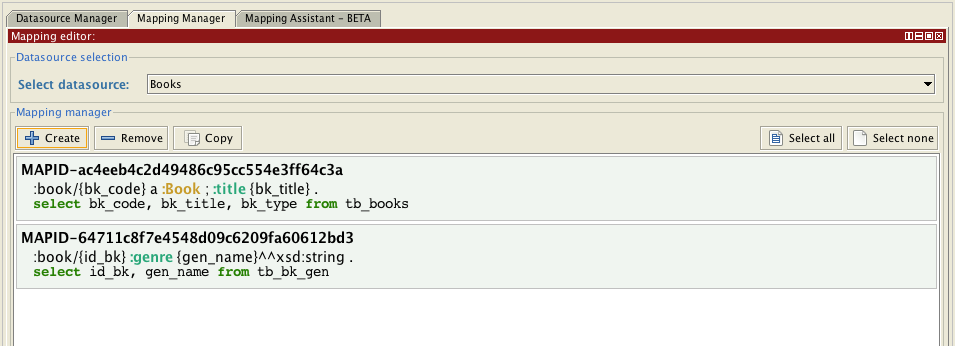
- Step 8: Select Create Mapping button to finish creating the mapping.

Go to the Mapping Manager tab and check the new mapping. There are two things to observe: (1) notice the class Book is not mentioned in the mapping and (2) the variable $gen_name has an additional data type tag xsd:string.
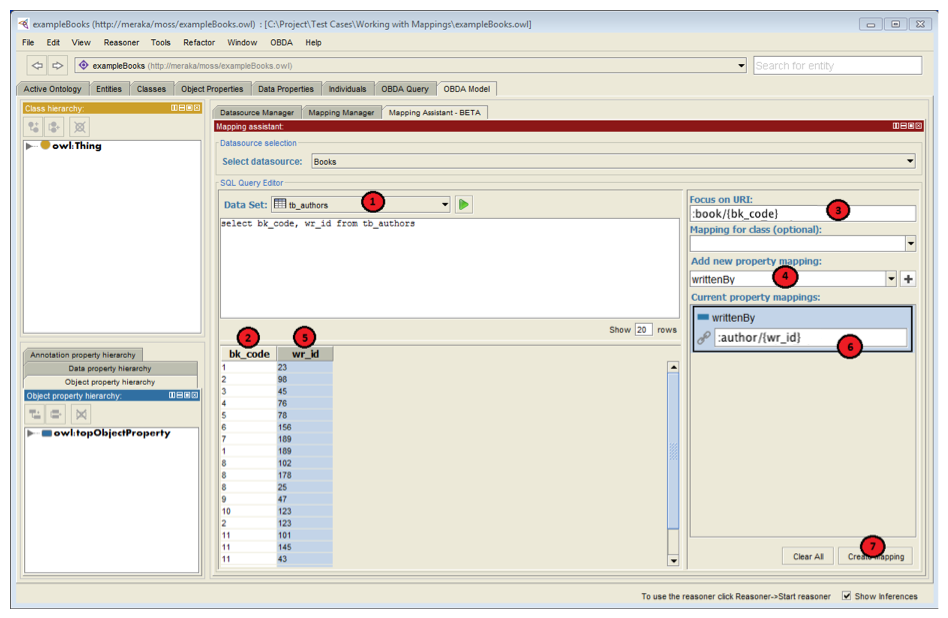
Finally we are going to link an object property writtenBy.
- Step 1: Choose table tb_authors in the Data Set.
- Step 2-3: Click on the bk_code column header to copy the name to Focus on URI field.
- Step 4: Write the data property writtenBy and press [ENTER].
- Step 5-6: Click on the wr_id column header to copy the name to property mapping item's field.
- Step 7: Select Create Mapping button to finish creating the mapping.
The final result of the mappings can be checked (or edited) in the Mapping Manager panel.
