Tutorial: Your First Hack
The standard program most programmers write when learning a new language is Hello World, which prints "Hello World!" onscreen in some way. Sounds exciting, right?
It isn't. It's boring.
So let's do a twist on that that's a bit more involved, but is hopefully a lot more rewarding.
A hack without a plan is like a train without a steering wheel: it works just fine. However, you might want some levers and other controls on that train, because unless derailing trains is your weekend hobby, you're not likely to enjoy the trip in the long-run, once you realize you don't know where you're going. So let's think a bit before making this hack.
Note: There a few good words of advice like this on this old JHack tutorial. Though JHack is outdated, many of them (especially Rule 3) still ring true.
EarthBound is an RPG, so it would make sense if you made an NPC say "Hello World" instead of just printing it onscreen. So we'll need to make a character say this at some point in the game. That's actually pretty easy, though...you just need to substitute some dialog at one point. And it's boring besides. Maybe the character could be in a place where he's not supposed to be? Say (spoiler alert!) Robot Ness in Ness' house at the beginning of the game? Let's work with that.
Alright, so we need:
- To decompile the ROM
- To make an NPC with the Robot Ness sprite, and some dialogue attached to it
- To write that dialogue in a CCScript file
- To add the sprite to Ness's bedroom using the map editor, EbProjEdit
Doesn't sound that hard, right? So let's hop to it!
Now that you have CoilSnake, you'll need an EarthBound ROM. I can't tell you how to get one, but they're pretty easy to find. Just ask your pal Google and don't click on any questionable ads/links in the process.
- Open up CoilSnake and select the Decompile tab
- Click on the "Browse..." button next to the ROM: field
- Select your EarthBound ROM
- Now click on the "Browse" button next to the "Output Directory:" field
- Choose where you want to save your project (YES, this is where all the files for your project will be stored, choose a good place!)
- Now press the big "Decompile" button at the bottom
A video walkthrough of these steps can be found here.
Most of the files in your CoilSnake project will be some sort of text file (.yml, .ccs). You'll need a text editor to edit these. While you can use Notepad, Notepad is awful, and it's worth installing a programmer-focused text editor like Notepad++. Don't use a document editor like Word; it's not designed for this and you'll have a really bad time.
All NPCs are configured in npc_config_table.yml, and are identified by their ID number. You can't add brand-new entries to this table, though, so we'll need to modify an existing one. In the map editor (more on this later), creating "new NPCs" just makes new references to these table entries.
The reason this works even if all current NPCs are used is because you can have multiple copies of the same NPC in-game, as long as they aren't close enough to each other to be loaded at once.
Let's take at look at 744:
744:
  Direction: down
  Event Flag: 0x274
  Movement: 708
  Show Sprite: when event flag set
  Sprite: 195
  Text Pointer 1: $c7db3f
  Text Pointer 2: $0
  Type: object
Change these attributes like so:
744:
  Direction: down
  Event Flag: 0x0
  Movement: 605
  Show Sprite: always
  Sprite: 5
  Text Pointer 1: robot.hello_world
  Text Pointer 2: $0
  Type: person
A few explanations are in order:
- The event flag is set to 0x0 because we won't need to toggle this sprite's visibility with an event flag, though we could if we wanted to.
- Therefore, Show Sprite is set to "always" instead of "when event flag set" or "when event flag unset"
- The movement code is set to 605, which will make the robot stand still.
- Sprite is set to 5 because the sprite we want (Robot Ness) is
005.pngin theSpriteGroupsfolder. - Type is set to "person" instead of "object" because "person" NPCs can be Talked to, while "object" NPCs have to be Checked.
- Finally, Text Pointer 1 specifies that the text block to run is the
hello_worldpart of a new CCScript file we're going to create,robot.ccs.
Now that we have our NPC ready, let's place it on the map!
You'll need the EB Project Editor for this step, although for the purpose of this first hack, you won't need to be fully knowledgeable with it yet (it's covered in more detail later in this guide).
You can open up the EB Project Editor through CoilSnake's Tools menu, even though sometimes, it doesn't work.
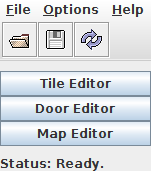
When you first open it, you should see a tiny, unassuming initial screen, something like the one pictured to the right. You can't really do anything with it yet, so click on the folder icon to open your project's Project.snake file. It might take a while to load everything, but you'll know when it's ready when all three buttons light up. We won't need to modify tilesets or door mechanisms, so open up the Map Editor.
Since we want to edit Ness' bedroom, scroll over the map until you find it – it's somewhere around the top-right corner.

Once you find it, bring up the Sprite Edit mode – do so by choosing it from the Mode menu at the top, or by hitting F2 if you're fond of keyboard shortcuts.
Then, right-click someplace within Ness' bedroom, and select "New NPC". Now right-click on it and choose "Switch NPC (0)". In the dialog box that pops up, type "744" - the ID number from npc_config_table.yml.
Ness' bedroom should now look something like this:

CCScript files must all be placed in the ccscript directory of your CoilSnake project. Go ahead and create an empty robot.ccs file with a text editor of your choice, and write this text into it:
hello_world:
    "@Hello World!" end
This will make our NPC say "Hello World!" to Ness, then stop the conversation. Neat, isn't it?
Looks like we are good to go. Go into CoilSnake once more. Before getting started, you'll need to copy your EarthBound ROM:
- Make a copy of your Base ROM (so you don't lose the original!) and rename it
- Click on the Compile tab in CoilSnake
- Choose your Base ROM
- Choose the project folder
- Choose a name for the output ROM - something like Test.smc will do
- Click on the big "Compile" button
- CoilSnake will ask you if you want to expand your ROM. Say yes and it will make sure there's enough free space for everything to be crammed back in there.
- Now sit back and let the compilation process complete
Watch a video of these steps: http://youtu.be/cjVKUQSSkhQ
Now, open up the output ROM in your favorite emulator (or simply click the Run button), and try out your work!

And there you have it. Your first hack. Isn't he cute?
Of course, this is just the beginning, and there's a lot to learn yet...
If you are getting an error like Unknown pointer label[robot.hello_world], please check that:
- You did not make a typo in the contents of
robot.ccs. - The file is actually named
robot.ccsand not, for example,robot.css. - The file has the proper extension, and is not named something like
robot.ccs.txt. Windows Explorer hides extensions by default, so it may not be showing you the.txtat the end of the filename. You should check that Windows is set to not hide file extensions. There are many tutorials online that can tell you how to do this, such as this one.
You got to build your first hack for EarthBound and you got familiar with some of the tools you'll be using, as well as getting a glimpse at some of the techniques you'll be using time and again. From now on, you can read this manual in almost any order, since most chapters aren't dependent on others. You'll start learning all sorts of techniques one by one, until you're ready to make the Next Big Hack.
Is your heart beating incredibly fast?