Tutorial: Performing Semantic SLAM with Votenet
In this tutorial, we will create a solution for Semantic SLAM that uses passive robot actuation and ground-truth localisation. The solution will employ:
- the BenchBot software stack for easy control of, and interaction with, a simulated robot in a realistic 3D environment
- Votenet, a novel object detector from Facebook Research, for 3D object detection in point clouds
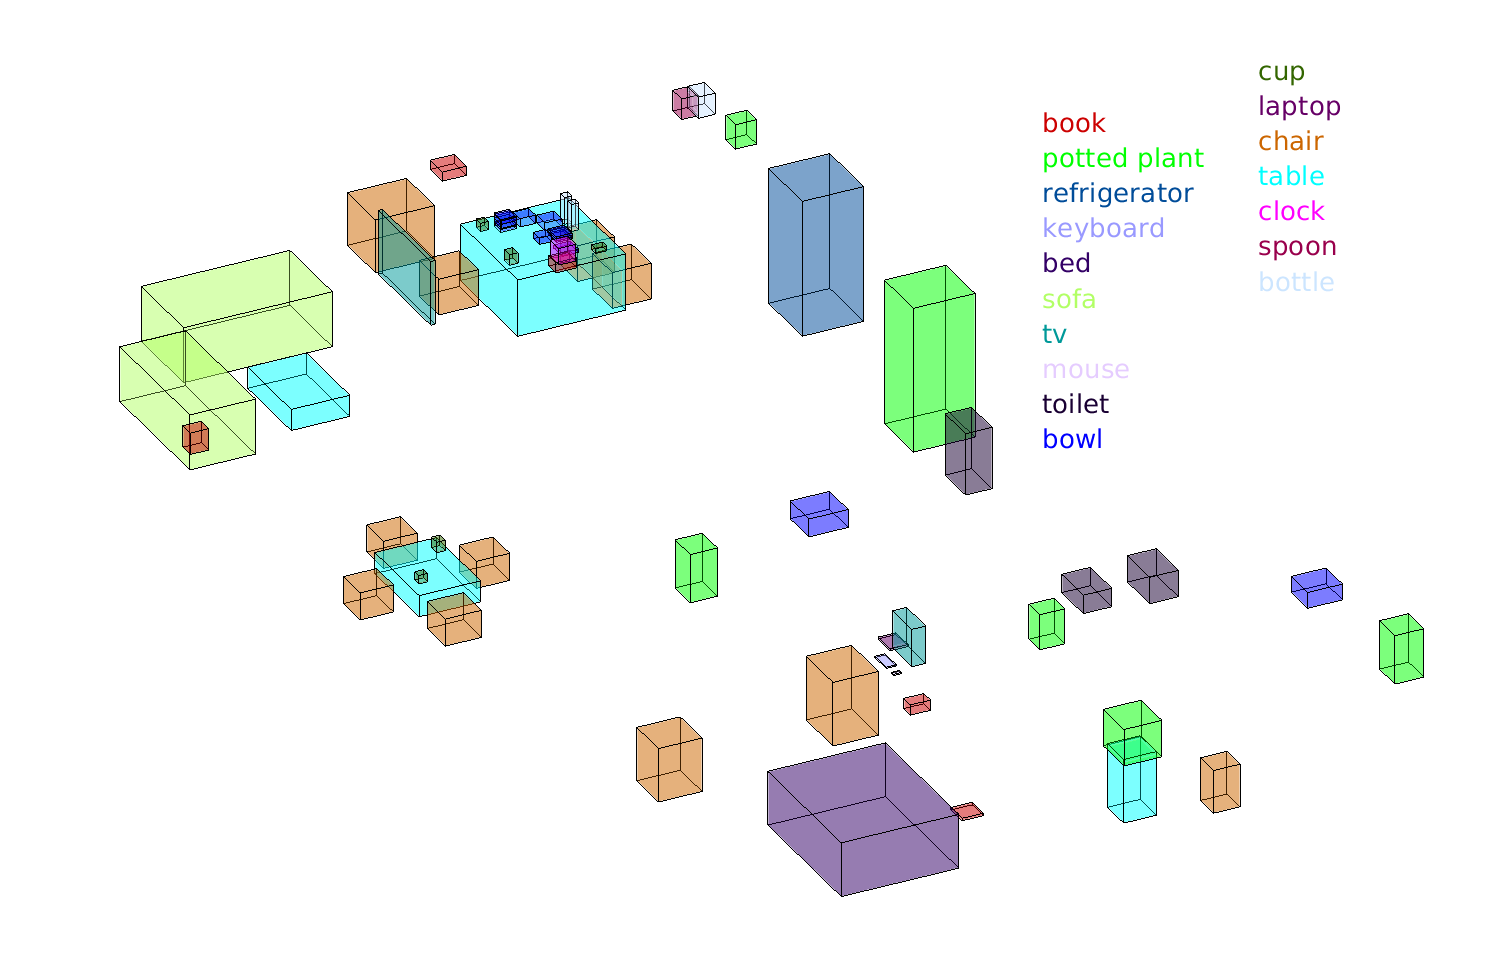
At the end, your solution will be able to produce an object-based semantic map (like the one shown below) for any environment available in the BenchBot software stack.
The completed solution is available as the "semantic_slam_attempt" example available in the SSU examples add-on.
The tutorial is split into six parts:
- Part I: Setting up your environment
- Part II: Creating a new Semantic SLAM Solution
- Part III: Using Votenet for Object Detection
- Part IV: Creating an Object-based Semantic Map from Detections
- Part V: Comprehensively Evaluating Performance with BenchBot Power Tools
- Part VI: ... over to you!
Run through the installation and getting started steps from the BenchBot software stack README. The important milestones in the process are highlighted below:
-
Clone the BenchBot software stack repository and install the software:
u@pc:~$ git clone https://github.com/qcr/benchbot
        ...
u@pc:~$ benchbot/install
The script will detect any known invalid system configurations, and interactively offer to fix detected issues. The installer is idempotent, meaning that you can run it again at any time to complete an unfinished installation, verify the integrity of a current installation, or update an existing installation. Please open an issue if you encounter any issues during installation.
-
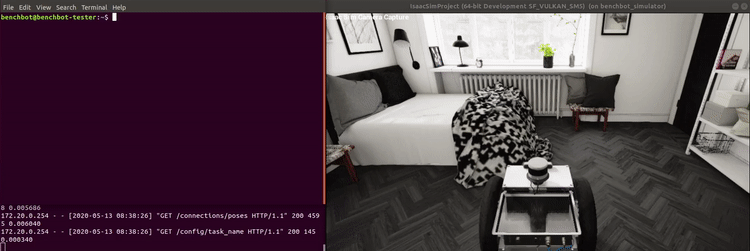
Verify success of the installation by running the
carter_omnirobot in the first scene of theminiroomenvironment, with the task settings we will be using for this tutorial:u@pc:~$ benchbot_run --robot carter_omni --env miniroom:1 --task semantic_slam:passive:ground_truth(remember to use the
-fflag if you would like to skip the initial check for updates when running the system). At this point, you should see something like the screen below: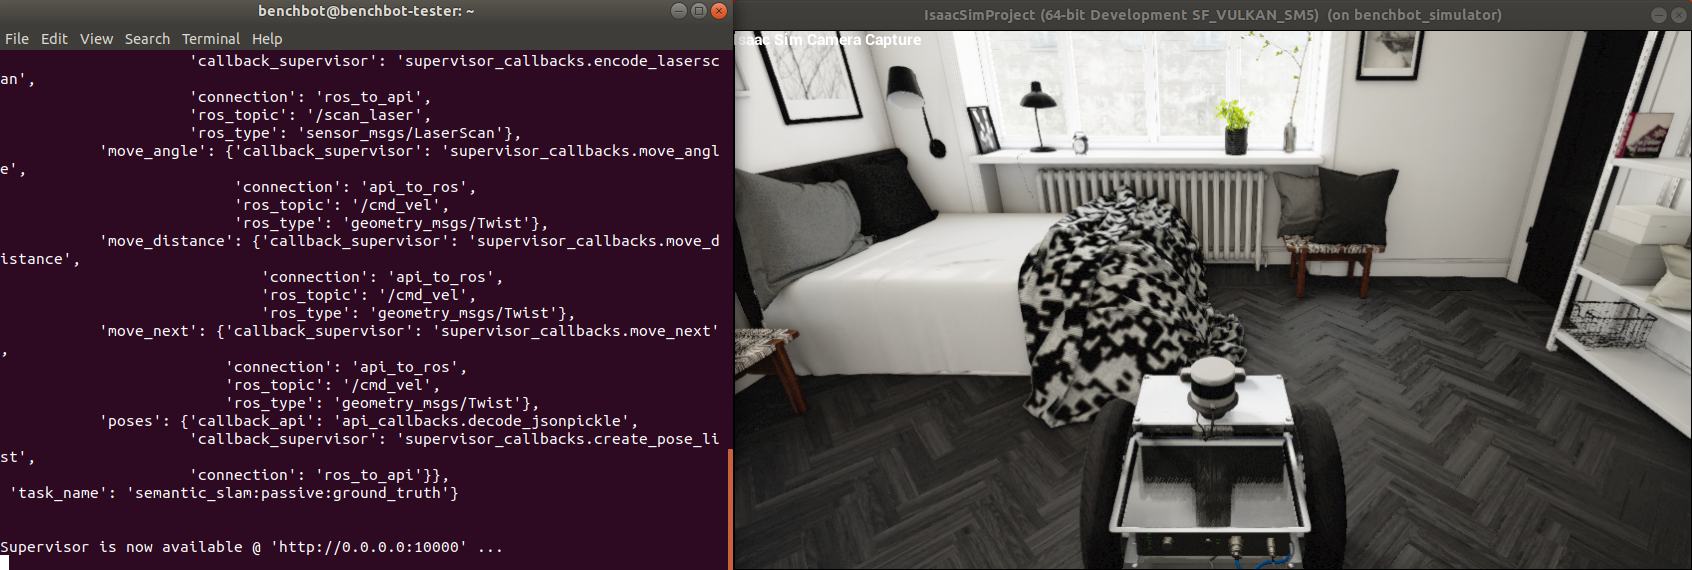
-
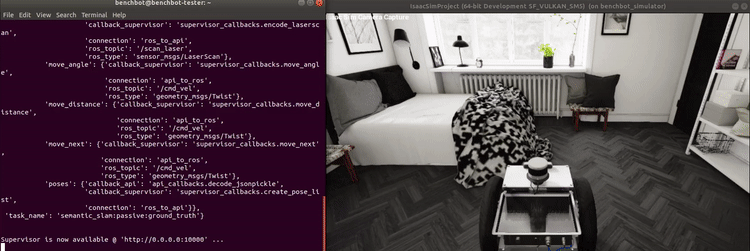
Lastly, confirm your submissions can interact with the simulator by using one of the examples installed with the software stack (run this script in a separate terminal to
benchbot_runfrom above):u@pc:~$ benchbot_submit --example hello_passiveThis simple example steps the robot through each pose in the trajectory provided by passive mode, and exits once the trajectory is complete as shown below:
Now that we have a working installation of the BenchBot software stack, and have verified we can use the provided examples, it is time to start creating our own BenchBot solution.
-
Firstly, we'll create the simplest BenchBot submission possible. Start by setting up a clean environment for our solution
my_semantic_slam:u@pc:~$ mkdir my_semantic_slam && cd my_semantic_slamThen, create a new 'Hello World' style python script called
my_semantic_slam.pyfor our solution:# ~/my_semantic_slam/my_semantic_slam.py if __name__ == '__main__': print("Welcome to my Semantic SLAM solution!")
Miniroom is a small environment, good for quick testing while developing. Execute the following two commands in their own terminal to run the 'Hello World' script against this environment:
u@pc:~$ benchbot_run --robot carter_omni --env miniroom:1 --task semantic_slam:passive:ground_truthu@pc:~$ benchbot_submit --native python3 ~/my_semantic_slam/my_semantic_slam.pyNote, the
--nativeflag will use whatever Python environment you have configured in your current terminal. This supports Conda, Python virtual environments, and vanilla installs. As shown below, the script exits immediately after printing the string.
-
Now we will add in BenchBot API interaction to drive the robot through some passive mode poses. We will only be editing our script and re-running it with
benchbot_submit, so leave thebenchbot_runcommand from above running in the background.Adjust our 'Hello World' script from above to attach to the running BenchBot instance using the API:
# ~/my_semantic_slam/my_semantic_slam.py

from benchbot_api import BenchBot

if __name__ == '__main__':
    b = BenchBot()
    print("Welcome to my Semantic SLAM solution!")
When run with
benchbot_submityou will see theBenchBot()constructor establishes a connection with all of the requirement BenchBot components, blocking until these connections are successfully established.
Next, adjust the script to run through 5 steps before quitting:
# ~/my_semantic_slam/my_semantic_slam.py

from benchbot_api import BenchBot

if __name__ == '__main__':
    b = BenchBot()
    print("Welcome to my Semantic SLAM solution!")

    for i in range(0,5):
        print("Performing step %d ..." % i)
        obs, result = b.step('move_next')
You will notice if you run the example above multiple times, the simulator resets each time a connection is established. The simulator always start from the same initial state, ensuring consistency between trials.
-
We will next use the
resultreturned by theBenchBot.step()function to drive the robot through every pose in the trajectory, exiting when done. Theresult(described here) can either beSUCCESS,FINISHED, orCOLLISION. Adjust the script to perform'move_next'steps while the result isSUCCESS:# ~/my_semantic_slam/my_semantic_slam.py from benchbot_api import ActionResult, BenchBot if __name__ == '__main__': b = BenchBot() print("Welcome to my Semantic SLAM solution!") result = ActionResult.SUCCESS while result is ActionResult.SUCCESS: print("Performing step ...") obs, result = b.step('move_next')
Run the script, and watch the robot run through the entire environment. You can even try running it against other environments if you wish by tweaking the
benchbot_runcommand.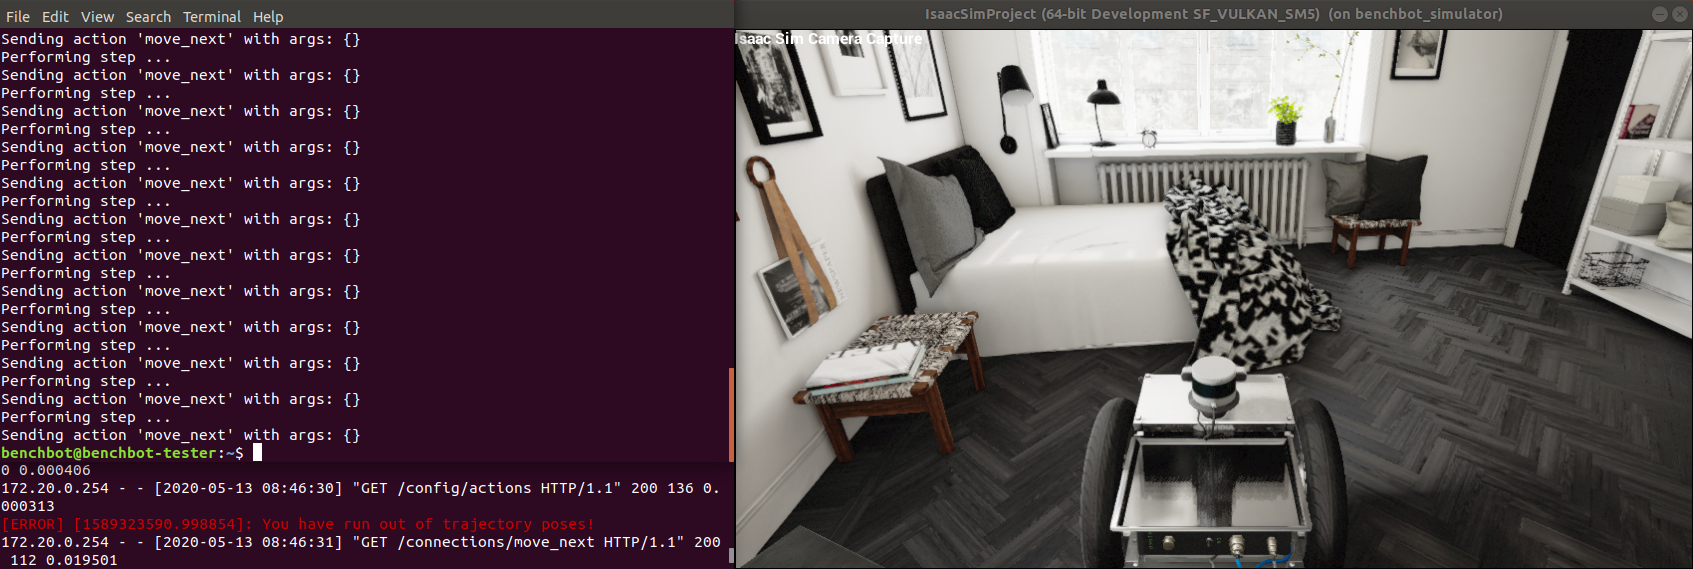
-
We could continue manually building up our control logic for the semantic slam task, or follow the OpenAI gym style, but writing these same loops over and over often becomes repetitive. The BenchBot API includes an
Agentclass for formalising your 'agent' that solves the task, and aBenchBot.run()method for executing your agent. So let's refactor the script to use these constructs:# ~/my_semantic_slam/my_semantic_slam.py from benchbot_api import ActionResult, Agent, BenchBot class MyAgent(Agent): def is_done(self, action_result): return action_result != ActionResult.SUCCESS def pick_action(self, observations, action_list): return 'move_next', {} def save_result(self, filename, empty_results, results_format_fns): pass # No results to save yet if __name__ == '__main__': print("Welcome to my Semantic SLAM solution!") BenchBot(agent=MyAgent()).run()
As you can see, once we have an
Agent, running it over an environment is as simple as a single line! AnAgentis an abstract class that requires implementations of each of the 3 methods shown above (see what happens if you remove thesave_resultfunction).Further details on the
Agentclass can be found in the BenchBot API documentation. Run the new script to confirm it does exactly the same as above. In the next section, we will use structure provided by our agent to tackle object detection.
Part III: Using Votenet for Object Detection
Note: Votenet doesn't currently support GTX30 series cards, so unfortunately the tutorial won't work for these targets (due to it depending on an old version of PyTorch, which depends on old CUDA versions, which don't understand how to compile layers for the GTX30 series architectures). There is a posted workaround here though that users have verified as working.
Votenet is a detector produced by the Facebook research group which produces 3D object detections from point clouds. In this section of the tutorial we will use Votenet to detect objects directly in the observations provided by the BenchBot API.
-
Follow the steps below to install Votenet on your system (we install it simply in the
$HOMEdirectory, but you are free to install it elsewhere if required). The latest official installation instructions can be found here. Start by cloning the repository:u@pc:~$ git clone https://github.com/facebookresearch/votenet && cd votenetInstall pytorch (note: a version earlier than 1.5.0 is currently needed due to this issue), and tensorflow:
u@pc:~$ pip3 install 'torch<1.5.0' torchvision tensorflowCompile the CUDA layers for PointNet++:
u@pc:~/votenet$ cd pointnet2 && python3 setup.py installInstall Votenet dependencies:
u@pc:~$ pip3 install matplotlib opencv-python plyfile 'trimesh>=2.35.39,<2.35.40' 'networkx>=2.2,<2.3'Download a pre-trained model, and extract to
./demo_filesu@pc:~/votenet$ wget "https://drive.google.com/uc?export=download&id=1oem0w5y5pjo2whBhAqTtuaYuyBu1OG8l" \ -O demo_files.zip && unzip demo_files.zip && rm demo_files.zip -
After each step, the BenchBot API returns a set of observations described in the BenchBot API documentation. We need to use the RGB images, depth images, and various poses in the observations to create a 3D point cloud for Votenet. Votenet also needs to be configured for our detections, initialised, and be called with data in its expected format. All of these are quite involved, and mostly specific to using Votenet as a detector, so we will not discuss them in detail in this tutorial.
Instead, we will use the helper functions provided by the
votenet_benchbot.pyscript from the BenchBot SSU examples. Add the script into our project folder:u@pc:~/my_semantic_slam$ wget https://raw.githubusercontent.com/benchbot-addons/examples_ssu/master/examples/.semantic_slam_attempt/votenet_benchbot.pyEdit the
ROOT_DIRdeclaration at the top of the script to point to where you installed Votenet. Based on what we did above, this will be the required edit:# ~/my_semantic_slam/votenet_benchbot.py ... # ROOT_DIR = os.path.join(os.path.dirname(os.path.abspath(__file__)), 'votenet') # Replace the line above with the following line: ROOT_DIR = os.path.expanduser('~/votenet') ...
-
Now edit your
Agentto get some detections for the current frame using the detector, and print what objects were found to the console:# ~/my_semantic_slam/my_semantic_slam.py from benchbot_api import ActionResult, Agent, BenchBot from votenet_benchbot import votenet_build, votenet_detection # new imports! class MyAgent(Agent): def __init__(self): self._votenet = votenet_build() def is_done(self, action_result): return action_result != ActionResult.SUCCESS def pick_action(self, observations, action_list): results = votenet_detection(self._votenet, observations) print("Detected %d objects in the frame: %s" % (len(results), ",".join(r['class'] for r in results))) return 'move_next', {} def save_result(self, filename, empty_results, results_formant_fns): pass # No results to save yet if __name__ == '__main__': print("Welcome to my Semantic SLAM solution!") BenchBot(agent=MyAgent()).run()
Run the new script, and watch your agent print out the objects it detects (note: the detector internally will report more objects than received, as the detections are filtered to match our class list). All this is achieved simply from adding "some" helper functions and a couple of lines to our agent!

Now we have a robot that can drive through an environment trajectory, and detect visible objects at each step along the way. There is one part remaining: combining the detections over the trajectory into a final object-based semantic map.
-
There are many strategies for how to combine a series of detections into a final map. Some of the variation in strategies includes whether amalgamation is done as a batch at the end or iteratively throughout the trajectory, criteria for treating multiple detections as a single object, and algorithms for computing the final bounding box. This is an area where better approaches could significantly improve the performance of your submission!
In this tutorial we use a very simple approach provided by the
votenet_nms()function invotenet_benchbot.py. The approach evaluates all detections as a batch at the end of the trajectory. It removes all detections detected as duplicates based on two basic IOU thresholds: a lower value for detections of the same class, and a higher value for detections of a different object class. Edit thesave_result()method for your agent to save all detections, and use thevotenet_nms()method when saving results:# ~/my_semantic_slam/my_semantic_slam.py ... from votenet_benchbot import votenet_build, votenet_detection, votenet_nms # new import! class MyAgent(Agent): def __init__(self): self._votenet = votenet_build() self._raw_results = [] def is_done(self, action_result): return action_result != ActionResult.SUCCESS def pick_action(self, observations, action_list): results = votenet_detection(self._votenet, observations) print("Detected %d objects in the frame: %s" % (len(results), ",".join(r['class'] for r in results))) self._raw_results.append(results) return 'move_next', {} def save_result(self, filename, empty_results, results_format_fns): votenet_nms(self._raw_results, self._votenet, empty_results['results']['class_list']) # TODO we will handle actually saving the results later ...
The
votenet_nms()function needs a class list to create a probability distribution for the chosen label. We use the default class list created with our empty results, described here. -
Now we need to save the results created by
votenet_nms(). Thesave_result()function of yourAgentprovides a number of arguments to make saving results easy. The first is thefilenameto save your results. If you save your results at this location, a number of tools in the BenchBot software stack can automate evaluation, renaming, zipping, etc. (as we will see in the next step). The next argument we will use isempty_resultswhich is a results dictionary already pre-populated with everything required in a results file except for your object-based semantic map. All you need to do is add your objects list to the'objects'field, and write the dict at the requested location.Adjust the
save_result()method in your agent to do these two things:# ~/my_semantic_slam/my_semantic_slam.py import json ... class MyAgent(Agent): ... def save_result(self, filename, empty_results, empty_object_fn): empty_results['results']['objects'] = votenet_nms(self._raw_results, self._votenet, empty_results['results']['class_list']) with open(filename, 'w') as f: json.dump(empty_results, f) ...
Run your script, and it should go through the trajectory as it did at the end of the previous, but there will be a new results file saved at
/tmp/benchbot_result(the value offilenameprovided to in thesave_result()function). To see how your algorithm performed, evaluate the results using the OMQ evaluation method through thebenchbot_evalscript:u@pc:~$ benchbot_eval --method omq /tmp/benchbot_resultFurther details on the evaluation scoring system can be found in the eval_omq add-on README.

-
Manually evaluating results after every submission quickly becomes tiresome, especially when rapidly developing an algorithm with iterative improvements. The BenchBot software stack has inbuilt tools to automatically evaluate the results of a submission:
u@pc:~$ benchbot_submit --evaluate-results omq --native python3 ~/my_semantic_slam/my_semantic_slam.pyYou can also easily save a copy of your results at a more convenient location:
u@pc:~$ benchbot_submit --evaluate-results omq --results-location ~/my_semantic_slam/results.json --native python3 ~/my_semantic_slam/my_semantic_slam.pyNote: these commands rely on you saving your results at the location provided by
filenamein thesave_result()function. The commands won't work if you save elsewhere as they have no way of knowing where the results were saved.
At this point, we have a solution to the semantic SLAM task using passive robot actuation and ground-truth localisation. It can run on any environments we choose, gather results for each of these environments, then benchbot_eval can be used with all of these results to produce a summary score.
This involves many monotonous manual steps, with potential for human error to creep into the process. BenchBot is all about taking the pain out of the process, including here. We can use a single script, benchbot_batch, to do all of the above in one step.
If you are still running benchbot_run, please make sure to kill it at this point with CTRL^C. To automatically run our semantic SLAM solution over two environments, then score the results on completion:
u@pc:~$ benchbot_batch --task semantic_slam:passive:ground_truth --robot carter_omni --envs miniroom:1,miniroom:5 --evaluate-with omq --native python3 ~/my_semantic_slam/my_semantic_slam.py
The benchbot_batch script includes a number of options for customising the automated run, which can be viewed with benchbot_batch --help. We finish with another couple of examples of using benchbot_batch to explore the performance of your algorithm:
- Naming your results with the 'my_semantic_slam' prefix, and saving a ZIP archive containing all results:
u@pc:~$ benchbot_batch --task semantic_slam:passive:ground_truth --robot carter_omni --envs miniroom:1,miniroom:5 --prefix my_semantic_slam --zip --native python3 ~/my_semantic_slam/my_semantic_slam.py - Using a pre-defined environment batch, like those in the batches_isaac add-on to produce a summary of our examples performance:
u@pc:~$ benchbot_batch --robot carter_omni --task semantic_slam:passive:ground_truth --envs-batch develop_1 --evaluate-with omq --native python3 ~/my_semantic_slam/my_semantic_slam.py
That's it; congratulations on making it to the end of our BenchBot tutorial! We have created a solution to the Semantic SLAM problem from scratch, and evaluated its performance over a range of 3D simulated environments.
We achieved an overall OMQ score of ~0.13 when run with environments miniroom:1, minirooom:3, house:1, & house:3, but that is only 13% of what's possible. There are plenty of ways to do better including trying different detectors, adjusting detector tuning, using smarter map creation algorithms, etc. And that's not even including novel research in the Scene Understanding research space. We are excited to see what breakthroughs you can achieve using BenchBot as your aid!