v3.0 BOM
You will need the following tools to assemble this printer.
| Qty | Description |
|---|---|
| 1 | Multimeter for checking wiring. |
| 1 | Soldering iron. |
| 1 | Small rubber mallet to help convince some parts to join. |
| 1 | Mineral oil or Vaseline for lubrication. |
| 1 | Optional fine grit sandpaper to clean up the rails. |
| 1 | Optional cyanoacrylate glue. (super-glue) |
You'll need controller electronics to drive the Snappy. Here's what I recommend. Prices given are based on what I found on Amazon with a cursory search. All parts found had free shipping options. All costs are in US Dollars.
| Qty | Description | Total Cost | Where Found |
|---|---|---|---|
| 1 | Power Supply, 120W. (300W w/ Heated Bed) | ~$18 | Amazon.com |
| 1 | Controller electronics. (RAMPS1.6+2560+Pololus) | ~$38 | Amazon.com |
| 3 | Mechanical microswitch end-stops and wiring. | ~$ 7 | Amazon.com |
| 5 | NEMA17 Stepper Motors, 40mm length, 1m cable | ~$58 | Amazon.com |
| 1 | J-Head Extruder hot end w/heater, thermistor. | ~$27 | Amazon.com |
| 2 | 40mm 12v 0.15A 2-pin cooling fan, 10mm thick. | ~$10 | Amazon.com |
| 1m | Wire, dual conductor, 22 gauge, stranded | ~$ 1 | Everywhere. |
| 1 | Heated Build Platform. (optional) | ~$16 | Amazon.com |
You'll need the following Hardware to build the cartesian frame:
| Qty | Description | Total Cost | Where Found |
|---|---|---|---|
| 3.1Kg | Plastic Filament. (@ $16/Kg) | ~$50 | Amazon.com |
| 1 | Extruder Drive Gear | ~$ 3 | Amazon.com |
| 1 | 686 bearing. | ~$ 3 | Amazon.com |
| 1 | Borosilicate glass build platform. (214x200mm) | ~$ 8 | Amazon.com |
| 6 | 3mm x 12mm socket head screws. | ~$ 1 | Everywhere. |
| 6 | 3mm nuts. | ~$ 1 | Everywhere. |
Not counting shipping costs, time, and labor.
- ~$225 without Heated Bed.
- ~$241 with Heated Bed.
All parts should be printable inside a 150mm x 135mm x 150mm build volume.
Recommended slicer settings:
- 2 perimeters layers
- 3 top and bottom layers
- 0.25 or smaller layer height
- 20% or better infill (50% for drive gears)
- grid/rectangular infill
- No support necessary
- No Raft or brim necessary
The very first thing you should do is print out the Slop Calibrator.
| Qty | Name | Image |
|---|---|---|
| 1 | Slop Calibrator (download) |  |
Find the smallest hole that the plug slides in and out of without a lot of force. Try all four rotations. If the plug is hard to insert or remove from the hole, the hole is too small. Read the number on the side of the block in front of the smallest hole that it fits. It will be a two digit number like .20, which is the value 0.20. This is the printer_slop value for your printer. If the number is 0.20, then you can use the pre-generated STL files for this project. If not, you will need to edit the config.scad file and change the printer_slop value to the value you measured. After editing the config.scad file, you will need to regenerate the STL files as described in Generating Model Files.
You will need to print out the following parts:
| Qty | Name | Image |
|---|---|---|
| 2 | Rail X-Y Motor Segment (download) |  |
| 2 | Drive Gears (use high infill density)(download) |  |
| 4 | Rail Segment (download) |  |
| 4 | X-Y Slider Sled (download) |  |
| 2 | X-Y Joiner (download) |  |
| 2 | Sled Endcap (download) |  |
| 1 | Glass Bed Supports (download) |  |
| 6 | Adjustment Screws (download) |  |
| 2 | Rail Y Endcap (download) |  |
| 2 | Y-Z Bottom Joiner (download) |  |
| 4 | Support Legs (download) |  |
| 2 | Z Base (download) |  |
| 4 | Z Rail Segment (download) |  |
| 4 | Lifter Rod (download) |  |
| 2 | Lifter Coupler (download) |  |
| 2 | Z Slider Sled (download) |  |
| 2 | Bridge Segment (download) |  |
| 1 | J-Head Extruder Platform (download) |  |
| 1 | Extruder Motor Clip (download) |  |
| 1 | Extruder Idler (download) |  |
| 1 | Compression screw (download) |  |
| 1 | Extruder Fan Shroud (download) |  |
| 1 | Extruder Fan Clip (download) |  |
| 1 | Cooling Fan Shroud (download) |  |
| 2 | Rail Z Endcap (download) |  |
| 2 | Bridge Brace (download) |  |
| 1 | Bridge Brace Center (download) |  |
| 1 | Spool Holder (download) |  |
| 2 | Wire Clips (download) |  |
| 2 | Cable-Chain Links (download) |  |
| 1 | Cable-Chain Mounts (download) | 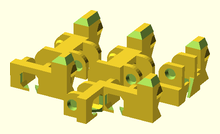 |
And one of the following motherboard mounts, depending on which electronics you use:
| Qty | Name | Image |
|---|---|---|
| 1 | RAMPS MotherBoard Mount (download) |  |
| 1 | RAMBo MotherBoard Mount (download) |  |
If you want to advertise your Snappy with a placard, print this and mount it on the right front side bridge segment:
| Qty | Name | Image |
|---|---|---|
| 1 | Snappy Logo Placard (download) |
If you have a RepRapDiscount Full Graphic Smart Controller LCD, print these, and replace the support legs by the RAMPS mount with it:
| Qty | Name | Image |
|---|---|---|
| 1 | RepRapDiscount Full Graphic LCD Base (download) |  |
| 1 | RepRapDiscount Full Graphic LCD Cover (download) |  |