

This is my Homesick Castle intended for use on the Windows Subsystem for Linux (aka "WSL", or Bash/Ubuntu on Windows).
If your search for guidance on setting up a reasonable dev environment on WSL has lead you here, I hope that through offering this fairly opinionated, occassionally solipsistic, yet well-intentioned collection of observations and sample configurations you may find something useful :)
I also leverage the deployable ease offered by Homesick in distributing and managing my configuration files, and have included an example Homesick "castle" in this repo which you are free to clone/download (see the instructions at the end of this readme...).
However, the usual "ymmv", "No warranty either expressed or implied", "Use of this repo may totally break your sh*t" - rules governing personal responsibility most definitely apply here, and you should certainly always be weighing the associated risks of hastily cloning some random dotfiles project into your environment :)
⌚ TL;DR ⏩ 🏁
But first, before you so eagerly throw your support behind Microsoft's (at least in the opinion of this writer, extremely welcome) efforts to be much more open-source interested/inclusive, I'd recommend reading this excellent blog post from former Docker/Google-Engineer-turned-core-member-of-Microsoft's Container Development Team, Jessie Frazelle discussing the nuts and bolts of WSL.
It should also be noted that prior to getting too precious about the idea of using WSL exclusively as your seamless "personal development-workflow-asis", you'll want to know that WSL is highly Windows build-dependent - meaning that certain things you might expect to "just work" in Ubuntu/Bash may only be supported in more recent builds, or perhaps offered exclusively through the Windows Insider Program.
In fact, after spending a lot of time in pretty rigorous comparison over the last several months - and if your build-version would seem to support it - I might even suggest skipping the rest of this guide, and heading straight over to https://blog.ropnop.com/configuring-a-pretty-and-usable-terminal-emulator-for-wsl - and configuring WSL along similarly X-server-based lines as opposed to the more "ConEmu-centric" approach roughly-outlined here (Note: You may additionally need to do as instructed here in order to get your X-server/Linux terminal app to work properly under WSL.).
Update: I can get neither Docker nor Vagrant to install run on my build :( The errors are plentiful and seem to change contantly. This issue has me completely re-thinking the suitability of WSL for my particular use case :( Since i can't actually upgrade my build, I believe I may actually need to consider going back to Cygwin (which is just incredibly disappointing...). - Ok, that reaction was a bit overwrought in hindsight...While I'm still disappointed that this can't unfortunately work for me, it's less of a WSL "deal-breaker" than I had been winding myself up over. In my case the problem doesn't appear to be exclusive to WSL, and switching to Babun/Cygwin wouldn't appear to solve my problem either :(
Update: I've also discovered Tmuxinator which has reduced the whispered profanity punctuating each VcXsrv crash back down to tolerably work-safe levels :)
Update: I've now ditched VcXsrv in favor of MobaXterm --which is working out much better for me (in fact, I've yet to see a single crash...). It has however been quite a bit more difficult for me to hack out a powershell script/shortcut that starts things up in an orderly manner, predictably launching an xfce4-terminal (although I have something working, it's far from what I would consider sufficient...essentially I'm adding an arbitrary amount of delay through the use of a "sleep" command so as to negotiate a pretty convolluted "relay" b/w MobaXterm, ConEmu, xfce4-terminal, and tmux/tmuxinator I have something in place that I like now. It still isn't anything slick, but it works consistently. I'll be adding a text file to the repo with what I'm using...).
Update: I've also waved bye-bye to ConEmu entirely after struggling to have it work properly following a recent Windows update. It may also be worth noting that the route to actually uninstalling ConEmu completely was fraught with an uncomfortable number of stops at locations scattered throughout the Windows Registry to delete various keys...a definite hassle that I would have fully-expected not to have encountered with a piece of software that has been around as long as ConEmu - which then leads me to my next important bulletin:
Note: a word of caution if you decide to completely remove ConEmu in favor of simplifying your configuration - when choosing among the various "guides" claiming suitability for this purpose, I found several that were either totally useless, or worse, could potentially do more harm than good. I ended-up following this vid on YouTube: https://www.youtube.com/watch?v=-mp5Xk55q2o - which didn't completely match-up with everything I needed to delete from the registry, but provided a reasonable starting place...again, make sure you have a functional backup before mucking-about in the registry...you can seriously mess things up if you're not careful....
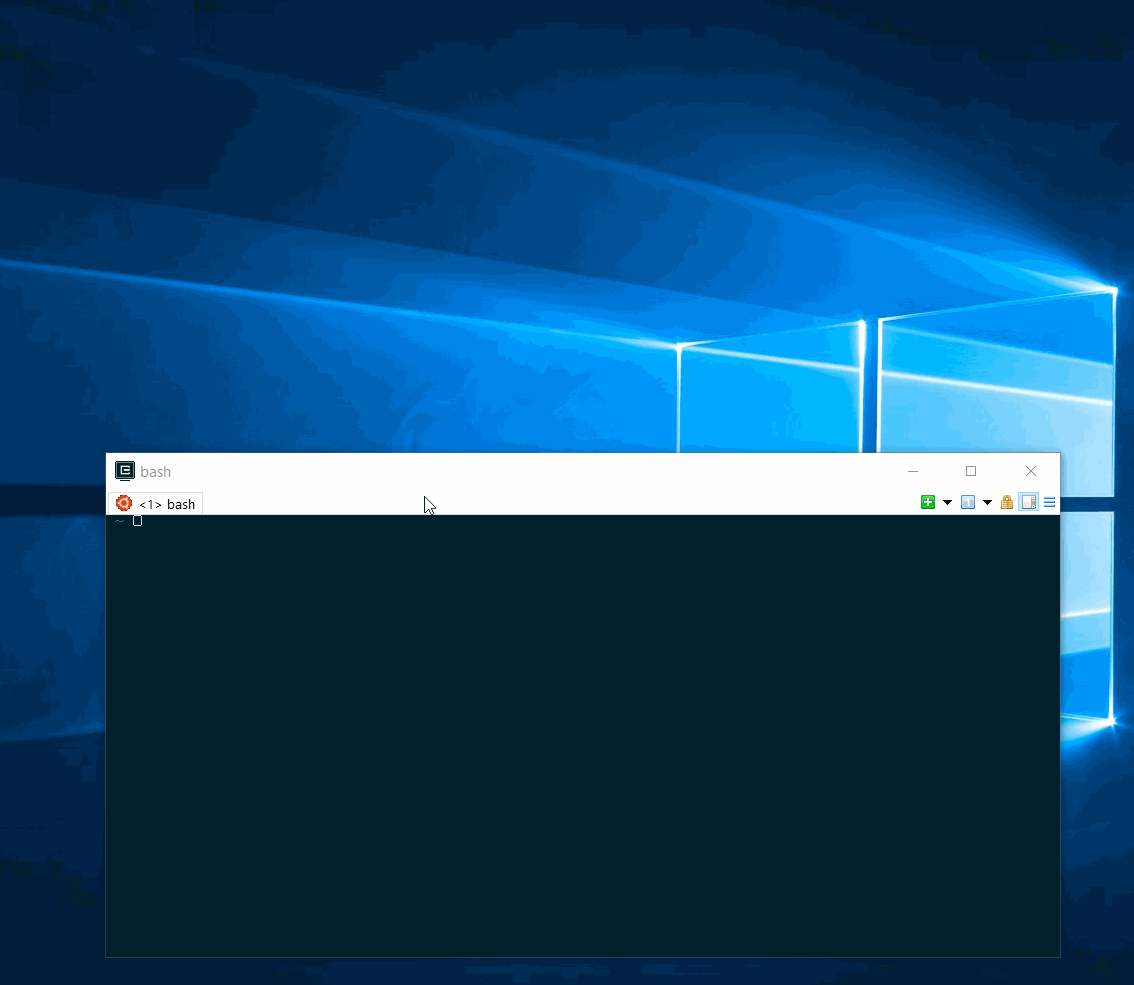
Once I was finally able to completely remove ConEmu, I was able to pretty easily create a desktop shortcut to launch xfce4-terminal:
1. Note that this was a lot simpler than what I had been using before. First, I right-clicked on the empty space on the Windows desktop, and selected New-->Text Document.
2. Next, I changed the the
.txt extension to .vbs.3. I then right-clicked this file, and selected Edit-->Notepad from the menu. Next I added the following:
args = "-c" & " -l " & """DISPLAY=:0 xfce4-terminal"""
WScript.CreateObject("Shell.Application").ShellExecute "bash", args, "", "open", 0
4. Next, open up MobaXterm, and click on the Session icon. This will open another window displaying "Choose a session type...". Click the File icon at the top of this window.
5. From here, in the "File/folder to open" field, enter:
C:\Users\<your user>\Desktop\start-xfce4-term.vbs
6. Next, click the "Bookmark settings" tab, and then click the "Create a desktop shortcut to this session", accepting the defaults. Click OK.
7. Close the MobaXterm application, and test that your shortcut opens MobaXterm (for use as your X server) and successfully launches and xfce4-terminal session. That's it :) if you've configured things as above, you should now have a convenient shortcut for launching your X server and terminal sessions.
Ok, rather perplexingly - due to what I'm sure are some uniquely-personal, environment-specific constraints - the above instructions worked exactly one time for me. Here's what I eventually did to get things working consistently:
- Open up MobaXterm and click on Sessions-->New Session at the top.
- A new window should open. Click on the Shell icon at the top of this window.
- From the "Terminal shell" drop-down, select Ubuntu Bash (WSL).
- In the "Startup directory" field, enter/select:
C:\Users\<your user> - Click the "Advanced shell settings" tab and enter:
bash -c -l "DISPLAY=:0 xfce4-terminal"
- Click the
OKbutton (ignoring the temptation to click on the "Bookmark settings" tab and the "Create a desktop shortcut to this session" button...). - You should see your session listed on the left-hand side of the main MobaXterm window. Right-click the icon and select "Save session to a file" and save it to your Windows desktop.
- Exit MobaXterm completely. You should now see a new shortcut icon on your desktop. Double-click it.
- If all goes well, this should open MobaXterm and then launch xfce4-terminal in a separate window (it might be hidden behind the main MobaXterm window, so you may need to minimize this first in order to see it...). This was really the only thing that ended-up working for me - at least consistently. Anyway, ymmv.
- One additional thing you will likely want to do to get copy/paste working properly between WSL and Windows: Go into the X11 server settings for MobaXterm, and change the clipboard behavior to "disable copy on select". Things should work as expected once you make this change :)
I'm definitely more comfortable recommending this sort of approach now than in the past where I naively considered any use of an X-server as contradicting some vaguely "minimalist" orthodoxy I thought I was honoring. Even considering the awkward and fairly disruptive VcXsrv crashes - which seems to happen when I drag the terminal window around just a bit too much (again, not an issue now that I'm using MobaXterm, which continues to be awesome...) this is hands down a much more sustainable way for me to get things done than trying to twist a native-Windows app into the pretzel-shaped approximation of my dimming recollection of a merely sufficient Mac/iTerm2 workflow. I will surely be either creating another Homesick castle specific to this approach (Note: I think this one still works fine as a "starter" collection...), or at least in the short term adding some additional commentary here as to how to accomplish the initial setup for this type of configuration :)
Since I believe I've now spent enough time experimenting with WSL to form a reasonably credible opinion - perhaps even earning the right to express this editorially - and given just how crucial I feel it is to minimizing any substantial impact to personal productivity/expected rate of contribution when transitioning to a Windows-based workflow, I'll just come right out and say that: There are currently no terminal applications for Windows that can compete with those offered natively for Linux or to the (truly excellent) iTerm2 for Mac.
The friction resulting from such a limited number of comparatively clumsy/imprecise terminal emulation options chafes abrasively over the course of a project's term, resulting in a corrosive atrophy to collaborative speed and agile delivery. This "damage" is typically relative to the composition and complexity of the various requirements. For instance, golang/node.js-based projects - typically featuring a majority of collaborators generally/historically contributing from largely non-Windows platforms - aren't likely to spontaneously (or enthusiastically) adapt to any mandated switch to an exclusively Windows-native workflow, which would also seem to rule-out any subsequent "boon" to productivity. By extension, organizational initiatives that seek to further process-engineer better/faster developement pipelines - and align these with "digital transformation" objectives that amount to more than mere buzzwords - would do well to consider a "bottom-up" examination of development workflows in this context.
Yes, I'll say it again that your Windows build version will be the single-most important factor in determining which path your WSL configuration is likely to take. Unfortunately for me (and perhaps those continuing to read), the full realization of this uncomfortable fact arrived much less swiftly than I would have preferred when I began configuring my environment for golang development. I was immediately pummelled by go build <command-line-arguments>: read |0: interrupted system call errors that would appear randomly regardless of version, which then began overlapping with frequent (and ultimately insurmountable) Vim code-completion plugin errors - or more recently while trying to go the "VcXsrv/Terminator" route as suggested in the previous link when I was halted abruptly (and permanently) by continual Client failed to connect to the D-BUS daemon: - errors.
If you're on an earlier build-version (prior to 15046, aka the "Windows Creator Update"), aren't able to upgrade for reasons outside your control, and are hitting some of these same snags as described above, then what follows may continue to be relevant to you :)
You can easily check your Windows build version by simply hitting the Windows key on your keyboard, typing winver, then checking the version against the release notes here.
Generally speaking, if you are planning to write golang code in WSL, you'll likely want to be on at least build 14905 which supports restartable system calls (thus avoiding the dreaded read |0: interrupted system call errors mentioned above, and of which a thorough discussion can be found here).
Presently, I'm using Up until very recently I had been exclusively using ConEmu as my terminal application, as it felt (to me) the most similiar to iTerm2 - a Mac-specific mainstay I had grown quite fond of. Having now tried Hyper.js, wsltty and a few others (the names of which I'm now forgetting), ConEmu - while far from a perfect replacement for iTerm2 - emerged as the most stable, configurable, and fully-featured of those I had tried. It also offers tabbed-sessions, which I can't really live without which up to this point had been a firm requirement for me, even as I warmed slightly to the exclusive use of tmux to boundary my sessions. However, as noted earlier I'm now mainly using the terminal application available as part of xfce4 which requires the use of VcXsrc, which perhaps not surprisingly has also had its fair share of problems (specifically, if having to re-establish your sessions and/or reconfigure all your panes/windows on average a couple of times a week due to VcXsrc crashes doesn't feel like an acceptable trade-off to you, then I'd actually recommend that you stick with ConEmu...) Update: ConEmu, MobaXterm and xfce4-terminal configured with Tmuxinator, when used together are an absolutely winning combo, and can be made to work on even the earliest Windows builds featuring WSL (and unless you absolutely require Vagrant or Docker support, might even completely suffice. :)
Whichever terminal application you choose, you will want it configured to run as an administrator - which I quickly learned in ConEmu when I initially tried to use the ping command, and got a "Permission denied" error. To configure this in ConEmu, open up Settings --> Startup --> Tasks, and add the -new_consule:a flag to your executable string for your Bash task so that it looks like %windir%\system32\bash.exe ~ -new_console:a when you're finished.
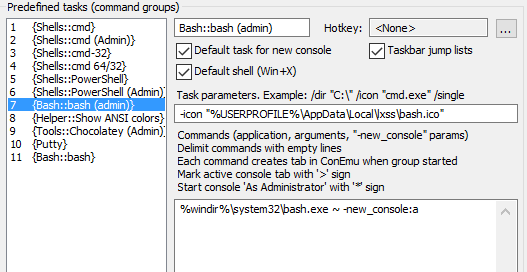
Click Save settings and Bash should no longer complain about permissions/privileges.
Update: I'm now recalling more completely why tabbed-sessions had previously held such appeal for me. While a local tmux config is great for maintaining local session boundaries, even if you are careful to detach from them, they are still tethered to a local process, -- meaning that the now-in-progress compile of Vim 8 you just kicked-off on a remote host isn't going to withstand the incoming forced-reboot naturally triggered by Windows Update minutes later ;)
To avoid this potential calamity you still need some mechanism by which to automatically start/create or re-attach to existing sessions on remote hosts (and subsequently boundary these sessions). This is where tabbed-sessions is particulary useful, since each remote connection can then be represented in it's own tab - and by logical extension much more intuitively mapped in a 1-to-1 manner to its own individual tmux session - initiated and maintained on the remote host.
In the past, since it was common that I might be connected to several remote systems at any given time (typically using sudo -i or sudo su -), it was extremely useful (I might even say it was a requirement...) for me to maintain several tabbed-sessions each of which was bound to some conditional logic in both my local and remote .tmux.conf files and aliased to the autossh command to establish what was essentially a "Close the lid on laptop. Drive home. Open lid on laptop. Trigger vpn connection - now wait for sessions to be restored in each tab..." - method of persistance (for example, similar to that offered here). While ssh "automation" at this level may not be of interest to everyone, and certainly should be balanced against any potential security implications (for example, at a minimum great care should be taken in preventing ssh-agent process-sprawl through something like some cleanup-scripting in a .bash.logout file, or the excellent oh-my-zsh forward-agent plugin, etc.), it's hard not to appreciate the friction-free convenience of this configuration - especially at 3am when the increasing frequency of CRITICAL alerts has converged to form a singular, uninterrupted tone - announcing the arrival of a 48-hour-work-marathon ;)
One additional observation that I should note is that while simply removing and reinstalling WSL is supposed to upgrade you from Ubuntu 14.04 to 16.04, this was not true for me, despite what I was pretty sure (at the time) was a supported build (it simply hung indefinitely at the command line, even after I fully uninstalled, rebooted, then repeated the lxrun install..I finally had to manually kill it - and in the end was still left with an unaltered version of 14.04).
However, not one to acquiesce so easily to such abruptly suspended progress, and now enticed perhaps a bit too unreasonably by the "waxy-shine" of the now "forbidden fruit" of Ubuntu 16.04 to remember giving it at least a quick rinse to dillute any caustic pesticides or cosmetic produce varnishes, I had to spend a fair bit of time mitigating the resulting upgrade "indigestion" in WSL.
Here's what I needed to do to get everything upgraded more or less successfully to 16.04:
Update Note: you should instead use the following set of commands when upgrading, so as to not need to reinstall packages:
$ sudo -S apt-mark hold procps strace sudo
$ sudo -S env RELEASE_UPGRADER_NO_SCREEN=1 do-release-upgrade
"Old" set of commands I needed to run: From cmd:
lxrun /setdefaultuser root
From bash as root:
do-release-upgrade
Then:
wget http://mirrors.kernel.org/ubuntu/pool/main/s/sudo/sudo_1.8.9p5-1ubuntu1.1_amd64.deb
wget http://mirrors.kernel.org/ubuntu/pool/main/p/procps/procps_3.3.9-1ubuntu2_amd64.deb
wget http://mirrors.kernel.org/ubuntu/pool/main/s/strace/stradpkg -i sudo_1.8.9p5-1ubuntu1.1_amd64.deb
ce_4.8-1ubuntu5_amd64.deb
dpkg -i sudo_1.8.9p5-1ubuntu1_amd64.deb
dpkg -i procps_3.3.9-1ubuntu2_amd64.deb
dpkg -i strace_4.8-1ubuntu5_amd64.deb
Then I had to do this to get ssh to work again:
chmod 0666 /dev/tty
I've since come to understand that 16.04 is technically not supported on pre-"Creator" builds, so I should probably just state for the record here that for those thinking of rolling the dice, upgrading may invite a number of other unexpected "guests" to the party who then refuse to leave, proceeding to break some of your fancier stuff :( The point here is that you should be reasonably clear on what problem you are looking to solve by upgrading to 16.04 and pretty sure it contains either the "fix" you seek, or are at least willing to accept the risk. My decision to upgrade wasn't particularly well-articulated or thoughtfull, and rather prompted by a pair of really frustrating issues which had me pretty willing to take my chances in experimenting. Here were the issues I was quite sure would be resolved by upgrading to Ubuntu 16.04:
- Several of my Vim plugins didn't work with the stock version of Vim that ships with Ubuntu 14.04 (In the end, I actually wound up just building Vim 8 from source due to dependency problems encountered with the Vim YouCompleteMe plugin that persisted even into 16.04).
- The routine difficulty I was having with getting sudo to work predictably/reliably, i.e.
sudo apt-get installwould typically hang, and it seemed like I was constantly having to exit my shell to perform trivial tasks as root (I didn't realize at the time that due to what I now believe is an environment bug, you may need to instead usesudo -E).
While upgrading was perhaps the right decision for me ultimately, it really didn't resolve either of the issues I'd sought to remedy initially; the YCM plugin still complained about the version of Vim, and sudo apt-get install now seemed even more busted than ever - having added a "decorative" new sudo: no tty present and no askpass program specified - error to it's limited output. I finally resolved this by downgrading several packages (-- Note: see the update above and notes on the wget, dpkg -i commands and /dev/tty permissions changes...), however each time I was subsequently tempted to run sudo apt-get update, I reflexively hesitated, - wondering if doing so might upset the seemingly fragile balance I'd worked to achieve (which, yes, continues to be a problem for me on my build) again, see the Update at the top of this section for how to work around this issue by using the -mark hold option to sudo, etc..
In retrospect these issues were again highly build/environment specific, (and I'll admit due in part to my misunderstanding of how sudo/su actually works with environment variables in WSL how sudo really just works in general - see my table below), and would seem comparatively rare, especially for those who have already carefully checked their build version for any surprises and are on anything other than the earliest Windows 10/WSL builds ;) In any case, since this was a much less straightforward and time-consuming process than I had anticipated, I'm including this information in case it might be useful to the similarly impetuous :)
I'd also like to send a super-appreciative shout-out to all those who so generously share their time and effort on Github assisting others in building and shaping rapidly deployable configurations. The bulk of my dotfiles are really just a curation of extremely useful things I've either lightly iterated on, -- or simply lifted outright from others (with permission of course). Several were sourced initially from Jessie Frazelle, - who through her work with Docker, Google (and now Microsoft!), continues to impressively shape many notable innovations while promoting FOSS/OSS and remaining unfailingly generous and remarkably empathic in offering considerable guidance on a range of engineering/development issues, -- and also Nate Mccurdy from Puppet, who - in addition to providing the principal inspiration for this repo - continues to generously offer his elegantly tailored, thoughtfully maintained and rigorously "customer-prem battle-tested" code/configuration for a rapidly deployable Ruby/Puppet development workflow --- You constantly inspire me through your intelligence and generosity --- Thank you both!
Ok, I hear ya...sounds like you're hungry. Here's how to deploy:
I'm a pretty big fan of both Bash-it and oh-my-zsh, and have been using both somewhat interchangeably lately. Despite a few missing/broken items, they both work pretty well on WSL:)
Install Bash-it with: sh -c "$(curl -fsSL https://raw.githubusercontent.com/Bash-it/bash-it/master/install.sh)"
- Install oh-my-zsh:
sh -c "$(curl -fsSL https://raw.githubusercontent.com/robbyrussell/oh-my-zsh/master/tools/install.sh)" - You may also want to try out the excellent powerlevel9k theme.
- First,
mkdir ~/srcthengit clone https://github.com/bhilburn/powerlevel9k.git ~/src/powerlevel9k - Create a symlink with
ln -s ~/src/powerlevel9k/powerlevel9k.zsh-theme ~/.oh-my-zsh/custom/themes/powerlevel9k.zsh-theme.
*Note that for older Windows builds (I believe this may be fixed on recent builds but haven't confirmed this yet...), currently running a large number of plugins or a special theme in either Bash-it or oh-my-zsh, i.e. powerline-multiline for Bash-it or powerlevel9k for oh-my-zsh, slows things down pretty intolerably... - If you're on an older build, I'd recommend choosing a minimal theme (I'm currently pretty happy with the oh-my-zsh "ys" default robby-russell theme..) and limiting your customizations if speed is important to you.
As noted above, I'm also a big fan of managing my dotfiles across different distributions with Homesick. While more or less a "git wrapper" abstracting a core subset of typical git source-control tasks to a set of reasonably intuitive conventions (which are then aggregated into "castles" - or repos tailored/specific to managing dotfiles...) Homesick still manages to differentiate itself from merely a "travel-sized, git translator/symlink-er" - by providing its themed-collection of command-line utilities similarly to those typical of git, i.e.homesick clone, homesick commit, homesick pull - without the same cumbersome requirement to first cd into the directory under source-control in order to manage its contents. It's also worth noting that given the generally more user-specific and less distributed nature typical of managing dotfiles, a number of git features specific to resolving conflicts, scaling efficiently, "cherry-picking" commits, rev-parsing, hooks, or sophisticated approaches to tagging/branching, are likely to be encountered less as useful features and more as either unneccessary distractions or arbitrary contstraints. In any case, it's important to remember the adjacent availability of git - always ready to be handed the "pickle jar", should a firmer "grip" be required :)
I'm happy to continue recommending Homesick as an alternative to some of the more awkward/arbitrary complexities found in other approaches to managing dotfiles. To install it:
- You'll first need to install ruby, then
gem install homesick - Clone this castle with
homesick clone rodtreweek/castle-winbuntu - Create the symlinks with
homesick link castle-winbuntu
Update: I've also started using a Makefile in addition to Homesick to script some additional tasks, as well as run shellcheck in a Docker container, - which I must say has worked quite well, especially when paired with Travis to catch any problems I may have overlooked... However, I still don't see these two approaches as mutually exclusive, and am likely to continue using both together.
I love, love, love vim-plug. You will too. I promise :) https://github.com/junegunn/vim-plug
-
Vim-plug Install:
curl -fLo ~/.vim/autoload/plug.vim --create-dirs https://raw.githubusercontent.com/junegunn/vim-plug/master/plug.vimvim +PlugInstall +qall -
Add a vim-plug section to your ~/.vimrc (or ~/.config/nvim/init.vim for Neovim). Complete instructions can be found here, but to summarize:
-
Begin the section with
call plug#begin() -
List the plugins with
Plugcommands, for example:" Shorthand notation; fetches https://github.com/junegunn/vim-easy-align Plug 'junegunn/vim-easy-align' -
End with
call plug#end()which updates&runtimepathand initializes plugin system- This also automatically executes
filetype plugin indent onandsyntax enable. - You can however revert these settings after the call. e.g.
filetype indent off,syntax off, etc.
- This also automatically executes
-
Reload .vimrc and type
:PlugInstallfrom within Vim to install plugins. -
Setting up YouCompleteMe natively to support code-completion in WSL is unfortunately still a WIP for me, andI'd been largely pretty blown away by YCM when I first encountered it a couple of years back, and it still remains one of my favorite Vim plugins - when it can be made to work correctly/predictably. The lenghthy list of dependencies and fairly complicated sequence of installation/configuration steps often idiosyncratic for whichever programming language(s) you may need it to support, already long and arduous on a Mac, was a significantly lengthier and more perplexing ordeal on WSL - and ultimately a failed experiment for me:( Although this again appears to be mainly due to the limitations of my Windows/WSL build, however the dated versions of Vim packaged with both Ubuntu Trusty and Xenial certainly haven't helped matters, nor am I eager to recommend any of the sparsely documented resources I was able to find that basically gave me false-hope in the end.).
Update - Since moving on from YCM, I've settled on using vim-mucomplete for (fast!) tab-based code-completion and vim-polyglot for syntax highlighting - a combo I've been extremely happy with :)
If however you may still want to give YCM a shot, you will first need to install Vim 8 (which I'd recommend upgrading to anyway, as it offers a number of features/improvements over Vim 7.x) following the instructions here to build it from source: https://github.com/Valloric/YouCompleteMe/wiki/Building-Vim-from-source (it's really not that bad...although do be careful to heed the warning for python 2 vs. 3 when building your config, as there are issues when attempting to use both...) As a shortcut, have a look at the gist I've created here, which uses checkinstall and the amazing fpm package builder to first create a .deb package, then safely/sanely install it :)
Update - I thought I'd take a moment here just to summarize a few things into a set of reasonable "bullet points", since I so frequently seem to jump around, rapidly lancing through prior assertions like these were line-items in an Ad-Tech "privacy policy" :) There are several things that you will likely need to configure to get things like copy/paste to work just so for you in your environment (perhaps even too many to even adequately discuss here, but I'll try...). Here's what you will most likely want to do at a minimum:
- Install and configure MobaXterm. (I tried other stuff. This one works best.)
- If you use tmux, which I'd encourage you to try if you haven't, make sure that when you change something related to display or key bindings for things like xfce4-terminal or vim in other files like
.bashrc,.zshrc, or.vimrcthat you also look at what you have in.tmux.confand whether it might be necessary for you to add/change anything there so that it doesn't conflict or result in other unexpected weirdness (specifically, you may need to install and use something likexclipand then configure tmux to use this to work around a number of problems, i.e. the rather counterintuitively-named optionset -g set-clipboard off- in your.tmux.confwhich actually allows for more predictable use of the copy/paste buffer, etc....). ConEmu. While there may be a way to just use MobaXterm exclusively, I haven't figured this out yet...I have a simple shortcut configured to start both MobaXterm and ConEmu, and this is then used to launch and facilitate the use of xfce4-terminal from WSL. This works pretty well for meSee my update at the beginning of this guide offering instructions for configuring MobaXterm as a replacement for ConEmu.- Upgrade to Vim 8 (I haven't used Neovim, which might be an option as well...I've spent quite a lot of time on my configs, so unless these are "plug 'n' play" with Neovim, I'm a bit reticent to experiment...). There are quite a lot of new features in this version, and if you intend on using the
.vimrcand.vimrc.settingsfiles included in this repo then this version is required. Although it's a bit of a pain to build this from source, if you are serious about using Vim as your IDE then I think it's also a bit worthwhile to get an idea as to what's contained in the source :)
I've also included a .fonts directory that contains a number of fonts I've found useful. You might also be interested in using a patched Inconsalata Awesome font for better terminal compatibility with vim-airline (not included - see the link below for instructions on installing this), or you might be interested in having a look at what's offered here: https://github.com/powerline/fonts .
- Download and install the Inconsolata Awesome patched font from here (not included in fonts):
Frankly, I am still finding the adjustment to using something other than iTerm2 chief among my challenges in establishing a reasonable dev workflow on Windows. My appreciation for iTerm2 has only deepened while I have sought to replace it with something even fractionally as good. In fact, although I can now at least paste from Windows/WSL into a Vim session on a remote host - I still have to first annoyingly turn off line-numbering, then use tmux's rather awkward copy-mode along with some fairly lengthy tmux config settings to pipe this input to xclip and then to a shared tmux paste-buffer - and even then this only results in the capture of an often unevenly white-spaced block of arbitrarily formatted text limited only to that which is currently visible on the terminal screen - then typically requiring the additional use of Vim's set paste option to further limit any resulting "entropy" to an amount ideally removable through a single pass of Vim's d/x, commands. This is where poignant nostalgia begins to emmerge for the layered, complimentary warmth of iTerm2 snuggly integrated with Vim - easily selecting and capturing several rows of text (or even entire documents), swiftly "yanking" this to the local system clipboard with "*y - and ultimately pasting its mirror-image system-wide - without restriction or shift key - simply with command + v.
After literally hours of experimenting, and with each suggested workaround featuring the same/similarly cumbersome layer of abstraction, (aka "Do I really need to setup an X server for this??") Note: While it doesn't make it any less of a pain-point, for the sake of fairness and acccuracy, I should offer the correction that this isn't really "abstraction". It's really just a feature of dealing with the natural boundary between what are really two distinct operating systems.
In trying to get any form of "seamless" copy/paste behavior to happen between the two (or perhaps even three, if we're talking about ssh'ing to a remote host...) OS's, you're essentially going to have to build a "bridge" between the clipboard on one OS to the other(s), and translate the corresponding registers between these distinct buffers. Obviously, on a Mac you're only really dealing with a single OS/clipboard buffer - so this is a much more straightforward/transparent operation (and easily taken for granted).
Soooo the short answer is: "Yes (at a minimum), you'll need to install an X-server of some sort (xming/VcXsrv/MobaXterm) if you want to share a clipboard b/w Linux and Windows - even when one (WSL) would appear to reside on the same host OS.".
Having now travelled down every available avenue with my build version, I finally threw in the towel and am trying out VcXsrv (additionally requiring the installation of a bunch of other stuff to satisfy various dependencies for first Terminator, then xfce4 respectively, i.e. the (huge) ubuntu-gnome-desktop package which seemed necessary to fill various other "gaps" in my build version). Note that if you do decide to go this route, make sure you have enough disk space.
I will say however that my ConEmu, vim-related copy/paste angst was substantially diminished upon discovery of this simple checkbox in Settings --> Keys & Macro --> Mark/Copy:
- then just selecting the text with the mouse/touchpad, or for larger copy selections, first doing a
cat <filename>, then selecting the text, andctrl-c,ctrl-vrespectively to copy/paste.
While I don't love the considerable amount of trailing whitespace that this captures, or the inability to reasonably deal with line-wrapping (note: again, this is really less an issue with ConEmu, and more to do with crossing the inherent boundary b/w OS's as mentioned above...) , this still made me a lot happier than having to first turn off line numbering, or constantly remove leading white space when pasting, for example into this readme here on Github. :)
Update: I was able to work around the trailing/leading whitespace issue as well as identify/reduce spaces before a tab by adding a few entries to my .vimrc.settings file:
autocmd ColorScheme * highlight ExtraWhitespace ctermbg=darkred guibg=darkred
- Added to the
AUTOGROUPSsection underaugroup configgroup, and then under theSEARCHINGsection:
" Show trailing whitespace and spaces before a tab:
match ExtraWhitespace /\s\+$\| \+\ze\t/
- Which highlights all whitespace in dark red, then by adding this:
" With the following mapping a user can press F5 to delete all trailing
" whitespace. The variable _s is used to save and restore the last search
" pattern register (so next time the user presses n they will continue their
" last search), and :nohl is used to switch off search highlighting (so
" trailing spaces will not be highlighted while the user types). The e flag is
" used in the substitute command so no error is shown if trailing whitespace
" is not found. Unlike before, the substitution text must be specified in
" order to use the required flag.
nnoremap <silent> <F5> :let _s=@/ <Bar> :%s/\s\+$//e <Bar> :let @/=_s <Bar> :nohl <Bar> :unlet _s <CR>
- I'm able to press the F5 key to remove all the useless whitespace in a file like so:
Again, not ideal, but this method arguably offers the least complicated remedy for cleaning-up problematic whitespace which some may even find preferable to the added installation, configuration, maintainance, and additional complexity of using an X-server to "proxy" terminal connections to a shared clipboard buffer - or perhaps as an alternative to troubleshooting multiple system components when things go wrong.
Another annoyance I was committed to at least minimizing right away was the routine observation of my pasted text "cascading" in a sideways ripple, then becoming a series of steady waves before crashing against the margin of my text editor every time (which is all the time) I forget to type :set paste. While it hasn't improved my memory any, and the "tide" seems to come in only slightly less frequently, I've at least configured F2 to toggle :set paste - so now I only have to type u + F2 :) (Oh, also make sure you have the "multiline paste" option set for ctrl-v in the settings for ConEmu...):
" Press F2 to toggle set paste:
set pastetoggle=<F2>
I've found that using SSH in the familiar Mac/CentOS way can be a bit problematic to duplicate on WSL. I've had issues where I'd gotten what I thought was a reasonable handle on things, to suddenly be confronted with a "host key verification failed" message, when certainly nothing obvious had changed on any relevant host keys, permissions on any presumably relevant files, hostnames or ip addresses. Even removing individual entries from the known_hosts file, followed later by removing everything within this file, then finally deleting the file entirely and rebooting never once resulted in the usual/expected prompting to re-add the host key. I finally had to do the following to force host-key prompting, and re-establish ssh connectivy to my remote host:
$ chmod 0666 /dev/tty
$ ssh -o StrictHostKeyChecking=no <your_user>@remote_host uptime
An additional word of warning here...You may also find (as I have just today...) that after spending an hour troubleshooting an SSH key-based authentication issue, where there was absolutely NO discernible whitespace in the authorized_keys file, I was still getting password-prompted even after quadruple-checking all permissions.
- Here's a tip. If you are having difficulty authenticating via key exchange do the following:
- On the host you are having difficulty, login via password initially.
- Next, back-up any id_rsa/id_rsa.pub files in the .ssh directory (warning these will be overwritten), and generate a key pair via the usual means.
ssh-keygen -t rsashould do fine for now. Accept all the defaults. - Then, use the
ssh-copy-idcommand to copy the file locally, i.e.ssh-copy-id -i ~/.ssh/id_rsa.pub localhost, which should create theauthorized_keysfile if it doesn't already exist, and add your public key to it. - Check that you now have a ~/.ssh/authorized_keys file, and that it matches what you have in ~/.ssh/id_rsa.pub.
- If everything checks out, simply do
ssh localhost, and you should not get password-prompted, and be logged-in straight away.If you are still prompted for a password, these are the main items to check:
700on your home directory (this is an easy one to miss, and typically only surfaces when/etc/ssh/sshd_confcontains the directive "StrictModes yes"...this one had me searching high and low...)700on.ssh600onauthorized_keys
Make sure you are either using the ssh-copy-id utility, or doing a cat id_rsa.pub >> authorized_keys from the original .pub file and NOT simply copy/pasting from Outlook, etc.
Even after painstakingly examining the output of ssh user@host -vvvvvvvvvvvvvvvvv for clues, I was unable to figure out where Outlook had seemingly done it's "smart" formatting on an ssh public key that an end-user had copy/pasted into an email. Unless you want to go through the unnecessary motions of checking every link in this particularly heavy chain, I'd recommend you insist (gently, of course) that any public keys you intend on placing on a host arrive in a "tamper-resistant" .pub file ;)
This has apparently been the case for at least a couple years now. Oddly, I have only really found this slender article discussing the issue here: https://meyering.net/nuke-your-DSA-keys/ - which was apparently written 7 years ago in 2010 - indicating the presence of an underlying vulnerability, and a full five years before the release of OpenSSH 7.0 (released August, 2015) where DSA support was finally dropped entirely.
SSH port forwarding/tunneling also seems pretty broken on WSL (at the very least it doesn't seem able to integrate with any real mechanism for name to number resolution, i.e. the /etc/hosts file appears at times as though it just gets ignored completely - or is perhaps less "authoritative" than the Windows-native "hosts" file. What this means is that you will typically need to use an ip address rather than the fqdn/hostname (including 127.0.0.1 instead of localhost) - unless the address would appear resolvable by a local/internal DNS server. You will also likely need sudo privileges in order to execute aliases/functions which may be configured to use "privileged ports" (which are really most network aliases/functions).
In fact, I was never really able to get ssh port-forwarding to work natively in WSL - and perhaps collaterly why I started seeing the host key verification failures mentioned above - so you might be better served by using a native Windows app like PuTTY to accomplish this (I can report that this works quite well, if a little less intuitively in terms of initial setup than I had expected...). I won't document it here, but be on the lookout for another setup guide here on Github featuring my transparent, muti-hop solution featuring ConEmu/PuTTY/Pageant and oh-my-zsh plugins to create a session "index" for several different types of encrypted tunnels/port mappings :)
Update: I was finally able to get ssh multiplexing to work, which has all but completely eliminated a massive number of obstacles for me... I'd describe this particular discovery as really the Sysadmin equivalent of feeling an immediate surge of supernatural power after being bitten by some weird glowing orange spider, or a sudden shirt-shredding green pectoral enormity after absorbing the entire radioactive, yet particularly nutrient-dense payload from an oddly unscrupulous, negligently-controlled yet curiously well-funded experiment featuring a highly-concentrated mix of weapons-grade plutonium, Human Growth Hormone, high-enzyme wheatgrass, and particularly viscous fish oil supplements :)
Since I'm constantly forgetting how these differ, and I suspect I'm not the only one who could use a decent reminder:
| Command | HOME=/root | Uses root's PATH | Corrupted by user's env vars |
|---|---|---|---|
sudo -i |
Y | Y (#2 below) | N |
sudo -s |
N | Y (#2 below) | Y |
sudo bash |
N | Y (#2 below) | Y |
sudo su |
Y | N (#1 below) | Y |
- PATH=/usr/local/sbin:/usr/local/bin:/usr/sbin:/usr/bin:/sbin:/bin:/usr/games probably set by /etc/environment
- PATH=/usr/local/sbin:/usr/local/bin:/usr/sbin:/usr/bin:/sbin:/bin:/usr/X11R6/bin
In short, you probably want sudo -i most of the time (which is the same as sudo su -) - or it's opposite (i.e. take your environment with you) which is sudo -E.
- Some themes I found for ConEmu: https://github.com/joonro/ConEmu-Color-Themes
- Gruvbox color scheme for ConEmu: https://gist.github.com/circleous/92c74d284db392a950d64a2b368517a1
- Solarized-dark color scheme for ConEmu: https://github.com/mattcan/solarized-gedit/blob/master/solarized-dark.xml
Definitely check out Boxstarter here. Install it with chocalatey, the awesome package manager for Windows! Here are some links to a few gists for use with Boxstarter:
- https://gist.github.com/jessfraz/7c319b046daa101a4aaef937a20ff41f
- https://gist.github.com/NickCraver/7ebf9efbfd0c3eab72e9
- In addition to installing Docker for Windows I also had to open up Powershell and run this:
Enable-WindowsOptionalFeature -Online -FeatureName:Microsoft-Hyper-V -All
- which was necessary to get Hyper-V fully installed. Note: Due mainly to build limitations, I've yet to get Docker working on my system.
- Although I ultimately didn't get very far with golang on my initial build, I have had success with it on a more recent Windows 10 build, so ymmv. The Github repo and basic instructions are available here. First, run the installer with:
zsh < <(curl -s -S -L https://raw.githubusercontent.com/moovweb/gvm/master/binscripts/gvm-installer)- or if you're using bash as your shell, substitutebashforzsh.
- I had to also install the following dependencies:
sudo apt-get install binutils bison gcc make
- Before you'll be able to install and use more recent golang versions, you'll first need to "bootstrap" gvm by installing, then using go1.4:
gvm install go1.4gvm use go1.4
- Then, you can do a
gvm listallto show all versions up to the most recent.
- For example, install version go1.9.1 with:
gvm install go1.9.1- Upon completion, it should display:
Installing go1.9.1...
 * Compiling...
go1.9.1 successfully installed!
- You will now be able to swiftly and easily switch among different golang versions :)
Install pyenv
Update: Unfortunately, I've had to turn off pyenv for the moment as it totally cripples WSL for me. I'm still looking for a workaround on this, and have been thinking about possibly using something like Presto instead of oh-my-zsh...anyway, hit me up if you may have found a solution. pyenv remains a dev tool I'm keen to continue using.
- First, you'll probably need to install this stuff (so that things like bzip2 and sqlite work correctly):
sudo apt-get install -y make build-essential libssl-dev zlib1g-dev libbz2-dev \
libreadline-dev libsqlite3-dev wget curl llvm libncurses5-dev libncursesw5-dev \
xz-utils tk-dev
- Install pyenv with:
bash < <(curl -L https://raw.githubusercontent.com/pyenv/pyenv-installer/master/bin/pyenv-installer)
- Add this to your .zshrc/.bash_profile, etc.:
# Load pyenv automatically by adding

export PATH="${HOME}/.pyenv/bin:$PATH"
eval "$(pyenv init -)"
eval "$(pyenv virtualenv-init -)"
- Update pyenv:
pyenv update
- Install some pythons:
# You can list available versions with:
pyenv install -l
# Then install with:
pyenv install 3.5.2
- Once you have installed the versions of python you want, have a look at the docs here: https://github.com/pyenv/pyenv#choosing-the-python-version . In a nutshell, you'll need to use the
pyenv localandpyenv globalcommands to set which versions of python you will want available to different projects.
As I have mentioned, I'm currently trying out using the xfce4 terminal app as discussed here: https://askubuntu.com/questions/827952/a-better-terminal-experience-for-windows-subsystem-for-linuxwsl - which, despite a bit of initial "noise" surrounding the somewhat clunky way I'm starting VcXsrv when using VcXsrv initially (I'm using MobaXterm now without a problem) with xfce4 terminal via a (probably misconfigured) Powershell shortcut, some intermittent VcXsrv crashes, and having to deal with the occassional splash of control characters salted throughout my copy/paste buffer (i.e. stuff like extraneous "200"'s, and ""'s - sometimes "framing" Github repository url's copied by clicking the "copy to clipboard" button, etc.)~ Update this is solved by this: https://www.reddit.com/r/tmux/comments/2xgrf8/garbage_characters_printed_to_screen_after_a/ and now that I'm understanding "bracketed paste mode" a bit better and how to turn this on/off - is actually something I'm now finding more appealing, and perhaps even preferring :) Even with all the issues I was having previously (with the possible exception of the problems I've had with Vagrant/Docker) this is still much, much more tolerable than anything else I have tried to date. Microsoft (or frankly any other enterprising/ambitious group of presumably C-coders) would seem to have a pretty significant opportunity here to introduce a real terminal application that could absolutely blow away anything currently available, and really be a suitable compliment to something like VScode - which would certainly go a long way to solidly supporting any claimed committment to developer advocacy :) I'd certainly be interested in hearing from anyone else who may have some thoughts on this (one way or the other).
Here are a few other blog posts I've also found helpful:
- Guide to using Tmux (take a look at the part related to installing xclip if you're having trouble copy/pasting from a remote system...ymmv): http://www.rushiagr.com/blog/2016/06/16/everything-you-need-to-know-about-tmux-copy-pasting-ubuntu/
- Here's the official xfce4-terminal docs page: http://docs.xfce.org/apps/terminal/start. I hope to offer more insights as I experiment with this.
- Dariusz Parys's dev setup
- David Tran's setup guide
- Andreas Johansson's terminal setup guide
- (Microsoft's) Brian Ketelsen offers a look at his dev setup here and also here
- Mike Lindegarde's powerlevel9k theme setup on Windows 10 using (Cygwin-variant) Babun (Also contains some good info on oh-my-zsh plugin configuration).
- Rushi Agrawal's guide to Tmux copy/pasting
- Scott Hanselman's setup
- Jeff Geerling's guide to using Ansible on WSL
- More fonts...
- Although unfortunately this hasn't worked for me yet, (see 'build version' discussion above...) I'm quite happy to endorse the approach offered by "ropnop" here: https://blog.ropnop.com/configuring-a-pretty-and-usable-terminal-emulator-for-wsl/. This approach features the installation of VcXsrv to facilitate the use of the Linux Terminator terminal app.
- Fixing zsh-autocomplete auto-accept: https://jee-appy.blogspot.com/2017/06/tab-completion-is-not-working-oh-my-zsh.html
- This is great: https://nickjanetakis.com/blog/using-wsl-and-mobaxterm-to-create-a-linux-dev-environment-on-windows - Wish I would have found this much earlier than I did particularly the portion "WSL, ConEmu and MobaXterm to the Rescue".
I'll be continuing to frequently add/remove/edit items contained within this project (perhaps until I author a proper blog post elsewhere, and make what's here a bit more conventional, i.e. much lighter on editorial, heavier emphasis on clear/concise list of installation/configuration steps ;)