FreeSO Avatar Tool: Exporting and Importing Animations
This page will guide you through how to export, create and import animations for use in FreeSO. I recommend Blender 2.8 or later, as it has a builtin glTF importer and exporter utility. This page will focus on the process with blender
Want to examine or tweak an existing animation in blender? Open up the Avatar Tool from the Volcanic main window, then find and select the animations you want with the search bar. You can match it up with outfits and accessories of your choice, which will be exported along with the animation.
(Avatar Tool TODO, with screenshots)
In Blender, you'll want to make a default project with the correct animation framerate. By default, animations in blender run at 24fps - you'll want to change this to 36fps. Why so specific? That is the framerate that animations in The Sims 1 use. It's essentially 30 frames out of 50 per second - I'm not sure how they ended up with this, but it's how FreeSO syncs animation timing with TS1.
Import the glTF you exported from the Avatar Tool from File>Import. The avatar should appear in the scene with the animation you bound.
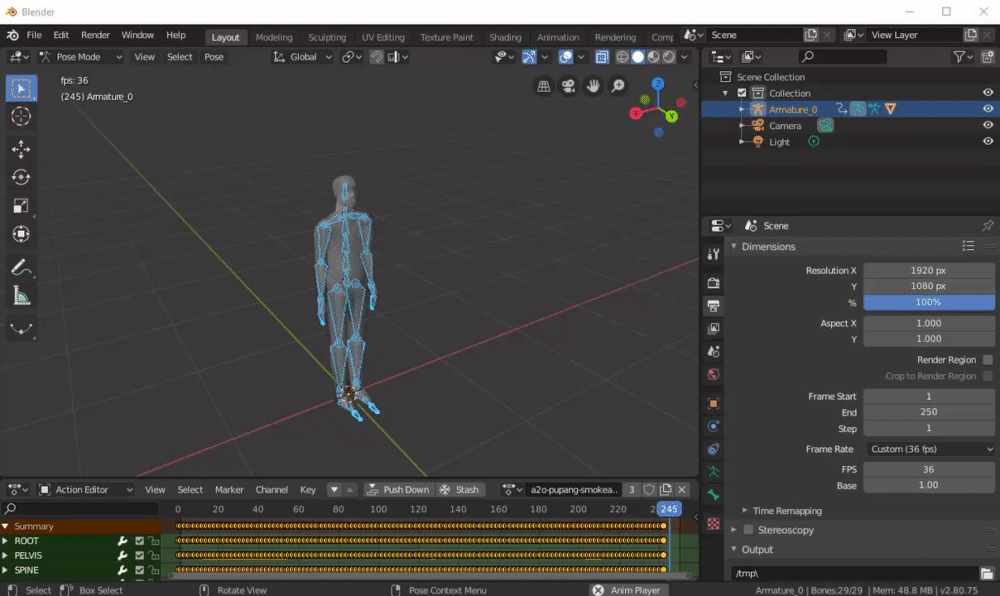
Press space to pause/play the animation that's active. Go to Dope Sheet > Action Editor to choose the active animation. Make sure your animation starts at frame 0 instead of 1. You can freely change the end frame to whatever you want - FreeSO assumes the animation ends with the final keyframe.
NOTE: While blender supports exporting properties as glTF extras, it does not support importing them. As a result, you will not be able to see timeprops in exported animations, though they are present. This section is currently relevant for any future tooling that does support this, and for exporting only.
Animations in the sims have events that fire on a specific time in the animation (measured in milliseconds). There’s not really native support for timed events in glTF or blender, so timeprops work a little unusually for our importer/exporter.
The timeprops for all animations in the file are bound to the scene in blender as “Custom Animations”, aka glTF “extras”. These are key value pairs that essentially look as follows:
timeprop/<frame>/<type> = (number)
Some timeprops have string values rather than number. Since properties in blender can only be floating point numbers, these properties are encoded a little differently, with the real value in the key, and the property value as dummy 1:
timeprop/<millisecond>/<type>=<value> = 1.0
Here are two example timeprops:
timeprop/3000/xevt = 100.0
timeprop/4000/sound=chair_sit_wood
If there are multiple animations in the file, timeprops will apply to all of them by default. For animation specific timeprops, replace “timeprop” with your animation name:
a2o-standing-loop/1000/xevt = 100.0

Above is an example of some timeprops in blender as the scene's custom properties for the animation a2o-pupang-smokears. Note that blender forcibly sorts custom properties alphabetically, which can result in some weird orders relating to the timestamp. The order cannot be changed manually, so be careful when modifying existing events (make sure you've selected the right one)
The most common timeprop. This signals an event to SimAntics, aka the false branch of the Animate Sim primitive. The value is the event ID passed to SimAntics, and is usually 100 based.
Sets the hand of the sim to a given hand type. 0 = idle, 1 = pointing, 2 = fist.
Plays the given sound event with the sim as a source. You can do this manually with an xevt, though later ts1 expansions prefer using this timeprop.
Binds a given appearance to the avatar. This appearance is referenced by its filename without .apr extension. Note that the appearance will stay on the sim even after the animation completes.
Unbinds the given appearance from the avatar. Can unbind appearances bound even outwith other animations.
I’m not an animator, so my experiences with the animation tools and process is limited. However, as long as your animation is correctly set up as a named action, and is created on the armature
The best way to start creating an animation is to export an avatar skeleton + model as described above, then build on it from there. I'd recommend exporting a2o-standing-loop with the default mesh+skeleton to get started (or no animation at all).

To get started making your own animation, make a new action in the action editor. This will clone the existing one. You should name it starting with a2o, and separated with dashes. Underlines and everything after them will be ignored, so feel free to put extra information in there.
Go to frame 0, select all the keyframes and delete them (assuming you want a blank slate). Then, press I and select "whole character" as a base frame. After this point, you're free to zip about the timeline, pose individual bones and set more keyframes by pressing I. I'd recommend setting your coordinate space to "local" when rotating bones. Note that The Sims does not support scaling bones, only rotation and translation.
To move the avatar while animating, make sure you are in pose mode and have selected all the bones! Do not move the armature in Object Mode, as its tranformations are technically outside the armature, so cannot be animated. Note that moving and rotating the armature entirely (not animated) will apply to the root bone automatically on import, so feel free to adjust the base position and rotation that way.

Remember that (0,0,0) is always treated as the avatar's position. When you are animating for an object, place the object RELATIVE to the position the avatar is in during use (eg. what slot they go to).
First you'll want to export your animation from Blender. Use the (.gltf) exporter, but remember to tick "custom properties" in the exporter options. You'll suffer a lot less exporting as (.glb), though if you wish to debug the gltf json I'd recommend glTF + external textures.

The next step is to import your animation ingame. Thanks to the Avatar Tool, this is rather simple. Just click "Import glTF scene" and the animations list should populate with the ones in the imported file.
When you import your animations, they will be temporarily loaded into the content system with -runtime appended to the name, and you can preview it in the animation preview with selected outfits and accessories. You can also go to a BHAV editor and use this runtime animation in scripts - though remember that it only exists temporarily! Importing a new glTF scene or closing the Avatar Tool will remove the animations from the runtime, so don't rely too heavily on unimported runtime animations!
Feel free to go back to Blender and make changes if you notice any issues. I do not recommend re-exporting your animation from FreeSO - keep your Blender project for the animations for making future changes. When you're confident your animation is finished, select all the animations you want (multiselect) and select "Import Selected Animations".
Importing animations saves them to the /Content/Avatars/Animations/User/ folder with the .anim extension. Note that the content system scans the entire /Content/Avatars/ folder - the structure is just to better separate FreeSO distributed avatar content from animations you have created. When you import the animation it will be loaded via the runtime additions content service, but it will be loaded from the file on subsequent runs.
Importing an animation that already exists will warn you, but after clicking yes everything should work on future playback of that animation.
This is TODO, but imported animations will export to the Downloads/AvatarTool folder. They will export in the binary format (.bcf + .cfp), though you will have an option to import as plaintext as well if you're interested in that kind of thing (.cmx + .cfp).
FreeSO is the only tool that exports fully compressed CFP files, so hopefully there aren't too many bugs. Custom animations have not yet been tested in TS1.