-
Notifications
You must be signed in to change notification settings - Fork 287
Tutorials
Please download the code Here. Feel free to fork, propose patches and this will help to update the code regularly.
Click here to check out this video to get a visual on how to build your own SixthSense device.
- Any windows computer/Laptop
- A camera
- Projector (You can also use your Monitor for interaction)
- Colour markers (Like: Red,Yellow,Blue & Green)
-
Adobe Flash player (active x)
-
MS Outlook
-
Internet connection is also required
So here we go
- After downloading the code from Github, uncompressed the zip file to any location in your computer (Ex: F:\sixthsense-sixthsense-4e155fc)
- Now open MS Outlook for running the Mail app( without outlook you may get errors )
- Now click on WUW01. Fig.1
- A Window appears Fig.2. Now click F5 to debug it.(Make sure you're connected to the internet)
- A Black window appears as in Fig.3 . There are certain options like camera,Tokens and apps
- Here you can select the camera you want to use from the drop down options.
- If you are having multiple cameras you can select from those option or if you have single camera it will automatically start capturing.
- You can also adjust your camera settings (Brightness,contrast,..etc) by clicking on "Adjust Camera Properties".
-
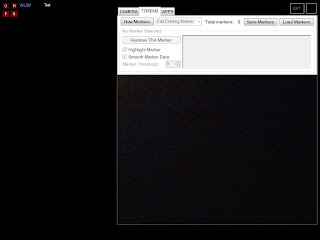
Click the "New Marker" button, you will see the camera flickering 3 times, during this period you will have to position you fingers (with the markers) in front of the camera and on the 3rd flicker you will have a still image.
-
Now simply drag the mouse over the markers with small circles that should only cover the part of the marker,repeat this process four times for the four markers (M,N,O & P)
-
Add the colour markers in the order : Red ,Yellow ,Blue & Green Fig.4
-
You can also check this video for adding colour markers : How to add markers
Some apps are listed below:
- You can see whether the four markers are being tracked and moving while you are moving those particular markers that is on the fingers. Fig.5
- The red marker (M) draws when the yellow marker (N) is hidden.When both the markers are visible you can move the mouse pointer to select different colours or eraser,etc Fig.6
- Make a rectangle with your pointer fingers and thumbs and when the gesture is recognized,the countdown starts
- Remove you hands from the camera frame to capture the desired photo. (The countdown lasts for 3 secs) Fig.7
- Displays the photos that you have taken Fig.8
- Displays a list of email from outlook (required that MS Outlook be running for this to work)
- Displays a weather app that can be localised to your area.Fig.9
- Displays 16 stocks values real time, use the slider at the bottom of the projected display to set the time scale.
- Play with beautiful wavy lines and explore your imagination.Fig.10
- It projects newspaper stories and related videos from Youtube or other web sites,directly onto the surface of the paper.Fig.11
- For book-recognition,the program gets activated with a gesture, and the system snaps a photo of the book, compares it with book-cover images it finds online, computes a match, and retrieves and projects the ratings.Fig.12
- An Analog clock will be projected by doing a circle gesture. Fig.13
- Displays different menu icons.Fig.14
(Note: Click on the Figs. to get the pictures.)