Sigfox EU MKRFOX1200
You will how to program an Arduino board to read sensor data, send and visualise it using Sigfox network and Soracom Harvest.
-
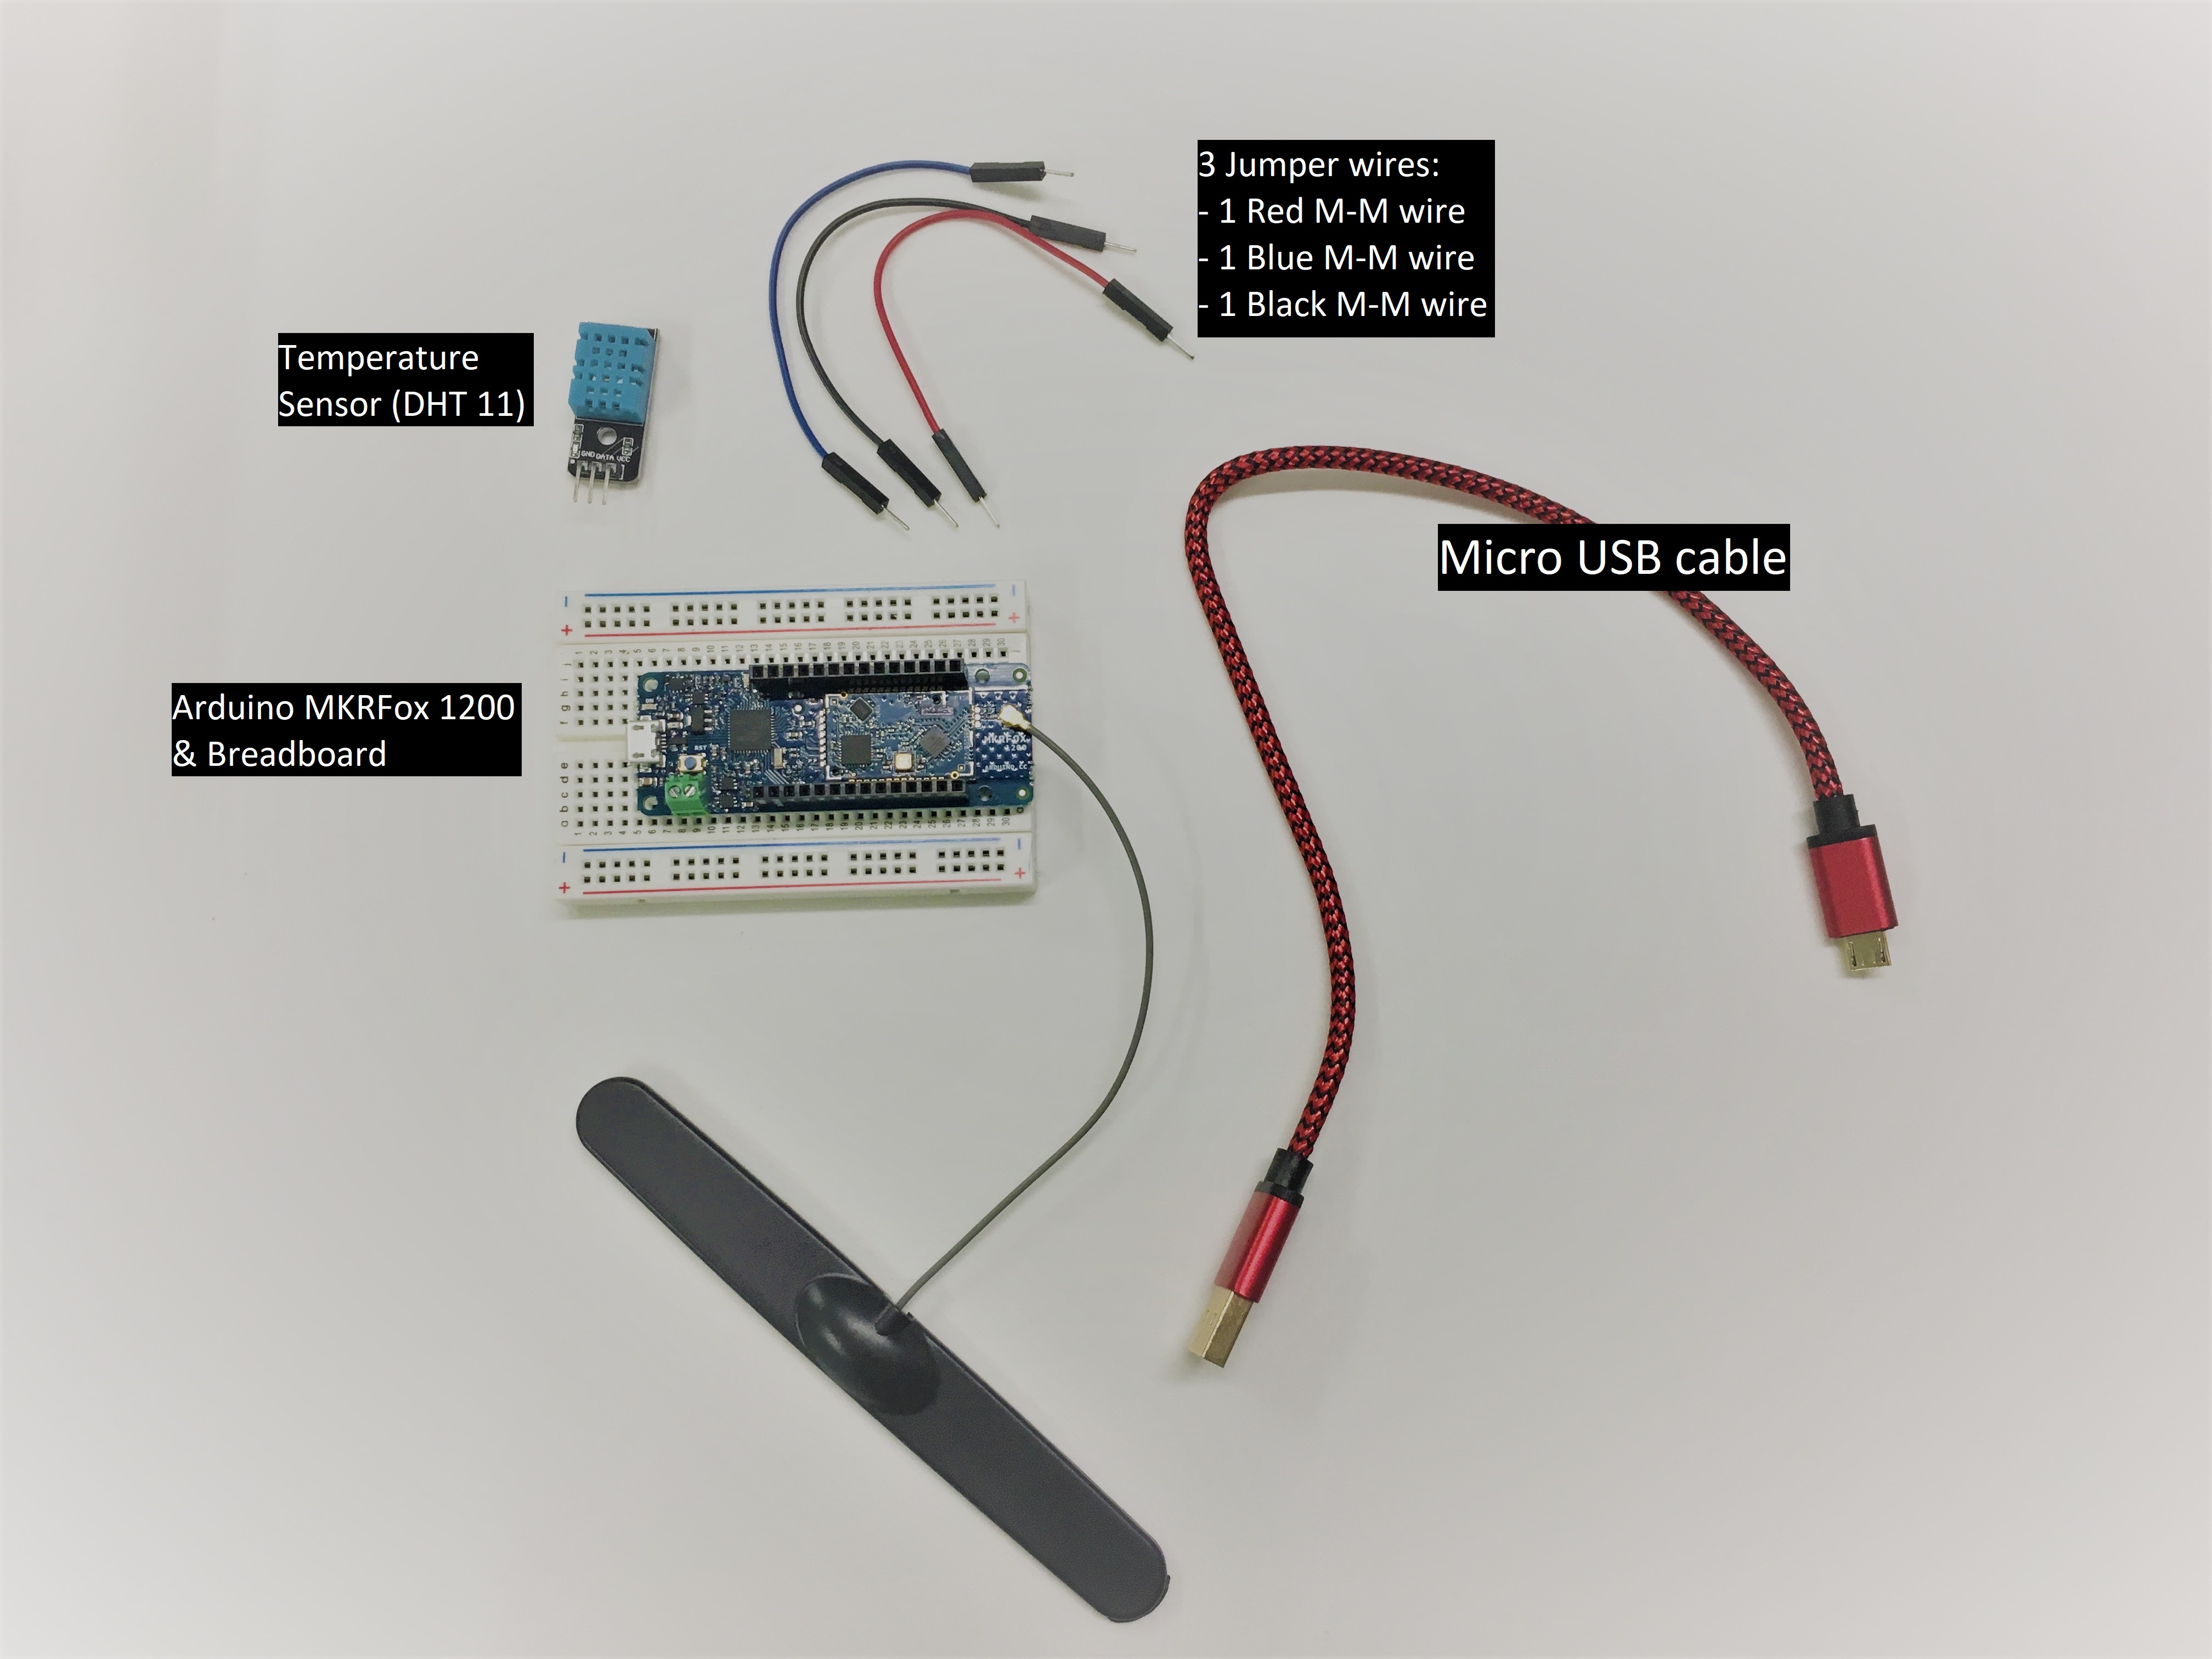
Arduino MKRFox1200
-
Solder-less Breadboard
-
DHT11 Temperature and Humidity Sensor
-
3 x Jumper wires
-
Picture image
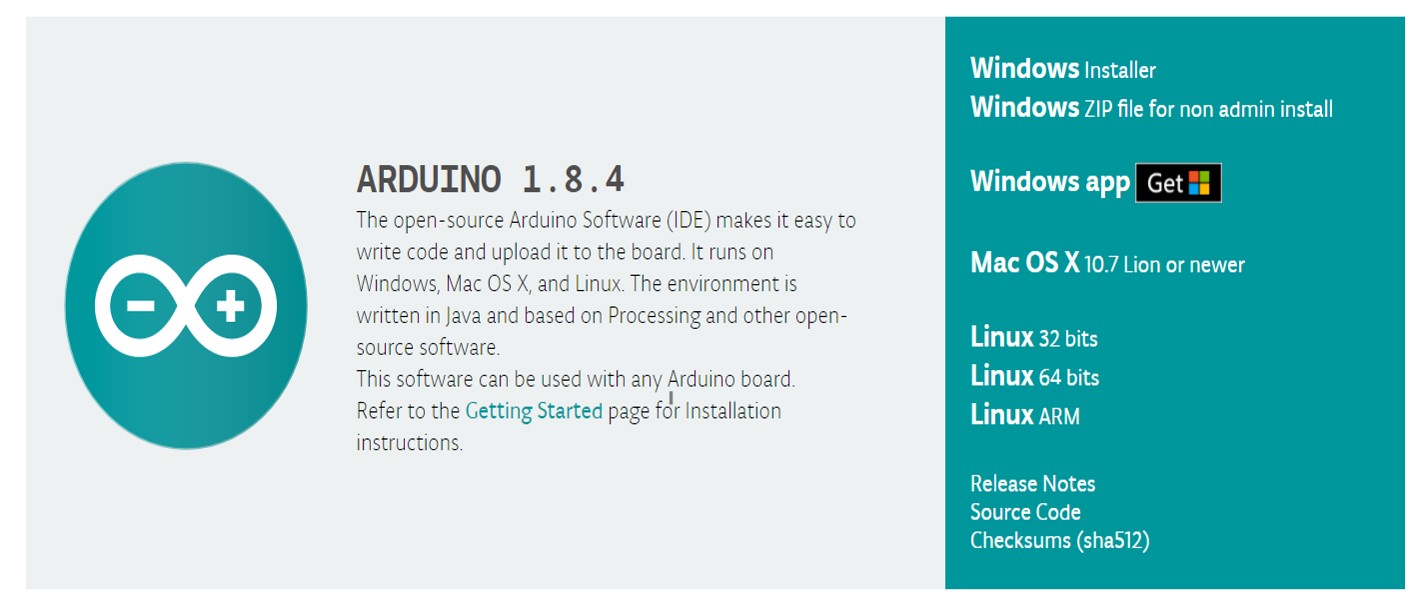
You can download it here Arduino IDE
- Download Page
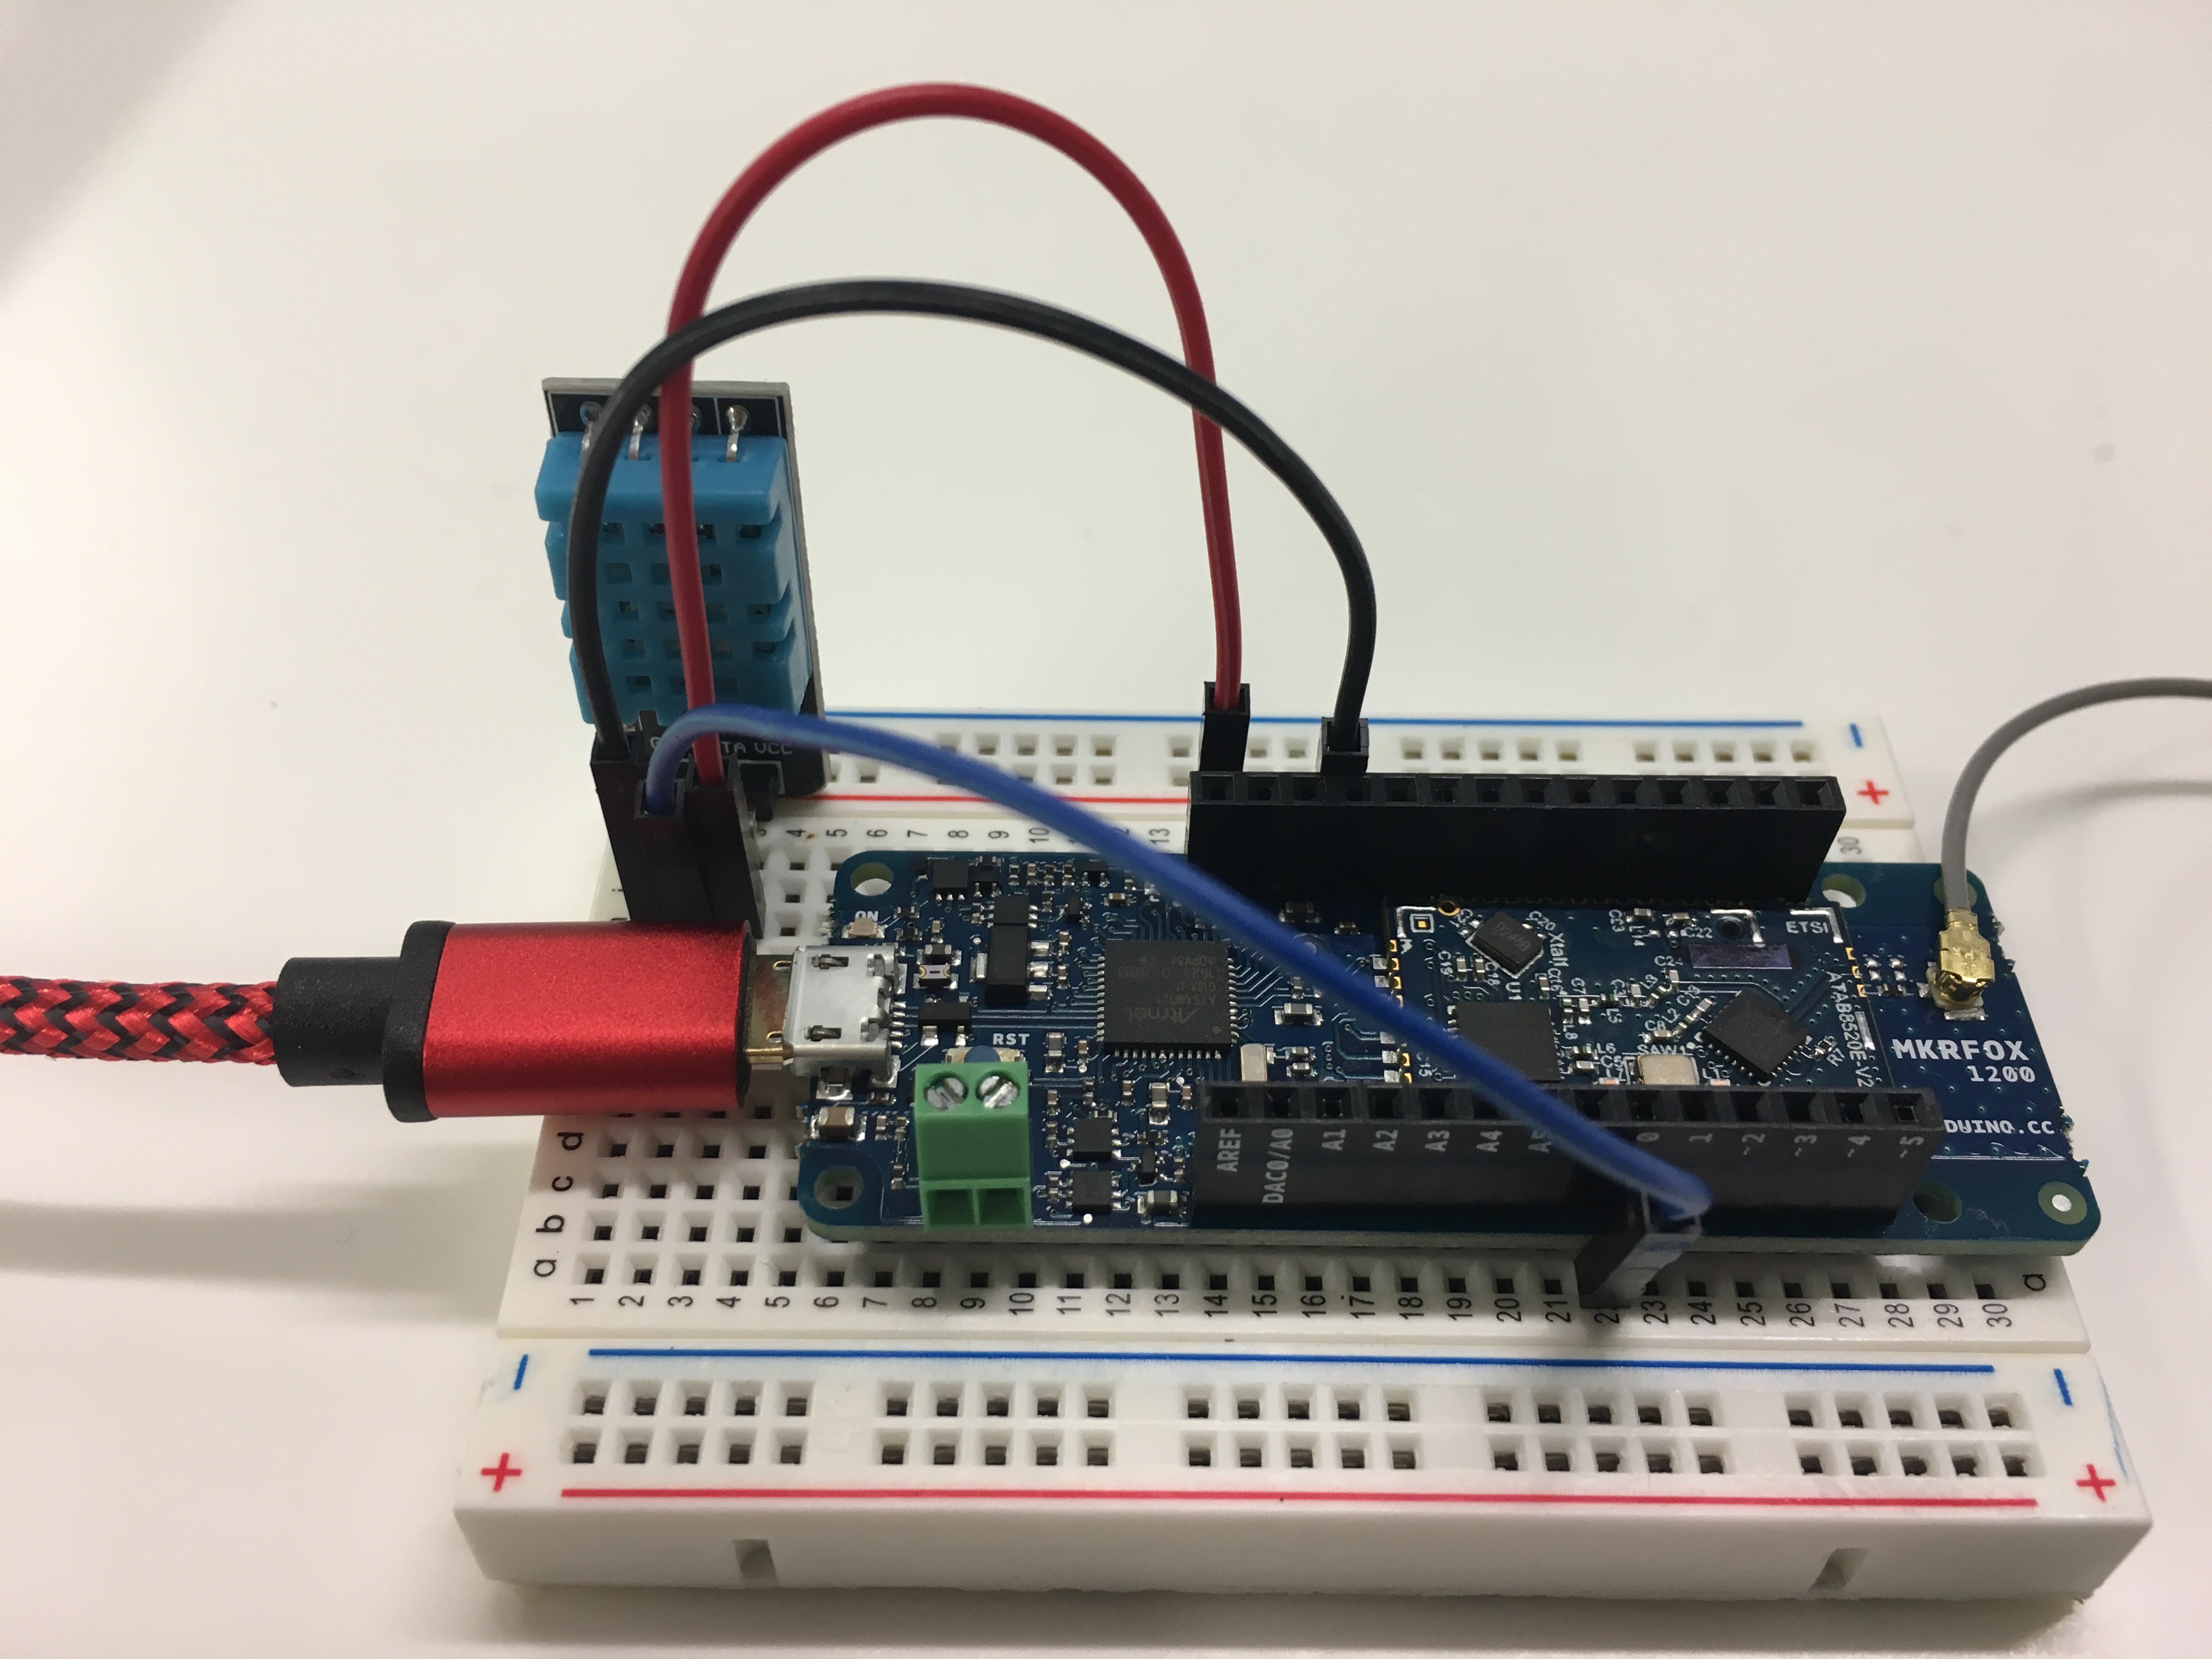
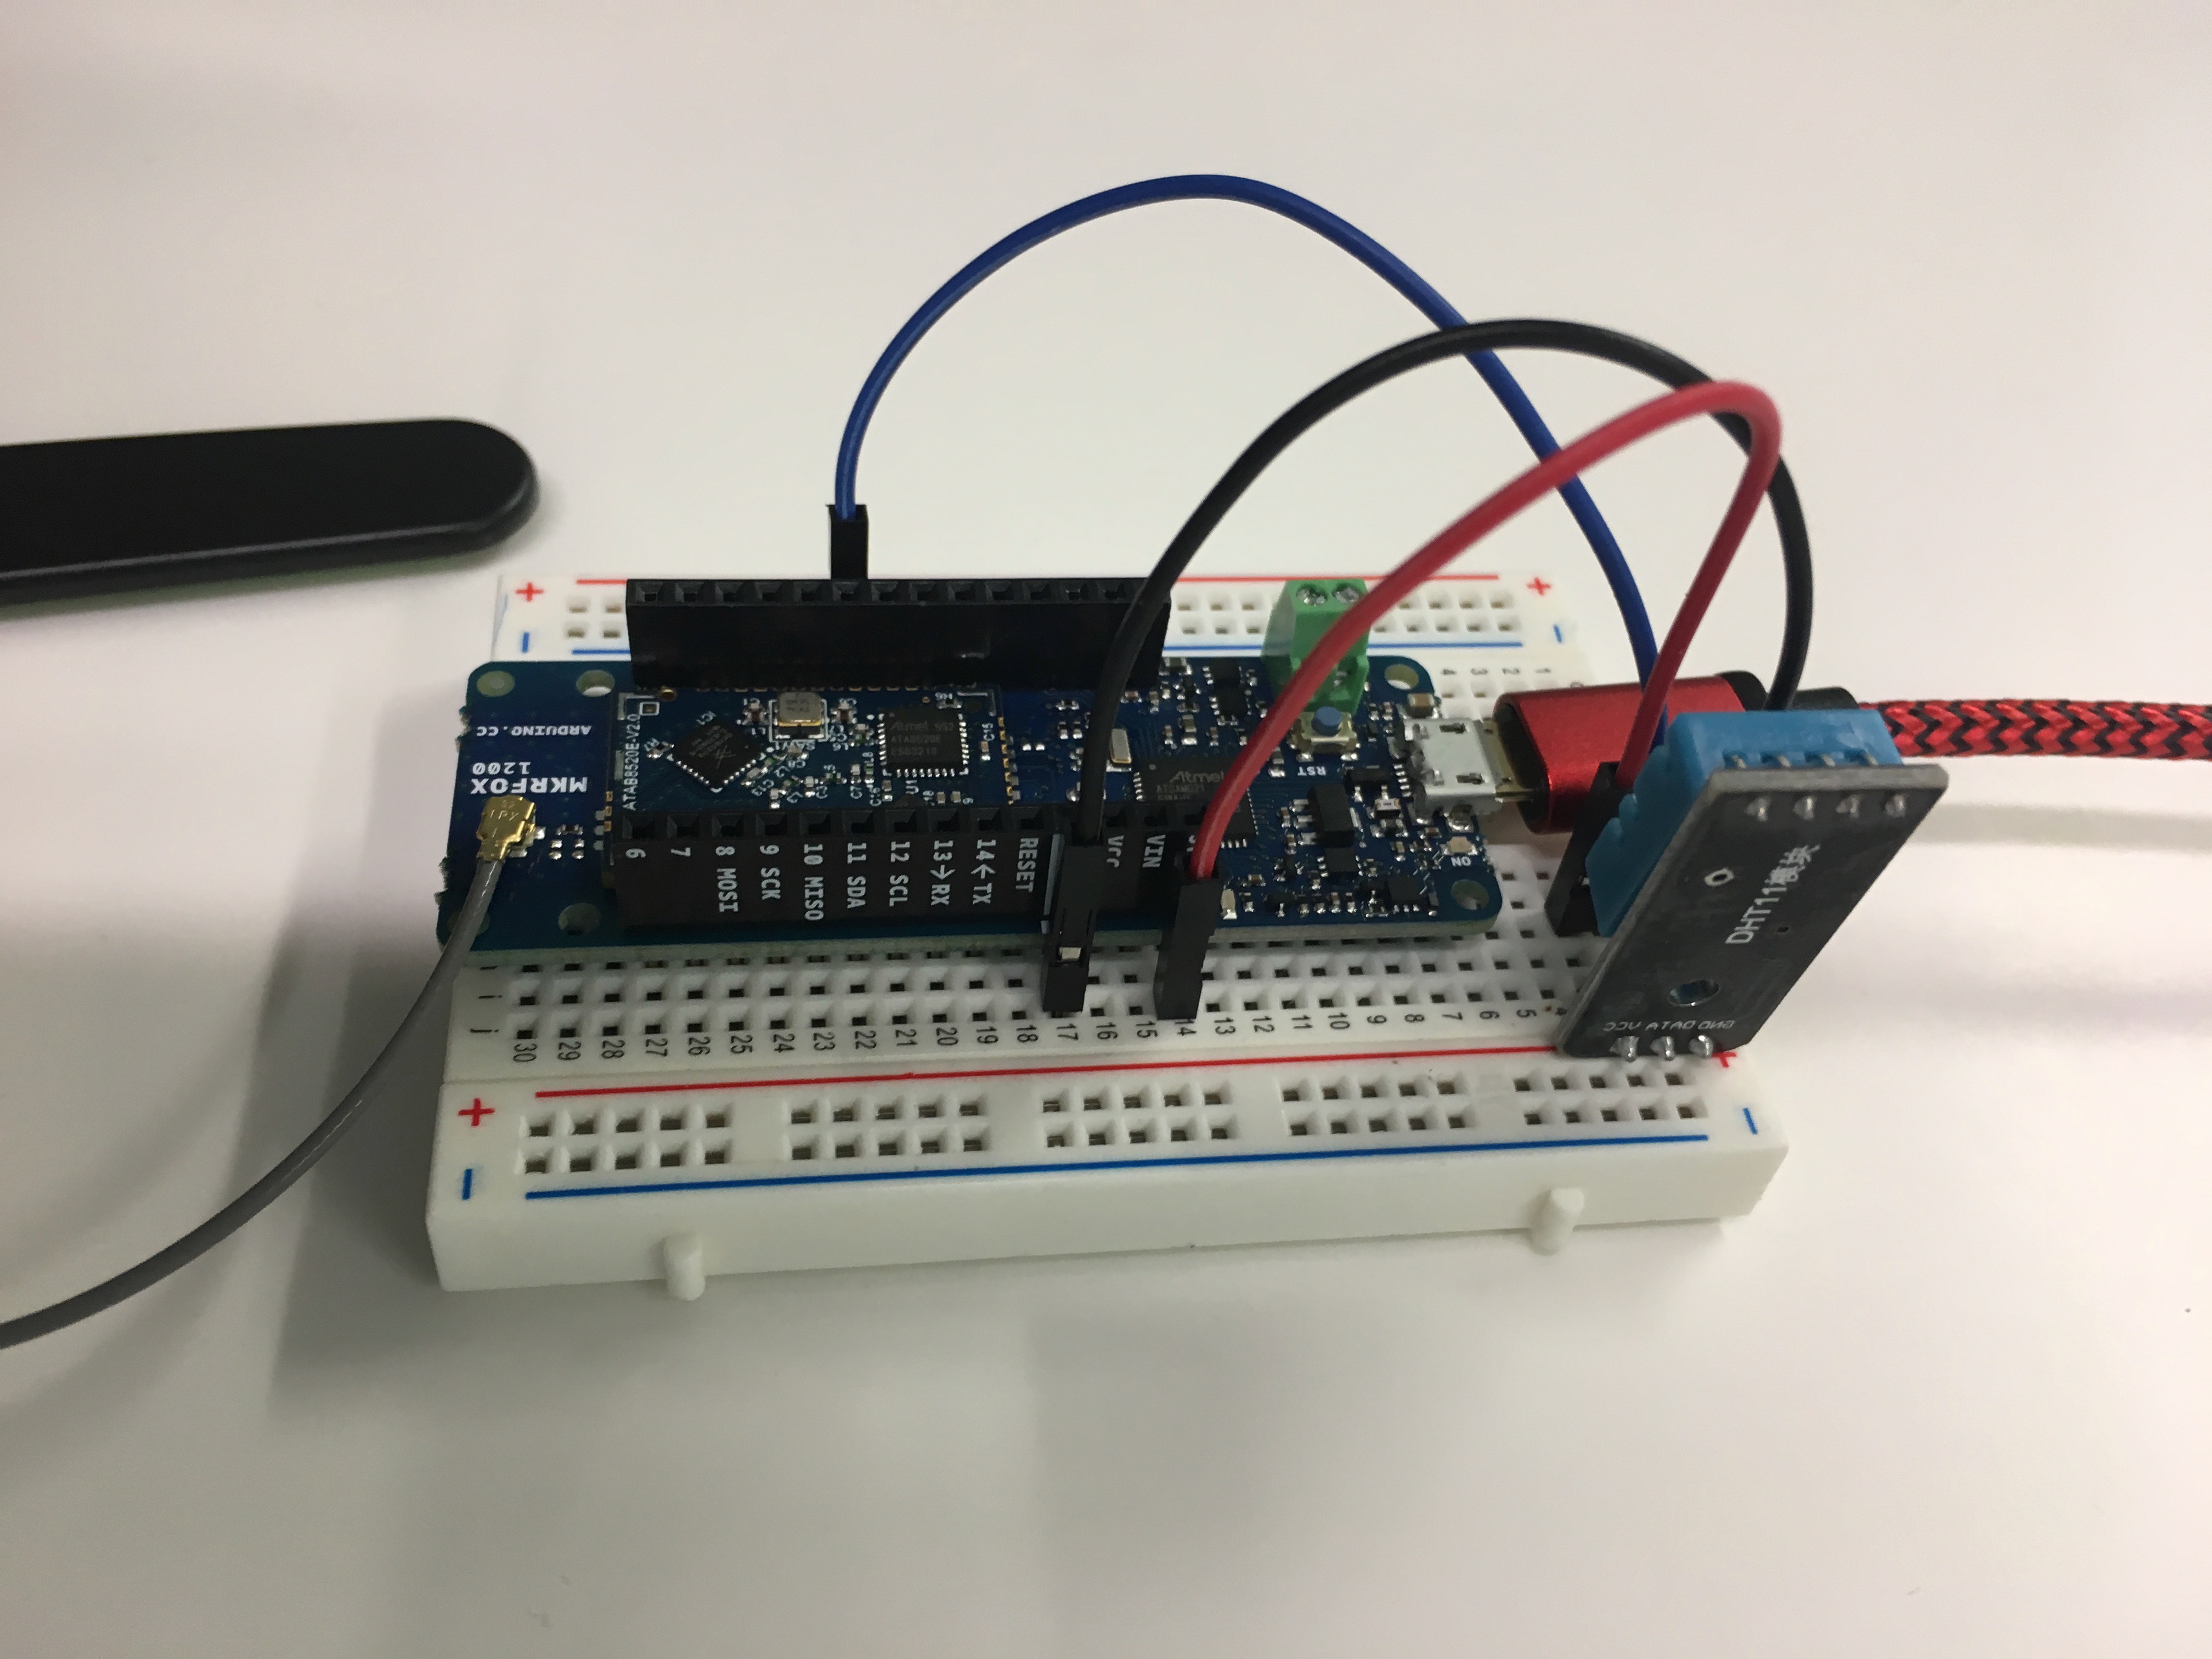
You will now wire your Arduino Micro together with DHT11 sensor.
Please be especially careful with the placement of red and black wires as a mistake could break the electronics.
You can wire everything as follow:
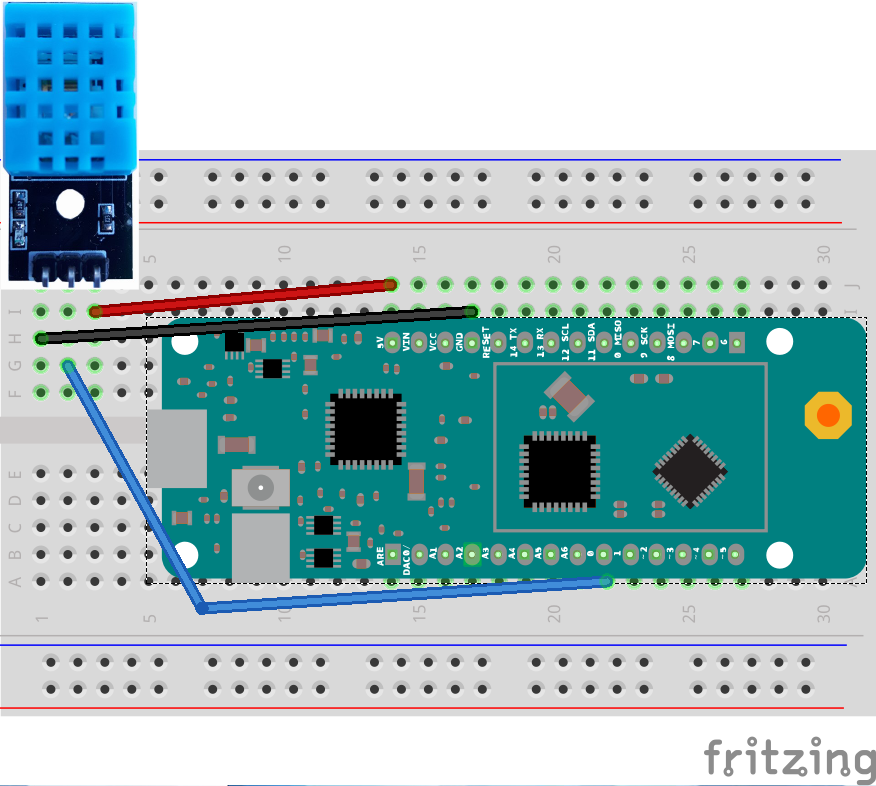
- Picture image [Top]
- Picture image [Right]
- Picture image [Left]
We will now open Arduino IDE and install additional board and libraries support
- In Arduino IDE Click on Sketch > Include Library > Manage Libraries
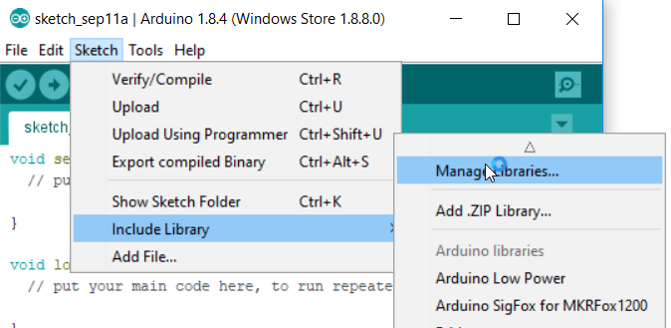
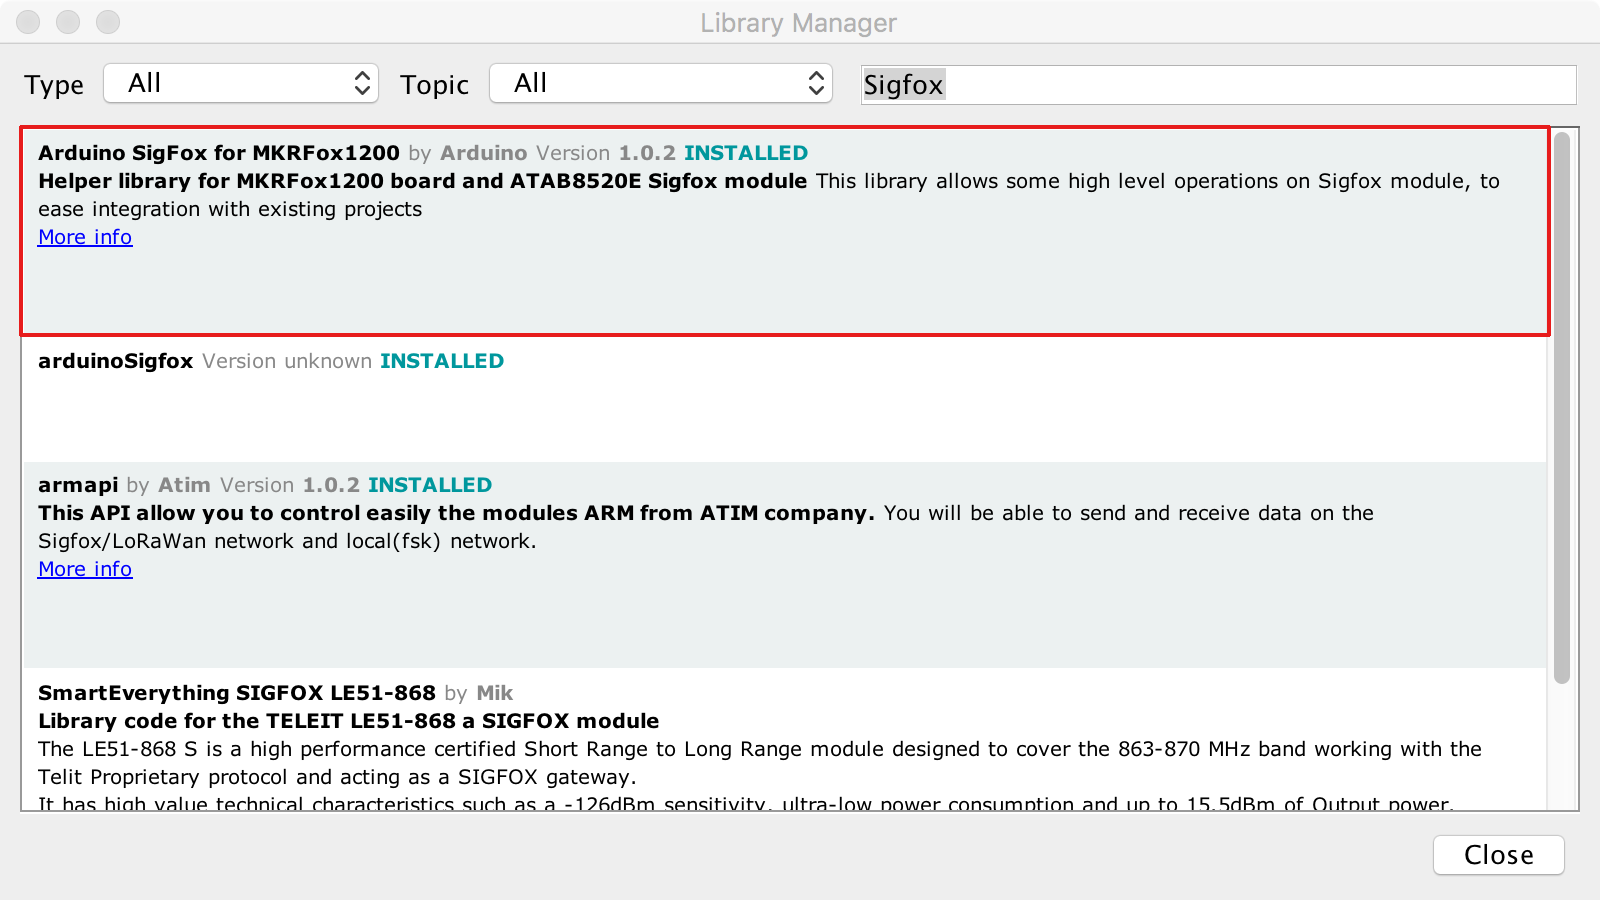
- There you can search for 'Sigfox' and should the 'Arduino SigFox for MKRFox1200' library. Click on it and install it
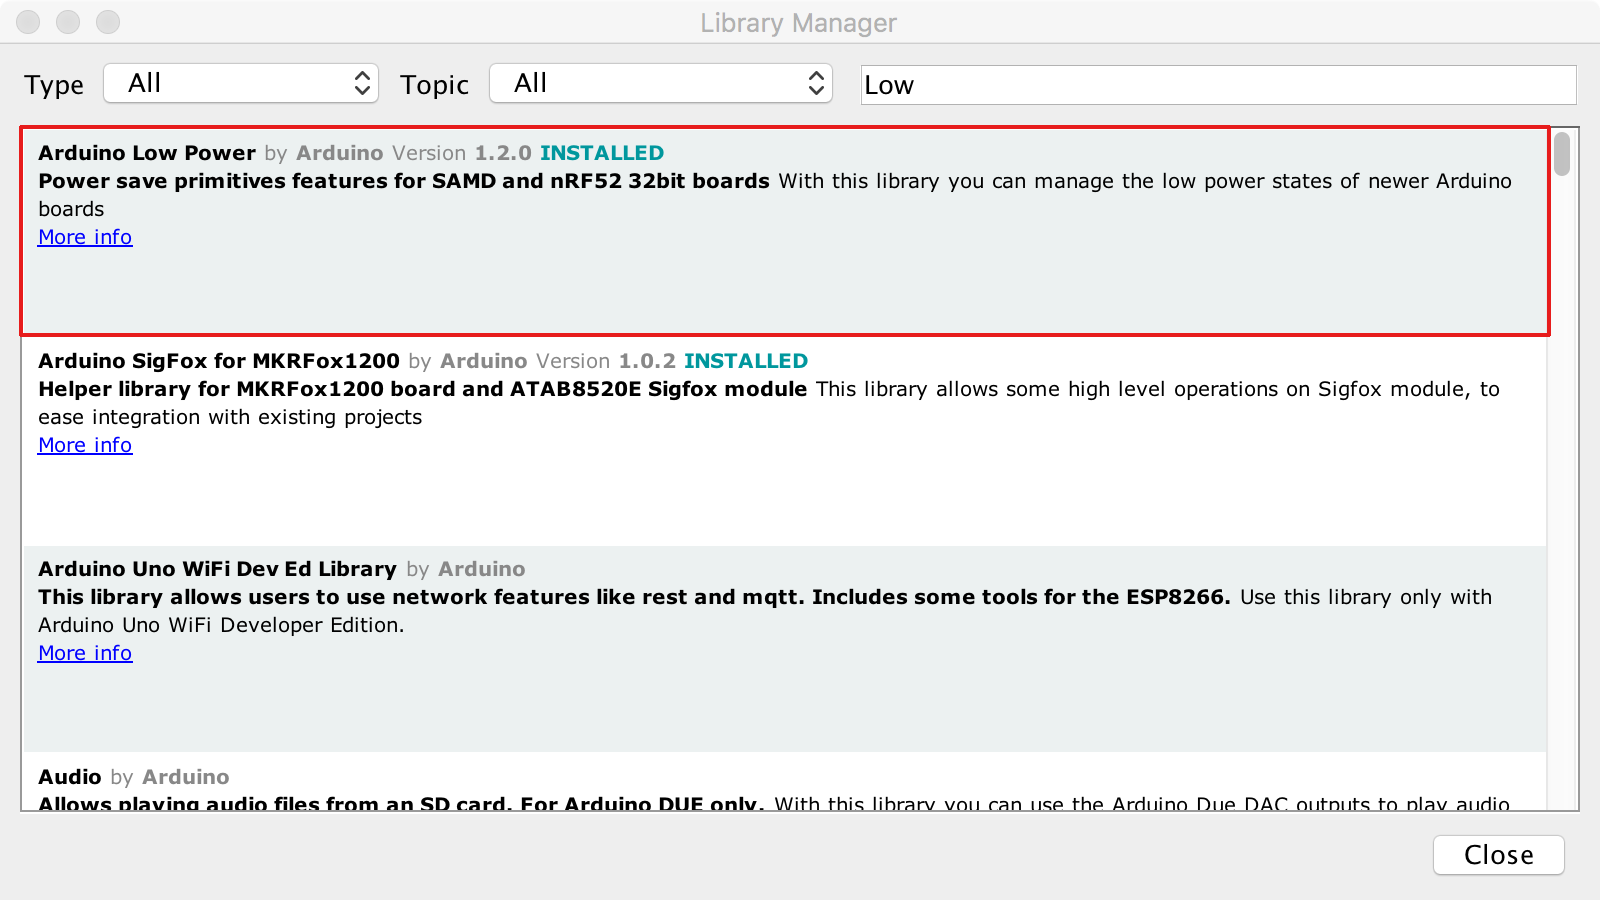
- now, search for 'Low Power' and should the 'Arduino Low Power' library. Click on it and install it
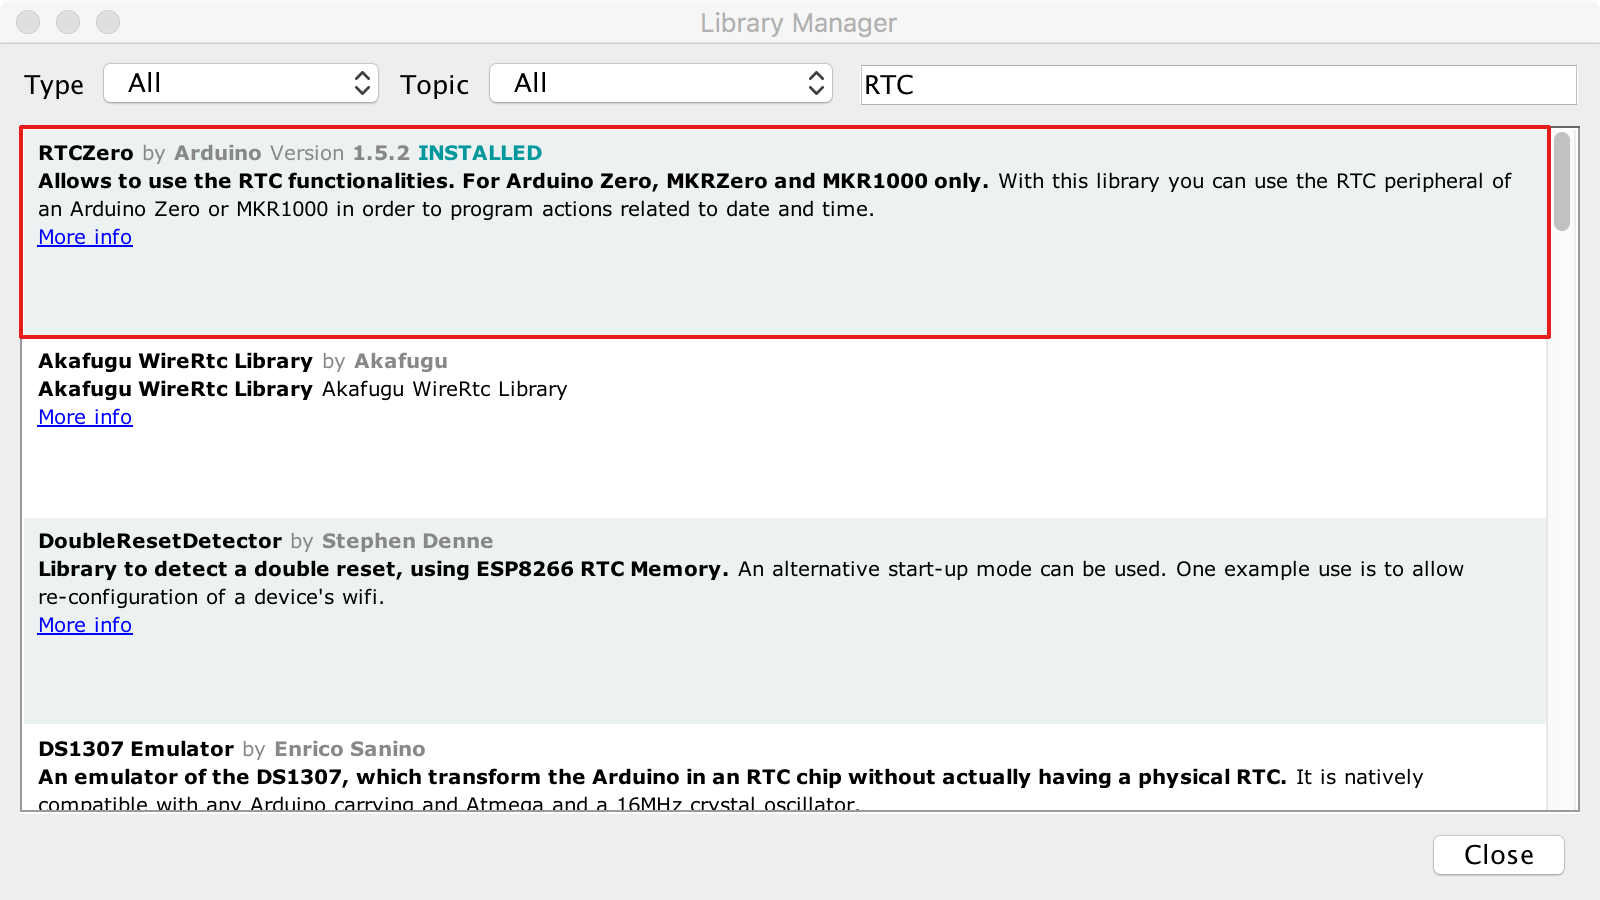
- finally, search for 'RTC' and should the 'RTCZero' library. Click on it and install it
Now that you have libraries installed, install MKRFox1200 board support
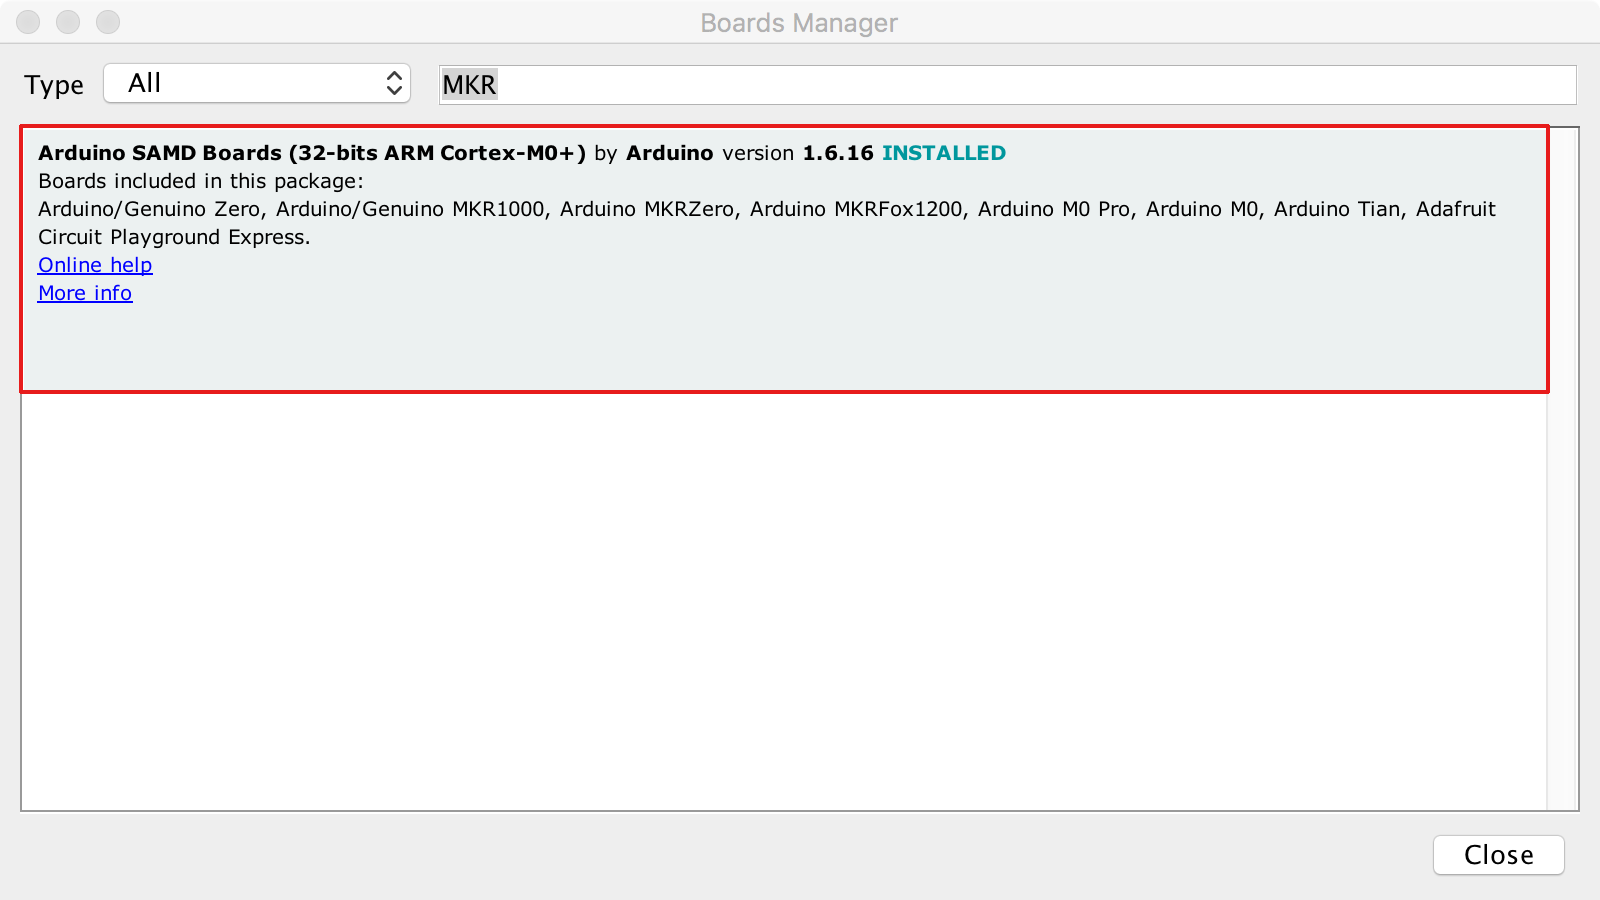
- In Arduino IDE Click on Tools > Board > Boards Manager

- There you can search for 'MKR' and should the 'Arduino SAMD Boards' board. Click on it and install it
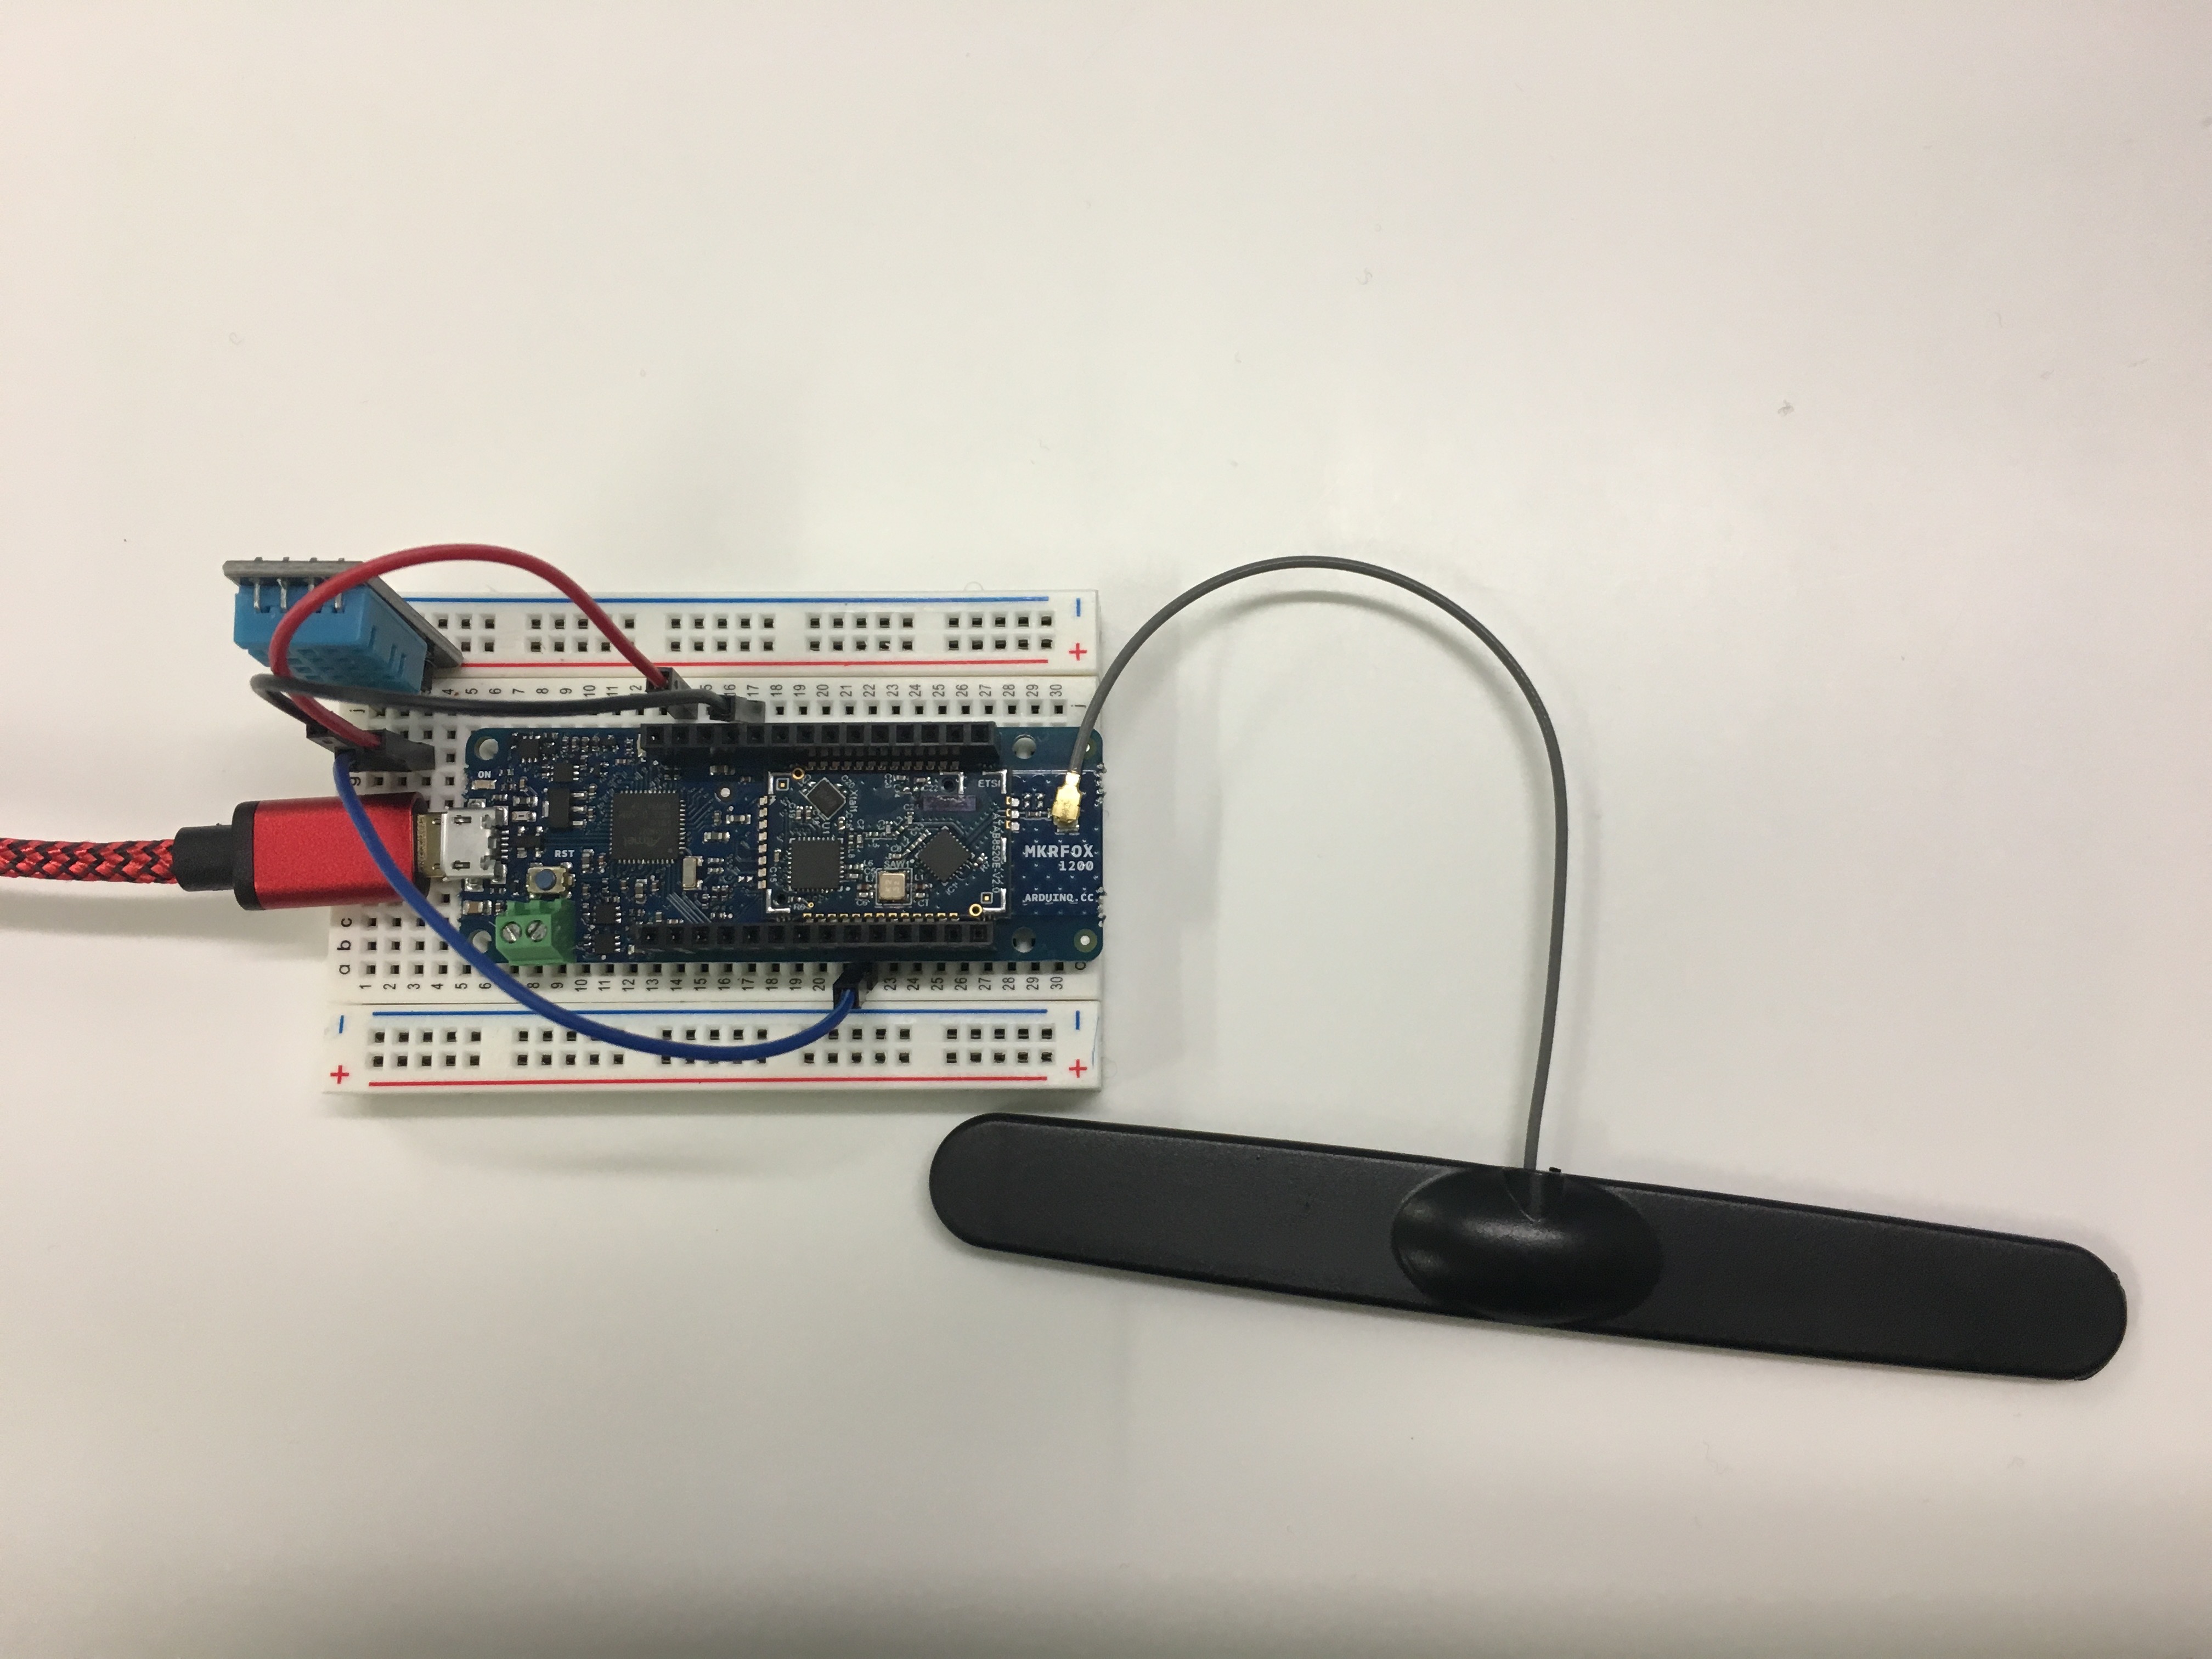
Now that your Arduino and Sensor are wired, you can connect it to your computer via USB.
We will now open Arduino IDE and program the Arduino MKRFox1200 in order to read your Sigfox module ID and PAC
Upload the following code on your Arduino Micro:
/*
 * Soracom MKRFox1200 Sigfox Workshop
 *  Find device's ID and PAC
 */

#include "SigFox.h"
#include "ArduinoLowPower.h"

void setup() {
  Serial.begin(9600);
  while (!Serial) {};

  // Uncomment this line and comment begin() if you are working with a custom board
  //if (!SigFox.begin(SPI1, 30, 31, 33, 28, LED_BUILTIN)) {
  if (!SigFox.begin()) {
    Serial.println("Shield error or not present!");
    return;
  }
  // Enable debug led and disable automatic deep sleep
  // Comment this line when shipping your project :)
  SigFox.debug();

  String version = SigFox.SigVersion();
  String ID = SigFox.ID();
  String PAC = SigFox.PAC();

  // Display module informations
  Serial.println("MKRFox1200 Sigfox first configuration");
  Serial.println("SigFox FW version " + version);
  Serial.println("ID  = " + ID);
  Serial.println("PAC = " + PAC);

  Serial.println("");

  delay(100);

  // Send the module to the deepest sleep
  SigFox.end();
}

// the loop function runs over and over again forever
void loop() {
    // Wait forever
    while(true);
}
Before run 'verify' and 'upload' the code, make sure the right 'board' is selected.
- Go to 'Tools' in the menu, 'Get board info' and select 'Arduino/MKRFox1200'.
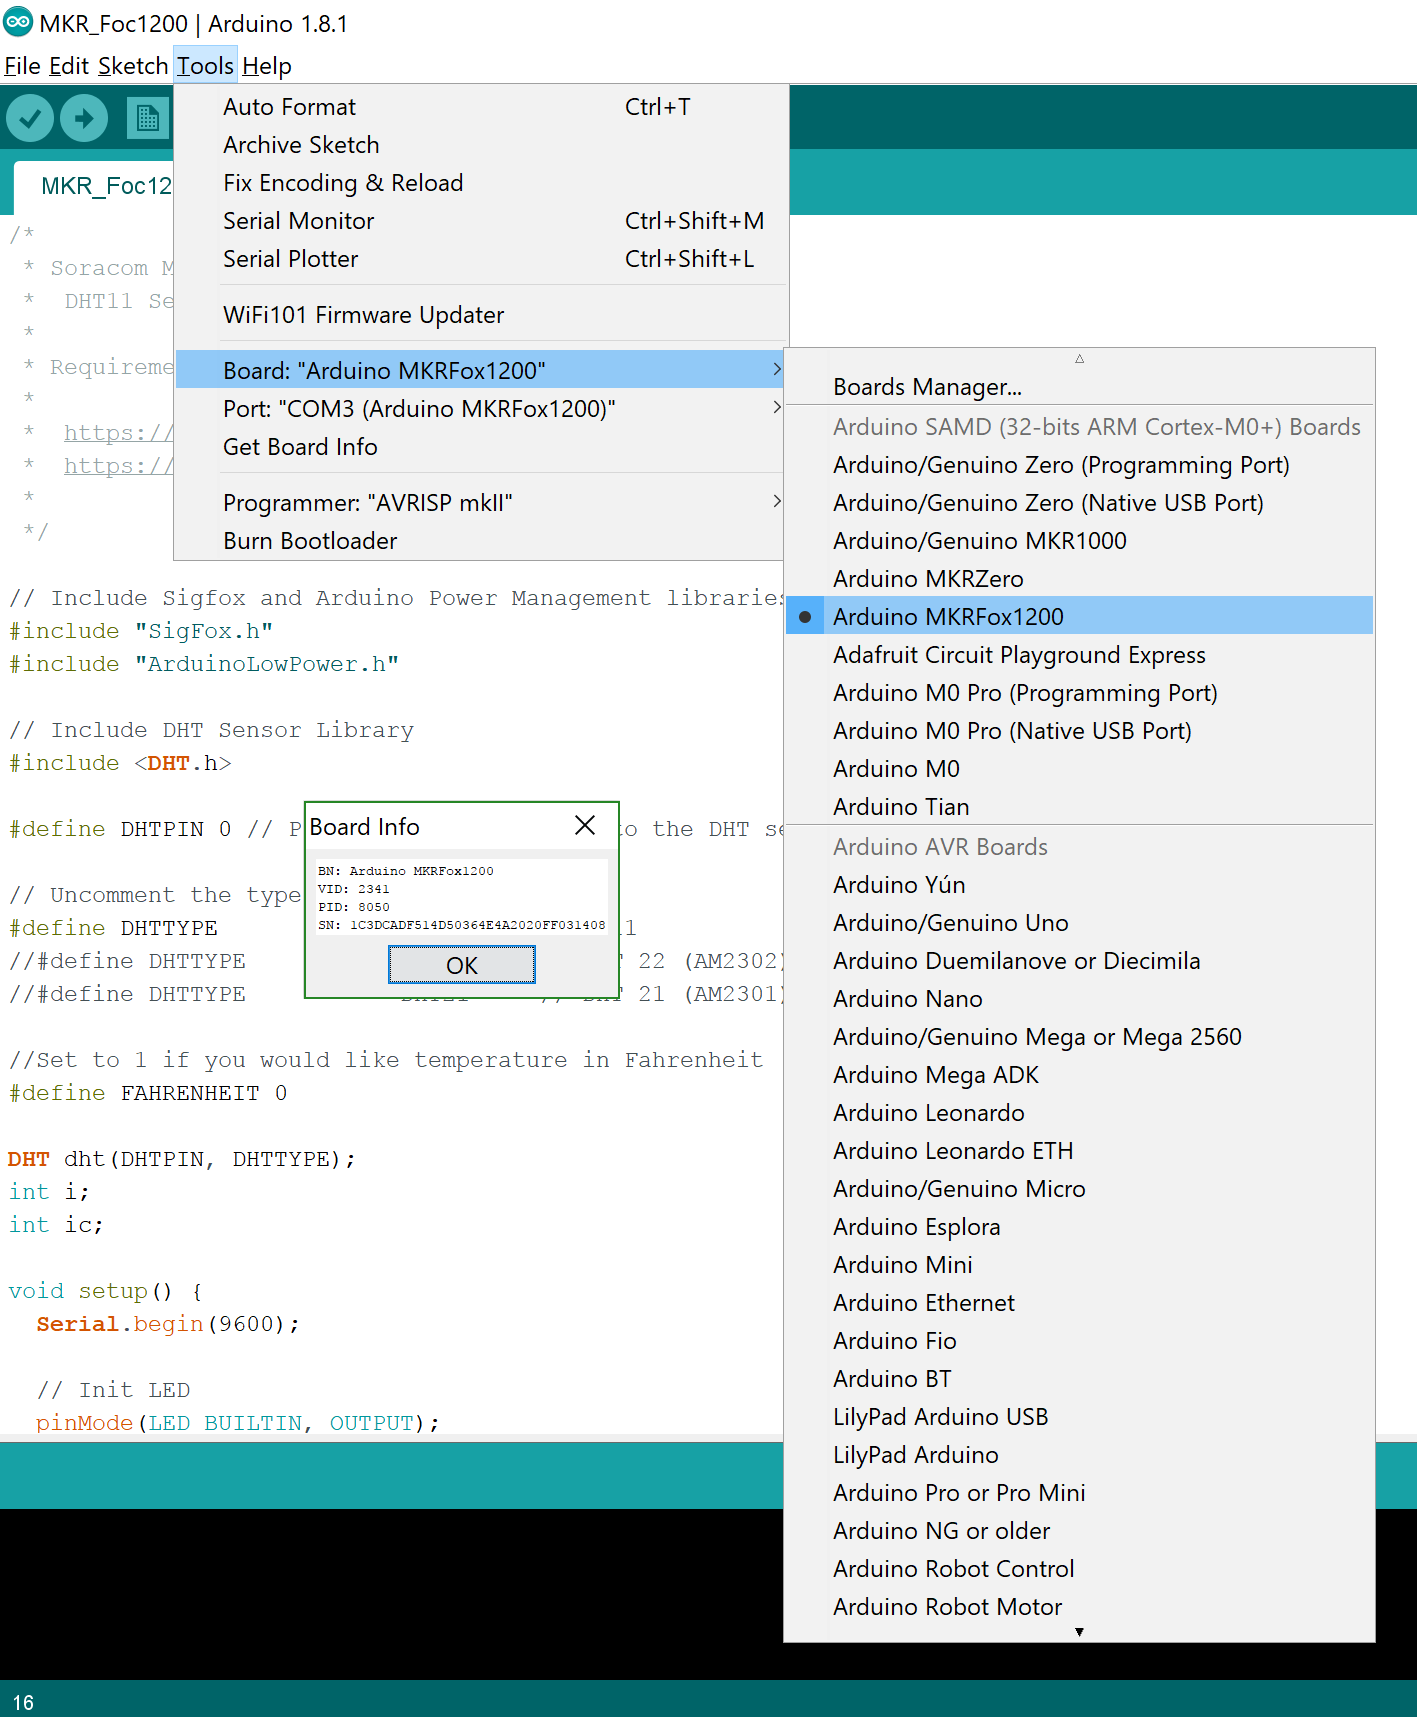
- Go to 'Tools' in the menu, 'Port' and select 'COMxx (Arduino/MKRFox1200)'.
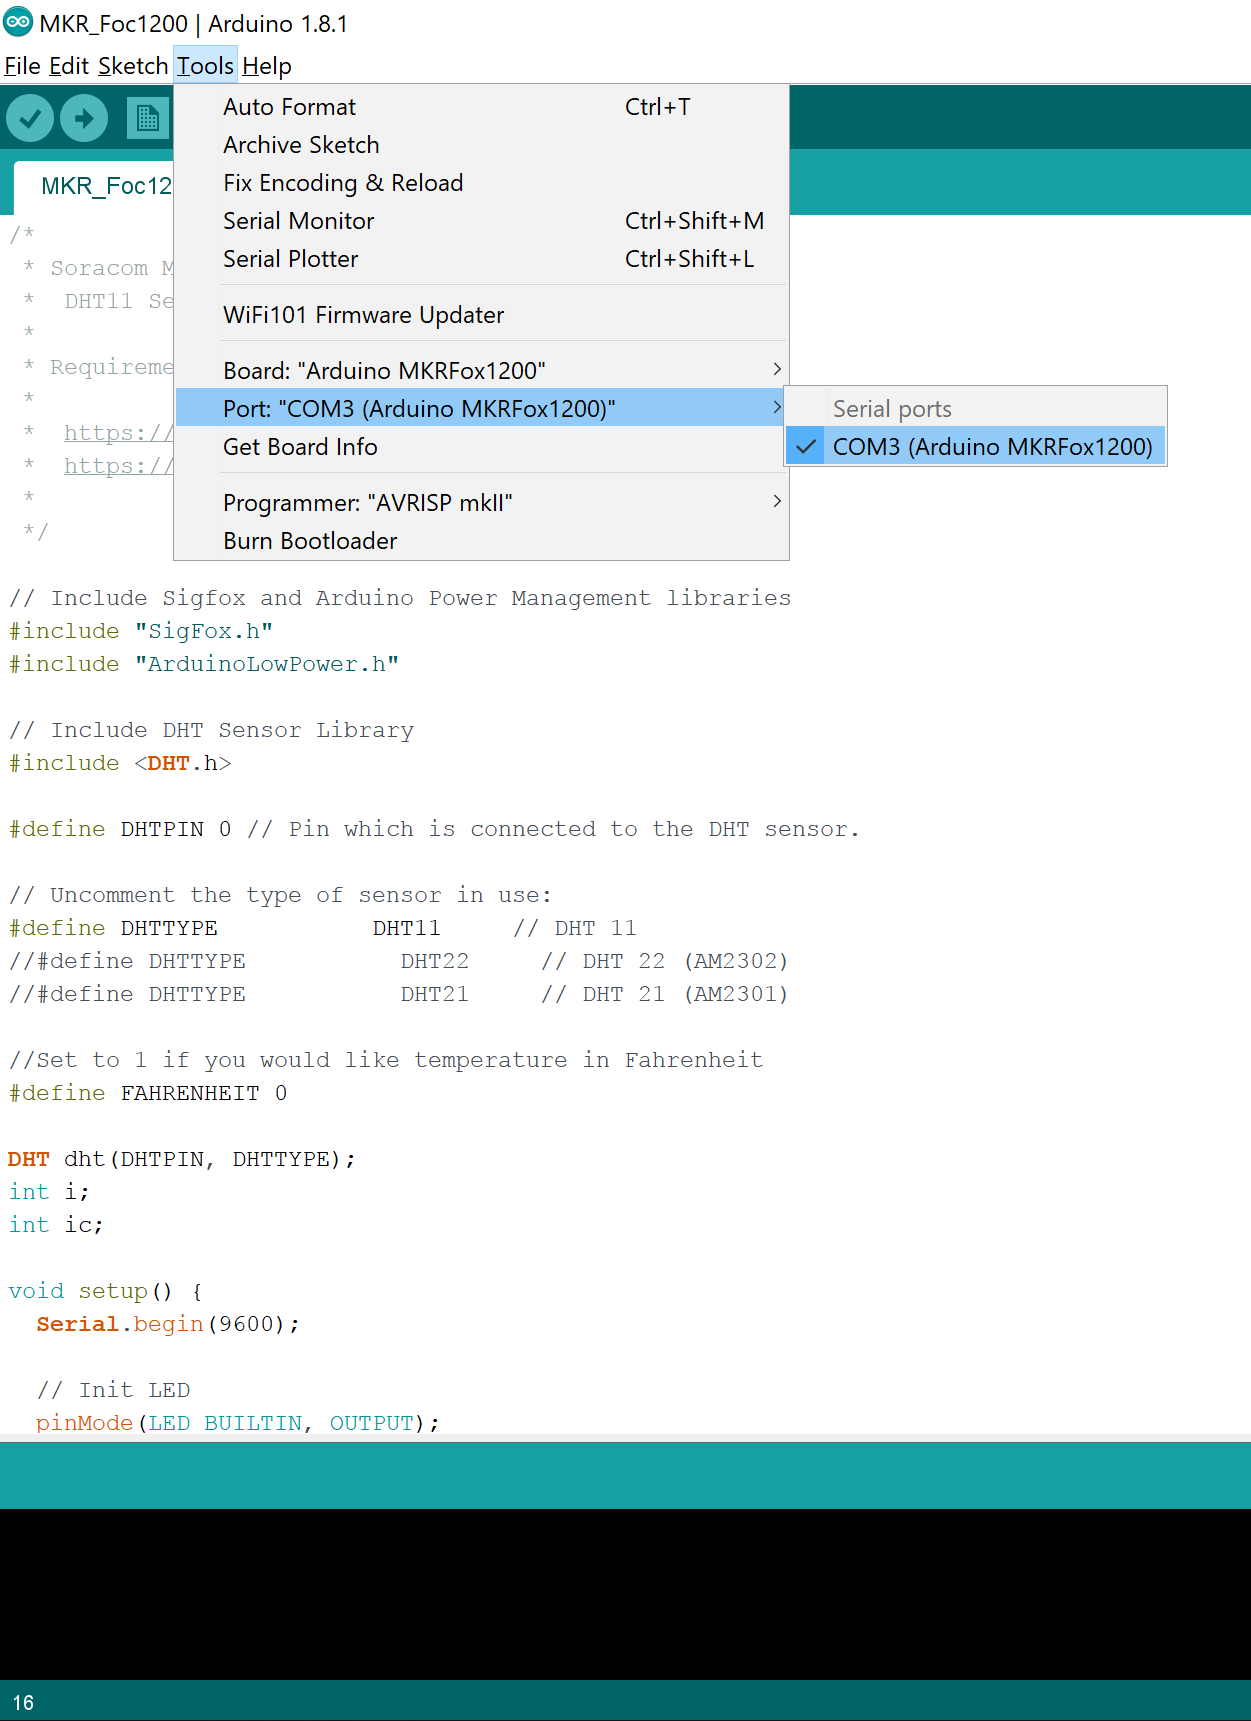
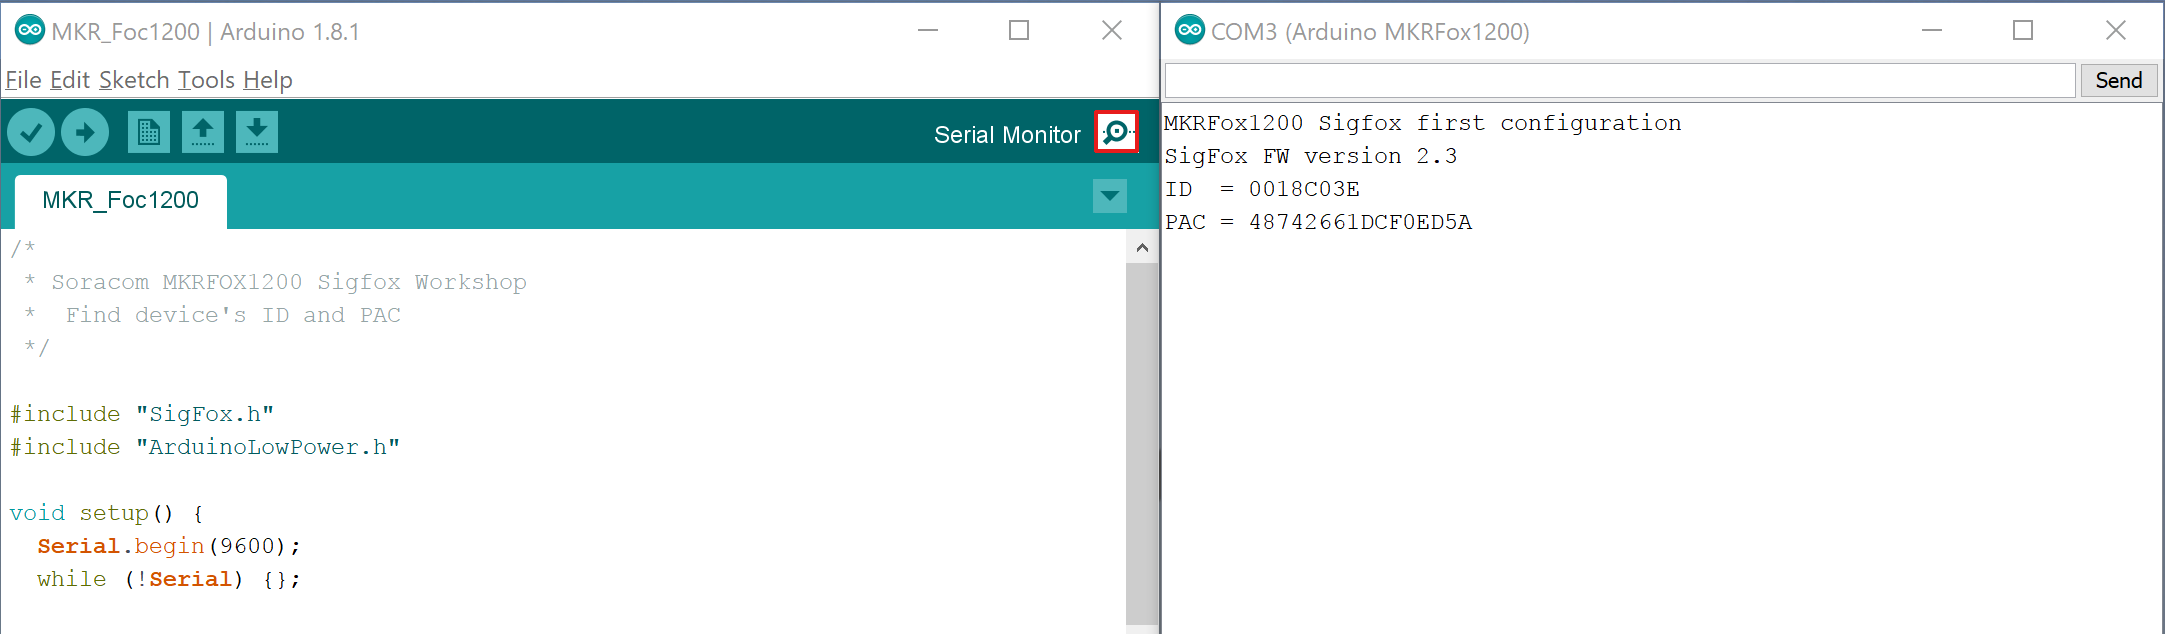
- Run 'verify' and then 'upload'. Open 'Serial Monitor' to view the output.
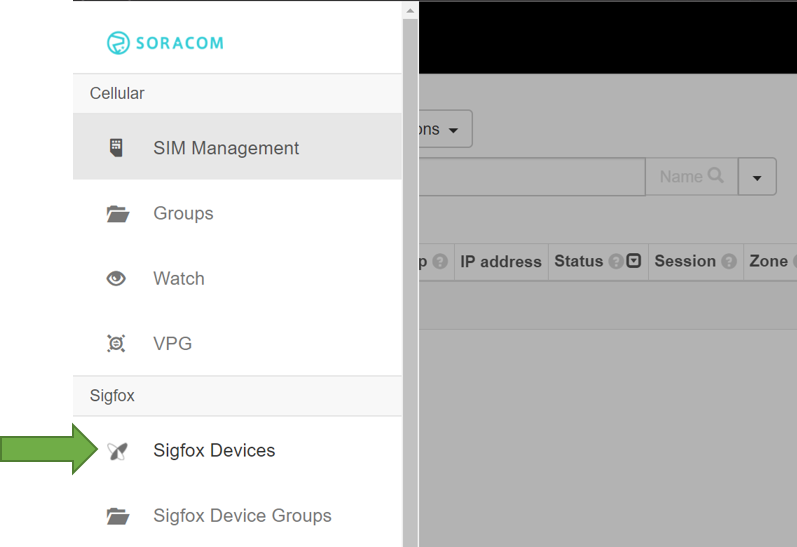
Go to the Soracom console, click on the menu, open up Sigfox page.
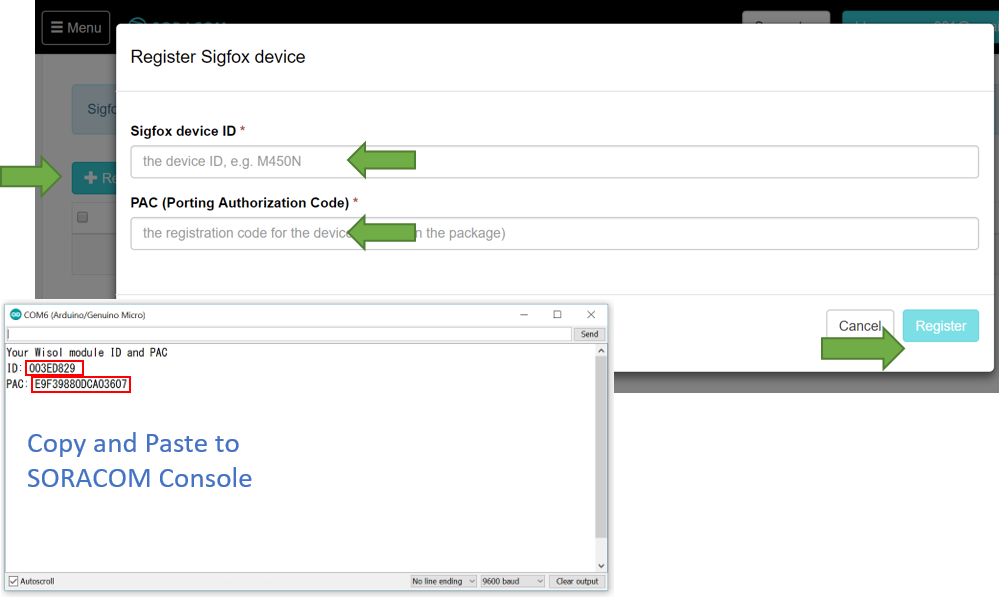
Register your module using your ID and PAC.
- From the "Menu" of upper/left corner in SORACOM User Console, choose "Sigfox Device".
- Click on the group you want to configure, or push "+ Add" button to create a new group then click on it.
In Soracom console, click on the menu, open up Sigfox Group page.
Create a group and in that group, activate Harvest
To use Harvest, you need to enable Harvest in the Basic settings of Group by following steps.
- Open existing or create a new Sigfox Device group
- From the "Menu" of upper/left corner in SORACOM User Console, choose "Sigfox Device Groups".
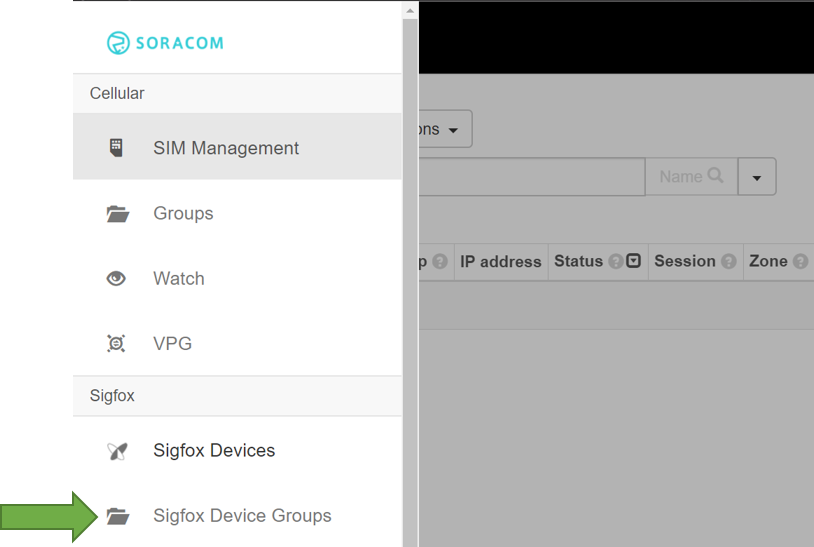
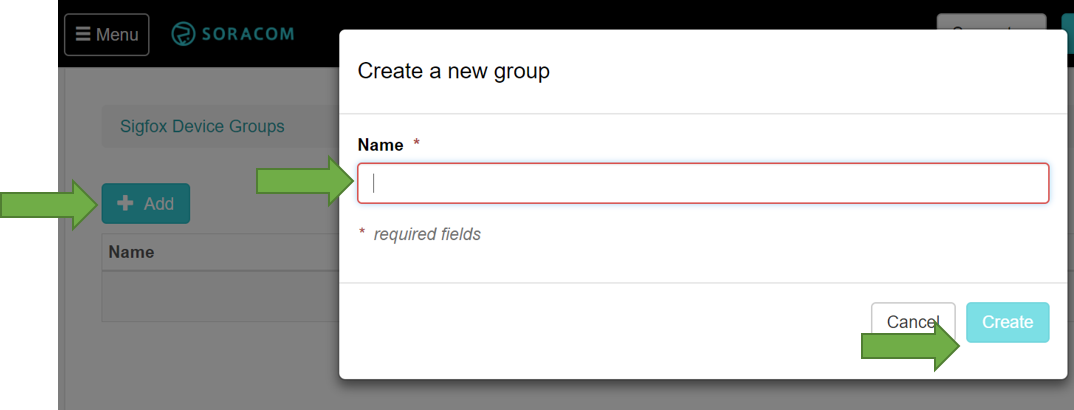
- Click on the group you want to configure, or push "+ Add" button to create a new group then click on it.
- Enable Harvest
- Click on "SORACOM Harvest" to open setting and change toggle switch to "ON", then press "Save".
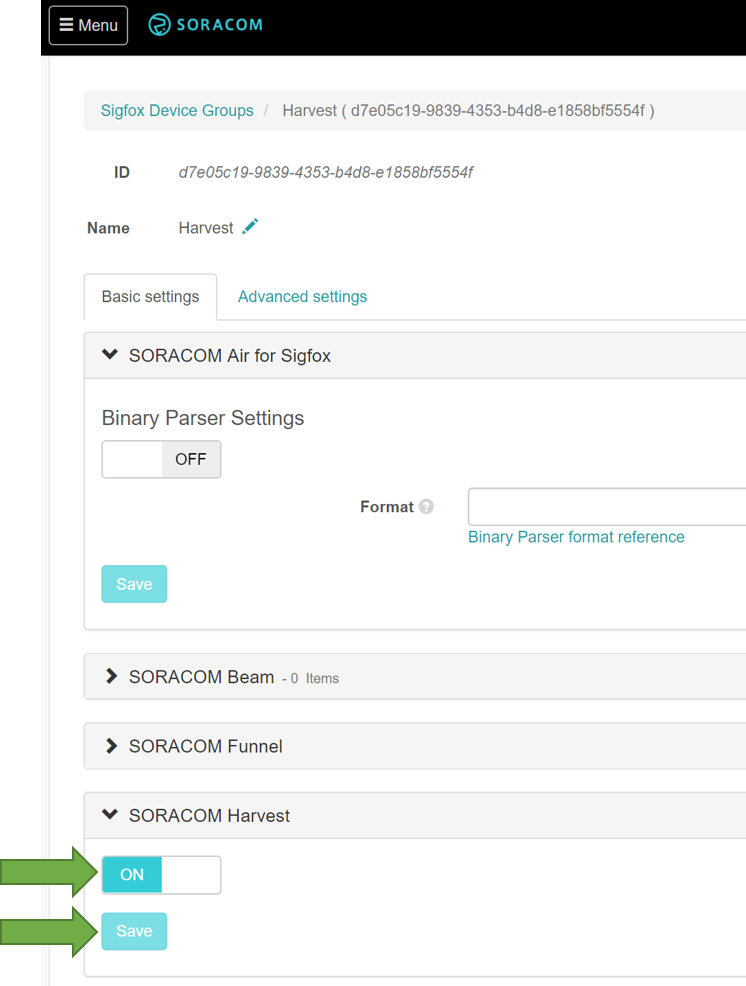
- Press "OK to confirmation dialog.
- Attach the group to Sigfox device
- Go back to Sigfox devices from the upper/left "Menu".

- Click on SIM to mark checkbox, choose "Change group" from "Actions" dropdown menu.

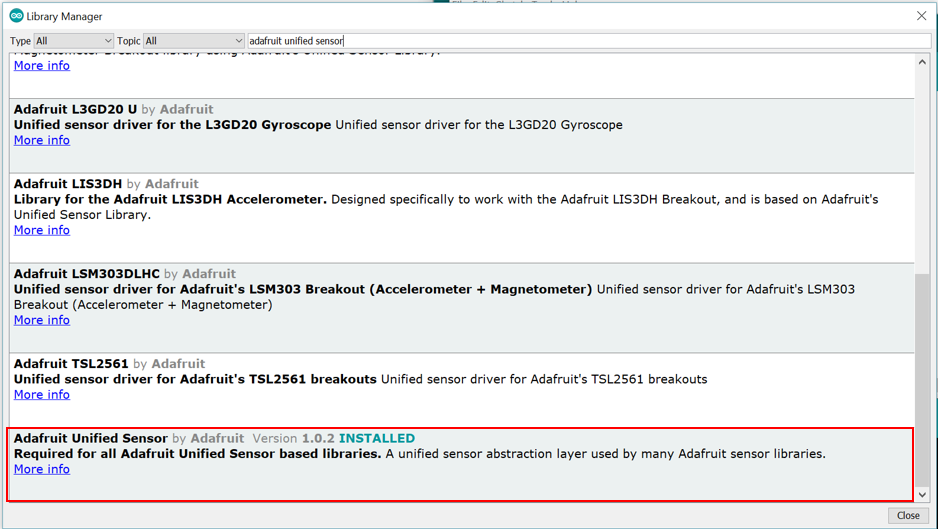
We will use the Adafruit DHT and Adafruit Unified Sensor libraries which you can install as follow
- In Arduino IDE Click on Sketch > Include Library > Manage Libraries
- There you can search for 'DHT' and should the 'Adafruit DHT library'. Click on it and install it
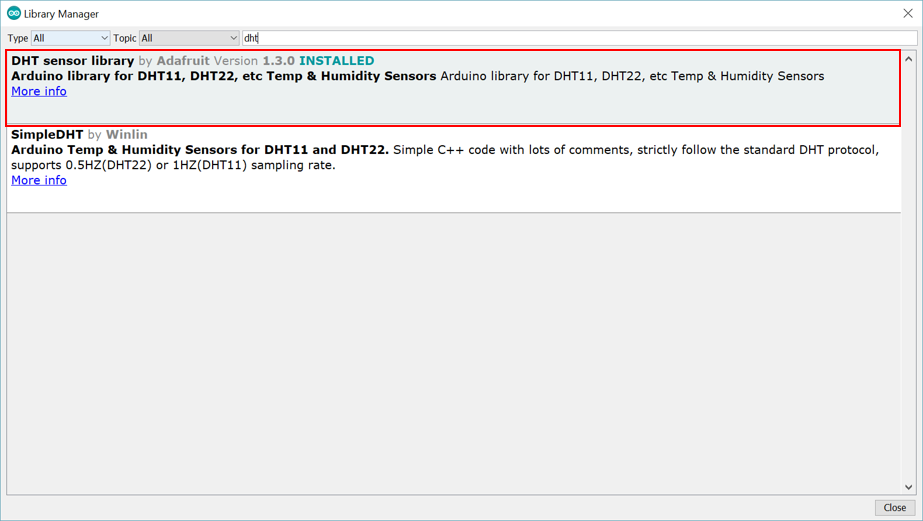
- also, search for 'Adafruit Unified Sensor' and should the 'Adafruit Unified Sensor Library'. Click on it and install it
Now that your device has been registered, it can transmit data.
Re-program your device with the following code:
/*
 * Soracom MKRFox1200 Sigfox Workshop
 *  DHT11 Sensor data
 *
 * Requirements:
 *
 *  https://github.com/adafruit/DHT-sensor-library
 *  https://github.com/adafruit/Adafruit_Sensor
 *
 */

// Include Sigfox and Arduino Power Management libraries
#include "SigFox.h"
#include "ArduinoLowPower.h"

// Include DHT Sensor Library
#include <DHT.h>

#define DHTPIN 0 // Pin which is connected to the DHT sensor.

// Uncomment the type of sensor in use:
#define DHTTYPE           DHT11     // DHT 11
//#define DHTTYPE           DHT22     // DHT 22 (AM2302)
//#define DHTTYPE           DHT21     // DHT 21 (AM2301)

//Set to 1 if you would like temperature in Fahrenheit
#define FAHRENHEIT 0

DHT dht(DHTPIN, DHTTYPE);
int i;
int ic;

void setup() {
  Serial.begin(9600);

  // Init LED
  pinMode(LED_BUILTIN, OUTPUT);

  // Wait for 12 min to see if Serial is connected, otherwise run the standard Sigfox-Soracom Sensor code
  for(i=0; i<72; i++){
    for(ic=0; ic<40; ic++){
      digitalWrite(LED_BUILTIN, HIGH);   // turn the LED on (HIGH is the voltage level)
      delay(50);                       // wait for a second
      digitalWrite(LED_BUILTIN, LOW);    // turn the LED off by making the voltage LOW
      delay(50);
    }
    if(Serial) break;
  }

  // Make sure our Sigfox shield is working
  if (!SigFox.begin()) {
    if(Serial) Serial.println("Shield error or not present!");
    for(i=0; i<2500; i++){
      digitalWrite(LED_BUILTIN, HIGH);   // turn the LED on (HIGH is the voltage level)
      delay(20);                       // wait for a second
      digitalWrite(LED_BUILTIN, LOW);    // turn the LED off by making the voltage LOW
      delay(20);
    }
    return;
  }


  // Initialize DHT Sensor
  dht.begin();

  // Enable debug led and disable automatic deep sleep
  // Comment this line when shipping your project :)
  SigFox.debug();

  // Display module informations
  String version = SigFox.SigVersion();
  String ID = SigFox.ID();
  String PAC = SigFox.PAC();

  if(Serial) Serial.println("MKRFox1200 Sigfox configuration:");
  if(Serial) Serial.println("SigFox FW version " + version);
  if(Serial) Serial.println("ID  = " + ID);
  if(Serial) Serial.println("PAC = " + PAC);

  if(Serial) Serial.println();
  if(Serial) Serial.println();

  // Send the module to the deepest sleep
  SigFox.end();
}

// the loop function runs over and over again forever
void loop() {
  // buffer for our Sigfox-Soracom data
  char sigbuf[12];
  // Wait a few seconds between measurements.
  delay(5000);

  // Reading temperature or humidity takes about 250 milliseconds!
  // Sensor readings may also be up to 2 seconds 'old' (its a very slow sensor)
  float h = dht.readHumidity();
  short hi = dht.readHumidity()*100; // we send humidity with 4 digits
  // Read temperature as Celsius (the default)
  float t = dht.readTemperature();
  short ti = dht.readTemperature()*10; // we send humidity with max 3 digits
  // Read temperature as Fahrenheit (isFahrenheit = true)
  float f = dht.readTemperature(true);
  short fi = dht.readTemperature(true)*10; // we send humidity max 4 digits

  // Check if any reads failed and exit early (to try again).
  if (isnan(h) || isnan(t) || isnan(f)) {
    if(Serial) Serial.println("Failed to read from DHT sensor!");
    return;
  }

  // Compute heat index in Fahrenheit (the default)
  float hif = dht.computeHeatIndex(f, h);
  // Compute heat index in Celsius (isFahreheit = false)
  float hic = dht.computeHeatIndex(t, h, false);

  if(Serial) Serial.print("Humidity: ");
  if(Serial) Serial.print(h);
  if(Serial) Serial.print(" %\t");
  if(Serial) Serial.print("Temperature: ");
  if(Serial) Serial.print(t);
  if(Serial) Serial.print(" *C ");
  if(Serial) Serial.print(f);
  if(Serial) Serial.print(" *F\t");
  if(Serial) Serial.print("Heat index: ");
  if(Serial) Serial.print(hic);
  if(Serial) Serial.print(" *C ");
  if(Serial) Serial.print(hif);
  if(Serial) Serial.println(" *F");

  // Normalising Data and preparing it to send to Sigfox-Soracom
  // Temperature can be negative and we assume they wouldn't be over 90 C (900) / 194 F (1940)
  //  as our sensor isn't used in extreme environment
  //  therefor if values are negative, we add 4096
  if(ti<0){
    ti = ti+4096;
  }
  if(fi<0){
    fi = fi+4096;
  }
  // As Humidity wouldn't be under 25% (Las Vegas goes as low as 30%), we will always get
  //  a number higher than 1000 and therefor do not need to process it

  // Compiling final Sigfox data
  int sorat;
  if(FAHRENHEIT){
    sorat = fi;
  }else{
    sorat = ti;
  }

  if(Serial) Serial.println();
  if(Serial) Serial.println();
  if(Serial) Serial.println("Sending humidity and temperature values to Sigfox-Soracom: ");
  if(Serial) Serial.print("Humidity: ");
  if(Serial) Serial.println(hi);
  if(Serial) Serial.print("Temperature: ");
  if(Serial) Serial.println(sorat);

  if(Serial) Serial.println();
  if(Serial) Serial.println("Sending message to Soracom-Sigfox network and getting the response will take up to 50 seconds");
  if(Serial) Serial.println("The LED will blink while the operation is ongoing");

  // Sending data to Sigfox-Soracom
  // Start the module
  SigFox.begin();
  // Wait at least 30mS after first configuration (100mS before)
  delay(100);
  // Clears all pending interrupts
  SigFox.status();
  delay(1);

  SigFox.beginPacket();
  SigFox.write(hi);
  SigFox.write(ti);

  int ret = SigFox.endPacket(true);  // send buffer to SIGFOX network and wait for a response
  if (ret > 0) {
    if(Serial) Serial.println("No transmission");
  } else {
    if(Serial) Serial.println("Transmission ok");
  }

  if(Serial) Serial.println(SigFox.status(SIGFOX));
  if(Serial) Serial.println(SigFox.status(ATMEL));
  if(Serial) Serial.println();

  if (SigFox.parsePacket()) {
    if(Serial) Serial.println("Response from server:");
    while (SigFox.available()) {
      Serial.print("0x");
      Serial.println(SigFox.read(), HEX);
    }
  } else {
    if(Serial) Serial.println("Could not get any response from the server");
    if(Serial) Serial.println("Check the SigFox coverage in your area");
    if(Serial) Serial.println("If you are indoor, check the 20dB coverage or move near a window");
  }
  if(Serial) Serial.println();

  SigFox.end();

  // Wait for 12 mins before sending next values to Sigfox-Soracom
  for(i=0; i<72; i++){
    for(ic=0; ic<10; ic++){
      digitalWrite(LED_BUILTIN, HIGH);   // turn the LED on (HIGH is the voltage level)
      delay(500);                       // wait for a second
      digitalWrite(LED_BUILTIN, LOW);    // turn the LED off by making the voltage LOW
      delay(500);
    }

    // While we wait, print Humidity and Temperature values to the serial console if it is attached
    float h = dht.readHumidity();
    float t = dht.readTemperature();
    float f = dht.readTemperature(true);

    if (isnan(h) || isnan(t) || isnan(f)) {
      if(Serial) Serial.println("Failed to read from DHT sensor!");
      return;
    }

    float hif = dht.computeHeatIndex(f, h);
    float hic = dht.computeHeatIndex(t, h, false);

    if(Serial) Serial.print("Humidity: ");
    if(Serial) Serial.print(h);
    if(Serial) Serial.print(" %\t");
    if(Serial) Serial.print("Temperature: ");
    if(Serial) Serial.print(t);
    if(Serial) Serial.print(" *C ");
    if(Serial) Serial.print(f);
    if(Serial) Serial.print(" *F\t");
    if(Serial) Serial.print("Heat index: ");
    if(Serial) Serial.print(hic);
    if(Serial) Serial.print(" *C ");
    if(Serial) Serial.print(hif);
    if(Serial) Serial.println(" *F");

    if(Serial) Serial.print("Will send next Sigfox-Soracom message in ");
    if(Serial) Serial.print((72-i)*10);
    if(Serial) Serial.println(" seconds");
    if(Serial) Serial.println();
    if(Serial) Serial.println();
  }
}
Once your Arduino Micro has been programmed, open up the Arduino console to start your device
You should see your ID and PAC followed by a message confirming that your data has been transmitted.
As required by Sigfox, the Arduino will then wait for 12 minutes before transmitting additional data, meanwhile its LED will blink and it will show you the current Humidity and Temperature every 10 seconds.
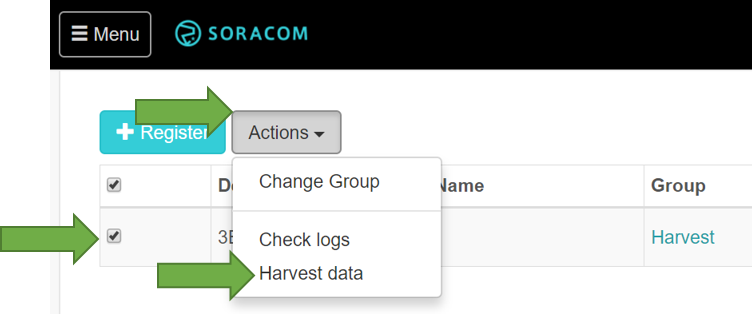
now that you've transmitted data, you can see it in Soracom Harvest.
- Check the checkbox on Sigfox Device and click 'Actions' -> 'Harvest Data'
- Harvest Screen:

You can activate automatic reload and you will now see your temperature data coming in every 10mins for as long as your Arduino Micro is running.
As you now have data coming to Harvest, you can setup a "Binary data parser" which can transform your data on the fly.
The principle for the sensor we created is the following
0 to 9,999 is the humidity value
0 to 9,999 is the temperature value
Sigfox network expect the data in HEX format, and so the following values are transmitted:
3900 becomes 0f3c
0260 becomes 00b0
0f3c00b0 becomes 39000260 which we process as follow 3900/100 02600/10 = 39 26
To achieve the decoding, we'll use the following Binary Parser format: humid::uint:16:little-endian:7:/100 temp::uint:16:little-endian:7:/10
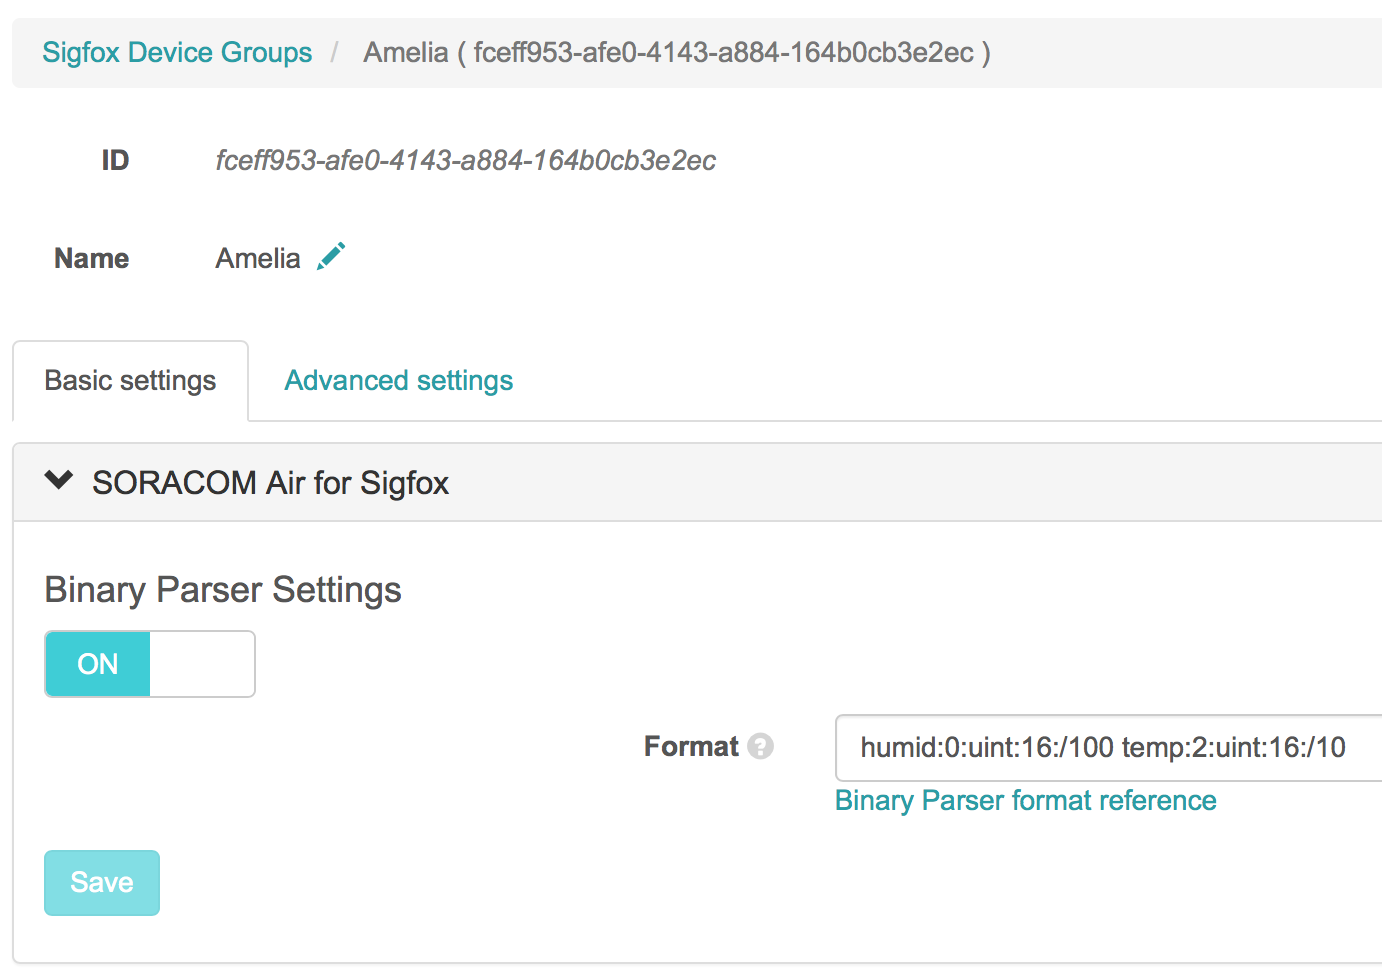
To set this up, go to the Soracom console, then Menu and select the Sigfox devices Group page
In the Sigfox devices Group page open Soracom Air for Sigfox, enable Binary Parser Settings and add the following in the parser format: humid::uint:16:little-endian:7:/100 temp::uint:16:little-endian:7:/10
Click Save and you're done.
The next Sigfox-Soracom value that comes in will be automatically parsed and your Harvest graph will now reflect that change.
You can read more information about the Binary Parser on our developers website at:
https://dev.soracom.io/en/docs/binary_parser/
Now that you've setup your device to talk to Sigfox-Soracom, you can start to leverage additional services like Soracom Beam which lets you forward data to HTTPs endpoint and Soracom Funnel which lets you forward data to Cloud services such as AWS IoT and Kinesis.