
Component/integration test is an hybrid between E2E and unit tests. It's gaining a lot of popularity and going by the testing diamond model it is considered as the default technique for modern backend. Its main idea is testing an entire component (e.g., Microservice) as-is, through the API, with all the layers including database but fake anything extraneous. This brings both high confidence and great developer experience. However, doing it right, fast, exhaustive and maximizing the value demand some learning and skills. This is the mission statement of this repo. Warning: You might fall in love with testing 💚
This repository contains:
1. ✅ 40+ Best Practices List - Detailed instructions on how to write component tests in the RIGHT way including code example and reference to the example application
2. 📊 Example application - A Complete showcase of a typical Node.js backend with performant tests setup (50 tests in 4 seconds! including database!)
3. 🚀 Recipes folders - Even more examples, each in its own folder, to cover more platform and use cases like Nest.js, Mocha, Jest, Express, Fastify (soon), message queues, authentication in tests, OpenAPI testing and more

👨🏫 Exciting news: I've just released my super-comprehensive testing course after two years of recording and editing. It's now on a 🎁 limited-time sale during July
Database And Infrastructure Setup- Optimizing your DB, MQ and other infra for testing (6 best practices)Web Server Setup- Good practices for starting and stopping the backend API (3 best practices)The Test Anatomy- The bread and butter of a component test (6 best practices)Integration- Techniques for testing collaborations with 3rd party components (8 best practices)Dealing With Data- Patterns and practices for testing the application data and database (8 best practices)Message Queue- Correctly testing flows that start or end at a queue (8 best practices)Development Workflow- Incorporating component tests into your daily workflow (5 best practices)
Our Showcase- An example Node.js component that embodies selected list of important best practices
More Examples And Platforms- A list of more examples that cover more platforms and topics
🏷 Tags: #strategic
✅ Do: All the databases, message queues and infrastructure that is being used by the app should run in a docker-compose environment for testing purposes. Only this technology check all these boxes: A mature and popular technology that can be reused among developer machines and CI. One setup, same files, run everywhere. Sweet value but one remarkable caveat - It's different from the production runtime platform. Things like memory limits, deployment pipeline, graceful shutdown and a-like act differently in other environments - Make sure to test those using pre-production tests over the real environment. Note that the app under test should not necessarily be part of this docker-compose and can keep on running locally - This is usually more comfortable for developers.
👀 Alternatives: A popular option is manual installation of local database - This results in developers working hard to get in-sync with each other ("Did you set the right permissions in the DB?") and configuring a different setup in CI ❌; Some use local Kubernetes or Serverless emulators which act almost like the real-thing, sounds promising but it won't work over most CIs vendors and usually more complex to setup in developers machine❌;
✏ Code Examples
# docker-compose.yml
version: '3.6'
services:
  database:
    image: postgres:11
    command: postgres -c fsync=off -c synchronous_commit=off -c full_page_writes=off -c random_page_cost=1.0
    environment:
      - POSTGRES_USER=myuser
      - POSTGRES_PASSWORD=myuserpassword
      - POSTGRES_DB=shop
    container_name: 'postgres-for-testing'
    ports:
      - '54310:5432'
tmpfs: /var/lib/postgresql/data🏷 Tags: #strategic
✅ Do: In a typical multi-process test runner (e.g. Mocha, Jest), the infrastructure should be started in a global setup/hook (Jest global setup), Mocha global fixture using custom code that spin up the docker-compose file. This takes away common workflows pains - The DB is an explicit dependency of the test, no more tests failing because the DB is down. A new developer onboarded? Get them up to speed with nothing more than git clone && npm test. Everything happens automatically, no tedious README.md, no developers wonder what setup steps did they miss. In addition, going with this approach maximizes the test performance: the DB is not instantiated per process or per file, rather once and only once. On the global teardown phase, all the containers should shutoff (See a dedicated bullet below).
👀 Alternatives: A popular option is manual installation of local database - This results in developers working hard to get in-sync with each other ("Did you set the right permissions in the DB?") and configuring a different setup in CI ❌; Some use local Kubernetes or Serverless emulators which act almost like the real-thing, sounds promising but it won't work over most CIs vendors and usually more complex to setup in developers machine❌;
✏ Code Examples
  // jest.config.js
  globalSetup: './example-application/test/global-setup.js'
// global-setup.js
const dockerCompose = require('docker-compose');
module.exports = async () => {
await dockerCompose.upAll();
};🏷 Tags: #performance
✅ Do: Keep the database and other infrastructure always alive in developers' machine so the next tests run will start at a glance, typically in 3-5ms. This super-fast start-up will encourage developers to run the tests continuously and treat them as a coding companion: It's an amazing coding experience to have the tests running all the time and watching your back as you type. Keeping the DB alive requires a clear data clean-up strategy, see our recommendation below. What about CI environment? This careful tune-up is mostly important in a developer machine where the test might get executed very frequently (e.g. after every editor save, once a minute), in a CI environnement the next tests execution might happen in a different machine and there is no motivation to keep the the docker-compose up.
👀 Alternatives: Should you teardown the docker-compose and restart in every tests execution, the startup time is likely to be 20x slower and is likely to kill this continuous-testing experience ❌;
✏ Code Examples
  // jest.config.js
  globalTeardown: './example-application/test/global-teardown.js',
// global-teardown.js - clean-up after all tests
const isCI = require('is-ci');
const dockerCompose = require('docker-compose');
module.exports = async () => {
// Check if running CI environment
if (isCI) {
dockerCompose.down();
}
};🏷 Tags: #intermediate
✅ Do: Use the same DB product that is being used in production and configure it for faster execution. Typically, DBs accept flags that allow to trade durability (i.e., data safety) for performance. With just a few configuration flags ~20-40% performance gain is achieved and hundreds tests can be run in a few seconds. Our guide includes a recipe with examples of how to tune-up the popular DBs for testing
👀 Alternatives: Some memory-only DB engines (e.g. SQLLite) are tempting - Surprisingly they are likely to be even slower in a multi-process testing mode + Present noise due to unsupported features❌; Some mock/stub the DB layer - Cutting off few seconds does not justify the greatly decreased risks coverage ❌
✏ Code Examples
# docker-compose file
version: "3.6"
services:
  db:
    image: postgres:13
    container_name: 'postgres-for-testing'
    // fsync=off means don't wait for disc acknowledgement
    command: postgres -c fsync=off -c synchronous_commit=off -c full_page_writes=off -c random_page_cost=1.0
    tmpfs: /var/lib/postgresql/data
# ...🏷 Tags: #performance
✅ Do: Use your real DB product, just store the data in a RAM folder to reduce IO and gain some performance boost. In Linux machine, this can be done quickly by mapping the data to the built-in tmpfs directory - This particular folder's content is stored in memory without disc involvement. In Mac and Windows, one should generate a RAM folder using a script that can be done once or automated. We have conducted multiple performance benchmarks and found that this only slightly improves the performance - The other optimizations that were covered above already minimize the IO work and modern SSD discs are blazing fast. Some specific databases like Mongo comes with a built-in memory engine, this is an additional option to consider.
👀 Alternatives: When configuring the DB for low-durability level (described in the bullet 'Optimize your real DB for testing, Don't fake it), this step may be omitted ✅;
✏ Code Examples
# docker-compose file
version: "3.6"
services:
  db:
    image: postgres:13
    container_name: 'postgres-for-testing'
    // 👇 Stores the DB data in RAM folder. Works only in Linux
    tmpfs: /var/lib/postgresql/data
# ...🏷 Tags: #intermediate
✅ Do: While there are various way to create the DB tables, always prefer the technique that is used in production - probably migrations. By doing so, another layer of bugs are covered: Should there be an issue with the DB schema - It will get caught during testing. Performance is always a critical concern, without thoughtful setup every tests execution will start with the migration framework approaching the DB to check if updates are needed. Alternatively, run the migrations only if a specific environment flag was passed. This will result in tests failing when the DB should get updated, developers must manually run npm script for migration but will maximize the tests start time. Note that migration is the right tool for building the schema and potentially also some metadata - But not the tests data itself (See bullet: Each tests must act on its own data)
👀 Alternatives: Most ORMs provide a 'sync' method that build the DB by the code model - This technique is not recommended for production and using it only for testing will bypass issues that exist in the production technique (e.g. migrations) ❌; Some migration frameworks (e.g. umzug which is also used by Sequelize) allow checking for newer version by looking at local files which is way faster, this is a viable option but not applicable in many ORMs ✅; You may store locally the last migration check and execute the migration command only if the migration folder changed since then ✅;
✏ Code Examples
// jest.config.js
globalSetup: './example-application/test/global-setup.js'

// global-setup.js
const npm = require('npm');
const util = require('util');
module.exports = async () => {
  // ...
  const npmCommandAsPromise = util.promisify(npm.commands.run);
  await npmCommandAsPromise(['db:migrate']); // Migrating the DB using a npm script before running any tests.
  // ...
}🏷 Tags: #basic, #strategic
✅ Do: The tests should start the webserver within the same process, not in a remote environment or container. Failing to do so will result in a loss of critical features: A test won't be able to simulate various important events using test doubles (e.g. make some component throw an exception), customize environment variables, and make configuration changes. Also, the complexity of measuring code coverage and intercepting network calls will highly increase
👀 Alternatives: one might spin the backend in Docker container or just a separate Node process. This configuration better resembles the production but it will lack critical testing features as mentioned above ❌; Some teams run integration tests against production-like cloud environment (see bullet 'Reuse tests against production-like environment), this is a valid technique for extra validation but will get too slow and limiting to rely on during development ❌;
✏ Code Examples
const apiUnderTest = require('../api/start.js');

beforeAll(async () => {
//Start the backend in the same process🏷 Tags: #basic, #strategic
✅ Do: The server under test should let the test decide when to open the connection and when to close it. If the webserver do this alone automatically when its file is imported, then the test has no chance to perform important actions beforehand (e.g. change DB connection string). It also won't stand a chance to close the connection and avoid hanging resources. Consequently, the web server initialize code should expose two functions: start(port), stop(). By doing so, the production code has the initialization logic and the test should control the timing
👀 Alternatives: The web server initialization code might return a reference to the webserver (e.g. Express app) so the tests open the connection and control it - This will require to put another identical production code that opens connections, then tests and production code will deviate a bit ❌; Alternatively, one can avoid closing connections and wait for the process to exit - This might leave hanging resources and won't solve the need to do some actions before startup ❌
✏ Code Examples
const initializeWebServer = async () => {
  return new Promise((resolve, reject) => {
    // A typical Express setup
    expressApp = express();
    defineRoutes(expressApp);
    connection = expressApp.listen(() => {
      resolve(expressApp);
    });
  });
};

const stopWebServer = async () => {
  return new Promise((resolve, reject) => {
    connection.close(() => {
      resolve();
    })
  });
};

beforeAll(async () => {
  expressApp = await initializeWebServer();
});

afterAll(async () => {
  await stopWebServer();
});
🏷 Tags: #e
✅ Do: Let the server randomize a port in testing to prevent port collisions. Otherwise, specifying a specific port will prevent two testing processes from running at the same time. Almost every network object (e.g. Node.js http server, TCP, Nest, etc) randomizes a port by default when no specific port is specified
👀 Alternatives: Running a single process will slow down the tests ❌; Some parallelize the tests but instantiate a single web server, in this case the tests live in a different process and will lose many features like test doubles (see dedicated bullet above) ❌;
✏ Code Examples
// api-under-test.js
const initializeWebServer = async () => {
  return new Promise((resolve, reject) => {
    // A typical Express setup
    expressApp = express();
    connection = expressApp.listen(webServerPort, () => {// No port
      resolve(expressApp);
    });
  });
};

// test.js
beforeAll(async () => {
  expressApp = await initializeWebServer();// No port
});🏷 Tags: #basic, #strategic
✅ Do: Write integration-component tests using the same style and practices used for unit tests. Half of the idea behind this technique is not to lose the great perks of unit tests (the second half is to cover more ground). In other words, this technique should be thought of like unit tests on steroids, not as small E2E tests. Why? The biggest threat to testing is abandonment. If the developer experience is not great, there are chances that the team won't use it, or fake it like they're using it. Code-wise, keep the tests very small (a good rule of thumb: no longer than 7 statements), the runtime should hopefully last few seconds and strive to be below 10 seconds, keep a consistent naming pattern like 'when... then...', use the AAA pattern to reach a very consistent structure, cover a single interaction and not a big flow. More explanations on this and other useful practices can be found in our sister guide here.
👀 Alternatives: Write tests that cover the entire user flow in the system, including many interactions (i.e., E2E) - Probably will result in slow execution (i.e., minutes, not seconds) and sometimes with flakiness. A few of these tests are needed. It can not serve as the canonical test technique that developers frequently write during coding ❌; Then why not just writing unit tests? - Some unit tests are needed to cover areas with algorithms or heavy logic (if they exist). However, unit tests won't yield enough confidence when serving as the primary technique. Units by design focus on 'unit', parts, a fake system isolation and not on the real thing. When our main tests cover something that doesn't resemble production - The deployment confidence is decreased. Kent Beck, 'father of TDD', wrote once "Programmer (aka “unit” tests). Give up tests being predictive and inspiring confidence for being writable, fast, and specific." ❌
✏ Code Examples
// basic-tests.test.ts
test('When asked for an existing order, Then should retrieve it and receive 200 response', async () => {
  // Arrange
  const orderToAdd = {
    userId: 1,
    productId: 2,
    mode: 'approved',
  };
  const {
    data: { id: addedOrderId },
  } = await axiosAPIClient.post(`/order`, orderToAdd);

  // Act
  const getResponse = await axiosAPIClient.get(`/order/${addedOrderId}`);

  // Assert
  expect(getResponse).toMatchObject({
    status: 200,
    data: {
      userId: 1,
      productId: 2,
      mode: 'approved',
    },
  });
});🏷 Tags: #basic
✅ Do: Call the backend under test's API using your preferred HTTP client library. Prefer a library that specializes only in making HTTP calls like axios or fetch. Other tools that hang around like supertest provides more testing-related features like inferring the URL from an express object, doing assertion and more. It's preferable not to bound the test to code objects rather to API-only and also to use default assertion library.
👀 Alternatives: Supertest - Consider to avoid as it encourages direct bounding to express objects and promote different assertion syntax that your built-in assertion library ❌;
✏ Code Examples
// basic-test.test.ts
const axios = require('axios');
let axiosAPIClient;

beforeAll(async () => {
  const apiConnection = await initializeWebServer();
  const axiosConfig = {
    baseURL: `http://127.0.0.1:${apiConnection.port}`,
    validateStatus: () => true,
  };
  // Create axios client for the whole test suite
  axiosAPIClient = axios.create(axiosConfig);
  // ...
});

test('When asked for an existing order, Then should retrieve it and receive 200 response', async () => {
  const orderToAdd = {
    userId: 1,
    productId: 2,
    mode: 'approved',
  };

  // Use axios to create an order
  const {
    data: { id: addedOrderId },
  } = await axiosAPIClient.post(`/order`, orderToAdd);

  // Use axios to retrieve the same order by id
  const getResponse = await axiosAPIClient.get(`/order/${addedOrderId}`);
  // ...
});🏷 Tags: #basics
✅ Do: If applicable, authenticate using the same mechanism as production so the same code will get tested. Practically, this means passing a signed token with the request and/or stubbing the claim provider (i.e., user management service) to authorize the request. Like any other testing design decision, one should strive to cover the same code that real users in production are stretching. In many authentication scenarios, this is possible. Generally speaking, there are three main types of authorization flows: (A) The webserver is expecting a signed token like JWT - Since the code anyway must hold the secret to verify the claim, the tests can also use this to sign a valid token in 2 lines of code. This way, the test act precisely like the client by passing a valid token. (B) Some credentials/claims are passed to the API which must verify those against the claim provider (i.e., HTTP call to an external user management component). The test can intercept this call on the HTTP-level and return a valid response. For example, by using interceptors tools like nock. Since the 3rd party service is outside the scope of the tests, the fact that we faked the response does not matter. The entire backend under test is tested. (C) Session-based flow where a session-key is passed to the API verifying against the session store. In this case, add the key to the store before the test(s) - The authentication will pass
👀 Alternatives: Mock the authentication middleware and disable it or trick it into authorizing the request - While not an awful option, it means that the 'real' authorization code is not part of the test (because the test stubbed /replaced it) ❌; Some are holding an environment variable or config key that instructs the system not to authorize requests (e.g., IS_TESTING=TRUE) - This, of course, is a dangerous option as it might leak to production
🏷 Tags: #basics
✅ Do: When testing API responses, compare all the relevant parts of the response object (e.g., status, body fields, specific HTTP header) with an object that shows the expected data (code example below). From the test reader perspective, looking at the desired response object as a single unit, tells the story much better than checking 5 fields using 5 different statements. All the popular test runners support partial object matching (e.g. Chai expect.to.deep.equal, Jest.ToMatchObject). This advice does not advocate testing many things in a single test - Often, a single conceptual topic demands checking multiple fields.
👀 Alternatives: Snapshots are a popular way to write a no-brainer assertion, we recommend against it. If the response payload is small, why not include it within the test for better readability? If it's huge, it's a sign that too many things are being tested together ❌; Separate to different tests - This is a great idea in many cases. It can also be nitty-gritty in other scenarios - Consider checking that a user was added successfully: The test expects getting back {id, name, phone}. Creating a test for every field has a very low ROI ✅;
✏ Code Examples
// basic-tests.test.ts
test('When asked for an existing order, Then should retrieve it and receive 200 response', async () => {
  // ...
  const getResponse = await axiosAPIClient.get(`/order/${addedOrderId}`);

  // Assert on entire HTTP response object
  expect(getResponse).toMatchObject({
    status: 200,
    data: {
      userId: 1,
      productId: 2,
      mode: 'approved',
    },
  });
});🏷 Tags: #basics
✅ Do: Organize your tests using 'describe' blocks representing API routes. Eventually, this will result in a tree of routes and tests underneath. For example describe('/API'), describe('POST /orders'). See the full example below. This common view of API end-points will likely look familiar and appeal to the occasional test report viewer. It resembles tooling that were proven to be popular like POSTMAN, OpenAPI docs, and others. Most, if not all, developers would know to map a test failure in a specific route with the corresponding code. A newly onboarded developer who is unfamiliar with the code would benefit from understanding the various routes and then easily start exploring the corresponding controller. Sometimes there are many scenario/cases under each route. In this case, consider creating another nested category (i.e. describe block) that represents a topic or user story. If the code under test is accessed using a message queue (see dedicated 4below), structure the routes by topics and queues.

👀 Alternatives: Organize the tests per topic or user stories title - This will also serve as great documentation for the viewer. Mapping between failures and the related code that should get explored might a little harder ;
✏ Code Examples
// basic-tests.test.js
describe('/api', () => {
  describe('GET /order', () => {
    // ...
  });

  describe('POST /orders', () => {
    // ...
  });
});🎦 Learn all of these topics in an online course by Yoni Goldberg
🏷 Tags: #intermediate #strategic
✅ Do: When planning your tests, consider covering the five typical flow's outputs. When your test is triggering some action (e.g., API call), a reaction is happening, something meaningful occurs and calls for testing. Note that we don't care about how things work. Our focus is on outcomes, things that are noticeable from the outside and might affect the user. These outcomes/reactions can be put in 5 categories:
• Response - The test invokes an action (e.g., via API) and gets a response. It's now concerned with checking the response data correctness, schema, and HTTP status
• A new state - After invoking an action, some data is probably modified. For example, when updating a user - It might be that the new data was not saved. Commonly and mistakenly, testers check only the response and not whether the data is updated correctly. Testing data and databases raises multiple interesting challenges that are greatly covered below in the 📗 section 'Dealing with data'
• External calls - After invoking an action, the app might call an external component via HTTP or any other transport. For example, a call to send SMS, email or charge a credit card. Anything that goes outside and might affect the user - Should be tested. Testing integrations is a broad topic which is discussed in the 📗 section 'Testing integrations' below
• Message queues - The outcome of a flow might be a message in a queue. In our example application, once a new order was saved the app puts a message in some MQ product. Now other components can consume this message and continue the flow. This is very similar to testing integrations only working with message queues is different technically and tricky. The 📗 section 'Message Queues' below delve into this topic
• Observability - Some things must be monitored, like errors or remarkable business events. When a transaction fails, not only we expect the right response but also correct error handling and proper logging/metrics. This information goes directly to a very important user - The ops user (i.e., production SRE/admin). Testing error handler is not very straighforward - Many types of errors might get thrown, some errors should lead to process crash, and there are many other corners to cover. We plan to write the 📗 section on 'Observability and errors' soon
Find here the same content as a course, online workshop, free webinar (TBD, follow here for specific date), or invite a private workshop to your team
🏷 Tags: #strategic #basic
✅ Do: Isolate the component under test by intercepting any outgoing HTTP request and providing the desired response so the collaborator HTTP API won't get hit. Nock is a great tool for this mission as it provides a convenient syntax for defining external services behavior. Isolation is a must to prevent noise and slow performance but mostly to simulate various scenarios and responses - A good flight simulator is not about painting clear blue sky rather bringing safe storms and chaos. This is reinforced in a Microservice architecture where the focus should always be on a single component without involving the rest of the world. Though it's possible to simulate external service behavior using test doubles (mocking), it's preferable not to touch the deployed code and act on the network level to keep the tests pure black-box. The downside of isolation is not detecting when the collaborator component changes and not realizing misunderstandings between the two services - Make sure to compensate for this using a few contract or E2E tests
👀 Alternatives: Some services provide a fake version that can be deployed by the caller locally, usually using Docker - This will ease the setup and boost the performance but won't help with simulating various responses ❌; Some services provide 'sandbox' environment, so the real service is hit but no costs or side effects are triggered - This will cut down the noise of setting up the 3rd party service but also won't allow simulating scenarios ❌;
✏ Code Examples
// Intercept requests for 3rd party APIs and return a predefined response
beforeEach(() => {
  nock('http://localhost/user/').get(`/1`).reply(200, {
    id: 1,
    name: 'John',
  });
});🏷 Tags: #basic
✅ Do: Typically one wishes to define default responses to HTTP requests and might need to override with custom behavior for specific tests (i.e. simulate some specific response). To ensure tests don't step on each other toes, define the default HTTP responses inside the hook that is executed before each test (Jest - beforeEach, Mocha - before), and clean-up after every test. Why? This way, every test will face the default behaviour and not some custom and surprising behavior that was defined by the previous test. You might see a minor performance degradation since the HTTP requests are being redefined many times - We have benchmarked this and found that the cost is 1ms per test
👀 Alternatives: It's possible to define the HTTP responses once in the before-all hook, in this case should some test intentionally or mistakenly override the behavior - It will affect all the tests ❌ You may define in every test the HTTP responses that are relevant for this test - It's likely to end with tedious repetitions of the same code ❌
✏ Code Examples
// Create a one-time interceptor before every test
beforeEach(() => {
  nock('http://localhost/user/').get(`/1`).reply(200, {
    id: 1,
    name: 'John',
  });
});

// Endure clean slate after each test
afterEach(() => {
  nock.cleanAll();
});🏷 Tags: #advanced, #draft
✅ Do: A common need is happy path + corner cases, not possible technically to change existing path - need to remove. Instead of removing, create unique path and unique response. Do this by acting on unique resources. If not possible, other option is global scope. This minimizes coupling between tests.
Remember that after every test everything is cleaned-up, see bullet about clean-up.
👀 Alternatives: Don't have default ❌ ; Use global scope ❌ ;
✏ Code Examples
// Using an uncommon user id (7) and create a compatible interceptor
test('When the user does not exist, return http 404', async () => {
  //Arrange
  const orderToAdd = {
    userId: 7,
    productId: 2,
    mode: 'draft',
  };

  nock('http://localhost/user/').get(`/7`).reply(404, {
    message: 'User does not exist',
    code: 'nonExisting',
  });

  //Act
  const orderAddResult = await axiosAPIClient.post('/order', orderToAdd);

  //Assert
  expect(orderAddResult.status).toBe(404);
});🏷 Tags: #basic
✅ Do: Instruct the network interceptor to block and warn on any outgoing HTTP request that is not intercepted. Blocking all calls typically requires no more than one statement nock.disableNetConnect(). For any request that was not explicitly defined - the interceptor will throw an exception and make the tests fail. Why is this needed? To protect the component borders. It might be that some HTTP calls were not considered and trying to hit a real external server. When requests are not intercepted, it violates the component isolation, triggers flakiness, and degrades performance. Remember to exclude calls to the local API under test that should serve the tests` requests. When the test suite is done, remove this restriction to avoid leaving unexpected behaviour to other tests suites.
👀 Alternatives: Trust your familiarity with the code and assume that all network calls were configured for interception. This dictates that any developer who puts HTTP requests in the code remembers to update the testing configuration - Isn't this a fragile assumption? ❌ Some interceptor tools allow recording and inspecting the traffic - This information is valuable for periodical review(see dedicated bullet on recoding) but not an ongoing guard ❌
✏ Code Examples
beforeAll(async () => {
  // ...
  // ️️️Ensure that this component is isolated by preventing unknown calls
  nock.disableNetConnect();
  // Enable only requests for the API under test
  nock.enableNetConnect('127.0.0.1');
});🏷 Tags: #basic
✅ Do: Go beyond the happy and sad paths. Check not only errored responses (e.g., HTTP 500 error) but also network-level anomalies like slow and timed-out responses. This will prove that the code is resilient and can handle various network scenarios like taking the right path after a timeout, has no fragile race conditions, and contains a circuit breaker for retries. Reputable interceptor tools can easily simulate various network behaviors like hectic service that occasionally fail. It can even realize when the default HTTP client timeout value is longer than the simulated response time and throw a timeout exception right away without waiting
👀 Alternatives: Checking only HTTP responses, without simulating network corener cases, is sensible for non-critical integrations ✅
✏ Code Examples
test('When users service replies with 503 once and retry mechanism is applied, then an order is added successfully', async () => {
  //Arrange
  nock.removeInterceptor(userServiceNock.interceptors[0])
  nock('http://localhost/user/')
    .get('/1')
    .reply(503, undefined, { 'Retry-After': 100 });
  nock('http://localhost/user/')
    .get('/1')
    .reply(200);
  const orderToAdd = {
    userId: 1,
    productId: 2,
    mode: 'approved',
  };

  //Act
  const response = await axiosAPIClient.post('/order', orderToAdd);

  //Assert
  expect(response.status).toBe(200);
});🏷 Tags: #basic
✅ Do: When checking that the component did send HTTP requests, also check the request's validity. For example, when checking that an email was sent, it's not enough to ensure that HTTP call was made to the right URL, it's imperative to verify that the body contains the necessary fields like email address and mail subject. By doing so, the tests cover one more layer of bugs: integration issues. You may achieve this by storing the outgoing request as a local variable and asserting that its schema, sometimes even the data, is as expected. Why is this important? When isolating a component by intercepting network requests, the tests hide bugs and sugarcoat the reality. By default, no matter how a request looks like, the response will be successful. The 3rd party service validation is avoided and will come into play only in production. The minimum act to mitigate this line of risks is to assert the correctness of the request. While a good start, it won't cover all the integration risks - What if a collaborator service was changed and the tests were not updated? This will get discovered only in production. Therefore, more techniques are needed to cover all the integration risks (See below on E2E and contract tests).
👀 Alternatives: Some rely on E2E test to check integration - This layer is valuable and needed as a last chance safety net. However, due its flakines, it's should be used sparingly and not as a primary testing tool ❌ What if there is misaligement on the exact values and requests sequence that we should be made? In this case, consumer-driven contract tests might be valuable (though pricey) ✅ ;
✏ Code Examples
// ️️️Assert that the app called the mailer service appropriately with the right input
test('When order failed, send mail to admin', async () => {
  //Arrange
  // ...
  let emailPayload;
  nock('http://mailer.com')
    .post('/send', (payload) => ((emailPayload = payload), true))
    .reply(202);
  const orderToAdd = {
    userId: 1,
    productId: 2,
    mode: 'approved',
  };

  //Act
  await axiosAPIClient.post('/order', orderToAdd);

  // ️️️Assert
  expect(emailPayload).toMatchObject({
    subject: expect.any(String),
    body: expect.any(String),
    recipientAddress: expect.stringMatching(
      /^[\w-\.]+@([\w-]+\.)+[\w-]{2,4}$/
    ),
  });
});🏷 Tags: #advanced
✅ Do: Various tools and network interceptors (e.g., nock) can tell about the existence and nature of outgoing HTTP requests. Run one of those tools as you plan test cases to realize which end-points and scenarios should get covered. With local interceptors that are made for testing (e.g. nock recording)., recording mode should be enabled when the tests run - Then all the network traffic will get captured in local files. Why is this important? You might miss end-points or, more likely, miss some corner scenarios. For example, one may believe that 'GET: /users/:id' returns only HTTP 200 with a body, the code relies on this response. In reality, this end-point also sometimes returns HTTP 204 with an empty body. If this is not tested before production, it will get tested in production... For complex and critical scenarios, consider also watching the production network logs to realize the various potential scenarios.
👀 Alternatives: Rely on your familairity with the code and trust that you didn't miss any network flow ❌ Manually skim through API documentation (e.g. OpenAPI) ✅ ;
🏷 Tags: #basic, #draft
✅ Do: Interception tools include record mode which ...; use this to become aware of the integration it self, but also to its various patterns. Ensure all variations are covered with testing. You may use the recorded file as default; Do this in staging environment; Valuable when there are many integrations.
👀 Alternatives: Persist ❌ ; In every test ❌ ;
✏ Code Examples
// use "fake timers" to simulate long requests.
test("When users service doesn't reply within 2 seconds, return 503", async () => {
  //Arrange
  const clock = sinon.useFakeTimers();
  nock('http://localhost/user/')
    .get('/1', () => clock.tick(5000))
    .reply(200);

  const orderToAdd = {
    userId: 1,
    productId: 2,
    mode: 'approved',
  };

  //Act
  const response = await axiosAPIClient.post('/order', orderToAdd);

  //Assert
  expect(response.status).toBe(503);

  //Clean
  clock.uninstall();
});🏷 Tags: #strategic
✅ Do: Any record that might affect the test results should be added at the beginning of the test. Exclamation mark. Doing so will result in short and self-contained test stories that the occasional reader can easily troubleshoot without skimming through the entire file. A common mistake is to seed the whole test data globally - This leads to high coupling and complexity. Specifically, failing to keep the tests self-contained will lead to the Domino effect: Understanding why test num #27 failed demands reading the 26 tests before. Each might have mutated the global data. Other undesired side effects: One can't run a single test because it depends on data that is generated by previous tests; It will get much harder to understand the test intent because the gun that is being shown on the last scene was never introduced before (The mystery guest syndrome). Are you concerned with performance? Based on our benchmarks, adding relevant data at the beginning of each test add ~1 second to the execution time - Absolutely worth the decreased complexity. This advice is valuable only to records that are the subject of the tests. Tests can have different types of data, see next bullet and this diagram.
👀 Alternatives: Seed data before all the tests - This will end in spaghetti dependencies between all the tests files ❌ ; Seed at the beginining of each file - Same spaghetti, only smaller ❌ ;
✏ Code Examples
test('When asked for an existing order, Then should retrieve it and receive 200 response', async () => {
    //Arrange - Create a record so we can later query for it and assert for is existence
    const orderToAdd = {
        userId: 1,
        productId: 2,
        mode: 'approved',
    };
    await axiosAPIClient.post(`/order`, orderToAdd);

    //Next -> Invoke the route under test and asssert for something
});🏷 Tags: None
✅ Do: Some data is not related to the tests flow. The test reader can understand and troubleshoot the test easily without being aware of it. For example, look-up table of all the currencies or countries in the world. There is no benefit in filling this tables again and again in every test file. How do we make the differentiation? Let's define more specifically 3 types of test data:
-
Metadata - General purpose lists and lookups that are needed for the app to perform but are not related at all with the test's subject. For example, currencies list, countries, roles list, and similar. This data can get seeded once globally. There is no point in re-adding it per test or file
-
Context data - Required records that hold a relationship with the subject under test but are not being tested directly. For example, consider an e-commerce purchase flow tests: The User entity, Shop entity, Business entity are all a parent or sibling of the Order that is being tested. They might affect the test result (e.g., Trying to order goods when the user was deleted) but are not the direct subject of the test. To keep the tests short and focused, this data can be added per file, if they affect the test results - Add the data per test
-
Test records - This is the data that is actually being tested and likely to be added or mutated. The reader must directly see what data exists to understand the results of the test. For this reason, explicitly define and add this information inside the test. Going with the same e-commerce site example, when testing the purchase flow, add the order records within the test
👀 Alternatives: Per-suite, expensive ❌ ; In every test ❌ ;
✏ Code Examples
// Adding metadata globally. Done once regardless of the amount of tests
module.exports = async () => {
  console.time('global-setup');
  // ...
  await npmCommandAsPromise(['db:seed']); // Will create a countries (metadata) list. This is not related to the tests subject
  // ...
  // 👍🏼 We're ready
  console.timeEnd('global-setup');
};describe('/api', () => {
let user;
beforeAll(async () => {
// Create context data once before all tests in the suite
user = createUser();
});
describe('GET /order', () => {
test('When asked for an existing order, Then should retrieve it and receive 200 response', async () => {
//Arrange
const orderToAdd = {
userId: user.id, // Must provide a real user id but we don't care which user creates the order
productId: 2,
mode: 'approved',
};
const {
data: { id: addedOrderId },
} = await axiosAPIClient.post(`/order`, orderToAdd);
...
});
});
});test('When asked for an existing order, Then should retrieve it and receive 200 response', async () => {
//Arrange - Create a record so we can later query for it and assert for is existence
const orderToAdd = {
userId: 1,
productId: 2,
mode: 'approved',
};
await axiosAPIClient.post(`/order`, orderToAdd);
//Next -> Invoke the route under test and asssert for something
});🏷 Tags: #basics
✅ Do: After invoking the route under test, a new state is likely to exist (e.g., new records) - Assert that the new state data is satisfactory using the REST API when applicable. By approaching through the API, the test simulates the most important flow: The user flow. What's wrong with approaching the DB directly? Not only it goes through a different journey than the user, but also the test might miss a bug in the API that returns the data (i.e., DB data is correct, the query code hides a bug). Sometimes, such REST API does not exist - In this case, use the outermost layer that does expose this info like controller, service, facade, or repository. The more external this layer is, the more bugs are caught, and the coupling to the internals` noise is minimized.
This design decision does not come without a caveat. The test invokes much more code than needed: Tests might fail because of failures in code not being directly tested. Our philosophy is to stick to user flows under realistic conditions at the cost of a slight increase in developer's sweat.
👀 Alternatives: Approach the DB directly - Miss bug in the query code, higher exposure to internal refactoring ❌ Approach the ORM - Not ideal for the same reasons like the option above ❌ Approach the service layer - Better than approaching the DB directly as it will be less sensitive to DB schema changes and resemble more the user flow
✏ Code Examples
test('When adding a new valid order, Then should be able to retrieve it', async () => {
  //Arrange
  const orderToAdd = {
    userId: 1,
    productId: 2,
    mode: 'approved',
  };

  //Act
  const {
    data: { id: addedOrderId },
  } = await axiosAPIClient.post('/order', orderToAdd);

  //Assert by fetch the new order, and not only by the POST response
  const { data, status } = await axiosAPIClient.get(
    `/order/${addedOrderId}`
  );

  expect({
    data,
    status,
  }).toMatchObject({
    status: 200,
    data: {
      id: addedOrderId,
      userId: 1,
      productId: 2,
    },
  });
});🏷 Tags: #strategic
✅ Do: The timing when the tests clean the database determines the way the tests are being written. The two most viable options are cleaning after all the tests vs cleaning after every single test. Choosing the latter option, cleaning after every single test guarantees clean tables and builds convenient testing perks for the developer. No other records exist when the test starts, one can have certainty which data is being queried and even might be tempted to count rows during assertions. This comes with severe downsides: When running in a multi-process mode, tests are likely to interfere with each other. While process-1 purges tables, at the very moment process-2 queries for data and fail (because the DB was suddenly deleted by process-1). On top of this, It's harder to troubleshoot failing tests - Visiting the DB will show no records.
The second option is to clean up after all the test files have finished (or even daily!). This approach means that the same DB with existing records serves all the tests and processes. To avoid stepping on each other's toes, the tests must add and act on specific records that they have added. Need to check that some record was added? Assume that there are other thousands of records and query for records that were added explicitly. Need to check that a record was deleted? Can't assume an empty table, check that this specific record is not there. This technique brings few powerful gains: It works natively in multi-process mode, when a developer wishes to understand what happened - the data is there and not deleted. It also increases the chance of finding bugs because the DB is full of records and not artificially empty. It's not perfect, though, since the DB is stuffed with data - Data that goes to unique columns might be duplicated. When adding 10 records and asserting their existence, a more sophisticated query will be needed. All of these challenges have reasonable resolutions (read the next bullets, for example, unique values can get random suffix). See the full comparison table here.
Who wins? There's no clear cut here. Both have their strength but also unpleasant implications. Both can result in great testing solution. Our recommended approach is cleaning up occasionally and accepting the non-deterministic DB state. This option resembles more the production environment, leads to more realistic tests and when done right will not show any flakiness. A bit of more sweat for more realism.
👀 Alternatives: Using transactions can also take care to clean up the DB automatically. The test will pass an open transaction to the code under test and finally abort the transaction. It's not recommended because the tests get more coupled to the code internals. It also generates cascading transactions model that complicates if the code already contains transactions. Lastly, it works only with particular DB that supports transactions ❌
✏ Code Examples
// After-all clean up (recommended)
// global-teardown.js
module.exports = async () => {
  // ...
  if (Math.ceil(Math.random() * 10) === 10) {
    await new OrderRepository().cleanup();
  }
};// After-each clean up
afterAll(async () => {
await new OrderRepository().cleanup();
});
// or
afterEach(async () => {
await new OrderRepository().cleanup();
});🎦 Learn all of these topics in an online course by Yoni Goldberg
🏷 Tags: #intermediate
✅ Do: Commonly, tests will need to add records to columns with unique constraints. Since multiple tests are likely to add the same value, add a tiny random value as a suffix. Collisions between tests are more likely to occur if the DB is not cleaning up after each test (See bullet: Choose a clear data clean-up strategy). When the data is retained, the 1st tests execution will pass but the 2nd will fail due to a unique constrain violation. Adding randomness is a good practice also when the tables are being cleaned after each test - Without it, a test writer must read all the previous tests to ensure no similar names were chosen. When adding a random value, it's better to keep the data descriptive and meaningful with a minor suffix. The test reader will surely learn more about the system this option {resident: 'Washinton avenue 17st NY {23-554}' comparing with this one {resident: '23-553'}. Tests are great example-based documentation, sadly the 2nd option above kills this opportunity. Keep the random suffix short, a combination of process id and the current time seconds is likely go be good enough.
👀 Alternatives: Clean the DB after each test - Read above about some caveats that are attached with this option (See bullet: Choose a clear data clean-up strategy) ❌
✏ Code Examples
// Adding a short unique suffix to the externalIdentifier enable the writer to ignore other tests
// and the need to clean the db after each test
test('When adding a new valid order, Then should get back 200 response', async () => {
  //Arrange
  const orderToAdd = {
    userId: 1,
    productId: 2,
    mode: 'approved',
    externalIdentifier: `id-${getShortUnique()}`, //unique value
  };

  //Act
  const receivedAPIResponse = await axiosAPIClient.post(
    '/order',
    orderToAdd
  );
  // ...
});🏷 Tags: #advanced
When it is impossible to assert for specific data, check for mandatory field existence and types. Sometimes, the response contains important fields with dynamic data that can't be predicted when writing the test, like dates and incrementing numbers. If the API contract promises that these fields won't be null and hold the right types, it's imperative to test it. Most assertion libraries support checking types. If the response is small, check the return data and type together within the same assertion (see code example). One more option is to verify the entire response against an OpenAPI doc (Swagger). Most test runners have community extensions that validate API responses against their documentation.
👀 Alternatives: When app maintains JSON Schemas of common payloads, most test runners can validate a JSON object (i.e. the API response) against JSON Schema ✅
✏ Code Examples
test('When adding a new valid order, Then should get back approval with 200 response', async () => {
  // ...
  //Assert
  expect(receivedAPIResponse).toMatchObject({
    status: 200,
    data: {
      id: expect.any(Number), // Any number satisfies this test
      mode: 'approved',
    },
  });
});🏷 Tags:
✅ Do: In testing, use the same mechanism and code that installs the DB tables in production. Typically this will be a migration command (i.e., ORM) or .sql files invoked by a bash command. In principle, any production element that can be copied to testing is a blessing - It covers another layer of bugs. Should you mistakenly re-ceate an existing table or rename a non-existing column, this glitch will get caught during coding long before deployment. A recommended place to invoke the installation is within the global test setup - This way, there is no way to run the tests without its pre-requisites (see more in the section 'Infrastructure Setup')
👀 Alternatives: Manually copy a DB dump - This is a great way to find installation issues only in production and also complicate the developer testing experience ❌ Automate a custom testing installation command (e.g., Docker with pre-defined tables, custom code) - Same caveats like previous paragraph ❌
✏ Code Examples
// Create the DB schema. Done once regardless of the amount of tests
module.exports = async () => {
  console.time('global-setup');
  // ...
  await npmCommandAsPromise(['db:migrate']);
  // ...
  // 👍🏼 We're ready
console.timeEnd('global-setup');🏷 Tags: #advanced
✅ Do: Check that the code under test doesn't accidentally ״overdoing״ - modifying more data than it is intended to. For example, a code that is supposed to delete one record, might accidentally delete all the records. Since most tests assert only the outcome of specific records, it's easy to miss these unplanned side effects. Testing this is a bit tricky but not too hard. At the beginning of a test, add the records that should be mutated—nothing unusual thus far. On top of this, add few more records than needed. In the end, assert that the records that were planned to be mutated are indeed mutated, but the rest are not. For example, when testing that the DELETE route works, add 2 records (!), try to delete one, ensure that it is gone, now also check that the second one is still there so the test deleted only what should be deleted (Credit: @giltayar)
👀 Alternatives: Some apply Repository/ORM level protection that ensures that one tenant is not accessing another tenant's records. This is valuable but doesn't cover all the scenarios ❌ Writes integration tests that include the data access layer and a real DB - Check that the number of affected records (i.e., commonly returned by DB operations) is as expected. Writing tests against the entire DAL demands more effort thus should be considered based a specific project's risk level ❌
✏ Code Examples
test("When deleting an existing order, Then should get a successful message", async () => {
  // Arrange
  const orderToDelete = {
    userId: 1,
    productId: 2,
    externalIdentifier: `id-${getShortUnique()}`, //unique value
  };
  const {
    data: { id: orderToDeleteId },
  } = await axiosAPIClient.post("/order", orderToDelete);

  // Create another order to make sure the delete request deletes only the correct record
  const anotherOrder = {
    userId: 1,
    productId: 2,
    externalIdentifier: `id-${getShortUnique()}`, //unique value
  };

  nock("http://localhost/user/").get(`/1`).reply(200, {
    id: 1,
    name: "John",
  });
  const {
    data: { id: anotherOrderId },
  } = await axiosAPIClient.post("/order", anotherOrder);

  // Act
  const deleteResponse = await axiosAPIClient.delete(`/order/${orderToDeleteId}`);
  const getOrderResponse = await axiosAPIClient.get(`/order/${anotherOrderId}`);

  // Assert
  expect(deleteResponse.status).toBe(204);
  // Assert anotherOrder still exists
  expect(getOrderResponse.status).toBe(200);
});Find here the same content as a course, online workshop, free webinar (TBD, follow here for specific date), or invite a private workshop to your team
🏷 Tags: #intermediate, #strategic
✅ Do: Create your own simplistic MQ fake and use it for the majority of testing. Real message queues are hard to purge between tests and will lead to flakiness. In principle, one should strive to use the same infrastructure like production - a real message queue container within a docker-compose (like done with the database). Unfortunately, MQ is a beast that is harder to tame. Queues must get cleaned between tests, (e.g., otherwise, test2 will fetch test1 message). Purging a queue is slow and not deterministic. When the purge/delete command arrives, some messages are in transit and the queue will not delete those until it get acknowledgment. Not only this, in a multi-process mode different processes will step on each others toes. A potential resolution is to create a dedicated queue per test, doing so will kill flakiness but at the same time will kill the performance. Real message queue is needed to test full flows and advanced features (e.g., retries) but is not convenient enough to serve as the primary technique during coding.
A better alternative is to use a simplistic fake that does nothing more than accepting messages, passing them to subscribers/consumers and emitting events when ack/delete happens. This fake will allow the tests to publish messages in-memory and subscribe to events to realize when interesting things happened (e.g., a message was acknowledged). Anyway, the primary mission statetement of the tests is to check how the app behaves and not the well-trusted MQ product. With a fake, all is stored in-memory with simple flows and super-fast performance. Writing a fake like this should not last more than few hours (See code example here and below). The only downside is that it is not suitable to check multi-legs flow like dead-letter queues, retries, and the production configurations. Since these specific tests are slow by nature, they anyway should be executed rarely. Given all of this background, a recommended MQ testing strategy is to use simplistic-fake for the majority of the tests, mostly the tests that cover the app flows. Then to cover other risks, write just a few E2E tests over a production-like environment with a real message queue system.
👀 Alternatives: Stub the message queue listener (the code that subscribes to the queue). Within the test, Mock this listener code to emit new fake MQ messages. While doable, this is not recommended. The listener layer is responsible for catching errors and mapping the result to some MQ action like acknowledgment or rejection. Leave this layer within the test scope ❌ Use a message queue in the cloud - This alternative will suffer from the same issues like real MQ, only it will be even slower ❌
✏ Code Examples
// fake-mq.js, Simplistic implementation of MQ client for testing purposes
// Note: This is code is even more simplified, see full example in the example application
class FakeMessageQueueProvider extends EventEmitter {
  async ack() {
    this.emit('message-acknowledged', { event: 'message-acknowledged' }); //Let the test know that this happened
  }

  async sendToQueue(queueName, message) {
    this.emit('message-sent', message);
  }

  async consume(queueName, messageHandler) {
    // We just save the callback (handler) locally, whenever a message will put into this queue
    // we will fire this handler
    this.messageHandler = messageHandler;
  }

  async pushMessageToQueue(queue, newMessage) {
    this.messageHandler(newMessage);
  }
}🏷 Tags: #advanced, #strategic
✅ Do: Design the message queue client/wrapper to throw events after every message handling. These events will let the test know when the operation is done, and the assertion part can start. Unlike API, message queue flows are hard to track. A typical test puts a message in the queue, some flow starts, and then at some unknown point in time, it ends. The test is left hanging, not knowing when it can check for the new state. Some overcome this by polling the DB for the desired changes (slower and flaky). The first step in making this better is taking advantage of the fact that after every flow, the handling code is acknowledging the message. The test can tap on this event. Implementation-wise, the MQ client should throw an event when it gets confirmation/rejection. The test will subscribe and be informed. One more enhancement is left: Events by nature are implemented with callbacks (e.g., EventEmitter, EventTarget). Callbacks will put an indentation in the test and complicates the flow (i.e., subscribe and handle first, then act and put a message in a queue). A simple solution is to promisify the event to achieve a super simple and flat test! See a code example below
👀 Alternatives: Poll until the new desired state (e.g. new DB record) is met - This isn't horrible using the right helpers, just a bit slower and more complicated to write ❌ Subscribe for events from the MQ itself, once a message was confirmed it's the right time to assert - Not supported by all MQ products and also much slower ❌
✏ Code Examples
// message-queue-client.js. The MQ client/wrapper is throwing an event when the message handler is done
async consume(queueName, onMessageCallback) {
  await this.channel.consume(queueName, async (theNewMessage) => {
    await onMessageCallback(theNewMessage);
    await this.ack(theNewMessage); // Handling is done, acknowledge the msg
    this.emit('message-acknowledged', eventDescription); // Let the tests know that all is over
  });
}
// The test listen to the acknowledge/confirm message and knows when the operation is done
test('Whenever a user deletion message arrive, then this user orders are also deleted', async () => {
// Arrange
// 👉🏼 HERE WE SHOULD add new orders to the system
const getNextMQEvent = once(MQClient, "message-acknowledged"); // Once function, part of Node, promisifies an event from EventEmitter
// Act
fakeMessageQueue.pushMessageToQueue('deleted-user', { id: addedOrderId });
// Assert
const eventFromMessageQueue = await getNextMQEvent; // This promise will resolve once the message handling is done
// Now we're certain that the operations is done and can start asserting for the results 👇
});🏷 Tags: #advanced, #strategic
✅ Do: This bullet is about the bread and butter of message queue testing. Act by putting a message in the queue, assert that it triggered the correct behavior (e.g., a record was added or deleted), then assert that the message was acknowledged or deleted (depends on the specific MQ product). Checking only the app logic, without reporting back to the MQ, is like testing against API without checking the HTTP response status. In the same spirit, also check for the opposite - Once a failure occurs, the message is not being acknowledged, so it will get back to the queue. These tests will stretch the efficiency of the app error handler - Any kind of exception should get caught and result in an adequate response to the MQ: Acknowledge or not
👀 Alternatives: Focus only on the app logic and state - Might miss scenarios where the MQ is not being informed and messages are re-processed again and again ❌ Test this only using E2E tests using a real queue by asserting the number of messages - It's harder to trigger various errors (e.g., data access layer is throwing an exception) from E2E level ❌
✏ Code Examples
//Putting a delete-order message, checking the the app processed this correctly AND acknowledged
test('Whenever a user deletion message arrive, then his orders are deleted', async  ()  => {

  // Arrange
  // Add here a test record - A new order  of a specific user using the API

  const  fakeMessageQueue = await  startFakeMessageQueue();
  const  getNextMQEvent =  getNextMQConfirmation(fakeMessageQueue);

  // Act
  fakeMessageQueue.pushMessageToQueue('deleted-user', { id:  addedOrderId });

  // Assert
  const  eventFromMessageQueue = await  getNextMQEvent;
  // Check here that the user's orders were deleted
  expect(eventFromMessageQueue).toEqual([{ event:  'message-acknowledged' }]);
});🏷 Tags: intermediate
✅ Do: Feed the test queue with a batch of messages, and simulate failures in specific messages. In the realm of these failures, assert that some messages do succeed and the consumer survives to re-fetch more messages. A batch of messages will trigger different risks than a single message - It might be that the entire batch processing will crash, although only specific messages are invalid (others should have been processed successfully). The test expects the client code to recover and fetch more despite the failures, did it? . In streaming applications, a failure in a single message might lead to dis-acknowledgment of the entire sequence or to acknowledge the last (ignore the error). Whatever your strategy is, a test is needed. When using real-queues, the number of messages that are being put should be bigger than a single fetch size (e.g., prefetch in Rabbit, MaxNumberOfMessages in SQS) - Check that although the batch contains errors, the 2nd page is also being fetched and handled.
👀 Alternatives: One might assume that correct handling of a failure proves that the consumer is resilient - In reality, it might be that the consumer code stops when a single message fails and won't re-connect to fetch more
✏ Code Examples
# docker-compose file
version: "3.6"
services:
  db:
    image: postgres:11
    command: postgres
    environment:
      - POSTGRES_USER=myuser
      - POSTGRES_PASSWORD=myuserpassword
      - POSTGRES_DB=shop
    ports:
- "5432:5432"🏷 Tags: #intermediate
✅ Do: Put an invalid message in a queue and assert that hell does not break loose. More specifically, check that the consumer rejects the message, it stays alive, and a proper monitoring metric is fired. Poisoned messages are known MQ phenomena where some invalid/old messages in the queue cause the handler to crash. For example, when due to sender fault a wrong messages schema is stored in a queues and the consumer is not ready for this. Since the consumer crashes, the messages are being served again and again and can paralyze an app. One should not assume a perfect queue content rather embrace a resilient approach - The consuming code should validate each incoming message schema and stop early in case of failures. On the broker/server-side, retry limit should be explictly defined. When the limit is passed, messages should get redirected to the dead-letter queue (see dedicated bullet)
👀 Alternatives: Share Schemas between publishers and consumers so there are fewer conflicts - In a distributed architecture that is built by different teams, it's not practical to count on a sanitized environment ❌
✏ Code Examples
# docker-compose file
version: "3.6"
services:
  db:
    image: postgres:11
    command: postgres
    environment:
      - POSTGRES_USER=myuser
      - POSTGRES_PASSWORD=myuserpassword
      - POSTGRES_DB=shop
    ports:
- "5432:5432"🏷 Tags: #intermediate
✅ Do: Simulate a scenario where the same message arrives twice 'mistakenly,' and assert that it doesn't trigger an undesired state like the same operation done twice. A known limitation of most MQ is 'at least once delivery', which means that the same message might arrive more than one time. Running the same operation multiple times can be unbearable for some business flows - Consider a Payment flow where some fees are withdrawn from the user account more than once. Write a test that put some state, then put the same message twice and check that the final state is satisfactory (e.g., the app charged only once).
👀 Alternatives: Some MQ products can guarantee exactly-once delivery (usually demands sacrificing other factors like performance), this a viable option under some scenarios ✅
✏ Code Examples
# docker-compose file
version: "3.6"
services:
  db:
    image: postgres:11
    command: postgres
    environment:
      - POSTGRES_USER=myuser
      - POSTGRES_PASSWORD=myuserpassword
      - POSTGRES_DB=shop
    ports:
- "5432:5432"🏷 Tags: #advanced, #strategic
✅ Do: Fake a connection/subscription error and ensure that the client retries, and finally, it crashes. This specific failure is outstanding - If the code crashes at this phase, the process won't consume any message and do nothing. You just got a zombie process, sad. Alternatively, should the process fire a metric and crash after few retries, it will increase the chances of the monitoring system realizing the anomaly. Some runtime infrastructure (.e.g, Kubernetes) can auto-heal this scenario by relocating failing processes to different machines or zones. This better treatment will happen only if the code exits, which like anything else, happens in reality if you test it. To achieve this test flow, simulate a connection failure using a stub or wrong MQ URL. You can also set a one-time failure (e.g., The 'MQ.subscribe' method fails only once) to ensure that the connection retries and succeeds finally.
👀 Alternatives: Put a try-catch, log the error, then test the logs - If the connection failed x times, it would keep failing. All the consumer processes will be alive, using resources for no reason instead of being moved and restarted by the infrastructure ❌
✏ Code Examples
# docker-compose file
version: "3.6"
services:
  db:
    image: postgres:11
    command: postgres
    environment:
      - POSTGRES_USER=myuser
      - POSTGRES_PASSWORD=myuserpassword
      - POSTGRES_DB=shop
    ports:
- "5432:5432"🏷 Tags: #intermediate
✅ Do: Write a few, no more than a few, tests against a production-like environment to realize configuration mismatches. All the tests that were described thus far are concerned with the app code. It is not unusual that the code seems fine, but production issues are triggered by MQ installation and configuration. For example, the code might expect a different queue/topic name than what was defined in production. There are many other configurations that affect the message flow like whether acknowledgement are needed and how many time to retry. Beyond configuration, some MQ functionality demands simulating an entire flow like message failing multiple times - These tests are slower by nature and better get separated from the core set of tests. Practically, create a dedicated file for these tests so they can be executed occasionally (e.g., during deployment smoke testing)
👀 Alternatives: Manual testing during deployment - The value of automation is probably evident at this point ❌
✏ Code Examples
# docker-compose file
version: "3.6"
services:
  db:
    image: postgres:11
    command: postgres
    environment:
      - POSTGRES_USER=myuser
      - POSTGRES_PASSWORD=myuserpassword
      - POSTGRES_DB=shop
    ports:
- "5432:5432"🏷 Tags: #strategic
✅ Do: Regardless of the exact timing, the first set of tests to be written is component tests. Once a new sprint or feature is kicked off, the first details known to the developer are about the outcome of the component. At first, a developer can tell what the API/MQ might receive and what (roughly) type of information is returned. Naturally, testing this outer layer, the public interface and outcome, should come first. By doing so, developers are pushed to work with the end in mind - Define the goals before the implementation. Testing the inner functions with unit tests before the overall outcome is specified and understood does not make any sense. Surprisingly, even classic TDD books mention this workflow, see the double verification loop model. What about E2E tests? These usually focus on a broader problem than needed at first - Consequently, it should also get deferred.
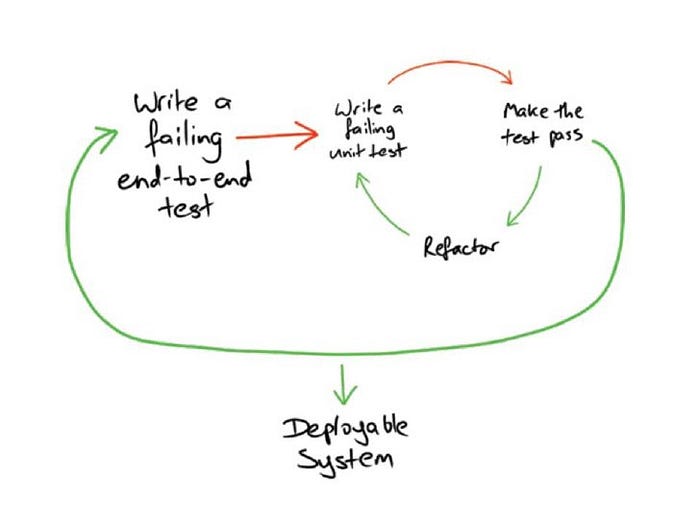
🏷 Tags: ``
✅ Do: Always write few E2E tests on top of component tests. Based on the specific nature of the component, some unit tests might be needed as well. Though E2E means different things to different testers, in the context of a backend they represent tests that are done with live collaborators (i.e., external services) on a real infrastructure. Therefore, they cover risks that are not covered by components tests - configuration issues, misunderstanding with 3rd party services, infrastructural issues and more. When then unit tests are needed? in the presence of none-trivial logic and algorithms. When having a single module with remarkable complexity, it's easier to avoid the distraction coming from other parts by isolating the challenging unit. This article greatly outlines when unit tests shine.
🏷 Tags: ``
✅ Do: Intuitively and manually check that your tests cover all, or at least most, of the application features (usually represented as routes). Yes, this measurement is based on human judgment and therefore is error-prone - Sadly, there is no better option yet. Many teams use code coverage to measure their test effectiveness. While this is a great measurement tool, it's by no means exhaustive and reliable enough to tell whether the tests are trustworthy enough. Having 100% coverage is expensive and does not guarantee bug-free deployment - Error might exist in the DB, MQ, or from code that is covered but not tested (i.e., one can reach some piece of code but not assert against it). Sometimes a component scores high coverage, say 90%, this might falsely trigger confidence, but the left 10% represent the most critical flows of the app. There are some other coverage blind spots and downsides. Consequently, when high reliability is imperative, it's recommended to use coverage as a complementary measurement, but not as the single truth for confidence. In the lack of reliable scientific measurement, nothing can inspire confidence more than knowing that what the user does is covered with testing (i.e., features). Practically, this can be achieved in few ways: by looking at tht test reports and comparing with the requirements document, or by looking at coverage reports and verifying that the untested code is not part of key features, and by checking that the core routes/messages are approached by the tests.
Mutation tests is also an increasing technique that can be combined in the verification suite of tools. That said, it can not serve as the primary technique since it is slow by nature and shows poor performance in tests that involve DB and IO.
🏷 Tags: #strategic
✅ Do: Write the tests on your most convenient time before or during coding, usually when you have enough certainty about the requirements/code. Do not write them once the features are ready because you will lose the great anti-regression perks of testing. Consider this, a developer is writing some great and fully-working code for 3 hours. Let's call this point in time - "A". Now she is coding for additional 6 hours only to discover that 5 hours ago, she presented a new bug. It might be that the last coding hours are a waste or should be fixed fundamentally. Should she have written some tests at point "A", those tests would have discovered the regression right awat and prevented this significant time loss. Like in rock climbing, tests secure our achievements and ensure we don't fall back below the latest success point. The earlier we write the tests, the less time can get lost due to a bug in code that already worked before (e.g., regression). on the other hand, the earlier we write the tests (e.g., TDD), the higher the chances of fundamental changes to the code that will mandate test refactoring - This is another form of time loss. The sweet spot then for writing tests is when the requirements and the implementation are clear enough. Not neccesserily 100% clear, but at least a solid understanding do exist. For some modules, this understanding might occur before writing the code, in other cases, one would prefer to run some experiments before filling confidence enough that she knows what the code is about. In either case, focus on the goal - Writing the tests early enough to get a safety net. Whether it is before the tests or 45 min after - This level of discussion is not strategic enough and should be left for the developers` personal style.
🏷 Tags: ``
✅ Do: Run the tests very frequently, not longer than every few minutes during coding. If possible let it happen automatically, even continuously, while a developer is coding. The more frequent the tests run, the sooner they will discover issues. When they run automatically, the developer won't even need to remember to do anything - The tests are just there, watching her back like a robot assistant. When a component's size is relatively small, the tests can get executed in watch mode, so every code change will trigger a new run. Try this with our example app (includes live DB) - The test will show feedback in 3 seconds. Concerned with noise coming from the testing terminal? Put it in the background: Some test runner will show pop-up when the tests suddenly fail (e.g., Jest notify). There are also silent test runners like mocha-silent and jest-silent. You may also try our experimental watch mode extension that will run the tests every 30 seconds automatically in the background. Interested? Just open an issue
🏷 Tags: #strategic
(This section also appear at the begining and is repeated here as it also integral part of the testing workflow)
✅ Do: When planning your tests, consider covering the five typical flow's outputs. When your test is triggering some action (e.g., API call), a reaction is happening, something meaningful occurs and calls for testing. Note that we don't care about how things work. Our focus is on outcomes, things that are noticeable from the outside and might affect the user. These outcomes/reactions can be put in 5 categories:
• Response - The test invokes an action (e.g., via API) and gets a response. It's now concerned with checking the response data correctness, schema, and HTTP status
• A new state - After invoking an action, some data is probably modified. For example, when updating a user - It might be that the new data was not saved. Commonly and mistakenly, testers check only the response and not whether the data is updated correctly. Testing data and databases raises multiple interesting challenges that are greatly covered below in the 📗 section 'Dealing with data'
• External calls - After invoking an action, the app might call an external component via HTTP or any other transport. For example, a call to send SMS, email or charge a credit card. Anything that goes outside and might affect the user - Should be tested. Testing integrations is a broad topic which is discussed in the 📗 section 'Testing integrations' below
• Message queues - The outcome of a flow might be a message in a queue. In our example application, once a new order was saved the app puts a message in some MQ product. Now other components can consume this message and continue the flow. This is very similar to testing integrations only working with message queues is different technically and tricky. The 📗 section 'Message Queues' below delve into this topic
• Observability - Some things must be monitored, like errors or remarkable business events. When a transaction fails, not only we expect the right response but also correct error handling and proper logging/metrics. This information goes directly to a very important user - The ops user (i.e., production SRE/admin). Testing error handler is not very straighforward - Many types of errors might get thrown, some errors should lead to process crash, and there are many other corners to cover. We plan to write the 📗 section on 'Observability and errors' soon
In this folder you may find a complete example of real-world like application, a tiny Orders component (e.g. e-commerce ordering), including tests. We recommend skimming through this examples before or during reading the best practices. Note that we intentionally kept the app small enough to ease the reader experience. On top of it, a 'various-recipes' folder exists with additional patterns and practices - This is your next step in the learning journey
More use cases and platforms. Each lives in its own folders:
- Nest.js
- Fastify (coming soon 🗓 )
- Mocha
- Authentication
- Message Queue
- Testing OpenAPI (Swagger)
- Consumer-driven contract tests (coming soon 🗓 )
- Data isolation patterns
- Optimized DB for testing
- Error handling
- Performance
The people who spent almost 1000 hours cumulatively to bring this content together

Independent Node.js consultant who works with customers in the USA, Europe, and Israel on building large-scale Node.js applications. Author of Node.js best practices. Holds testing workshops online, onsite and also a recorded course.

Started to program accidentally and fell in love. Strive for readable code. Chasing after perfection. Knowledge freak. Nothing is obvious. Backend developer.

Enthusiastic Node.js and javscript developer. Always eager to learn and explore new technologies.