Please, visit Spark website for documentation about it. See also its public repository
Spark - A micro framework for creating web applications in Kotlin and Java 8 with minimal effort
Tomas Sanchez Spark MVC implementation: Sprank, is the result of improving an assigment for UTN FRBA, Systems Design Course where it consist of developing a simple web application using an MVC pattern with Spark Java and JPA. Having Bootstrap 5 and HandleBars for front-end developing.
The seed provides a minimal set up to arrage your project so you can create a web application with even less effort.
If you are developing the System Design assignment I highly recommend taking a look at this seed, it will provide a good inspiration and can be a reference for your project.
DISCLAIMER: using this seed DOES NOT guarantee passing the assignment, nor developers account for responsibility in case of wrong usage of interfaces provided.
- Project structure: a guideline and convention to better organization.
- Model View Controller pattern: you don't have to code a MVC design yourself.
- Automatic instantiation and initialization of controllers.
- Views are automatically binded to a controller.
- Example controllers provided.
- Base foundational controller with convenience methods.
- Database
- Good practices
- Persistent entity provided for entity standarization.
- Crud repository interface
- Transactional services example
- Front End Templates: easily to extend with HandleBars.
- Distinguish your project with Material Design for Bootstrap (MDB)
- Automatic Navigation activation.
- In model endpoints.
- User profile & roles automatic Navbar handling.
- Internationalization support.
- Security
- User - Role - Privileges
- Log In and Register
- Session token
- Easy to secure endpoints with @Secured anotattion
The Controller has a View which contains a Model, the ViewModel. You should manipulate this ViewModel to reflect changes on your view, when a request is being responded. Your controller will be automatically instantiate by the ControllerLoaderService as long as it inherits from Controller class and it is located inside the controller package (not the core.mvc.controller package), so you don't need to worry about initialization, nor trying to use a singleton approach. With this a View and aViewModel will be automatically initializated, ready to be modified according to your needs.
- Create a new
class ExampleController extends Controllerinside thecontrollerpackage (not thecore.mvc.controllerpackage) - Create a new
file Example.html.hbswith the same name as your controller. Ex.ToDoController, andToDo.html.hbs(case sensitive) - Create a method that returns a
ModelAndView, and takes the spark'sRequestandResponseobjects in the controller with the annotation@GetMapping. Ex:@GetMapping public ModelAndView onShowPage(Request request, Response response){ return getModelAndView(); }
- Run
maininRouterclass. - Open your browser on localhost:7070/'ControllerName'. Ex.
ToDoController, andToDo.html.hbswill be displayed at/todoendpoint
The core package represents the fundamental components of this seed. There you will find a mvc package where the Model View Controller is implemented.
database package contains abstract convenience super classes which will help you with the model design.
services package includes implementations used during run-time.
The most notorious are shown bellow:

There is no need for you to worry about the core package, it just works. Modifyng it may require some understanding of the MVC pattern and the seed itself.
This seed proposes the following package structure:
- Your package
- app
- seeder
- config
- controller
- model
- user
- repository
- services
- security
- auth
- filter
- services
- app
app: here it is recommended to initialize the server. Note: this is already provided in the Application class.
config: use this package to develop your own @Configuration classes a security configuration is already provided.
controller: use this package to group the different controllers classes.
model: it is recommended to develop entities in this package.
repository: use this package for Domain objects collections
services: optional split code your controller business-logic and interaction with a specific respository. For example: if you need to send an e-Mail to users during registration, instead of coding this logic on a RegistrationController you can do it in a UserService which your controller will make use of.
security: develop yout custom security services and filters.
NOTE: As per Eric Evans' book Domain-Driven Design, the “repository is a mechanism for encapsulating storage, retrieval, and search behavior, which emulates a collection of objects.” Likewise, according to Patterns of Enterprise Application Architecture, it “mediates between the domain and data mapping layers using a collection-like interface for accessing domain objects.”
This seed MVC implementation was designed for the specific case of developing a Server-Side-Rendered Web Application, However it does support the use case of REST API.
The Controller class is a generic implementation. Your controllers must inherit this class. By default all controllers are set to the path /controllername with the method GET, and if a TemplateEngine is set, it executes a method that responses with a ModelAndView.
IMPORTANT all controllers must be inside of the your.package.controller package (not your.package.core.mvc.controller). And DO NOT create multiple controller packages.
Suppose you want to display a new "HelloPage", in order to achieve this, you must create a new controller:
public class HelloController extends Controller {

    /* =========================================================== */
    /* Lifecycle methods ----------------------------------------- */
    /* =========================================================== */

    @Override
    protected void onInit() {
        // TODO Auto-generated method stub
    }

    @Override
    protected void onBeforeRendering(Request request, Response response) {
        // TODO Auto-generated method stub

    }

    @Override
    protected void onAfterRendering(Request request, Response response) {
        // TODO Auto-generated method stub

    }

}
When extending the Controller class you will need to define the lifecycle methods, which we will talk about later. Now ignore this, just know that you must only provide the override definition, as no behaviour is really needed.
Then to set up the endpoint you must use the provided annotations as shown bellow:
public class HelloController extends Controller {

    /* =========================================================== */
    /* HTTP Request methods -------------------------------------- */
    /* =========================================================== */

    @GetMapping
    public ModelAndView showHelloPage(Request request, Response response){
        return getModelAndView();
    }

}
Then by the controller means, you are all set. The @GetMapping will set enable GET requests with the showHelloPage method as handler.
These handler methods must return a ModelAndView object (unless the engine is set to false), and take spark.Request and spark.Response as parameters.
For convenience a method getModelAndView() is provided in the Controller superclass, this method will retrieve the handlebars' file. You do not need to modify anything, as long as you respect the naming convention of this seed.
The View class provides a layer of abstraction, representing the logic behind the matching and mapping of an <HTML/> file. It contains a Model, which will be refered as ViewModel, this will allow you to reflect the changes in the actual view, the UI. There is a one-to-one relation between Controller and View.
If you want to display your controller view, a web-page, you will need a HandleBars file which name should be <ControllerName>.html.hbs for this case: HelloController must have Hello.html.hbs in the directory main/resources/templates.
Note: Each Controller has its own View instance, this View is loaded from main/resources/template/ from the file controllername.html.hbs. For example your HelloController would send an html made from the Hello.html.hbs template. The naming is case sensitive, so hello.html.hbs won't work out of the box. See how NotFoundController has a NotFound.html.hbs view file.
A View example using the included layout of Bootstrap-navbar: Hello.html.hbs
Now you can visualize your Hello.html.hbs file at https://localhost:7070/hello
The Model is another abstraction, also refered here as ViewModel, in this case of a Map<String, Object>, providing convenience methods such as instantiation via JSON or Properies file. Model also provides fluent setter for properties, and can be joined with other models (puts one map into another).
This ViewModel is used to reflect changes in the User interface.
Note: Each View has a Model instance. In addition a Model can contain another Model within. As a Controller has a View which contains a ViewModel, controllers will have different ViewModel instances, however there is a shared ViewModel among them.
{{isValid}} is a property of the ViewModel which can be set/unset by its corresponding controller, in this scenario it is used to modify a Bootstrap 5 class for the input form-control, the is-invalid which alerts an error message when set.
All ViewModel properties should be set/unset from the corresponding Controller As shown bellow:
public class LoginController extends Controller{

    @PostMapping
    public ModelAndView onLogIn(Request request, Response response){

        if(passwordIsWrong(request.queryParams("password"))){
            this.getView().getModel().set("isValid", "is-invalid");
        }

        return getModelAndView();
    }
}NOTE: when reloading page the ViewModel is reset to a blank state.
You should override this LifeCycle methods, implementating the lifecycle of the ViewModel. However, you can leave them empty, and will work just as well, without any logic.
    /* =========================================================== */
    /* Lifecycle methods ----------------------------------------- */
    /* =========================================================== */

    /**
     * This method is called upon initialization of the View. The controller can perform its
     * internal setup in this hook. It is only called once per View instance, unlike the
     * onBeforeRendering and onAfterRendering hooks.
     */
    protected abstract void onInit();

    /**
     *
     * This method is called every time the View is rendered, before the Renderer is called and the
     * HTML is placed in the DOM-Tree. It can be used to perform clean-up-tasks before re-rendering.
     *
     * @param request the Spark HTTP request object
     * @param response the Spark HTTP response object
     */
    protected abstract void onBeforeRendering(Request request, Response response);

    /**
     *
     * This method is called every time the View is rendered, after the HTML is placed in the
     * DOM-Tree. It can be used to apply additional changes to the Model after the Renderer has
     * finished.
     *
     * @param request the spark HTTP request object
     * @param response the spark HTTP response object
     */
    protected abstract void onAfterRendering(Request request, Response response);
A recommended implementation is use this methods to add logic before the View is rendered and after it has been rendered.
Continuing the example of above, as the Model does not refresh by itself, you should clean up the model in the onAfterRenderingMethod, not before as it will not be rendered, due to properties overriding, but for the next request, the model will be clean.
public class LoginController extends Controller{

    @Override
    protected void onAfterRendering(Request request, Response response){
        this.getView().getModel().set("isValid", "");
    }

    @PostMapping
    public ModelAndView onLogIn(Request request, Response response){

        if(passwordIsWrong(request.queryParams("password"))){
            this.getView().getModel().set("isValid", "is-invalid");
        }

        return getModelAndView();
    }
}
By doing this, when reloading the page, the field will no longer be is-invalid.
The seed provides you with a PersistentEntity class which should be extended by your use case entities which will be persisted in a database. This is only a generic class with convenience attributes for an entity's Id and generation of them. See how the User class extends PersistentEntity.
@MappedSuperclass
public abstract class PersistentEntity implements Serializable {

    @Id
    @GeneratedValue(generator = "uuid")
    @GenericGenerator(name = "uuid", strategy = "uuid2")
    @Column(name = "id", updatable = false, nullable = false)
    private String id;

}
You can easily create your own entity as
@Entity
@Table(name = "students", uniqueConstraints = {@UniqueConstraint(columnNames = {"email"})})
public class Student extends PersistentEntity{

    @Column(name = "name")
    private String name;

    @Column(name = "email")
    private String email;
}
Recommendation: it is a good practice to define the column name for your entities and for your table.
In addition, there is a PersistentEntitySet<T extends PersistentEntity> generic superclass, which allows you to easily create CRUD Repositories, as you DO NOT NEED to implement them yourself. However, for better performance or special use cases, it is recommended to override them.
The interface provided:
public abstract class PersistentEntitySet<T> implements WithGlobalEntityManager {

    /**
     * Retrieves Table name (class name).
     *
     * ? Example: PersistentEntitySet<User> => Table name is User
     *
     * @return the table name
     */
    protected String getTableName();

    /**
     * Obtains all entities in the database.
     *
     * @return an entity list.
     */
    public List<T> getEntitySet();

    /**
     * Persists an entity in database.
     *
     * @param entity to be persisted
     * @return persisted entity
     */
    public T createEntity(T entity);


    /**
     * Obtains a single entity.
     *
     * @param id the entity unique id
     * @return entity or null.
     */
    public Optional<T> getEntity(long id);

    /**
     * Updates the database with the entity.
     *
     * @param entity to be updated
     * @return the updated entity
     */
    public T updateEntity(T entity);

    /**
     * Updates the database with the entity.
     *
     * @param id the entity's unique id
     * @return the updated entity
     */
    public T updateEntity(Long id);

    /**
     * Removes an entity from database.
     *
     * @param entity the entity to be deleted
     */
    public void deleteEntity(T entity);

    /**
     * Removes an entity from database.
     *
     * @param id the entity unique id
     */
    public void deleteEntity(Long id);
}NOTE: You can easily add your own custom implementation in a child class.
See this case of UserRepository
public class StudentRepository extends PersistentEntitySet<Student> {

    // No need to implement the aforementioned PersistentEntitySet methods. nor override them.

    /**
     * Obtains an student from database that matches the given email.
     *
     * @param email to match
     */
    public Optional<Student> findByEmai(String email){

        try{
            return Optional.of(
                                (Student) entityManager()
                                                .createQuery(String.format("FROM %s S WHERE S.email LIKE :email"))
                                                .setParameter("email", email)
                                                .getSingleResult()
                            );
        }catch(Exception e){
            return Optional.empty();
        }
    }
}This seed contains 2 (two) views, Home and LogIn and a custom Not Found mapped view. Note that each view has its own controller, and all of these inherit from a BaseController. This controller has no associated view, as it is purely an implementation of shared methods and convenience shortcuts.
In this seed, used for developing assignments in UTN-FRBA, the BaseController implements WithGlobalEntityManager, TransactionalOps, interface provided by professors of the course System's Design, which includes convenience methods for transactional operations.

As shown in the Spark routing-documentation, it offers an easy way to create a route.
With three pieces:
- verb (get, post, put, delete, etc...)
- A path (/, /home, /users/:id)
- A callback method
Spark.get("/", (request, response) ->{});However, for Server-Side rendering you will also need a TemplateEngine. And your callback method should return a ModelAndView. So it becomes not that simple.
Spark.get("/", (req, res) ->{
    return new ModelAndView(new HashMap<>(), "filePath.hbs");
},
new HandleBarsTemplateEngine());
When using a controller...
TemplateEngine hte = new HandleBarsTemplateEngine();
HomeController home = new HomeController();
Spark.get("/home", home::handleGETMethod, hte);
Even though this looks cleaner, it leads to the problem of keeping track of the TemplateEngine, controllers instances, literal path. This aggravates when having multiple controllers, with multiple methods even for the same Request method.
Where it can lead to something like:
TemplateEngine hte = new HandleBarsTemplateEngine();
HomeController home = new HomeController();
UsersController users = new UsersController();
ToDosController todos = new ToDosController();
LoginController login = new LoginController();
RegisterController register = new RegisterController();
// And so on...
Spark.get("/home", home::handleGETMethod, hte);
Spark.get("/home/:id", home::handleGETWithIDMethod, hte);
Spark.post("/home", home::handlePostMethod, hte);
Spark.post("/home/:id", home::handlePostWithIdMethod, hte);
// And so on...
Now deleting, or altering any route will be a nightmare, with a very poor legibility. Even JSON or any other MediaType response routing requieres a ResponseTransformer.
In order to simplify and offer better legibility, inspired by the SpirngBoot framework, this seed contains @interfaces which will do the mapping for you.
The provided annotations are:
/**
 * Annotation for mapping HTTP GET requests onto specific handler methods.
 *
 * @author Tomás Sánchez.
 */
@Retention(RetentionPolicy.RUNTIME)
@Target(ElementType.METHOD)
public @interface GetMapping {

    /**
     * The path of the endpoint.
     *
     */
    String path() default "";

    /**
     * Wether a Template engine should be used or not.
     */
    boolean engine() default true;
}

/**
 * Annotation for mapping HTTP POST requests onto specific handler methods.
 */
@Retention(RetentionPolicy.RUNTIME)
@Target(ElementType.METHOD)
public @interface PostMapping {

    /**
     * The path of the endpoint.
     *
     */
    String path() default "";

    /**
     * Wether a Template engine should be used or not.
     */
    boolean engine() default true;
}

/**
 * Annotation for mapping HTTP DELETE requests onto specific handler methods.
 */
@Retention(RetentionPolicy.RUNTIME)
@Target(ElementType.METHOD)
public @interface DeleteMapping {

    /**
     * The path of the endpoint.
     *
     */
    String path() default "/:id";

}


/**
 * Annotation for mapping HTTP PUT requests onto specific handler methods.
 */
@Retention(RetentionPolicy.RUNTIME)
@Target(ElementType.METHOD)
public @interface PutMapping {

    /**
     * The path of the endpoint.
     *
     */
    String path() default "/:id";

}
The @GetMapping will map GET request to the specified path or DEFAULTS in the controller endpoint which is /<controllerName>, there is also an additional parameter: engine which by default will be true: this determines wether the response is an html or not. When true, function should return a ModelAndView, when false it is recommended to return a serializable object as a ResponseTransformer will be used to adapt the response to JSON type.
IMPORTANT doing a request mapping as shown bellow:
public class HomeController extends Controller {

    /* =========================================================== */
    /* HTTP Request methods -------------------------------------- */
    /* =========================================================== */

    @GetMapping(path="homepage")
    public ModelAndView showHomePage(Request request, Response response){
        return getModelAndView();
    }

}
Will result in setting a GET endpoint on /home/homepage.
The same rule applies to @PostMapping. However, @DeleteMapping and @PutMapping do not use the engine logic, for both is recommended to return an object.
As shown below:
public class UsersControlller extends Controller{

    /* =========================================================== */
    /* HTTP Request methods -------------------------------------- */
    /* =========================================================== */

    @DeleteMapping
    public Object onDeleteUser(Request request, Response response){
        userService.delete(request.params("id"));
        return null;
    }

    @PutMapping
    public Object onDeleteUser(Request request, Response response){
        return userService.update(request.params("id"), request.queryParams("user"));
    }

}NOTE: both @DeleteMapping and @PutMapping will use the default path users/:id.
RECOMENDATION: If you need to delete/update from a
forma easy way I found is to make aPOSTwith a flag which indicates wheter it is a post, a delete or an update. This wil allow you to return aModelAndView. UsingJavaScript,fetch()an when returning reload the window, this will reflect the changes in theViewModel, but this requires preventing form default behaviour and using a custom implementation.
Tomas Sanchez's Spark Security implementation was designed inspired on Spring Security
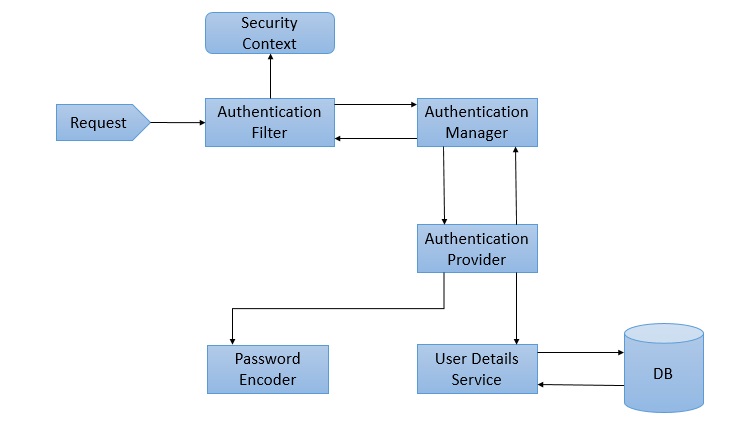
Read more about Spring Security from the source.
Following this, idea the Spark Architecture:

Authentication is the process of verifying who someone is.
There is a provided interface to express this:
public interface Authentication extends Principal, Serializable {

    /**
     * Indicates the authorities that the principal has been granted.
     *
     * @return the authorities granted to the principal or an empty collection.
     */
    Collection<? extends GrantedAuthority> getAuthorities();

    /**
     * Usually a password, but could be anything relevant to the <code>AuthenticationManager</code>.
     * Callers are expected to populate the credentials.
     *
     * @return the credentials that prove the identity of the <code>Principal</code>
     */
    Object getCredentials();

    /**
     * The identity of the principal being authenticated. In the case of an authentication request
     * with username and password, this would be the username.
     *
     * @return the principal identity.
     */
    Object getPrincipal();

    /**
     * Indicates wether the authentication is validated or not.
     *
     * @return true if the token has been authenticated
     */
    boolean isAuthenticated();

    /**
     *
     * @param isAuthenticated <code>true</code> if the token should be trusted (which may result in
     *        an exception) or <code>false</code> if the token should not be trusted
     *
     */
    void setAuthenticated(boolean isAuthenticated);
}
In this design, the AuthenticationProvider produces Authentications and the AuthorizationManager consumes them.
This interface incapsulates the logic behind the authentication process. It is the main strategy. It uses the lone method authenticate() to authenticate an Authentication object.
It is an implementation of the AuthenticationManager, so this must support the method authenticate(). With this, the process of authentication is started. It has the responsibility of retrieving an UserDetail. NOTE: this user detail is not the one provided in the model package, when developing your own User class you must provide an specific adapter to transform your User class to UserDetail.
If the user is not found, it can throw a UsernameNotFoundException. On the other hand, if the user is found, then the authentication details of the user are used to authenticate the user, creating an Authentication object.
This seed provides you with an implementation the SimpleAuthenticationProvider class, located in the security.auth package, which utilizes the default password encoding, the BCryptPasswordEncoder, based on the bcrypt password-hashing function, this means it is the responsible of matching passwords.
This provided interface allows you to develop your custom Authentication process. In this seed implements a JSON Web Token (JWT) Authentication.
This class is should be an specific implementation of the mapping from your User model entity to the utilized UserDetail. It is the bridge between your database and the authentication process.
Should implement the lone method of loadUserByUsername(), which retrieves an User of your model and transforms it into a UserDetail.
This seed provides you with an implementation the SimpleUserService, located in the security.services package.
Authorization is the process of verifying what specific applications, files, and data a user has access to.
Similar to AuthenticationManager, this interface incapsulates the authorization process. Its interface is the method authorize() which verifies wether an Authentication is valid or not.
An UserDetails has a Collection of GrantedAuthority objects, these determine wether the user has access to an specified resource.
This is a simple interface with the sole method of getAuthority().
/**
 * A representation of an authority given to an user.
 */
public interface GrantedAuthority extends Serializable {

    /**
     * An authority must be represented by a string.
     *
     * @return the granted authority
     */
    String getAuthority();
}It is a Spark specific implementation of before Filters for the autorization process.
/**
 * Generic Interface for authorization filter in Spark.
 *
 * @author Tomás Sánchez
 */
public interface SparkAuthorizationFilter {

    /**
     * Session Authorization filter.
     *
     * @param request the Spark HTTP request object
     * @param response the Spark HTTP response object
     * @param authorities a list of required authorities
     * @throws UnauthorizedException when no session was found or token has expired.
     * @throws ForbiddenException when current user is not authorized
     */
    public void authorizationFilter(Request request, Response response,
            Collection<GrantedAuthority> authorities);
}
When there is no session or it has expired, UnauthorizedException is thrown. When the current user is not authorized, a ForbiddenException is thrown. It is the responsibility of the developer to catch these exceptions with Spark.exception() handler.
This project includes an implementation for using a JWT in a Spark Session, SessionJwtAuthorizationFilter, and a global exception handler for both UnauthorizedException and ForbiddenException.
There is a hierarchical Role-Privilege system, in which a Role has many Privileges (many-to-many relationship).
This was based on Baeldung's Spring Security – Roles and Privileges
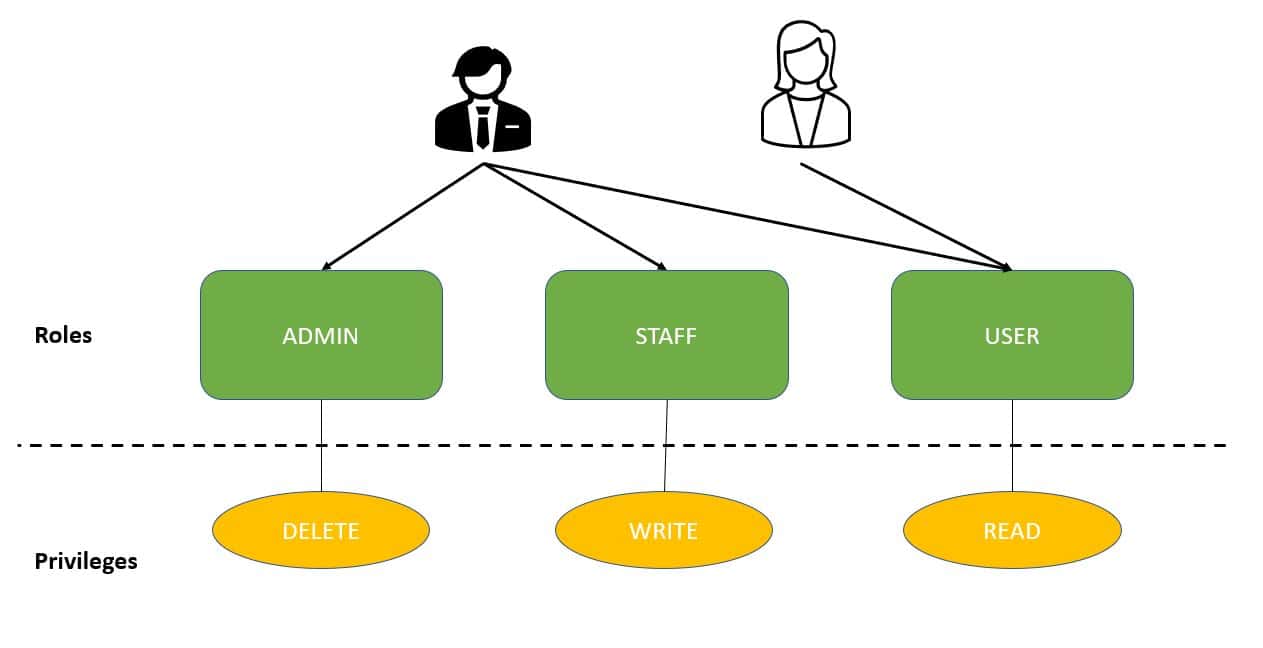
For simplification, an User has only one Role (Many-To-One), and these Roles are organized hirearchally resulting in:
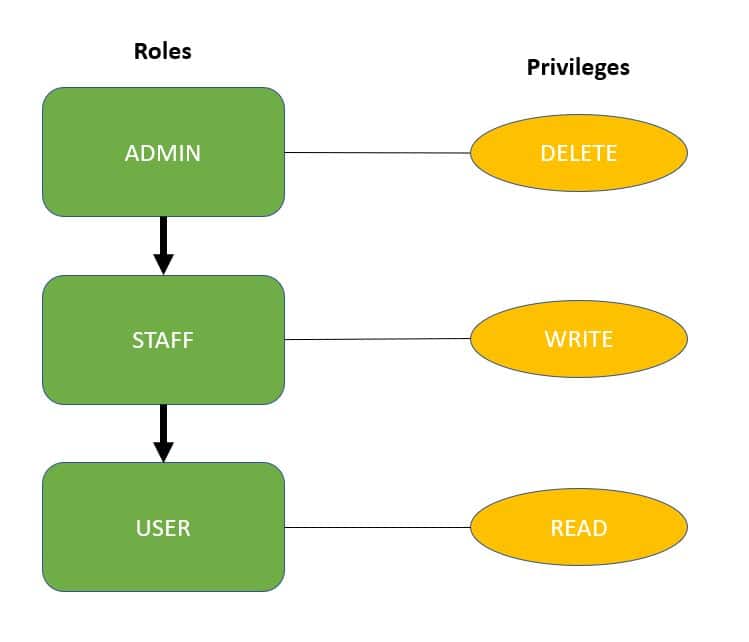
So, assigning the role ADMIN automatically gives the user the privileges of both the STAFF and USER roles.
However, a user with the role STAFF can only perform STAFF and USER role actions.
In addition to reflect this on the DB, each Role has an intrinsic Privilege which results in a ROLE_<ROLE_NAME> as a Privilege.
Eg. Admin: Role, has a ROLE_ADMIN: Privilege
There is an @interface provided to easily restric access to different request handler methods, @Secured.
@Retention(RetentionPolicy.RUNTIME)
@Target(ElementType.METHOD)
public @interface Secured {

    /**
     * Allow access only to given roles or authorities. When no authorities are set, allows access
     * only when session is authenticated.
     *
     * <br>
     * </br>
     *
     * Recommended to use a role hirearchy to better organization.
     */
    String[] roles() default {};
}
Eg. AdminController has a View which should be only accessible for users with the ROLE_ADMIN authority.
public class AdminController extends Controller {

    /* =========================================================== */
    /* Lifecycle methods ----------------------------------------- */
    /* =========================================================== */

    // ...

    /* =========================================================== */
    /* Request Handling ------------------------------------------ */
    /* =========================================================== */

    @GetMapping
    @Secured(roles = "ROLE_ADMIN")
    public ModelAndView index(Request request, Response response) {
        return getModelAndView();
    }
}
@Secured annotattion MUST be used along with a @<Method>Mapping anotattion, because this last one determines the path where the SparkAuthorizationFilter will be added.
In this case, @Secured forbids GET request on the /admin path to all User entities which DO NOT have the Privilege of ROLE_ADMIN.
NOTE: All other request handlers for different methods will not be afected. Eg. to restricts POST request, another @Secured anotattion should be used alongside the @PostMapping.
There is a custom implementation of a ResourceBundle, it requires a .properties file located in /resources/locales/, and also to be named as it follows: i18n-{ISO 639-1}.properties. See ISO 639-1 for further information.
These properties will be loaded automatically into a model, available for the controller, an so its view.
Being your i18n-en.properties file:
inputLabel=An Input label
inputPh=Insert a text
Therefore, you can access these translations from a view this way:
Which will result in:
For each controller, before onBeforeRendering, the request's header Accept-Language will be evaluated, if it is the same as the current used, there will be no changes, otherwise, there will be a try to load the requested language from a .properties file, if it exists, else the default language will be used.
Following the previous example, if the Accept-Language header switchs to es, and there is a i18n-es.properties:
inputLabel=Una etiqueta
inputPh=Ingrese un texto
Will result in:
This project was facilitated with 💙 by Tomas Sanchez.
All material is provided under an MIT License unless otherwise specified.
MIT License: https://mit-license.org/ or see the LICENSE file.