Official PyTorch implementation of the ICCV 2023 paper: From Chaos Comes Order: Ordering Event Representations for Object Recognition and Detection.
🖼️ Check Out Our Poster! 🖼️ here
If you find this work useful, please consider citing:
@InProceedings{Zubic_2023_ICCV,
author = {Zubi\'c, Nikola and Gehrig, Daniel and Gehrig, Mathias and Scaramuzza, Davide},
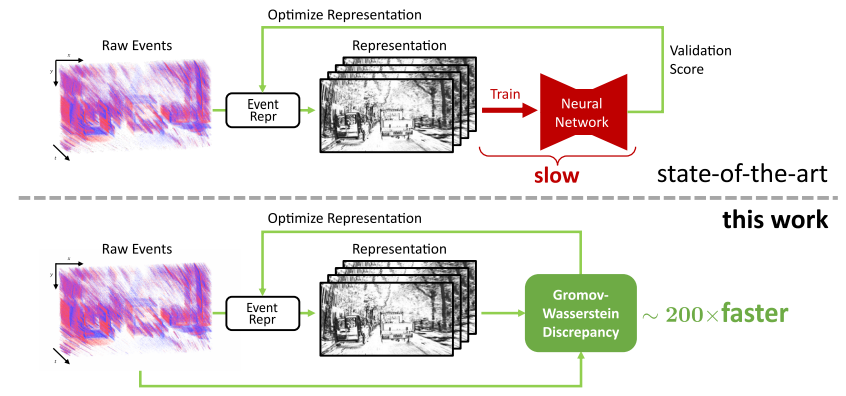
title = {From Chaos Comes Order: Ordering Event Representations for Object Recognition and Detection},
booktitle = {Proceedings of the IEEE/CVF International Conference on Computer Vision (ICCV)},
month = {October},
year = {2023},
pages = {12846-12856}
}We highly recommend using Mambaforge to reduce the installation time.
conda create -y -n event_representation python=3.8
conda activate event_representation
conda install -y pytorch==1.13.1 torchvision==0.14.1 torchaudio==0.13.1 pytorch-cuda=11.7 -c pytorch -c nvidia
pip install matplotlib tonic tqdm numba POT scikit-learn wandb pyyaml opencv-python bbox-visualizer pycocotools h5py hdf5plugin timm tensorboard addict
conda install -y pyg -c pyg
conda install -y pytorch-scatter -c pyg
cd ev-licious
pip install .
cd ..
cd gryffin
pip install .-
To evaluate or train the model, you will need to download the required preprocessed datasets:
Train Validation Test Gen1 download download download -
1 Mpx dataset needs to be downloaded from the following repository and then processed using precompute_reps.py file.
-
Annotations for GEN1 and 1 Mpx datasets can be downloaded from here.
Contains folders of all trained models (in the end full YOLOv6 backbone that is now on-par with Swin-V2 but faster training and less memory). Each folder has weights folder, and we use best_ckpt.pt as the checkpoint.
Currently, contains two optimized representations we found (small variations), by default the second one is used - aim for gen1_optimized_2 and gen1_optimized_augment_2 weights when evaluating.
If you want to use the first one, uncomment it at lines 16-66 (optimized_representation.py) and comment out the second one (lines 86-134).
gen1_optimized_augment_2 should produce the following results (50.6% mAP):
 Average Precision  (AP) @[ IoU=0.50:0.95 | area=   all | maxDets=100 ] = 0.506
 Average Precision  (AP) @[ IoU=0.50      | area=   all | maxDets=100 ] = 0.775
 Average Precision  (AP) @[ IoU=0.75      | area=   all | maxDets=100 ] = 0.539
 Average Precision  (AP) @[ IoU=0.50:0.95 | area= small | maxDets=100 ] = 0.420
 Average Precision  (AP) @[ IoU=0.50:0.95 | area=medium | maxDets=100 ] = 0.580
 Average Precision  (AP) @[ IoU=0.50:0.95 | area= large | maxDets=100 ] = 0.528
 Average Recall     (AR) @[ IoU=0.50:0.95 | area=   all | maxDets=  1 ] = 0.319
 Average Recall     (AR) @[ IoU=0.50:0.95 | area=   all | maxDets= 10 ] = 0.635
 Average Recall     (AR) @[ IoU=0.50:0.95 | area=   all | maxDets=100 ] = 0.666
 Average Recall     (AR) @[ IoU=0.50:0.95 | area= small | maxDets=100 ] = 0.622
 Average Recall     (AR) @[ IoU=0.50:0.95 | area=medium | maxDets=100 ] = 0.712
 Average Recall     (AR) @[ IoU=0.50:0.95 | area= large | maxDets=100 ] = 0.666
- Set
DATASET_PATHas the path to either the 1 Mpx or Gen1 dataset directory - Set
OUTPUT_DIRto the path where you want to save evaluation outputs. - Set
conf-file's (e.g. ev-YOLOv6/configs/gen1_optimized_augment2.py by default; configs are same for both gen1 and gen4) pre-trained parameter to the path of the model (best_ckpt.pt) - Evaluation scripts also start from
train.pyfile, but usetestingparameter
For simplicity, we are only showing the validation script for Gen1. For 1 Mpx it should be similar.
python ev-YOLOv6/tools/train.py --wandb_name test_gen1_optimized_augment --file $DATASET_PATH \
--data-path ev-YOLOv6/data/gen1.yaml --conf-file ev-YOLOv6/configs/gen1_optimized_augment2.py \
--img-size 640 --batch-size 32 --epochs 100 --device 0 --output-dir $OUTPUT_DIR \
--name test_gen1_optimized_augment --representation OptimizedRepresentation --dataset gen1 --testingpython ev-YOLOv6/tools/train.py --wandb_name test_gen1_optimized_augment --file $DATASET_PATH \
--data-path ev-YOLOv6/data/gen1.yaml --conf-file ev-YOLOv6/configs/gen1_optimized_augment2.py \
--img-size 640 --batch-size 32 --epochs 100 --device 0 --output-dir $OUTPUT_DIR \
--name test_gen1_optimized_augment --representation OptimizedRepresentation --dataset gen1 --testing --augmentPretrained Swin-V2 weights (swinv2_yolov6l6.pt) can be downloaded from here.
You can set the pretrained variable to your path to swinv2_yolov6l6.pt file.
- Set
OUTPUT_DIRto the directory where you want to store training outputs
Training without augmentation:
python ev-YOLOv6/tools/train.py --wandb_name gen1_optimized --file /shares/rpg.ifi.uzh/dgehrig/gen1 \
--data-path ev-YOLOv6/data/gen1.yaml --conf-file ev-YOLOv6/configs/swinv2_yolov6l6_finetune.py \
--img-size 640 --batch-size 32 --epochs 100 --device 0 --output-dir $OUTPUT_DIR \
--name gen1_optimized --representation OptimizedRepresentation --dataset gen1
Training with augmentation:
python ev-YOLOv6/tools/train.py --wandb_name gen1_optimized_augment --file /shares/rpg.ifi.uzh/dgehrig/gen1 \
--data-path ev-YOLOv6/data/gen1.yaml --conf-file ev-YOLOv6/configs/swinv2_yolov6l6_finetune.py \
--img-size 640 --batch-size 32 --epochs 100 --device 0 --output-dir $OUTPUT_DIR \
--name gen1_optimized_augment --representation OptimizedRepresentation --dataset gen1 --augment- Set
OUTPUT_DIRto the directory where you want to store training outputs
Training without augmentation:
python ev-YOLOv6/tools/train.py --wandb_name gen4_optimized \
--file /shares/rpg.ifi.uzh/nzubic/datasets/gen4/OptimizedRepresentation \
--data-path ev-YOLOv6/data/gen4.yaml --conf-file ev-YOLOv6/configs/swinv2_yolov6l6_finetune.py \
--img-size 640 --batch-size 32 --epochs 100 --device 0 --output-dir $OUTPUT_DIR \
--name gen4_optimized --representation OptimizedRepresentation --dataset gen4
Training with augmentation:
python ev-YOLOv6/tools/train.py --wandb_name gen4_optimized_augment \
--file /shares/rpg.ifi.uzh/nzubic/datasets/gen4/OptimizedRepresentation \
--data-path ev-YOLOv6/data/gen4.yaml --conf-file ev-YOLOv6/configs/swinv2_yolov6l6_finetune.py \
--img-size 640 --batch-size 32 --epochs 100 --device 0 --output-dir $OUTPUT_DIR \
--name gen4_optimized_augment --representation OptimizedRepresentation --dataset gen4 --augment- All details regarding the execution of Mini N-ImageNet experiments can be seen in n_imagenet/scripts folder.
- Details on how to download the Mini N-ImageNet dataset and prepare data can be seen at their official repo here.
- Computation can be run with the following command:
ID=0
REP_NAME=VoxelGrid

CUDA_VISIBLE_DEVICES=$ID python representations/representation_search/gen1_compute.py \
--event_representation_name $REP_NAME
where ID represents ID of the device, and REP_NAME represents the representation name.
python representations/representation_search/optimization.py
Change file Path to the directory of GEN1 folder where training.h5, validation.h5 and testing.h5 files are.
Change SAVE_PATH of run_optimization function to the path where you want to save the results.
Obtained optimal representation (ERGO-12):

This project has used code from the following projects:
- Swin-Transformer for the Swin Transformer version 2 implementation in PyTorch
- YOLOv6 for the object detection pipeline
- n_imagenet for Mini N-ImageNet experiments
- AAAI_Event_based_detection for processed/filtered 1 Mpx dataset