A Python package to make the creation of Cog actors easier!
build_a_cog depends on Panda3D. If you have not installed it already, you can do so with the following command:
pip install Panda3DTo install the latest version of build_a_cog, open your favorite command terminal and use the following command:
pip install build_a_cogIf for whatever reason you are unable to install build_a_cog through pip, you can also install it through the latest source distribution released on GitHub. Download the .whl file and open your favorite command terminal. Navigate to wherever the file was downloaded and run the following command:
pip install [file]With build_a_cog, the creation of Cog actors becomes much easier.
Like with any other Panda3D Toontown project, you must first extract the Phase Files. You can do so with the following command, with [x] being replaced by the id of the phase file:
multify.exe -xf phase_[x].mfWith build_a_cog, you will need phase_3, phase_3.5, phase_4, phase_5, phase_6, phase_7, phase_11, and phase_12. Once these files are extracted, drop them into the same directory you want to have your Python files in. Your directory should look similar to this:
| phase_3
| phase_3.5
| phase_4
| phase_5
| phase_6
| phase_7
| phase_11
| phase_12
| test_cog.py
Next, drop the three suit type models in your main directory. tt_a_ene_cga_zero.bam, tt_a_ene_cgb_zero.bam, and tt_a_ene_cgc_zero.bam are all in phase_3.5/models/char. Finally, you will need the suit icon model: ttr_m_gui_gen_cogIcons.bam. You can find this file in phase_3/models/gui. Once these files are in your directory, it should look like this:
| phase_3
| phase_3.5
| phase_4
| phase_5
| phase_6
| phase_7
| phase_11
| phase_12
| test_cog.py
| tt_a_ene_cga_zero.bam
| tt_a_ene_cgb_zero.bam
| tt_a_ene_cgc_zero.bam
| ttr_m_gui_gen_cogIcons.bam
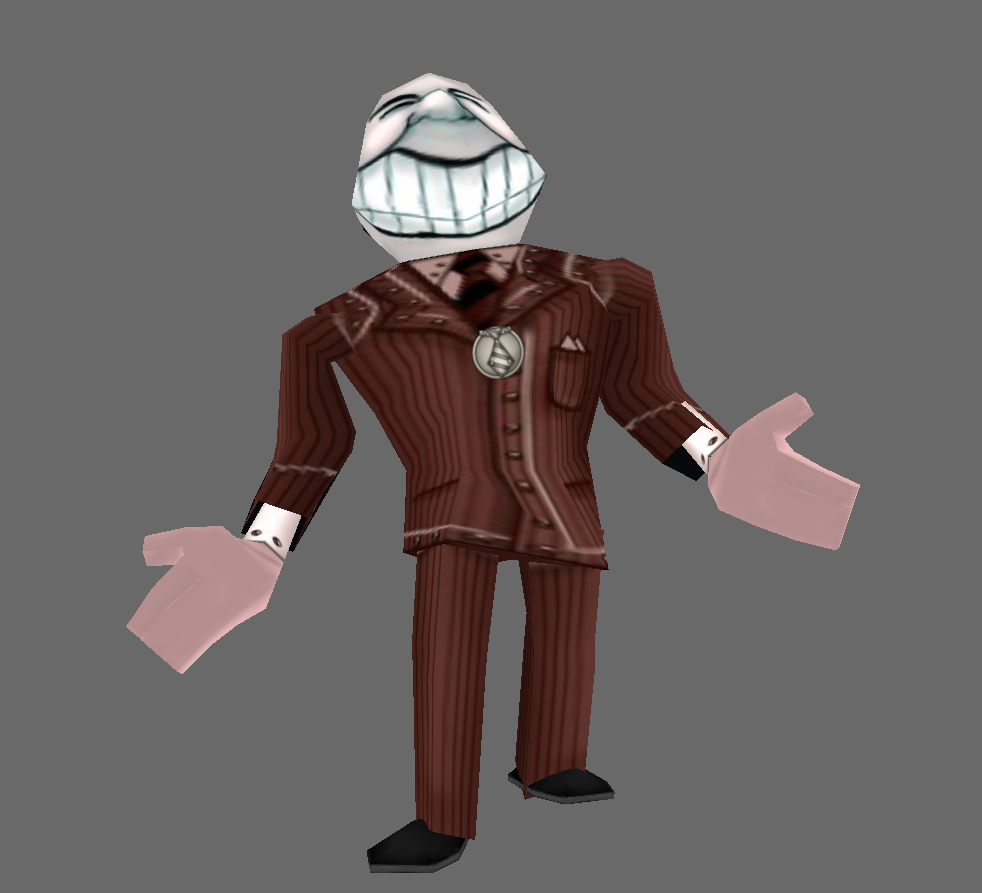
Now that all the necessary files are here, you can open the Python file containing your scene and start to program! Here's an example scene:
from direct.directbase.DirectStart import base

import build_a_cog as cog

yesman = cog.build(cog.Cog(suit=cog.Suit(model="tt_a_ene_cga_zero.bam",
        sigil="CorpIcon",
        torso="phase_3.5/maps/c_blazer.jpg",
        arms="phase_3.5/maps/c_sleeve.jpg",
        legs="phase_3.5/maps/c_leg.jpg",
        hands=(0.95,0.75,0.75,1.0)
    ),
    head=cog.Head(file="phase_4/models/char/suitA-heads.bam",
        node="yesman",
        texture=None,
        color=None
    ),
    animation=cog.Animation(file="phase_5/models/char/tt_a_ene_cga_song-and-dance.bam",
        anim_loop=True,
        loop_from=None,
        loop_to=None,
        loop_restart=None,
        pose=False,
        pose_frame=None
    )
))

yesman.setPos(0,20,-4.2)
yesman.setH(180)
yesman.reparentTo(render)

base.run()
This code will produce the following cog:
You can find documentation for build_a_cog in the rustycog lib.rs file.
Code in build_a_cog is licensed under the MIT License.