The pyelmer package provides a simple object-oriented way to set up Elmer FEM simulations from python.
Some utility-functions for pre-processing using the gmsh python API, execution of ElmerGrid and ElmerSolver, and some post-processing routines are provided.
pyelmer requires Python >= 3.7. To run simulations, an Elmer executable is needed. As pyelmer was developed to be used with gmsh, an installation of this package is required (even though it may also be used without gmsh). Simulation settings, solver, and materials are stored in yaml-files. Therefore pyelmer depends on pyyaml. Furthermore, matplotlib is used for visualization.
The required packages should be installed automatically when installing pyelmer. If you encounter any problems, try to run:
pip install --upgrade gmsh
pip install --upgrade pyyaml
pip install --upgrade matplotlibYou can install pyelmer using pip:
pip install pyelmerThe basic working principle of pyelmer is the representation of sif-file entries in dictionaries. Each section of the sif-file is represented by instances of the classes
- Solver
- Equation
- Material
- Body
- Boundary
- BodyForce
- InitialCondition
The parameters of e.g. a material are stored in
material.data = {
    'Density': 1.1885,
    'Heat Capacity': 1006.4,
    'Heat Conductivity': 0.025873
}
An object of the class Simulation is used to manage all members of the sif-file:
import pyelmer.elmer as elmer

# simulation object
sim = elmer.Simulation()

# create material and add it to sim
air = elmer.Material(sim, 'air')
air.data = {
    # material data here
}

# add solvers, equations, bodies, ...
heat_solver = elmer.Solver(sim, 'heat')
heat_solver.data = {
    # solver data here
}
# ...

# write sif-file
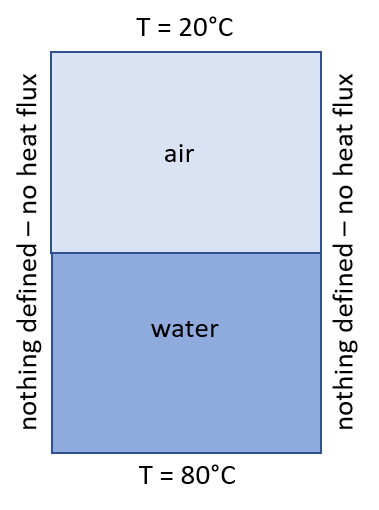
sim.write_sif('./simulation_directory/')The following example shows the setup of a simple heat transfer simulation. The domain consists of two quadratic bodies stacked on top of each other, the lower one is water and the upper one is air. At the bottom a constant temperature of 80°C, and at the top a constant temperature of 20°C is set. You may consider this as a very simple model of the heat distribution when boiling water in a pot:
The example uses the OpenCASCADE geometry kernel of gmsh. Note, that you may also use the build-in "geo-style" kernel in python. Alternatively, it is also possible to manually set the body-ids of the mesh created with the tool of your choice.
import os
import gmsh
from pyelmer import elmer
from pyelmer import execute
from pyelmer.post import scan_logfile
from pyelmer.gmsh import add_physical_group, get_boundaries_in_box


###############
# set up working directory
sim_dir = "./simdata"

if not os.path.exists(sim_dir):
    os.mkdir(sim_dir)

###############
# geometry modeling using gmsh
gmsh.initialize()
gmsh.option.setNumber("General.Terminal", 1)
gmsh.model.add("heat-transfer-2d")
factory = gmsh.model.occ

# main bodies
water = factory.addRectangle(0, 0, 0, 1, 1)
air = factory.addRectangle(0, 1, 0, 1, 1)

# create connection between the two bodies
factory.synchronize()
factory.fragment([(2, water)], [(2, air)])

# add physical groups
factory.synchronize()
ph_water = add_physical_group(2, [water], "water")
ph_air = add_physical_group(2, [air], "air")

# detect boundaries
line = get_boundaries_in_box(0, 0, 0, 1, 0, 0, 2, water)
ph_bottom = add_physical_group(1, [line], "bottom")
line = get_boundaries_in_box(0, 2, 0, 1, 2, 0, 2, air)
ph_top = add_physical_group(1, [line], "top")

# create mesh
gmsh.model.mesh.setSize(gmsh.model.getEntities(0), 0.1)
gmsh.model.mesh.generate(2)

# show mesh & export
gmsh.fltk.run()  # comment this line out if your system doesn't support the gmsh GUI
gmsh.write(sim_dir + "/case.msh")

###############
# elmer setup
elmer.data_dir="./data"

sim = elmer.load_simulation("2D_steady")

air = elmer.load_material("air", sim)
water = elmer.load_material("water", sim)

solver_heat = elmer.load_solver("HeatSolver", sim)
solver_output = elmer.load_solver("ResultOutputSolver", sim)
eqn = elmer.Equation(sim, "main", [solver_heat])

T0 = elmer.InitialCondition(sim, "T0", {"Temperature": 273.15})

bdy_water = elmer.Body(sim, "water", [ph_water])
bdy_water.material = water
bdy_water.initial_condition = T0
bdy_water.equation = eqn

bdy_air = elmer.Body(sim, "air", [ph_air])
bdy_air.material = air
bdy_air.initial_condition = T0
bdy_air.equation = eqn

bndry_bottom = elmer.Boundary(sim, "bottom", [ph_bottom])
bndry_bottom.data.update({"Temperature": 353.15})  # 80 °C
bndry_top = elmer.Boundary(sim, "top", [ph_top])
bndry_top.data.update({"Temperature": 293.15})  # 20 °C

sim.write_startinfo(sim_dir)
sim.write_sif(sim_dir)

##############
# execute ElmerGrid & ElmerSolver
execute.run_elmer_grid(sim_dir, "case.msh")
execute.run_elmer_solver(sim_dir)

###############
# scan log for errors and warnings
err, warn, stats = scan_logfile(sim_dir)
print("Errors:", err)
print("Warnings:", warn)
print("Statistics:", stats)
The pre-defined materials and solvers can be found in the directory pyelmer/examples/2D_heat_transfer/data. An alternative version of this example, without using the pre-defined materials and solvers, can be found in the examples folder.
Additional examples can be found on GitHub in the examples directory:
Some utility functions for the geometry generation with gmsh are provided in pyelmer/gmsh.py (e.g. add_physical_group, get_boundaries_in_box used in the example). An advanced object-oriente gmsh interface using the OpenCASCADE kernel, which facilitates the detection of the boundaries is used in crystal_growth_2d.py.
Note, that it may also be worth trying pygmsh, which is build on top of the rather complicated gmsh python API used in this example.
There are two video tutorial on pyelmer (using deprecated solver-specific keywords):
A presentation from the elmer webinar series (using these two examples) can be found here.
In earlier versions of pyelmer solver-specific keywords were used, for maintainability reasons these are not included any longer. For the old implementation with solver-specific keywords use:
import pyelmer.elmerkw as elmer
# instead of
# from pyelmer import elmerA simple documentation in form of doc-strings can be found in the source code. A more extensive documentation will hopefully follow soon.
pyelmer is published under the GPLv3 license.
If you use pyelmer in your research, we would be grateful if you cite us using the information provided here.
This project has received funding from the European Research Council (ERC) under the European Union's Horizon 2020 research and innovation programme (grant agreement No 851768).
Any help to improve this package is very welcome!


