![]()
Manage your pending tasks
Visit website »
View Code
·
Report Bug
The aim of this projects is to implement a console application to manage a to-do list.
TODO is an application to manage a to-do list in a simple way. From this, you can create, delete and display the tasks of your day with a series of commands:
todo add TEXT: This command is used to create new tasks.todo delete TEXT: To delete an existing task, by searching for the task name instead of an identifier, you can easily delete it.todo list: You will be able to see all the tasks in your list. This command allows you to change the output format with the--output <TYPE>parameter, where you can choose betweentxt,jsonandtableoptions.
As you can see, its use is very simple, since this application is in charge of handling errors, searching by text instead of by identifier, making the connection with the Rest API, etc.
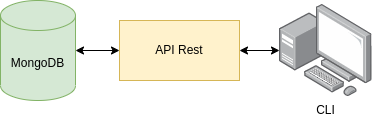
To make this application work properly, it is necessary to have a Rest API in charge of managing all the requests with a MongoDB server.
There are two ways to test this application:
- Locally: This is explained in the section Installation.
- Using the GitHub Actions playground: A workflow has been created to perform a series of tests ./actions/workflows/example.yml.
- Create randomly between 10 and 100 entries.
- They are displayed on the screen depending on the output type specified in the workflow input (
txt,tableorjson). - The events created are deleted, leaving the list empty.
To install this application on a local machine, it can be done in two ways, but in both, it is necessary to clone this repository:
git clone https://github.com/FernandoPerezLara/todo.git
cd todo

git submodule init & git submodule update
git config submodule.recurse trueThis method is the most recommended because the installation of packages and libraries is done automatically in a controlled environment. On the other hand, it is more secure, it does not require open ports on your local machine, since the communication is done internally between the containers.
As previously mentioned, it is necessary to have the API Rest and the MongoDB server running in the background to make the corresponding requests. To do this, the following command is launched:
cd node-todo
docker-compose up
This command will create a custom image for the Rest API (Dockerfile) and two containers to run the database and the Rest API (docker-compose.yml). This will create a network named node-everything_server that will connect to the application container.
Secondly, to run the application it will be enough to execute the following command, since it will automatically create the necessary images and containers:
docker-compose run todo list --output tableThese images can be found in the folder ./docker/Docker and are orchestrated using the file docker-compose.yml.
This way is the least recommended because it requires manually installing all the dependencies and libraries needed to run the program.
As done in the previous section, first of all, in order to be able to run the Rest API together with the MongoDB server it will be necessary to install all the necessary dependencies:
cd node-todo
npm install
node server.js
It is necessary to modify the MongoDB server link in the file ./node-todo/config/database.js y and the file ./scripts/utils/constants.py.
Once the Rest API and database are launched, the Python libraries needed to run the program will be installed:
pip install -r requirements.txt
./todo list --output tableInside this repository you can find the submodule FernandoPerezLara/node-todo. This contains the Rest API server and the database server.
The file todo will be in charge of executing the application and with a series of commands specified in ./scripts/commands manage al the tasks from the list. Request and error handling can be found at ./scripts/utils.
LThe tests can be found in the folder ./test.
The configuration file for the containers is docker-compose.yml and makes use of the images created in the folder ./docker.
Finally, all workflows can be found at ./.github/workflows.
This repository has automated workflows for the future implementation of new features.
The main and develop branches are protected, to create a new feature or resolve a bug, it is necessary to create a new branch from develop and create a pull request from this branch for its later combination with develop.
When creating the pull request, the following workflows will be executed:
- ./actions/workflows/linter.yml: It checks that all the code is well written, if not, this branch is blocked.
- ./actions/workflows/test.yml: This flow executes the tests found inside ./test.
- Add between 10 and 100 new items to the list.
- Display a list in
txtformat. - Display a list in
jsonformat. - Display a list in
tableformat. - Remove a single item from the list.
- Remove all items from the list.
If all workflows pass successfully, it will be necessary for a team member to review the changes and accept them.
Before creating the pull request it is recommended to pass these two workflows from a local machine, this can be done with the following commands:
docker-compose run linter
docker-compose run test
To make it easier to search for errors, a log system has been implemented and can be found at ./output/logs.txt.
- Fernando Pérez Lara (@FernandoPerezLara) for developing this project.