How to manage and use Policies
Policies offer a way to give access rights to specific users, whereas the access can include the ability to read, write, edit, or delete entities of the MBP (e.g., Sensors, Sensor Data, Devices, Operators, ...). Once created, a policy can be attached to any entity of the MBP, defining for which users they are accessible. Furthermore, altering data is possible to increase privacy using so-called Policy Effects.
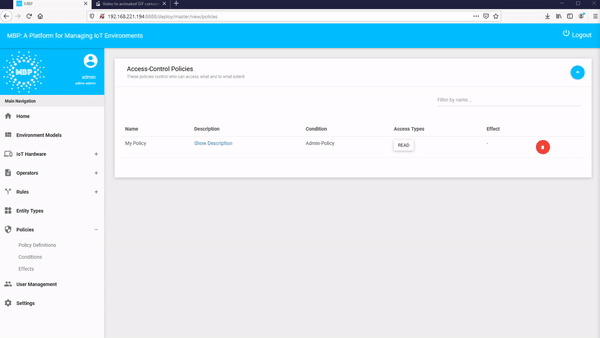
To create a new access policy, select "Policies" in the main menu.
As shown, a Policy can consist of two parts: 1) A policy condition, which defines which users are allowed to access an entity of the MBP, and 2) a policy effect, which allows to alter data to be shared to increase privacy. Policy effects are especially useful if someone wants to share their position but only want to share it with a specific accuracy, e.g., 500 meters. Adding a rounding modifier to the data so the specific position is not shown to other users can be achieved by the Policy effects. Policies follow a white list principle, which means you have to specifically give access to your entities, otherwise, only you have access to them.
- Select Conditions under the tab Policies
- Select + to add a new Condition
- Give the condition a name so you can reuse it later (for example if you want to use it in several policies)
- A condition consists of "Rules" that can be combined using AND or OR operators. First, use the drop down menu to select on which basis you want to allow access. Currently, you can give users access based on their user name, their first name, or last name. Specifying the last name allows, for example, to give your whole family access with a single condition
- In the second drop down menu, you can select a comparison operator, such as equals, not equals, begins with, and so on
- After that, in the text field, you can specify the user(s) to give access to (e.g., by putting their user name, first name or last name).
- Click on Register to create the condition
Effects allow to alter shared data for privacy reasons.
- Select Effects under the tab Policies
- Select + to add a new effect
- Give the effect a name so you can reuse it later (for example if you want to use it in several policies)
- Select action type (currently only one type is available) Numeric Accuracy Modification
- Set the accuracy, specifying how much the values should differ from the original values by specifying on which factor it should be rounded
- Set the precisions, i.e., the number of digits to be shown (data is rounded accordingly)
- Select register

- Select Policy Definitions under Policy
- Select + to add a new policy
- Give it a name, a description, select the previously created condition, the type of access (e.g., read or write), and (if applicable) the effect to alter data
- Click of Register

- Create your entity using the + button (e.g., a device)
- Fill out the specific form and select the created policy in the drop down menu (selection of multiple policies is possible. Warning: we do not check conflicts between policies)
- Now the device is only visible for users specified by the policy