How to register actuators
To register a new actuator in MBP, you will need to create before a control operator suitable for the actuator, and a device to which the actuator is plugged to and where the operator will be executed to connect to the MBP.
In the MBP, press the Actuators button in the dashboard to reach the actuators view, then press the ➕ button.

Fill the properties in the shown dialog, choose the previously created Operator and Device, and press Register.
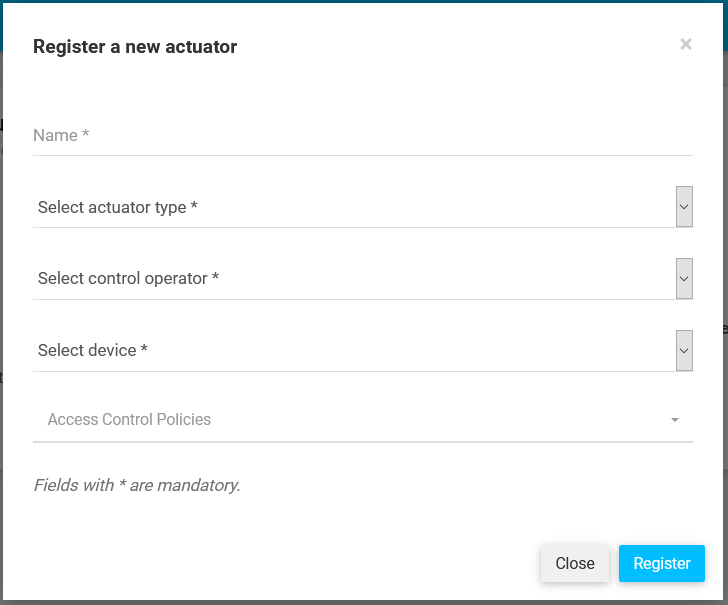
The following properties are required for the registration:
-
Name: Choose a name so that you can easily know which actuator it is and where it is. If you have more of the same type in your home, it is important to know what exact it controls, for example,
light-switch-living-room. -
Actuator type: Choose the actuator type from the provide options: Buzzer, Speaker, Switch, LED, Light, Vibration, Motor, Heater, Air Conditioner. If your actuator type is not yet provided in the options, you can add a new actuator type in
Main Navigation > Entity Types > Actuator types. -
Control operator: Choose a corresponding operator for your actuator. See already provided control operators.
-
Device: Choose the device the sensor is plugged to.
Optional properties:
-
Access control policies: the access to IoT hardware can be controlled through policies. They are defined in the policies view
Main Navigation > Policies. Please see How to define policies.
Actuators can be in the following states:
- Unavailable: the operator cannot be installed (device unavailable, wrong configuration, ...).
- Ready: the actuator is ready for installation, device is available and correctly configured.
- Installed: the operator is already installed, but not running (that is, stopped).
- Running: the operator is installed and running.
- Unknown: the state of the actuator is not known, it was not recognize. Check all data you have inserted.
To see more details about an actuator, click on the name of a registered actuator in the actuators view. In the actuator detail view, the aforementioned states can be visualized as well.
To be able to send commands to the actuator, we first need to install the corresponding operator in the connected device and start it.
Press the Install operator button. After this, the actuator should have the state Installed. Then, press Start Operator. If everything went fine, the actuator will be in the Running state. Some statistics will be also shown, for example the average value from all received sensor values.
Please see How to create IoT applications, to see how to create rules that will automatically send commands to actuators.