Welcome to our XTrips.ai demonstration. Today, we're excited to take you through a practical and straightforward exploration of our application. Developed with express.js and hosted on AWS EC2, XTrips.ai is our answer to the complexities of travel planning. We've focused on creating a tool that's not only technologically advanced but also intuitive and easy to use. Whether you're planning your next trip or just curious about our technology, this walkthrough is designed to give you a clear understanding of how XTrips.ai can simplify your travel experience.
Watch our demo here: https://youtu.be/futt20VbQhU
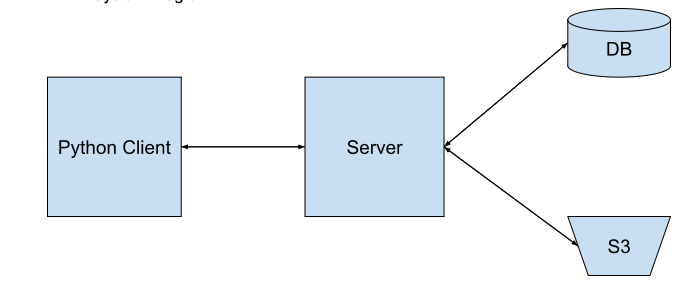
Our system architecture is demonstrated as follows:
Jingyu WU jwt9656 Kaiwen Che mzi4117 Bingqi Shang eoq2203 Yangshuo Zhang
The 'xtrip' database, designed for a flight booking system, has been successfully created and deployed on Amazon Web Services (AWS). This deployment leverages AWS's robust, scalable, and secure cloud infrastructure to ensure high availability and performance of the flight booking system.
The database consists of eight interrelated tables:
- booked_flight: Stores details of each booked flight’s information.
- user: Stores user information. A password is implemented for security,
- booking: Links user information with responding flight bookings.
- flightquery: Stores flight’s origin, destination, and date
- leg: Stores each flight’s information returned by flightAPI
- flightquery_leg: connects flightquery and leg
- file: stores itinerary files’ amazon s3 keys
- bookedflight_session: Links booked_flight with a session string.
Here is the sql file of the database: xtrip_initialization.sql
Our backend infrastructure utilizes the express.js framework and is deployed on Amazon Web Services (AWS) Elastic Compute Cloud (EC2) for robust and scalable performance.
Our project have two basic workflows, here's a breakdown of each: Search & Booking Flow:
- Gather Information: Collect data from user input.
- API Call: Call the query api to get flight information.
- Database Storage: Store the processed data in flightquery, legs, and flightquery_legs tables.
- Display Flight Options: Show flight options to the user.
- User Selection: User chooses a flight.
- Book Flight: Selected flight details are stored in booked_flight.
- Generate Confirmation Number: Create a confirmation number for the booking.
- Record Booking: Add a new record to the booking table.
- Retrieve & Return Data: Fetch new records and return the confirmation number.
Generate Recommendation Flow:
- Fetch User's Booked Flights: Use confirmation code to get booked_flight.ids.
- Show Booked Flights: Display these flights to the user.
- User Specifies Flight: User chooses a flight by booked_flight.id.
- Recommendation Generation: Execute generate() which includes calling the GPT API, uploading to S3, and saving data to the files table.
Here is a list of our apis:
- /register: Register the user to our system
- /login: Login the user and get a token for authentication
- /query: Search the flight information
- /book: Book the flight and get a confirmation number
- /display: Display the bookings of a user
- /generate: Generate the travel itinerary recommendations by ChatGPT
- /view_rec: View travel itinerary recommendations
The client-side application allows users to interact with the system to book flights and generate itinerary. Here is a guide about how to use this application:
- Login/Register
Before proceeding to the system’s main features, the user needs to login with an email address and a password. For new users, they can register a new account instead and use it to login next time.
- Search Flight and Make a Reservation
The user can search flights by inputting airport codes and date. After a while, the user will see a list of flights and choose one to book. To complete the reservation, payment information is required. The user will receive a notification when the process is finished.
- Display Reservations
The user is able to see details about all reservations made by the user.
- Generate and View Itinerary Recommendation
To generate the recommendation, the user is required to provide the confirmation number of a reservation made on the system. A file id will be returned and the user can use it to retrieve a file with itinerary recommendation inside.
.
├── .gitignore
├── LICENSE
├── README.md
├── backend
│   ├── .env
│   ├── apis
│   │   ├── book.js
│   │   ├── display.js
│   │   ├── generate.js
│   │   ├── login.js
│   │   ├── query.js
│   │   ├── register.js
│   │   └── view_rec.js
│   ├── app.js
│   ├── aws.js
│   ├── config.js
│   ├── database.js
│   ├── package-lock.json
│   ├── package.json
│   ├── uuid.js
│   └── xtrip-config.ini
├── frontend
│   ├── client-config.ini
│   ├── main.py
│   └── sessions.json
└── xtrip_initialization.sql
cd backend/
npm install
node app.jsMake sure to update the client-config.ini to connect the correct backend service.
cd frontend/
python3 main.py