
StackPedal is a multi-level foot pedal designed for extremely easy control of an arbitrary amount of buttons, for under 20$. It's ideal for activities that involve lots of clicking or scrolling, or with macros that are pressed frequently. Provided are a Processing sketch which generates a design based on your parameters and a basic Arduino sketch to let you dictate the messages your buttons will send. The default sketch settings are for either a Teensy LC/3.2/4.0 or ESP32 as the microcontroller. Many other microcontrollers can work. Arduino Nano and any of the ubiquitous Nano clones WON'T work, because their usb hardware makes them unable to act as an HID (mouse).
Why the stack? By locating buttons at different levels, buttons can be closer together and still accurately pressed with a shoe on. The result is a more compact pedal that wont get in your way. Why wood? Wood is strong, looks nice, can be built quickly, and lends itself to a very straightforward editor interface. However a future TODO is to make a 3D printable version of this.
The pedal shown in this readme uses an ESP32 (LOLIN32) which can be found on Amazon. These are currently one of the cheapest boards that can act as an HID, costing as low as $6 if you buy them in packs of 4.
There are 2 ways to build the physical pedal. Either export Gcode files from the Processing sketch to run on a CNC router, or export a PDF template, print it out, and route everything by hand.
- Microcontroller (Teensy LC/3.2/4.0 or ESP32 recommended)
- Pine board, 1/2" (12.5mm) thick
- Plastic sheet, 1/16" (1.5mm) thick
- 5mm tactile buttons
- Button PCB (Official board on OSHPark)
- Foam sheet, 6mm thick
- Foam sheet, 2mm thick (or adhesive non-slip backing)
- Silicone adhesive (if using non-adhesive backed foam sheet)
- #4 wood screws
- 26AWG wire (or similar)

First download Processing and open the StackPedalGenerator sketch. At the top of the sketch is a section called 'USER VALUES'. There are 4 different subsections of variables to fiddle with:
- 'CNC MACHINE RELATED' If you are going to go the CNC route, make sure to set all these values so that they are correct for your machine, especially the first 4 which are marked with '**'. Ignore these if routing by hand.
- 'TEMPLATE SCALE RELATED' This changes the on-screen scale of the pedal and consequently the scale of the PDF that you export. Getting a perfectly scaled printout can take some trial and error.
- 'UNIVERSAL DESIGN RELATED' These give you control over the basic dimensions of the pedal. You can change things like the location of the usb jack, length of the button stacks, overall depth of the pedal, etc. You can probably leave most of these alone if you're unsure, but make sure the ones that begin with 'mcu' relfect the correct dimensions for your microcontroller.
- 'PER BUTTON DESIGN RELATED' These can be set indivudually for each button stack.
Now you can work on the button layout. The basic concept of StackPedal is to stagger button stacks at different heights in order to make it easy hit the correct button with your foot despite everything being very compact. These heights are referred to as levels. Level 0 buttons are sunk into the base itself, and higher level buttons get glued on. Each successive level adds an extra height of whatever your 'woodStockT' value is set to. To add buttons to your design, do pedalManager.addButton(level) in the order that you want them to be located on the pedal going from left to right:
pedalManager.addButton(0); //this button is the leftmost, since it's the first added, and its level is 0
pedalManager.addButton(1); //middle button
pedalManager.addButton(2); //the last button added is the rightmost, and its level is 2
The above example creates a simple pedal with 3 equally-sized buttons increasing in height from left to right. If you want different widths for your buttons, you can use pedalManager.setButtonWidth(button ID). The button ID is automatically determined by the order you add the buttons, with first/leftmost being 0. The next example creates a design with 1 large base-level button in the center, 2 bigger buttons on either side of it one level higher, and 2 smaller buttons on the far left and right another level higher.
pedalManager.addButton(2); //the button's ID depends on the order you add them, this is button 0
pedalManager.addButton(1); //button 1
pedalManager.addButton(0); //button 2
pedalManager.addButton(1); //button 3
pedalManager.addButton(2); //button 4
pedalManager.setButtonWidth(0,25); //use button ID followed by value
pedalManager.setButtonWidth(1,45);
pedalManager.setButtonWidth(2,120);
pedalManager.setButtonWidth(3,45);
pedalManager.setButtonWidth(4,25);
You may also want to change the position of the MCU, which in turn impacts the position of the USB jack. The jack can be on either the left, back, or right walls of the pedal, and you can choose the wall as well as the relative position on that wall with the following 2 variables:
int mcuJackWall = 1;   //0 = left side, 1 = back side, 2 = right side
float mcuJackPos = .5; //shift jack on selected wall by inputting a value from 0-1 with .5 putting it in the middle.
CNC Method:
Press 'g' in the processing sketch to export gcode once you've finished your design. It will output 4 separate .nc files, job0, job1, job2, and job3.
Run job0 to cut out the base. Make sure you export your design with the correct toolR and woodStockT values. A 3mm bit is recommended. Level 0 buttons get cut into the base itself.
Run job1 to cut out the higher level button stacks.
Run job2 to cut out plastic presser panels. 1.5mm thick ABS plastic is ideal. Thicker and it may not flex right, but thinner and it may flex too much.
Run job3 to cut out the plastic top cover panel and the usb panel
By Hand Method:
This requires a little more elbow grease than the cnc method but it's how I made the first prototype, which only took a few hours. Print a template and use it to mark your parts. Carefully saw everything out and route the pockets and wire tracks with a Dremel. A trick for getting accurate depths by hand is to snap a drill bit in half so its short enough to stick only a few mm out of the chuck of a hand drill, and then set it to the exact depth you want for a given section. Then just quickly sink a bunch of holes in that area. Now when you dremel, you just need to erase the holes and you'll end up with a relatively even and correct depth. It may help to glue up the button stacks before routing (see photos below) so that you have a bigger object which is easier to clamp down.
For cutting out the plastic panels, scissors or shears work fine.
Both Methods:
You now should have all your wooden parts cut and routed:
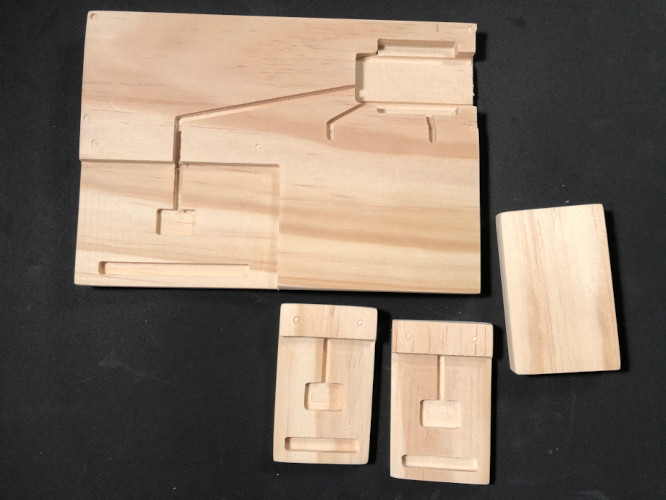
You want to glue up the stacks according to your design:

The next step is to connect the higher level wire tracks to the tracks routed in the base by drilling diagonally down to create a tunnel. Typically a 1/8 bit works well for most wires:

If you are going to stain/seal the pedal, now is the time to do it.
Wire up the buttons to either some protoboard or the official button pcb. Using the pcb is a better option because the tight fits means no need for screws. You can achieve the same thing with protoboard if you take the time to dial it in. Make your connections to the microcontroller.
Cut a strip of 6mm foam to sit into the foam cutout for each panel. For a stiffer button feel, fill up the whole slot. For an easier to press one use a shorter piece. You dont have to add foam at all but the button will be extremely clicky and will probably wear out sooner.
Use a hand drill to make 1/16" pilot holes for all the plastic panels and connect them with #4 wood screws.
At this point you want to put some kind of grippy backing onto the bottom of the pedal. The cheapest option is standard 2mm craft foam and some kind of adhesive such as hardware store silisone. You could also try adhesive-backed tapes or furniture sliders, which will probably provide better grip at higher cost.
There are a few options for how the StackPedal actually interfaces with a computer:
A) Having the usb cable providing both power and data connection. Any microcontroller that supports HID will work in this way.
B) With an ESP32 or other mcu with built-in Bluetooth, using a usb cable for power only. This can be powered via the computer's port if you want, but can also plug into a wall outlet via a 5V block. This is helpful since the StackPedal sits on the ground where reaching the computer with a cable might be a hassle. It also frees up a port. Communication with the computer is via Bluetooth.
C) With an ESP32 or other mcu with built-in Bluetooth, using a battery pack (rechargeable or not). This is a fully wireless solution but requires changing the code to make the mcu go to sleep when not transmitting, otherwise it will tear thru batteries really quickly. A great writeup on ESP32 deep sleep can be found here https://lastminuteengineers.com/esp32-deep-sleep-wakeup-sources/
For options B and C, T-vK made a great BLE mouse library for the ESP32 which can be found at https://github.com/T-vK/ESP32-BLE-Mouse
An example list of materials and their source, with base cost followed by approximate actual cost for the 3-stack pedal shown in construction photos.
- ESP32, Amazon, pack of three: $21, $7 per
- Pine board, Lowes, 1/2" thick 3ft long: $5, approx $2.50 per
- Plastic sheet, Amazon, 1/16" thick, pack of 2: $8, $2 per
- 5mm tactile buttons, Amazon, pack of 100: $6, 3 x $0.06 (I hate Amazon but it's hard not to buy things priced like this)
- Button PCB (Official board on OSHPark) $1.65 for 3
- Foam sheet, 6mm thick, Michaels, $1, approx $0.1 per
- Foam sheet, 2mm thick, Michaels, $1, approx $0.50 per
- #4 wood screws, Lowes, 2 x packs of 8: $3.00
Total cost if you have to buy all of these things is $46.32. But the per pedal cost is a maximum of $17.04, which goes down more if you buy a bigger pack of screws, a bigger sheet of plastic, etc.