Reference Operating System Setup Guide (Vivado 2015)
NetFPGA-SUME development should be possible on any Linux distribution which supports the Xilinx Vivado Design Suite. We are currently using Xilinx Vivado Design Suite 2015.1. Xilinx provides a list of officially-supported Linux distributions for Vivado Design Suite 2015.1 under Architecture Support and Requirements section of UG973.
In this guide, we will provide instructions on setting up Vivado Design Suite, and programming solutions for NetFPGA-SUME board on Ubuntu 14.04.2 LTS. The screen shot are taken from a machine running Ubuntu 14.04 LTS.
Depending on how you install the Linux distributions, the operating system can be configured with different set of packages. The following list of packages are needed so that your environment is ready for development for NetFPGA-SUME board. Please install the following packages using package manager that comes with your distribution, e.g. apt for Ubuntu.
To run package installation in Ubuntu:
$ apt-get install <package_name>
To search package in Ubuntu:
$ apt-cache search <regular_expression>
Here are the list of mandatory packages:
| Package | How to Install | Used for |
|---|---|---|
| gcc g++ | apt-get install gcc g++ | installing gcc and gcc C++ compiler (package gcc-g++ on other distos) |
| minicom | apt-get install minicom | RS-232 link to NetFPGA-SUME card |
| libusb-devel | apt-get install libusb-dev | Third-party driver for Xilinx JTAG programming cable |
| glibc.i686 | apt-get install libc6-i386 | 32-bit statically-linked Microblaze compiler and binutils |
| pySerial | apt-get install python-serial | Python access for the serial port |
| wxpython | apt-get install python-wxgtk2.8 | Python GUI library |
| scapy | apt-get install python-scapy | Packet generator / receiver |
Xilinx Vivado Design Suite will work on most of the Linux distributions. You can download Xilinx Vivado Design Suite 2015.1 from here. You can use webinstall or download the full installation package. If you download the full package, please check the MD5 SUM Value before installation to make sure that the package is not corrupted.
If you downloaded webinstall, you can use the following commands:
$ chmod +x Xilinx_Vivado_SDK_2015.1_0428_1_Lin64.bin
$ sudo ./Xilinx_Vivado_SDK_2015.1_0428_1_Lin64.bin
If you downloaded the full package, follow the next two steps: To extract the package, you can use the following command:
$ tar zxvf Xilinx_Vivado_SDK_2015.1_0428_1.tar.gz
Get into the extraction directory (usually Xilinx_Vivado_SDK_2015.1_0428_1), run xsetup with root previlidge.
$ sudo ./xsetup
The following steps are common to all installation modes:
- Read and Accept License Agreements.
- Select Vivado System Edition in Select Edition to Install page.
- In Vivado System Edition page, deselect Vivado High Level Synthesis (if you are not going to use it) and select Software Development Kit as shown in the figure below:
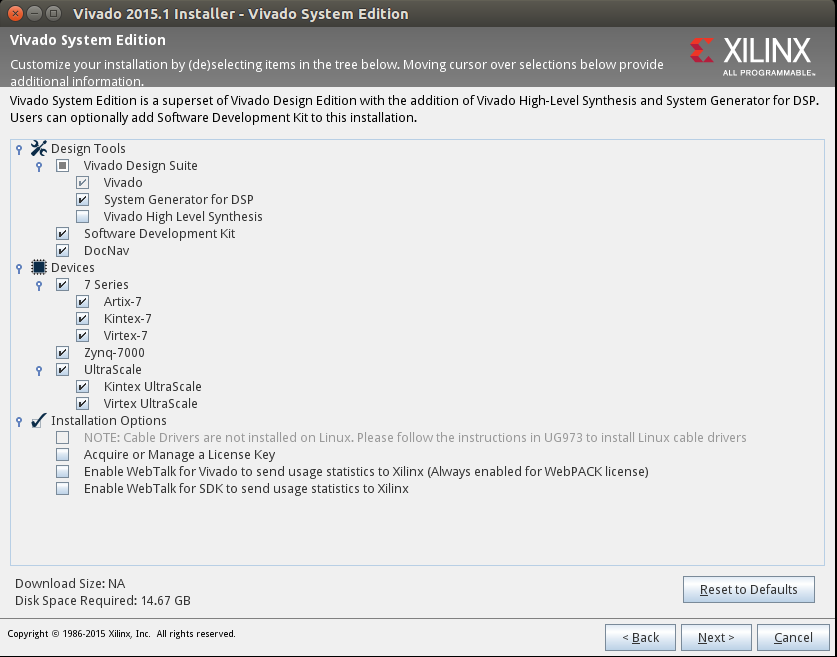
The installation may takes several minutes to half an hour to finish depending on your computer performance.
When installing Vivado, at least for Version 2015.4, probably for earlier versions too, you are presented to also install the “DocNav” utility used to access and navigate Xilinx documantation. However on some operating systems (tested with Ubuntu 14.04 LTS 64bit) you cannot simply run DocNav because of missing libraries.
In general to run a 32-bit executable file on a 64-bit multi-architecture Ubuntu system, you have to add the i386 architecture and install the three library packages libc6:i386 libncurses5:i386 libstdc++6:i386. source link
To install run sudo dpkg --add-architecture i386, run sudo apt-get update and sudo apt-get install libc6:i386 libncurses5:i386 libstdc++6:i386
To debug cases of missing libraries it is useful to run ldd <failing executable> to identify missing libraries and list library paths of present libraries that are loaded for the execution of the program , source.
To find corresponding packages for the missing libraries, run dpkg -S libxxx*, replace the ":amd64" with ":i386" and sudo apt-get install <packagename>. Repeat this over and over until ldd said had no "not found" entires.
the missing packages are
sudo apt-get install libstdc++6:i386 libfontconfig1:i386 \
libXext6:i386 libxext6:i386 libice6:i386 libXrender1:i386 \
 libglib2.0-0:i386 libsm6:i386 libsm6:i386
However for other OS and other package managers than dpkg you have to identify the corresponding packages on your own using the above technique.
Once the installer finishes, in a terminal go to Vivado_Install_Dir/data/xicom/cable_drivers/lin64/install_script/install_drivers/install_drivers and execute the script install_drivers as root (see UG973):
$ cd /opt/Xilinx/Vivado/2015.1/data/xicom/cable_drivers/lin64/install_script/install_drivers/
$ sudo ./install_drivers
After the installation, to start Vivado Design Suite, open a command prompt, source the environment setting script and start vivado:
$ source /opt/Xilinx/Vivado/2015.1/settings64.sh
$ vivado &
To test if the Vivado Cable driver works:
- Connect NetFPGA-SUME to your PC and turn on the power supply for NetFPGA-SUME board.
- In Vivado Welcom Window click Open Hardware Manager.
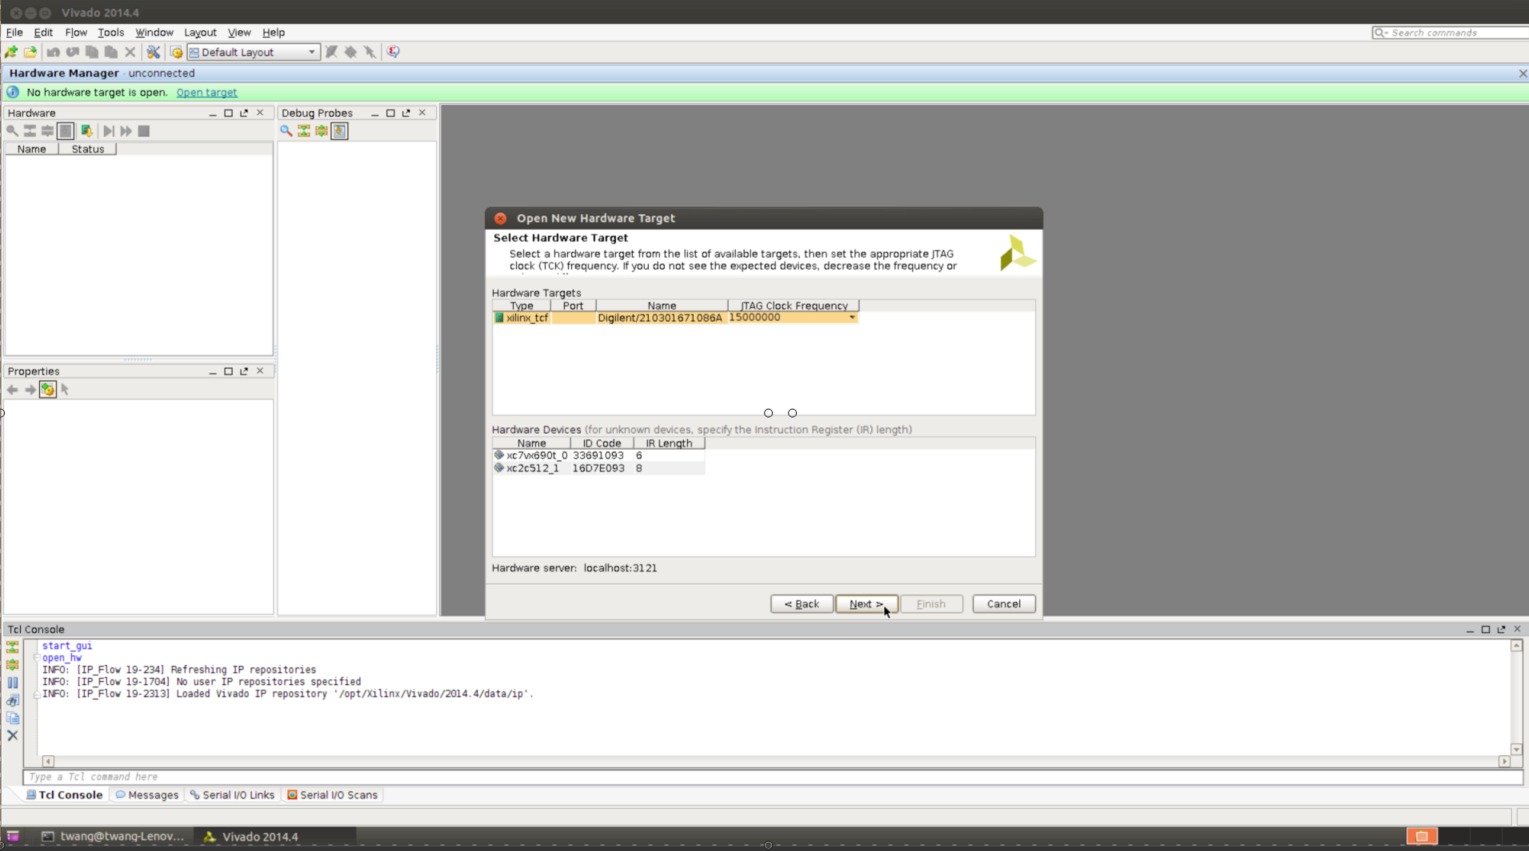
- Click Open Target on the green bar in the Hardware Manager window, and select Open New Target....
- When the Open New Hardware Target dialog appears click Next until Select Hardware Target tab shows up.
- In the tab, you should see a
xilinx_tcftype target shows up in the Hardware Targets table, andxc7vx690tandxc2c512devices showed up in Hardware Devices table. If you see both of them available, the driver has been successfully installed.
You need to install Digilent Adept Tools to write bitfiles to the Flash. The on-board Flash is divided into 4 sections and you can configure which section to load the bitfile from when the board is powered up (please refer to the FPGA configuration section of NetFPGA-SUME Reference Manual). Digilent Adept Tools can be downloaded from Software->Adept2 section on Digilent Website. You need to download and install both Adept 2.16.1 Runtime and Adept 2.2.1 Utilities. Both of them are distributed in three format: DEB package, RPM package or compressed file with installation scripts. You can use DEB package for Ubuntu distribution.
To install the DEB package in Ubuntu:
$ sudo dpkg -i digilent.adept.runtime_2.16.1-2_amd64.deb
$ sudo dpkg -i digilent.adept.utilities_2.2.1-amd64.deb
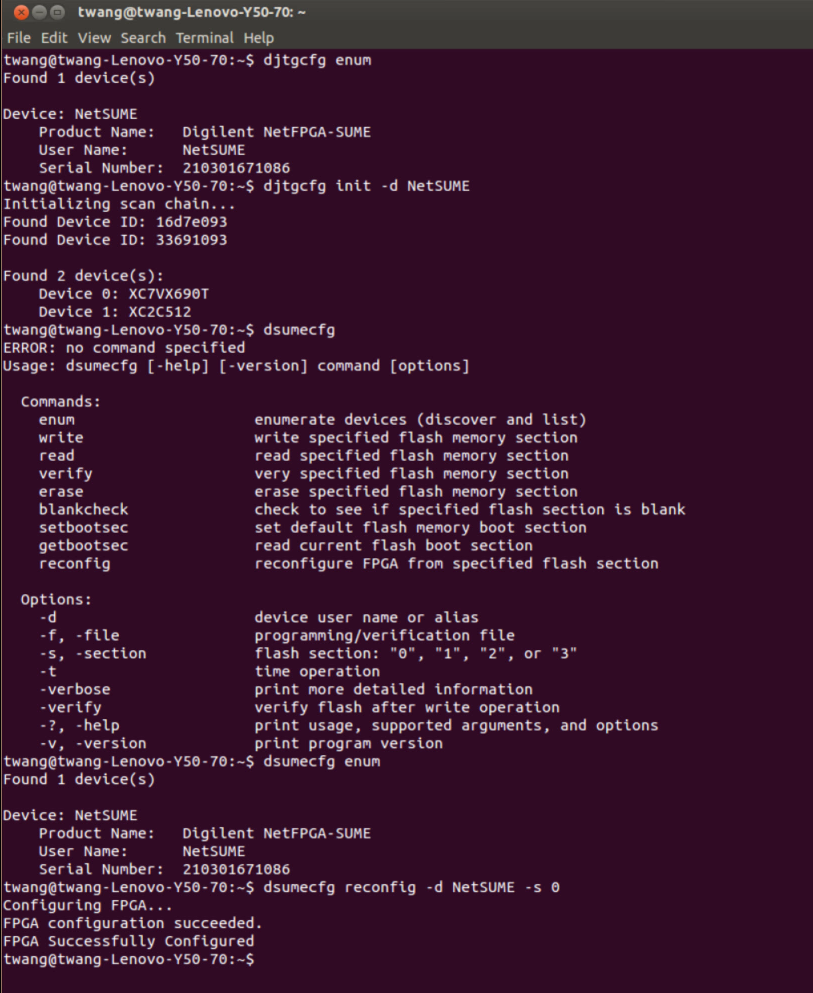
To test the installation of Digilent Adept Tools, power on the NetFPGA-SUME board and connect it to your PC using the micro-USB cable. Open up a terminal and in command line:
- Enumerate the devices (discover and list) with
$ djtgcfg enum
- Initialize JTAG Scan Chain
$ djtgcfg init -d NetSUME
- Enumerate devices with dsumecfg
$ dsumecfg enum
- Configure NetFPGA-SUME with bitfile stored in Flash section 0
$ dsumecfg reconfig -d NetSUME -s 0
and you should get something like the screen shot below: