Welcome to Bharatrail, your innovative solution for hassle-free train ticket purchases.
- Minimal Design: With an eye for design, I worked on crafting a minimal but unique UI experience.
- Coach Selection: Along with being able to select seats, user can also select coach.
- Crowd Visualization: The app helps you get an idea of how crowded your surrounding might be on a particular train.
Before you begin, ensure you have the following prerequisites installed on your system:
- Clone the Repository:
git clone https://github.com/Sama-3l/BharatRail.git
- Move into the repository
cd BharatRail - Get all dependencies and run on connected device
flutter pub get
flutter run
If you are looking for the apk, you can get the Bharatrail_v1.0.0.apk in the folder:
cd .\BharatRail\apk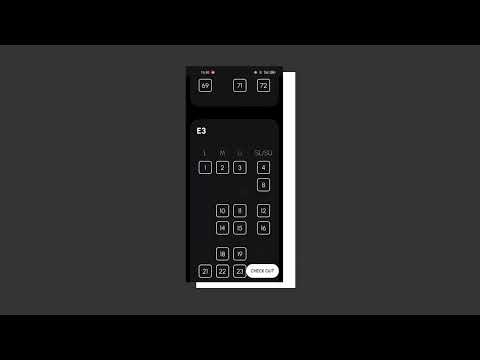
The idea behind the design was to keep it minimal and also provide a sense of luxury to the app. You can check out the Figma file for this app to get more details on the designing of this app.
Starting with how the trains work in the app, we have Train objects that store attributes that would belong to a train's data.
Classes have all the classes that a train might have (Sleeper, AC1, AC2, etc.)
TrainCity is an object that stores a City object along with the time of arrival for the train and time of departure from the same city.
    class Train {
        String name;
        int number;
        List<TrainCity> citiesCovered;
        List<int> daysOperational;
        List<Class> classes;

        Train(
            {required this.name,
            required this.number,
            required this.citiesCovered,
            required this.daysOperational,
            required this.classes});
}Now every class has a certain metrics related to it which are number of available seats, number of RAC seats and number of WL seats (There are others but right now this is what the app is built for).
Along with metrics, we also have the coaches (For AC3 - B1, B2, B3, etc.) that are associated to the same.
class Class {
    String name;
    int dimensionOfClass; // No of seats on one side; S, 3A - 4; 2A - 3; 1A - 2
    List<int> metrics;
    List<Coach> coaches;

    Class(
        {required this.name,
        required this.dimensionOfClass,
        required this.metrics,
        required this.coaches});
}This just stores the name but it has been made into an object to allow further scaling when we need to add stations, etc.
class City{
    String name;

    City({required this.name});
}Now we have a coach that has a number associated to it, along with a number of seats.
class Coach {
    String coachNumber;
    List<List<bool>> seats = [
        [],
        []
    ]; // Contains 2 bool values first stores if it's already booked second stores if it's selected now

    Coach({required this.coachNumber});
}On the other hand, we need an object to handle the information provided by the user to filter our backend(if the app is actually completed) accordingly.
The arrival and departure City along with depTime which actually contains the departure date is set by the user with an empty tickets list.
class User {
    String name;
    City arrCity;
    City depCity;
    DateTime depTime;
    List<Ticket> tickets = [];

    User(
        {required this.name,
        required this.arrCity,
        required this.depCity,
        required this.depTime});
}Now, generally the ticket stores a ticket number along with the rest of the information about the coach, class, etc. but this way we'll be able to have more tickets and avoid a clutter.
The ticket is distinguished by the class it is defined to and stores information about the train and the coach which in turn stores the information about the tickets that have already been booked and that have been selected by the user in an array. This array is given by seats in coach.
class Ticket {
    String seatClass;
    Coach coach;
    Train train;

    Ticket({required this.seatClass, required this.coach, required this.train});
}This is not a real splash screen but I added one to smooth out the flow of the app. It shows the logo which I made (it's basically just urbanist font), and then it leads you into the home page.

The task didn't specify a home page but there always is just too much information that needs to be provided beforehand, that a ticketing system rarely ever comes without one. It made design sense to have a onboarding and provide a varied number of options there.

This is the main ticket selector page that displays train details and then allows you to select class of ticket and also which coach.

Payment overlay for completing the seat bookings.

This is a code snipet from functions.dart which controls the auto-scrolling which is triggered when you select a coach. It scrolls by a height which is 2.1 times the height of user's screen (done using MediaQuery).
I will implement scroll back to top button too.
    // Function called when a new coach is selected from
    // The dropdownmenu in Buy Ticket screen         (select_coach_drop_down.dart)
    void onCoachChange(Ticket ticket, Class currClass, String? newValue,
        ScrollController controller, double height) {

        int indexOfCoach = currClass.coaches.indexWhere((element) {
        return element.coachNumber == newValue!;
        });

        if (indexOfCoach != -1) {
        scroll(controller, height, indexOfCoach);
        }
        ticket.coach = currClass.coaches[indexOfCoach];
    }


    // Called to scroll the listview (5 lines above us)
    void scroll(ScrollController controller, double height, int index) async {
        controller.animateTo(height * index,
            duration: Duration(milliseconds: scrollDuration),
            curve: Curves.easeInOutCubic);
}There are total three types of seats and I went through some literature to finally learn, for myself too actually, what RAC, WL, etc. actually mean and I did my best to implement the same into the app.
