<com.guannan.library.CustomKeyBoardView
        android:id="@+id/keyboard_view"
        android:layout_width="match_parent"
        android:layout_height="wrap_content"
        android:layout_alignParentBottom="true"/>
我们拿到CustomKeyBoardView对象后可以获取KeyboardView的实例对象,然后可以设置键盘的背景颜色,按键的字体颜色和大小等等。如果对这些属性不熟悉,请拿出几分钟阅读一下下面内容。这里就不再一一介绍。
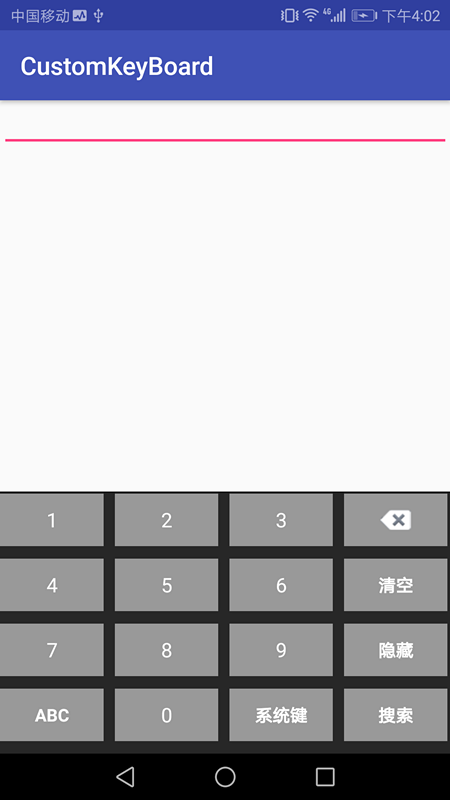
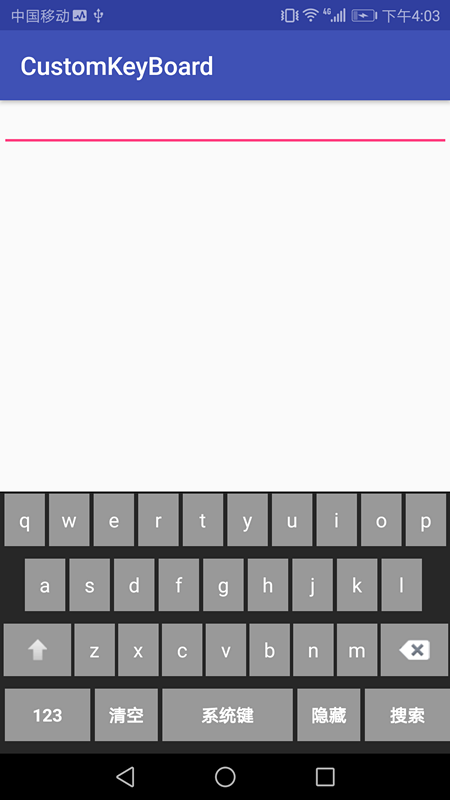
android自定义键盘的使用在一些金融类,银行类的产品当中特别常见,这是为了避免一些第三方的键盘非法的采集个人银行密码或者交易密码等。为此作为一个开发,我们应该会自己定制键盘,起初以为定制这样的键盘需要自己使用常用控件去一个一个布局,经过查阅资料发现,有更简单的做法,就是使用KeyboardView和Keyboard,了解了这两个类之后,自定一个漂亮好用的键盘简直不是事儿~~。先看下效果图:
<android.inputmethodservice.KeyboardView
    xmlns:android="http://schemas.android.com/apk/res/android"
    android:id="@+id/keyboard_view"
    android:layout_width="match_parent"
    android:layout_height="wrap_content"
    android:layout_alignParentBottom="true"
    android:focusable="true"
    android:focusableInTouchMode="true"
    android:keyPreviewLayout="@layout/preview_layout"
    android:keyBackground="@color/color_999999"
    android:keyTextColor="@color/color_ffffff"
    android:keyTextSize="16sp"
    android:shadowColor="@color/color_999999"
    android:shadowRadius="5">

</android.inputmethodservice.KeyboardView>
<?xml version="1.0" encoding="utf-8"?>
<Keyboard xmlns:android="http://schemas.android.com/apk/res/android"
          android:horizontalGap="0px"
          android:keyHeight="42dip"
          android:keyWidth="23%p"
          android:verticalGap="0px">
    <Row
        android:verticalGap="10dp">
        <Key android:codes="49" android:keyEdgeFlags="left" android:keyLabel="1"/>
        <Key android:codes="50" android:horizontalGap="2.5%p" android:keyLabel="2"/>
        <Key android:codes="51" android:horizontalGap="2.5%p" android:keyLabel="3"/>
        <Key android:codes="-5" android:horizontalGap="2.5%p" android:isRepeatable="true" android:keyEdgeFlags="right" android:keyIcon="@mipmap/delete"/>
    </Row>

    <Row
        android:verticalGap="10dp">
        <Key android:codes="52" android:keyEdgeFlags="left" android:keyLabel="4"/>
        <Key android:codes="53" android:horizontalGap="2.5%p" android:keyLabel="5"/>
        <Key android:codes="54" android:horizontalGap="2.5%p" android:keyLabel="6"/>
        <Key android:codes="-100" android:horizontalGap="2.5%p" android:keyEdgeFlags="right" android:isRepeatable="true" android:keyLabel="清空"/>
    </Row>

    <Row
        android:verticalGap="10dp">
        <Key android:codes="55" android:keyEdgeFlags="left" android:keyLabel="7"/>
        <Key android:codes="56" android:horizontalGap="2.5%p" android:keyLabel="8"/>
        <Key android:codes="57" android:horizontalGap="2.5%p" android:keyLabel="9"/>
        <Key android:codes="-3" android:horizontalGap="2.5%p" android:keyEdgeFlags="right" android:keyLabel="隐藏"/>
    </Row>

    <Row
        android:verticalGap="10dp">
        <Key android:codes="-2" android:keyEdgeFlags="left" android:keyLabel="ABC"/>
        <Key android:codes="48" android:horizontalGap="2.5%p" android:keyLabel="0"/>
        <Key android:codes="-101" android:horizontalGap="2.5%p" android:keyLabel="系统键"/>
        <Key android:codes="-102" android:horizontalGap="2.5%p" android:keyEdgeFlags="right" android:keyLabel="搜索"/>
    </Row>
</Keyboard>
这里解其中的一些属性,
| 属性 | 解释 |
|---|---|
| android:keyWidth | 键盘上每个键的宽度(这里使用xx%p表示,下面介绍%p的计算方式) |
| android:keyHeight | 键盘上每个键的高度 |
| android:codes | 表示键盘上面的数字或者字母的ASCCI码值,因此我们要查阅ASCCI来定义我们的value |
| android:horizontalGap | 水平方向每个键的间距 |
| android:verticalGap | 垂直方向每行之间的间距 |
| android:keyLabel | 显示在键盘上面的值 |
| android:isRepeatable | 当我们长按回退删除图标的时候要将这个属性置为true,这样会连续删除 |
| android:keyIcon | 按键上面显示的图标 |
==%p的计算方式,就是一行占据是100%p,假如一行有四个键,平均下来每个键的宽度为100%p/4 = 25%p,也可以稍微加一点间距显得好看==
//数字键盘布局
mNumberKeyBoard = new Keyboard(activity, R.xml.number);
//字母键盘
mCharacterKeyBoard = new Keyboard(activity, R.xml.character);
mKeyboardView = (KeyboardView) activity.findViewById(R.id.keyboard_view);
mKeyboardView.setKeyboard(mNumberKeyBoard);
mKeyboardView.setEnabled(true);
mKeyboardView.setPreviewEnabled(true);
mKeyboardView.setOnKeyboardActionListener(keyboardListener);
其实很简单~~~~ KeyboardView已经为我们预备了设置方案,我们只需要定义一个布局preview_layout:
<?xml version="1.0" encoding="utf-8"?>
<TextView
    xmlns:android="http://schemas.android.com/apk/res/android"
    android:layout_width="wrap_content"
    android:layout_height="wrap_content"
    android:background="@drawable/ic_launcher_background"
    android:gravity="center"
    android:textColor="@android:color/black"
    android:textSize="40sp"/>
然后KeyboardView布局引入既可以看到效果
android:keyPreviewLayout="@layout/preview_layout"
==***这里有一点需要注意:直接这样设置如果,显示的Toast样式如果直接这样,在显示字母键盘的时候,可能样式会变形,这个时候只需给TextView的background设置一个图片或者自定义的drawable即可解决这种问题==