Power Up Your Raspberry Pi for Flutter
Imagine You have a Raspberry Pi sitting on your desk or tucked away in a drawer, collecting dust. You bought it with grand ideas of developing Flutter apps on it, but the thought of setting it up for development has always seemed too complicated. Now, picture a tool that makes this process simple and effortless – that’s snapp_cli. 🚀
snapp_cli allows you to control everything from your laptop 💻. Here’s how it simplifies your development process:
-
🔗 Effortless Connection: snapp_cli sets up a secure, passwordless SSH link from your laptop to your Raspberry Pi, so you can manage it without direct interaction.
-
🔧 Automated Installation: snapp_cli automates the installation of Flutter and all necessary dependencies on your Raspberry Pi. You run snapp_cli from your laptop, and it handles everything remotely. But that's not all – snapp_cli also supports custom embedders like Flutter-pi.
-
⚙️ Custom Device Configuration: snapp_cli configures your Raspberry Pi to appear as a custom device in your IDE. You can easily select it and run your Flutter apps, just like you would on a phone or emulator.
-
🛠️ Seamless Remote Development: Develop and debug your Flutter apps directly from your laptop. snapp_cli enables hot reload, restart, and access to DevTools, so you can run and test apps on your Raspberry Pi with all the tools you need for smooth and efficient remote development.
In essence, snapp_cli transforms your idle Raspberry Pi into a powerful Flutter development platform, all managed from your laptop. Whether you're new to Flutter or an experienced developer, snapp_cli makes remote development simple and effective.
snapp_cli is a Dart-based command-line tool. If you already have Flutter installed on your laptop, getting snapp_cli up and running is quick and easy. Just run the following command in your terminal:
dart pub global activate snapp_cliMake sure that system cache bin directory is added to your system's PATH to use snapp_cli globally. follow this link for more information: Running a script from your PATH
Using snapp_cli is straightforward. Once installed, you can use it to set up and manage your Raspberry Pi for Flutter development. Let's start with bootstrap command.
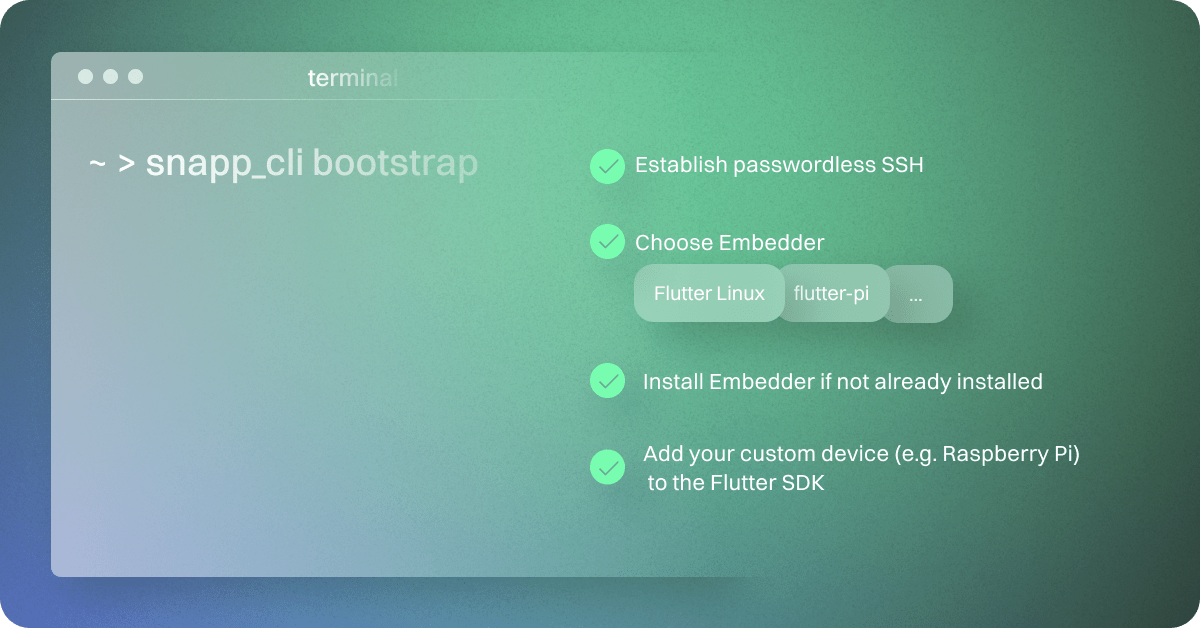
The most important command in snapp_cli is the bootstrap command. This command is interactive and guides you through the entire setup process, making your remote device(Raspberry Pi) ready for Flutter development with minimal effort.
To use the bootstrap command, simply run:
$ snapp_cli bootstrapThe bootstrap command simplifies the entire setup process for your Raspberry Pi. It prompts for your Raspberry Pi's IP address and username to establish a passwordless SSH connection. You'll then choose a Flutter Embedder (Flutter Desktop, Flutter Pi or ...), and the command checks and installs it along with any necessary dependencies. Finally, it configures your Raspberry Pi as a custom device in the Flutter SDK, allowing you to select and run your Flutter apps on the Raspberry Pi directly from your laptop, enabling seamless remote debugging and development.
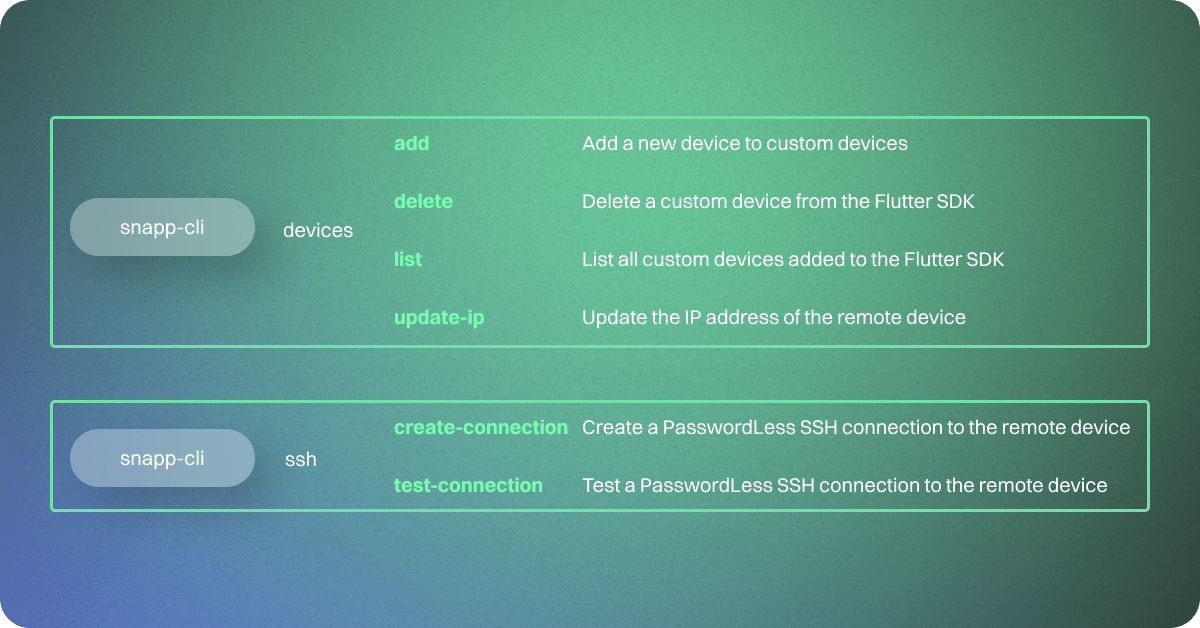
snapp_cli includes additional commands to help you manage your devices and SSH connections efficiently:
The devices command helps you manage your custom devices in the Flutter SDK. With subcommands to add, delete, list, and update the IP addresses of your devices, you have full control over your development environment.
The ssh command assists in establishing and managing secure, passwordless SSH connections to your remote devices. Subcommands are available to create and test SSH connections, making remote access and management straightforward.
Each command has specific options and usage, which you can explore further by running snapp_cli --help or snapp_cli <command> --help.
If you encounter any issues while using the snapp_cli tool, you can run the commands in verbose mode to obtain more detailed information about the error. To do this, simply add the -v flag to your command. For example:
$ snapp_cli bootstrap -vSometimes, you may face difficulties establishing an SSH connection to a device due to various reasons, such as an incorrect IP address, username, password, or SSH key. To verify whether the SSH connection is functioning correctly, you can execute the snapp_cli ssh test-connection command. If the connection fails, attempt to establish a new connection using the snapp_cli ssh create-connection command.
If you still cannot establish an SSH connection, it may be necessary to review the SSH configurations on both your host (e.g., your PC) and the remote device (e.g., Raspberry Pi).
However, be cautious: if you have any other SSH connections to your remote device or to other devices, using the following commands will remove them.
- Clear the
.snapp_clidirectory:rm -r ~/.snapp_cli - Clear the known hosts file:
ssh-keygen -R yourIpAddress
- Clear the ssh-agent saved keys:
ssh-add -D
Connect to your remote device via a simple SSH connection:
ssh [username]@[ipAddress]After successfully connecting to your remote device, remove the .ssh folder that contains the SSH keys:
rm -r ~/.ssh- Ensure you replace yourIpAddress with the actual IP address of your device.
- Be explicit about replacing placeholders like username@ipAddress with the appropriate user and IP address for the Raspberry Pi.
In some cases, you may need to manually edit the flutter_custom_devices.json file, which stores the configurations for custom devices. Here are the steps to follow if you encounter this situation:
-
Locate the
flutter_custom_devices.jsonFile:- The location of the
flutter_custom_devices.jsonfile can vary depending on the operating system you are using. You can find it with thesnapp_cli listcommand.
- The location of the
-
Backup the File:
- Before making any manual changes, it's a good practice to create a backup of the
flutter_custom_devices.jsonfile in case something goes wrong.
- Before making any manual changes, it's a good practice to create a backup of the
-
Edit the JSON File:
- Use a text editor to open the
flutter_custom_devices.jsonfile. You can make changes to the device configurations as needed. Ensure that the JSON structure is valid; any syntax errors can cause issues.
- Use a text editor to open the
-
Test the Configuration:
- To test the changed configuration you need to run your app again.
Keep in mind that manually editing the flutter_custom_devices.json file should be done with caution, as incorrect changes can lead to configuration issues. It's recommended to use the CLI tool to add, update, or delete custom devices whenever possible.
If you encounter any issues with this package or have suggestions for improvements, please open an issue. You are welcome to contribute to the development of this project by forking the repository and submitting pull requests.
This project is licensed under the MIT License


