This repository is intended to run inside a raspberry pi connected to an FRC robot. It will allow users to see an analytics dashboard, as well as control LEDs on the robot to reflect robot state.
The raspberry pi needs to have a 5V 2A power source. The simplest way is to cut a micro USB cable and put ferrule connectors onto the end of the cable you just cut. The micro USB cable needs to be plugged into 5V 2A rail of the VRM on the robot.
The LEDs we used are the following LEDs: WS28122 NeoPixel.
Verify that you have no more than 50 LEDs from the strand hooked up otherwise you will blow the 2A fuse on the VRM. Our LED strip is 0.2 Watts per LED, so we then used the following formulas to calculate the max LED count:
0.2 Watts per LED / 5 Volts = 0.04 Amps per LED
2 Amps / 0.04 Amps per LED = 50 LEDs
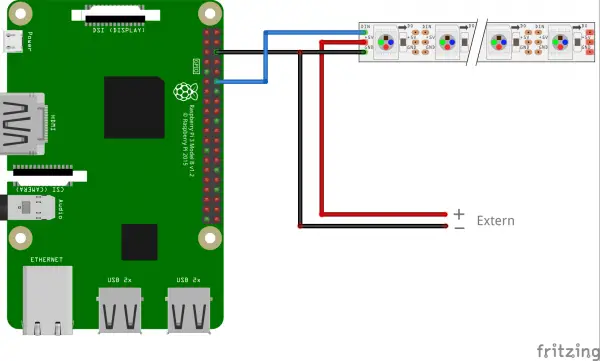
Next, hook up the LED strip to the Raspberry Pi and the other 5V 2A rail on the VRM (shown as Extern) using the picture below:
These steps need to be done while the raspberry pi is connected to the internet without a firewall. Keep in mind this usually means the pi is connected to a power outlet and hooked up via ethernet to a public facing router - NOT on the robot.
Clone the repository onto your raspberry pi under the home directory:
cd /home/pi
git clone git@github.com:Valor6800/rpi-analytics.git
From the /home/pi/rpi-analytics directory, run the following:
./online-setup.sh
Once the above online steps are complete, you can wire the pi up to the robot OR continue with the following steps before wiring things up.
From the /home/pi/rpi-analytics directory, run the following:
./offline-setup.sh
Both the dashboard and the led controller run by default when the raspberry pi boots up!
To see the dashboard, go to http://10.68.0.9:8080 while connected to the robot where 10.68.0.9 is the static IP address of the raspberry pi. See below on how to setup static IP address on the raspberry pi. You will need to configure the static IP to match your robot network in order to access the dashboard once the pi is connected to your robot.
To view the error logs for the two services:
led-controllerdashboard
Run:
sudo journalctl -u <name>.service -n 50
Where <name> is one of the two bullet points above. This will show the last 50 lines of the log for that utility.
Open up the file /etc/dhcpcd.conf and change the following lines:
interface eth0
static ip_address=10.XX.YY.ZZ/24
static routers=10.XX.YY.1
A few notes:
- Verify that those lines are un-commented so they are put into effect.
- XXYY is your team number. Ex: XX is 68 and YY is 00 for our team, 6800.
- ZZ is an arbitrary number, which Valor chooses 9. This number cannot collide with the roborio (2) and other limelights
- We recommend using 10.XX.YY.5-10 to avoid collisions with the DHCP scope of the robot network
Reserved IP's for reference
- Default gateway/robot radio: 10.XX.YY.1
- roboRIO: 10.XX.YY.2
Reboot your pi to set the static IP with:
sudo reboot
