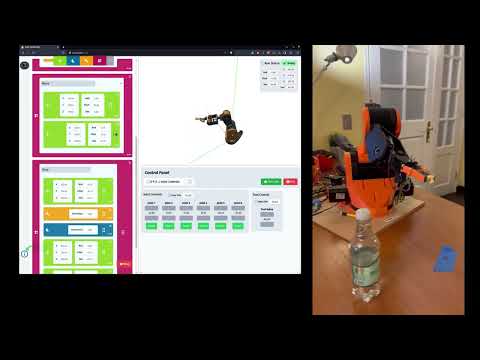
Welcome to the Ribot project, your comprehensive solution for controlling robotic arms with up to 6 degrees of freedom (DOF). This project encapsulates both firmware and software components tailored to deliver an exceptional user experience in robotic arm manipulation.

- Docker Desktop: Download here
- Python 3.8 or higher
- ESPTool Python package for firmware flashing (Required, if using Docker):
pip install esptool toml
- Alternatively, you can use your own install of ESP IDF (v5.1.1) for manual firmware flashing.
-
Clone the Repository
git clone https://github.com/alberto-abarzua/ribot.git
-
ribot.py Script This utility script facilitates building, running, and managing the project.
- Usage:
python ribot.py --help
- Usage:
-
Building the Firmware for ESP32
python ribot.py build-esp
-
Flashing the Firmware
python ribot.py build-esp --flash
-
Running Backend and Frontend Services For real ESP32:
python ribot.py runserver --esp
For a dummy firmware version (Docker):
python ribot.py runserver
- Language: C++
- Framework: ESP IDF
- Target Platform: ESP32 Microcontroller
- Functionality: Manages robotic arm control logic and real-time operations.
- Backend
- Language: Python
- Framework: FastAPI
- Functionality: Facilitates communication between the frontend and firmware, processes control commands, and manages system state.
- Frontend
- Language: JavaScript
- Framework: React
- Functionality: Provides a user interface for interacting with the robotic arm, sending commands, and receiving feedback.
- Firmware to Backend: Sockets
- Frontend to Backend: WebSockets and HTTP requests
The Ribot project utilizes a Python library, ribot-controller, to seamlessly integrate backend operations with the robot arm's firmware. This library is a pivotal component of the backend, enabling efficient and straightforward control of the robotic arm. It's available on PyPI and can be easily incorporated into Python-based applications.
- Easy-to-Use Interface: Provides simple and intuitive commands for robotic arm control.
- Direct Connection with Firmware: Ensures seamless communication between the backend and the robotic arm's firmware.
- Python-based: Leveraging Python's versatility and simplicity for robotic control tasks.
To install ribot-controller, use pip:
pip install ribot-controllerBelow is an example illustrating how to use the ribot-controller library to control the robot arm:
from ribot.control.arm_kinematics import ArmParameters, ArmPose
from ribot.controller import ArmController, Settings

if __name__ == "__main__":
    # Arm parameters (Physical dimensions of the arm)
    arm_params: ArmParameters = ArmParameters()
    arm_params.a2x = 0
    arm_params.a2z = 172.48

    arm_params.a3z = 173.5

    arm_params.a4z = 0
    arm_params.a4x = 126.2

    arm_params.a5x = 64.1
    arm_params.a6x = 169

    controller = ArmController(arm_parameters=arm_params)
    # The websocket server is used by the simulation in the Frontend
    controller.start(websocket_server=False, wait=True)

    controller.set_setting_joints(Settings.STEPS_PER_REV_MOTOR_AXIS, 400)
    controller.home()

    # Move to a position
    position = ArmPose(x=320, y=0, z=250, pitch=0, roll=0, yaw=0)
    controller.move_to(position)
    controller.wait_done_moving()

    # Move to angles (rads)
    angles = [0.0, 0.0, 0.0, 0.0, 0.0, 0.0]
    controller.move_joints_to(angles)

    # Move the tool (rads)
    controller.set_tool_value(1.2)

    print("Homed:", controller.is_homed)
This example demonstrates initializing the controller, setting up the arm parameters, and executing various movements including positioning, angling, and tool manipulation.
For detailed documentation, please visit our Docs.
Please feel free to contribute to this project! We welcome any and all contributions to help improve the Ribot project. We don't have any specific guidelines for contributing, but please follow the general guidelines below:
Issues: If you find any bugs or have any feature requests, please create an issue on GitHub.
Pull Requests: If you have any changes you'd like to make, please create a pull request on GitHub. We'll review it and merge it if it looks good!
Code Style: Follow the existing code style (formatting and linting). For python code, we use black, isort, mypy, and flake8. For C++ code, we use clang-format and clang-tidy. For JavaScript code, we use prettier and eslint.
- You can check if you are following the code style by running
python ribot.py lintin the root directory of the project. This will run all the linters and formatters on the codebase. - To format the code, run
python ribot.py formatin the root directory of the project. This will run all the formatters on the codebase.
Testing: We have unit tests for the Python codebase. You can run them by running python ribot.py test in the root directory of the project.
This project is licensed under the MIT License.
Happy coding and controlling with Ribot! 🤖✨