For our colorblind simulation postprocess material we do the following:
We start with the sRGB values from the SceneTexture PostProcessInput material node.
We then remove gamma correction and convert it to LinearRGB space using the following formula:
LinearRGB = power(abs(sRGB), 2.2f)
We then transform the LinearRGB space into XYZ space using the following transformation matrix:
      |R|   | 0.4124564 0.3575761 0.1804375 |
XYZ = |G| x | 0.2126729 0.7151522 0.0721750 |
      |B|   | 0.0193339 0.1191920 0.9503041 |
Colorblind simulation happens in the LMS color space which is named from the Long, Medium and Short wavelengths of light detected by cones in the human eye.
We can transform from XYZ space into LMS space using the Hunt-Pointer-Estevez model:
      |X|   |  0.4002 0.7076 −0.0808 |
LMS = |Y| x | −0.2263 1.1653  0.0457 |
      |Z|   |  0.0000 0.0000  0.9180 |
For better performance, we can combine the XYZ transform and the LMS transform and convert directly from Linear RGB space to LMS space using the following:
    | 0.31399022 0.63951294 0.04649755 |
T = | 0.15537241 0.75789446 0.08670142 | = XYZ x LMS
    | 0.01775239 0.10944209 0.87256922 |
After the colorblind simulation has been applied, we can convert back from LMS space to LinearRGB space by using the inverse of the above matrix like so:
           |  5.47221206 -4.64196010  0.16963708 |
Tinverse = | -1.12524190  2.29317094 -0.16789520 |
           |  0.02980165 -0.19318073  1.16364789 |
When simulating Protanopia, we need to simulate missing the L cone in the eye. The L cone is sensitive to red light. To do this, we must adjust the Red, Green, and Blue levels of color in our LMS space. A detailed explaination of how to do this can be found here. We use the following matrix to simulate Protanopia:
    | 0.00000000 1.05118294 -0.05116099 |
P = | 0.00000000 1.00000000  0.00000000 |
    | 0.00000000 0.00000000  1.00000000 |
To simulate Deuteranopia which is missing the M cone and unable to see green light, we use the following matrix:
    | 1.00000000 0.00000000 0.00000000 |
D = | 0.95130920 0.00000000 0.04866992 |
    | 0.00000000 0.00000000 1.00000000 |
And to simulate Tritanopia which is missing the S cone and unable to see blue light, we use the following matrix:
    |  1.00000000 0.00000000 0.00000000 |
T = |  0.00000000 1.00000000 0.00000000 |
    | -0.86744736 1.86727089 0.00000000 |
So, to simluate any of the above 3 types of colorblindness, we multiply our LMS transformation of the LinearRGB space by one of the above matrices (P, D, or T), then convert that back to LinearRGB space using the Tinverse transformation matrix...
LinearRGB = LMS x Tinverse
Once we have converted the LMS simulation back to LinearRGB space, we can apply gamma correction again using the following formula:
sRGB = power(abs(LinearRGB), (1.0f / 2.2f))
Then we can output the sRGB values from the post process material to render the colorblind simulation.
Another type of colorblindness is not being able to see any colors at all. People with Monochromacy see everything in shades of gray.
To simulate Monochromacy, we don't need to convert to LMS space, instead we can take the LinearRGB color space and multiply by the following matrix (again, explained in detail here):
        |R|   | 0.212656 |
 Mono = |G| x | 0.715158 |
        |B|   | 0.072186 |
This results in a single linear value and we output that same value in the Red, Green and Blue channels for our color to provide a monochrome output.
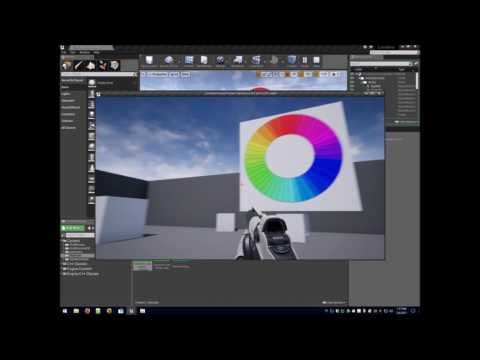
I've provided a sample YouTube video that demonstrates how to use the colorblind simulation postprocess material in your game so that you can easily simulate colorblindness and see what someone who's colorblind would see when playing your game.
You will need Unreal Engine 4.16.1 or greater (older versions of the engine may work, but if you can't open the assets included here then you will need to upgrade to a later version of the engine).
Download the .zip file from the Releases page and save this to somewhere on your hard disk. Open the .zip file and extract the contents (or just copy the "Content" folder) into the folder for your game. You want to copy it into the same folder where a Content folder should already exist (you want to "merge" these 2 Content folders). For example...
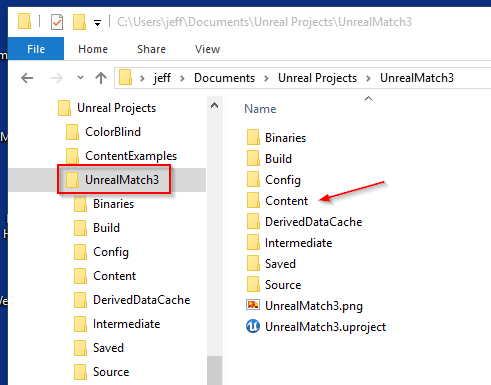
Copy the "Content" folder in the game folder (with the red box shown above, NOT into the other "Content" folder shown with the arrow).
Start up the editor for your game and in the Content Browser (in the Content/Materials folder) you should see the following assets:
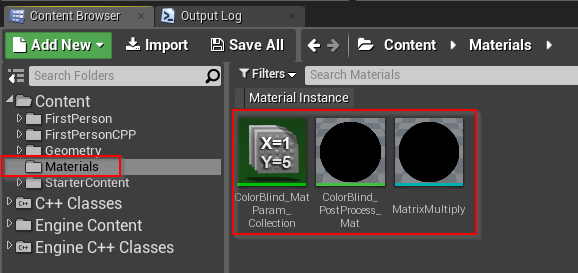
If you do not see these assets in your game's Content/Materials folder then you have extracted or copied things to the wrong place and the material WILL NOT WORK. Go back and remove the files from wherever you added them and extract the files again.
Double click on the "ColorBlind_Mat_Param_Collection" asset first to verify that you can open it. You should see something like this (click on the image for more detail):
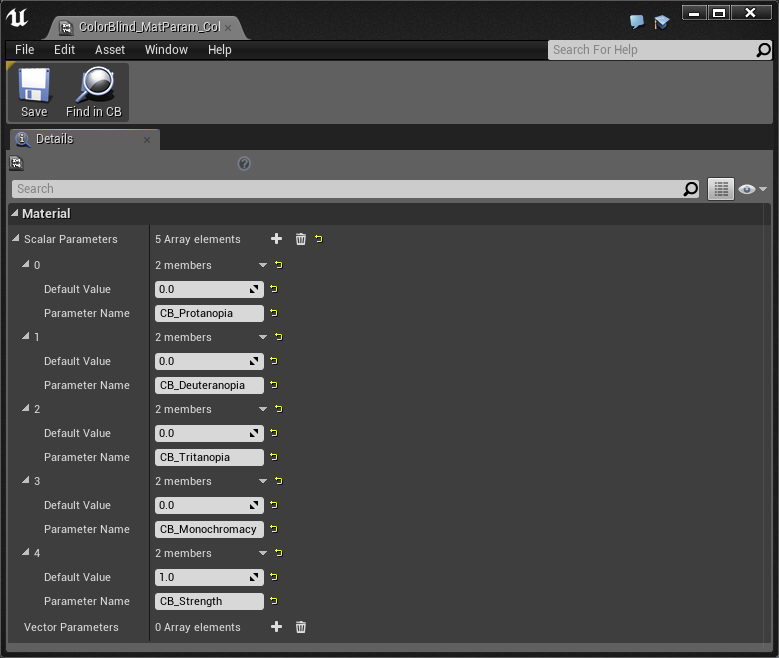
As mentioned in the video, to turn on one of the 4 colorblind simulation modes, set one of the parameters (CB_Protanopia, CB_Deuteranopia, CB_Tritanopia, or CB_Monochromacy) to 1.0 and set the other 3 parameters to 0.0 to turn them off. The colorblind simluation postprocess material will only let one simulation type be active at a time, so if more than one are turned on at the same time, you will only see the effect of one of them.
Now we need to add the colorblind postprocess material to the CameraCompoent (or the World Camera) for your game. To do this, open the Character for your game in Blueprint (for my game, this asset was called "FirstPersonCharacter").
In Blueprint, find the CameraComponent in the list of the components in the upper left and select it with the mouse (click on image for more detail)...
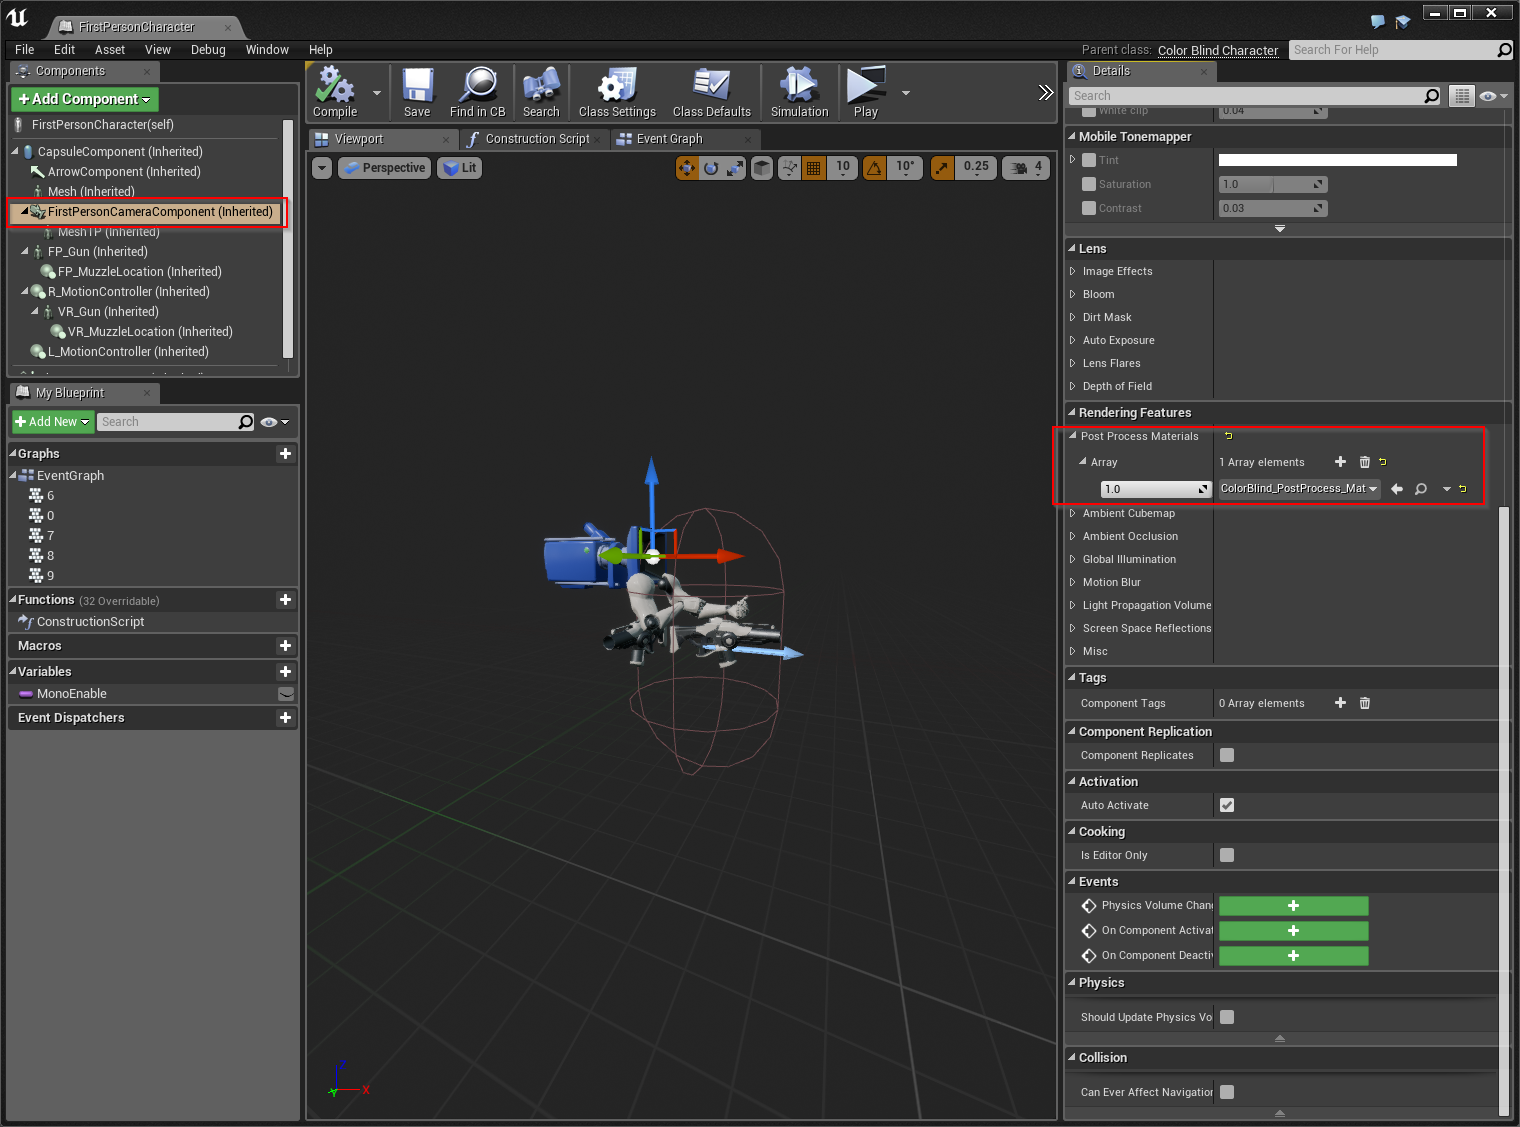
Scroll down the list in the Details panel on the right until you see the "Rending Features" section and expand the "Post Process Materials" item. Click the "+" sign to add an element to the array. Click on the "Choose" dropdown and select "Asset reference" so that you can drop the colorblind postprocess material here.
Then go back to the Content Browser and go into the Materials folder and find the "ColorBlind_PostProcess_Mat" material, select it and drag it into the postprocess array element that you just added (it will be highlighted with a dashed green box).
When you are done, it should look like the image shown above.
Click the "Compile" button in the toolbar at the top to re-build the Character Blueprint and then click the "Save" button to save your changes.
You can test out your changes by opening the "ColorBlind_Mat_Param_Collection" again and change the CB_Protanopia parameter 'Default Value' to 1.0, save your changes and start up your game. You should immediately notice a difference in the colors in your game. Exit from your game and go back to the material parameter collection and set the CB_Proptanopia Default Value back to 0.0 and save your changes.
Now, we can add some Blueprint to the Event Graph of the Character (FirstPersonCharacter in my case) to intercept key presses to use them to control the colorblind simulation mode. For my example, I use the keyboard keys '6' to '9' to set the simulation mode and I use the key '0' to turn off the colorblind simulation. All of these keys are on the number row at the top of the keyboard (these are not the NumPad keys).
Here's what the FirstPersonCharacter Event Graph looks like (again, click on the image for more detail):
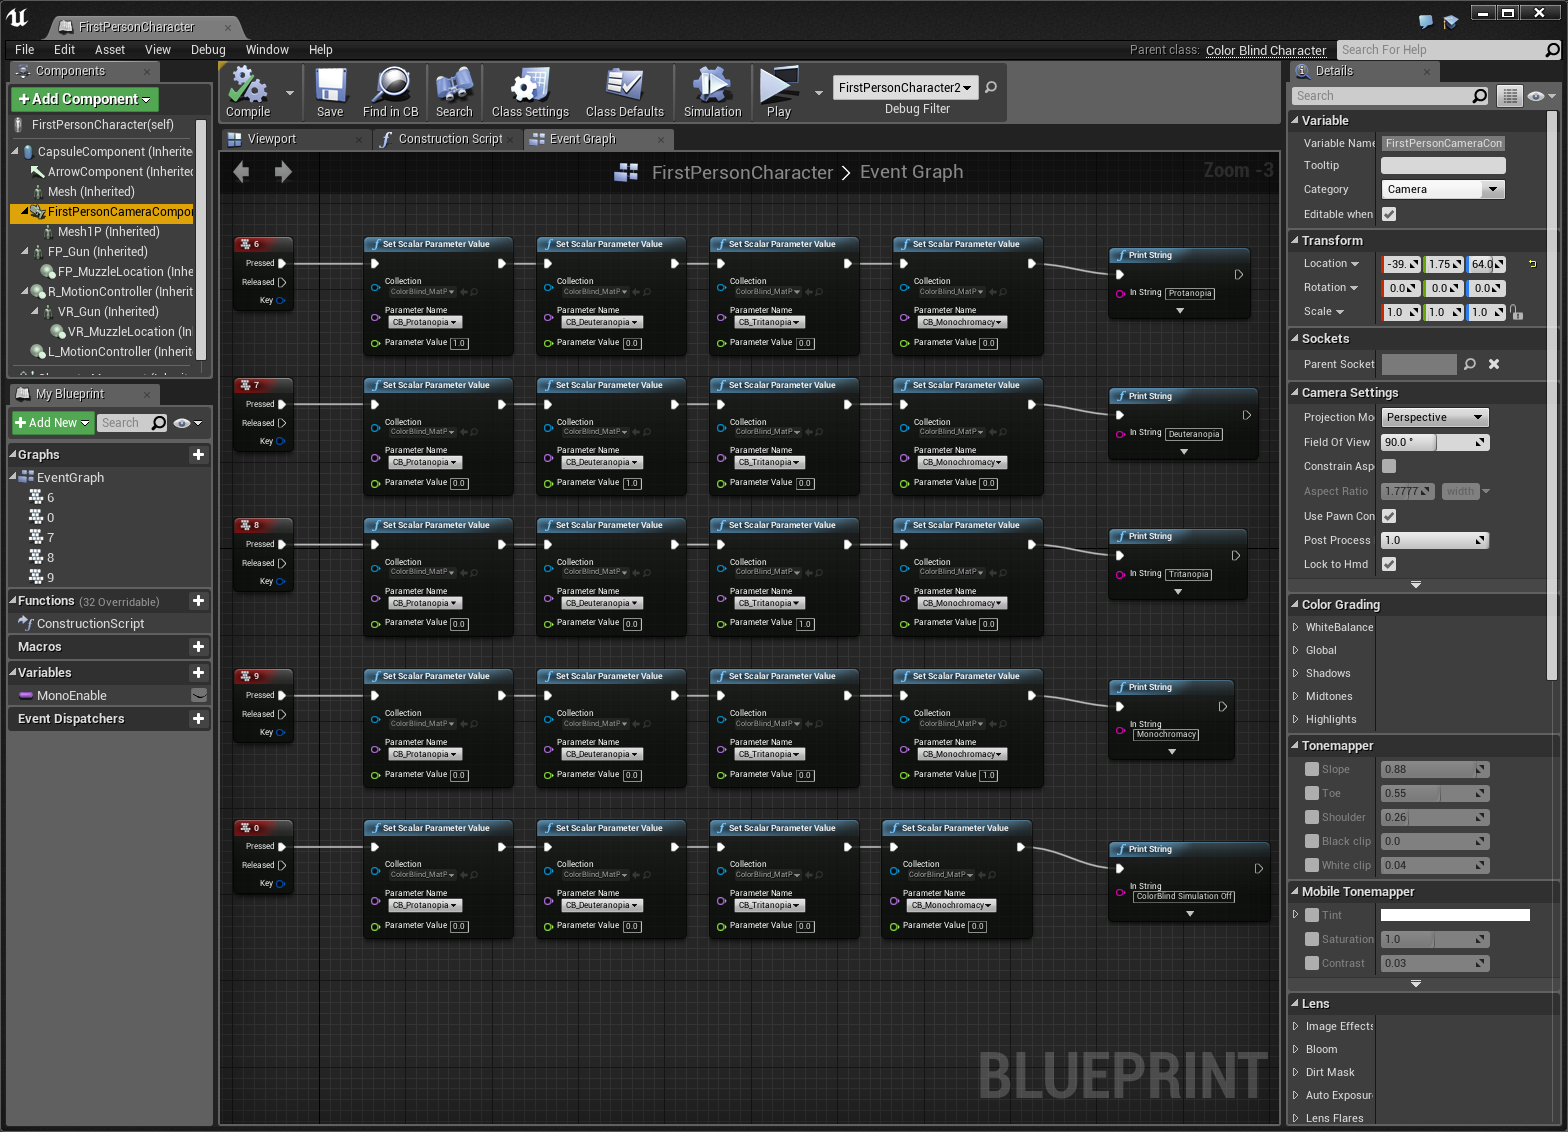
There are 4 rows for each mode (Protanopia, Deuteranopia, Tritanopia, and Monochromacy) and one additional row that turns everything off. Each row starts with an Event for the keypress and then uses "Set Scalar Parameter Value" to set the material collection parameter values to 1.0 or 0.0 to control which colorblind simulation mode is enabled (and to disable the others). The end of the row uses "Print String" to print out a message to the display to indicate what mode was selected.
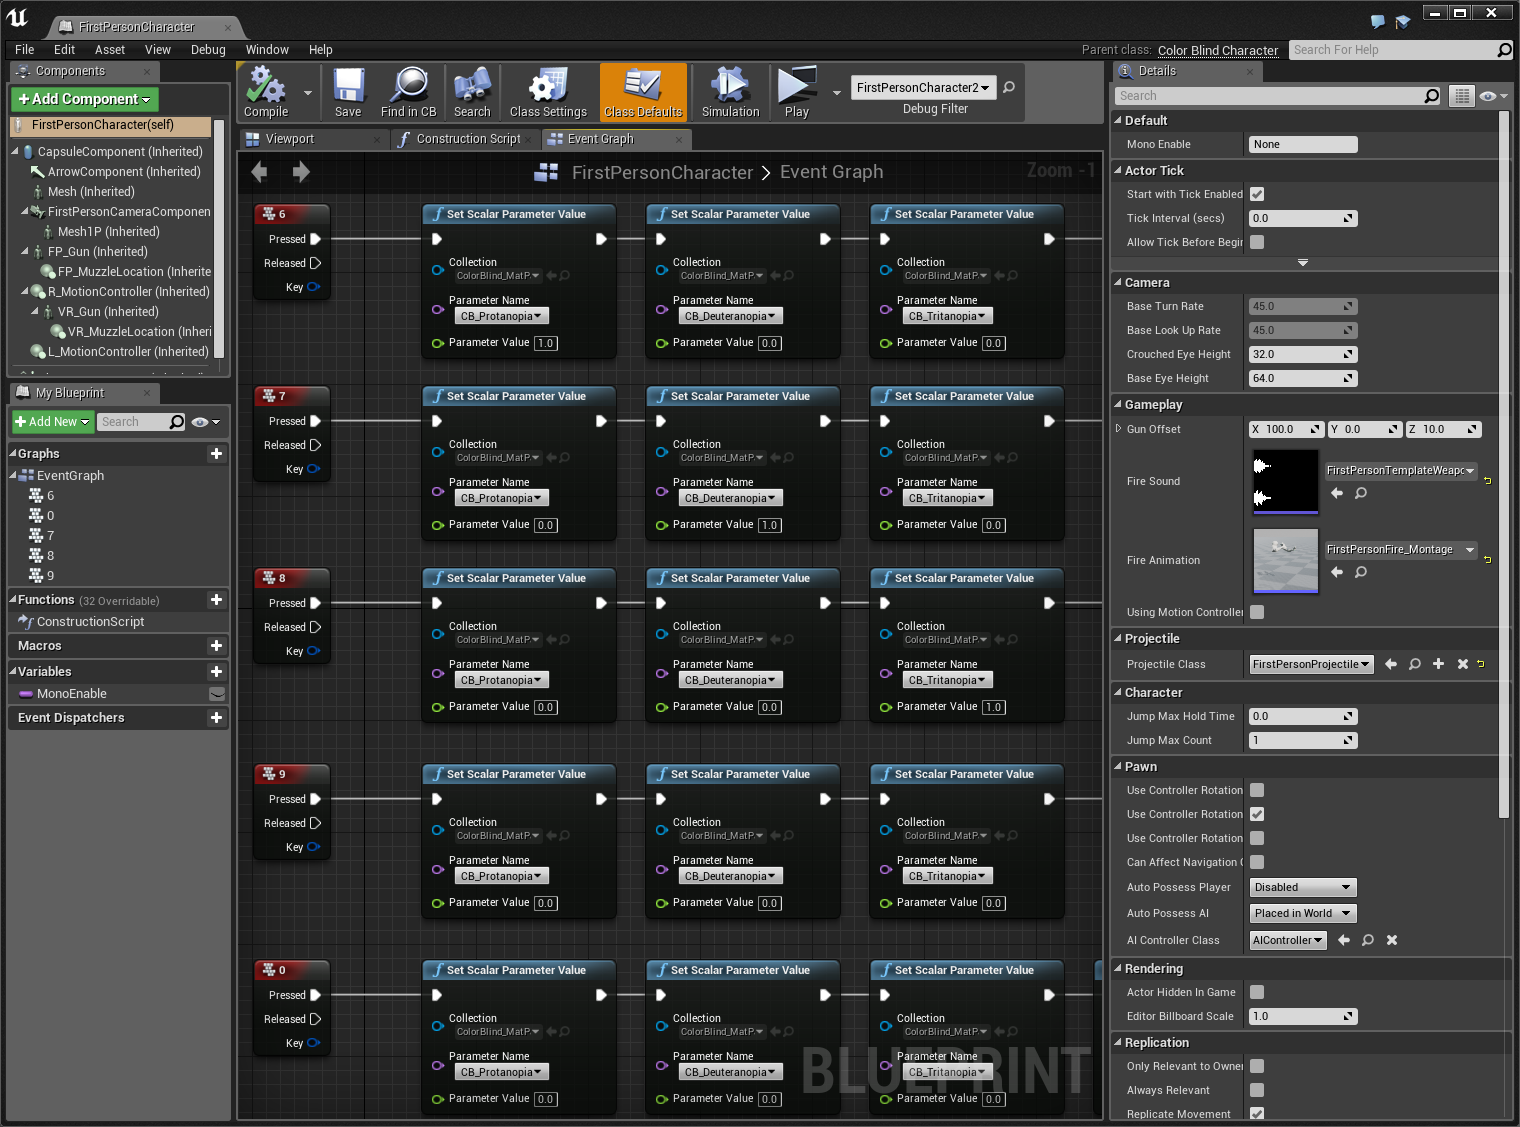
Here's 2 more shots of this zoomed in more to show better detail:

Once this is all added to your Character's Event Graph, click the "Compile" button to rebuild your Character Blueprint and click the "Save" button to save everything.
Now you can start your game and press '6', '7', '8', or '9' to enable one of the colorblind simulation modes and press '0' to turn the colorblind simulation back off.
NOTE: Make sure you remember to remove the colorblind simulation postprocess material from your Camera or CameraComponent before you ship your game! Also, remove the Blueprint nodes for the '6', 7', '8', 9', and '0' keys before you ship your game. :)
If you want to add a console command that allows you to control the colorblind siumulation mode and strength, you can use the following code:
Open your Character class .h file (for my example it was "ColorBlindCharacter.h") and add the following at the bottom of your xxxCharacter class:
public:
	UFUNCTION(exec)
	void ColorBlind(FString command, float value);
The only thing after that should be the closing brace and the semicolon:
};
Then open the .cpp file for your Character class (for my example it was "ColorBlindCharacter.cpp") and add the following at the top of the file (right after all of the other #include lines):
#include "Engine/Engine.h"
#include "Materials/MaterialParameterCollection.h"
#include "Materials/MaterialParameterCollectionInstance.h"
Then add the following at the very bottom of the file.
void AYourClassHere::ColorBlind(FString command, float value)
{
	if (command == TEXT(""))
	{
		// note that these lines are output in reverse order so they appear correctly on the screen in game
		GEngine->AddOnScreenDebugMessage((uint64)-1, 5.0f, FColor::White, TEXT("       (strength is followed by a value between 0.0 and 1.0 for the strength of the simulation)"));
		GEngine->AddOnScreenDebugMessage((uint64)-1, 5.0f, FColor::White, TEXT("       where 'command' is 'prot', 'deut', 'trit', 'mono', 'off', or 'strength'"));
		GEngine->AddOnScreenDebugMessage((uint64)-1, 5.0f, FColor::White, TEXT("Usage: ColorBlind command <value>"));
		return;
	}

	// load the ColorBlind material parameter collection
	static UMaterialParameterCollection* Collection = Cast<UMaterialParameterCollection>(StaticLoadObject(UMaterialParameterCollection::StaticClass(), NULL, TEXT("/Game/Materials/ColorBlind_MatParam_Collection"), NULL, LOAD_None, NULL));

	if (Collection == nullptr)
	{
		GEngine->AddOnScreenDebugMessage((uint64)-1, 2.0f, FColor::White, TEXT("MaterialParameterCollection was not found!  Make sure you put the files in Content/Materials in your game's folder!"));
		return;
	}

	static UMaterialParameterCollectionInstance* CollectionInstance = nullptr;

	if (CollectionInstance == nullptr)  // get the material parameter collection instance (if we haven't done this already)
	{
		UWorld* World = GetWorld();

		if (World == nullptr)
		{
			GEngine->AddOnScreenDebugMessage((uint64)-1, 2.0f, FColor::White, TEXT("Can't get the World (for some reason)!"));
			return;
		}

		CollectionInstance = World->GetParameterCollectionInstance(Collection);
	}

	if (CollectionInstance == nullptr)
	{
		GEngine->AddOnScreenDebugMessage((uint64)-1, 2.0f, FColor::White, TEXT("Can't get the CollectionInstance (for some reason)!"));
		return;
	}

	static FName Name_Protanopia("CB_Protanopia");
	static FName Name_Deuteranopia("CB_Deuteranopia");
	static FName Name_Tritanopia("CB_Tritanopia");
	static FName Name_Monochromacy("CB_Monochromacy");
	static FName Name_Strength("CB_Strength");

	if (FCString::Stricmp(*command, TEXT("prot")) == 0)
	{
		CollectionInstance->SetScalarParameterValue(Name_Protanopia, 1.0f);
		CollectionInstance->SetScalarParameterValue(Name_Deuteranopia, 0.0f);
		CollectionInstance->SetScalarParameterValue(Name_Tritanopia, 0.0f);
		CollectionInstance->SetScalarParameterValue(Name_Monochromacy, 0.0f);
		GEngine->AddOnScreenDebugMessage((uint64)-1, 2.0f, FColor::White, TEXT("Protanopia"));
	}
	else if (FCString::Stricmp(*command, TEXT("deut")) == 0)
	{
		CollectionInstance->SetScalarParameterValue(Name_Protanopia, 0.0f);
		CollectionInstance->SetScalarParameterValue(Name_Deuteranopia, 1.0f);
		CollectionInstance->SetScalarParameterValue(Name_Tritanopia, 0.0f);
		CollectionInstance->SetScalarParameterValue(Name_Monochromacy, 0.0f);
		GEngine->AddOnScreenDebugMessage((uint64)-1, 2.0f, FColor::White, TEXT("Deuteranopia"));
	}
	else if (FCString::Stricmp(*command, TEXT("trit")) == 0)
	{
		CollectionInstance->SetScalarParameterValue(Name_Protanopia, 0.0f);
		CollectionInstance->SetScalarParameterValue(Name_Deuteranopia, 0.0f);
		CollectionInstance->SetScalarParameterValue(Name_Tritanopia, 1.0f);
		CollectionInstance->SetScalarParameterValue(Name_Monochromacy, 0.0f);
		GEngine->AddOnScreenDebugMessage((uint64)-1, 2.0f, FColor::White, TEXT("Tritanopia"));
	}
	else if (FCString::Stricmp(*command, TEXT("mono")) == 0)
	{
		CollectionInstance->SetScalarParameterValue(Name_Protanopia, 0.0f);
		CollectionInstance->SetScalarParameterValue(Name_Deuteranopia, 0.0f);
		CollectionInstance->SetScalarParameterValue(Name_Tritanopia, 0.0f);
		CollectionInstance->SetScalarParameterValue(Name_Monochromacy, 1.0f);
		GEngine->AddOnScreenDebugMessage((uint64)-1, 2.0f, FColor::White, TEXT("Monochromacy"));
	}
	else if (FCString::Stricmp(*command, TEXT("off")) == 0)
	{
		CollectionInstance->SetScalarParameterValue(Name_Protanopia, 0.0f);
		CollectionInstance->SetScalarParameterValue(Name_Deuteranopia, 0.0f);
		CollectionInstance->SetScalarParameterValue(Name_Tritanopia, 0.0f);
		CollectionInstance->SetScalarParameterValue(Name_Monochromacy, 0.0f);
		GEngine->AddOnScreenDebugMessage((uint64)-1, 2.0f, FColor::White, TEXT("Off"));
	}
	else if (FCString::Stricmp(*command, TEXT("strength")) == 0)
	{
		float param_value = fmax(1.0f, fmin(0.f, value));

		CollectionInstance->SetScalarParameterValue(Name_Strength, param_value);
		GEngine->AddOnScreenDebugMessage((uint64)-1, 2.0f, FColor::White, FString::Printf(TEXT("Strength set to %f"), param_value));
	}
}
You will want to replace the "AYourClassHere::" at the top of the function with whatever your class name is (for example "AColorBlindCharacter::").
Save the .h file and the .cpp file, then rebuild your project.
When you start the game, you can use the "ColorBlind" command in the console to control the colorblind simulation. For example, to turn the colorblind simulation for Protanopia, pull down the console and enter "colorblind prot" (without the double quotes). You can turn off the colorblind simulation by using the console command "colorblind off" (without the double quotes).
Using "colorblind deut", "colorblind trit", or "colorblind mono" will enable the other 3 colorblind modes.
You can control the strength of the simluation by using "colorblind strength" follows by a value from 0.0 to 1.0, for example "colorblind strength 0.7".