

ProjectFramework is a MIT-licensed library for project management at application level with Pharo Smalltalk. The ProjectFramework enables to build typical project-based desktop GUI applications, without reinventing the wheel for project behaviors such as Open, Save, Closing, setting properties, etc. For example, when an user close a project inside an application window, menu items such as close, properties, save, etc. should be disabled, and re-enabled again when a project is opened. This is managed by the ProjectFramework automatically. A Spec UI application can be automatically generated from templates with basic menu options in very few lines of code.
ProjectFramework is designed to create project-centric applications with minimal effort, and tries to be fairly agnostic regarding the choices of UI widget libraries, this means no widget toolkit dependent code.
There are several ways to install the ProjectFramework. At minimum, you need a working Pharo virtual image installed in your system. Check the Pharo website for installation information regarding the Pharo Open-Source system. Once Pharo is launched you have the following installation options:
EpMonitor disableDuring: [
  Metacello new
    baseline: 'ProjectFramework';
    repository: 'github://hernanmd/ProjectFramework/repository';
    load ].
Install ProjectFramework from Command-Line Interface using Pharo Install:
pi install ProjectFrameworkIf you want to add the ProjectFramework to your Metacello Baselines or Configurations, copy and paste the following expression:
        " ... "
        spec
                baseline: 'ProjectFramework'
                with: [ spec repository: 'github://hernanmd/ProjectFramework/repository' ];
" ... "- SState from Masashi Umezawa
- i18N from Torsten Bergmann
- Spec
- Traits
- file-dialog from Peter Uhnak
- SpecUIAddOns
- Fuel
The ProjectFramework includes a class representing your whole Application. An Application is global to an image - only one application per image could be active at a time - and could contain a single active project or multiple projects. PFProjectBase is the basic core (abstract) class for user projects. A custom Project class could be created by inheriting from PFProjectBase. Such class will inherit basic project features, for example: setting or getting project author, adding or removing project users, adding or removing project owner(s), query project creation or modification dates, setting file name extension, and querying project history information. Every instantiated project must belong to an application, so the first thing to do is to create an application class:
An Application class should inherit from PFProjectApplication:s
PFProjectApplication subclass: #MyApplicationClass
   	instanceVariableNames: ''
   	classVariableNames: ''
   	package: 'MyApplication-Core'
If there is just one subclass of PFProjectApplication in the image, then it will be automatically configured and used as the "current application class". Otherwise, you should set up the current application class using the global preferences, for example:
PFProjectSettings currentApplicationClass: PFSample1ApplicationClass.PFProjectSettings implements customization points in ProjectFramework, so that the Settings Framework might collect them and populate a setting browser with them.
The following snippet details how to add your own Project class:
PFProjectBase subclass: #MyPFProject
   	instanceVariableNames: ''
   	classVariableNames: ''
package: 'MyApplication-Core'To link the Application with the Project, we need to add a method to MyApplicationClass in instance side:
defaultProjectClass
	" Private - See superimplementor's comment "

	^ MyPFProject
You can also configure the application name in class side of MyApplicationClass:
applicationName
	" Answer a <String> with receiver's name "

	^ 'My First Application'
If you want to customize your serialized project file extension, define this method:
applicationExtension
	" Answer a <String> with receiver's project file extension "

	^ 'ext'
Before jumping to automatic UI generation, you might want to explore the basic message sends and core classes in the ProjectFramework.
An user (PFProjectUser) represents an user with projects and can instantiate multiple projects, however only one project will be the active project (#currentProject) at a time for the current application.
Projects are identified by name (String), and an user cannot have duplicated projects, this is projects with the same name. The following expressions show how to create an user with a project, and the type of operations which could be done:
Creating an user with a new project:
| usr prj |

usr := PFProjectUser named: 'John Perez'.
prj := usr addNewProject: 'My First Project'.
Check actually everything was correctly configured:
prj authorName.  "'John Perez'"
prj projectName. "'My First Project'"
A project can be queried for typical project expected attributes:
prj fileName. "'My First Project.fuelprj'"
prj creationDateAsString. "'2018-03-13 01:47:57'"
prj saveStatus.  "false"
Projects can also have owners.
prj hasOwner. "false"And versioning is also supported:
prj version: '1.0.0'.
prj versionString. "'1.0.0'"
Save the project to file and ask if it was actually saved:
prj save.
prj saveStatus.
The file name is actually the project name, added with a default "fuelprj" extension (the extension String can be configured later):
'My First Project.fuelprj' asFileReference exists. "true"Currently the ProjectFramework serializes and materialize its projects using the Fuel serialization library.
There are different ways to create projects, depending on specific scenarios. Creating and adding projects are two separate things. An user can create a project meaning only instantiating a new PFProjectBase, without adding it as part of its application projects. On the other hand, adding a project means creating the instance, and adding it to both the application and the collection of user projects.
Let's create another project:
prj2 := usr createProject: 'My Second Project'.Check that such project was not added to the user projects yet:
usr hasProjectNamed: 'My Second Project'.And then we can add it to the user projects:
usr addProject: prj2.Note that previously we added a project passing its name, and now we use a PFProjectBase as parameter, the result is the same.
Finally re-check again if it was added correctly:
usr hasProjectNamed: 'My Second Project'.None of the previosuly sends set the created project as the current application project. That should be done separately using:
prj setCurrentFor: usr.The ProjectFramework has built-in support for several types of User-Interfaces. The differences between UI's are that they provide different layouts considering the features (or limitations) of available underlying widget library. This also provides an abstraction layer for future widget toolkits or libraries (such as Bloc).
First we require a "Window" class:
PFStandardProjectWindow subclass: #MyAppProjectWindow
	instanceVariableNames: ''
	classVariableNames: ''
	package: 'MyApplication-UI'
We need to link your application with your project. Add the following class (we will talk about it in the next section about Adding a project controller):
PFProjectManager subclass: #MyAppProjectManager
	instanceVariableNames: ''
	classVariableNames: ''
	package: 'MyApplication-UI'
Then add an instance method in MyAppProjectWindow:
defaultProjectManagerClass

	^ MyAppProjectManager
If you want to close the Window after creating a project, add the following method:
closeAfterCreateProject
   	" Answer <true> if receiver's window should close after creation of a project "

	^ true
If you want to inform the user of the current project, implement #defaultWindowTitle to answer a String and do not override the #title method.
From now the link between application, and other artifacts are managed by a Controller object.
The project window is responsible to render the widgets and trigger to user events such as opening, saving or closing project files. However, to maintain a clear separation of responsibilities and cleaner interfaces, such additional features are implemented in a class acting as Controller, connecting the project model MyPFProject and the UI MyAppProjectWindow. The root class for project controllers is PFProjectManager. Currently provides the following features:
- Link the UI to application and project classes.
- Accessing translations through an application translator object.
- Code for serialization and materialization of project files.
- Exception handling for creation, opening and removing projects.
- Provides a Finite-State Machine protocol for events and actions.
- Recent projects management.
Implement the following method in your controller:
initialize
	" Private - See superimplementor's comment "

	super initialize.
	self applicationClass: MyApplicationClass.
	self projectClass: MyAppProject.
You may notice that we inherited the main application window from PFStandardProjectWindow class. Actually he ProjectFramework includes two library bindings to render the UI:
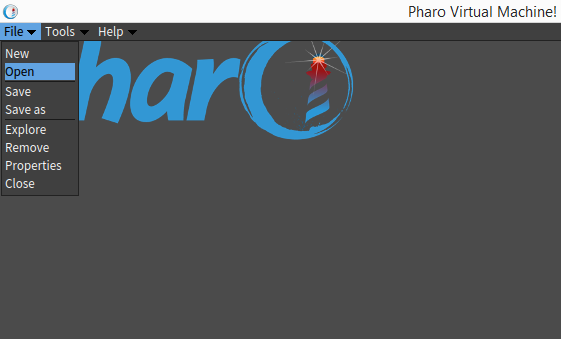
ProjectFrameworkSpec classes inherits from ComposableModel (in Pharo 6.x) or ComposablePresenter (in Pharo 7.x) and uses the SpecUIAddOns package classes to provide a "standard" layout. The standard project window is based in the Spec ApplicationWithToolbar class. Alternatively, a "Project Details" with or without recent projects list layout is also available.
Here is a screenshot of both layouts:

To launch an example window, please evaluate:
PFSample1StandardWindow open.Also to configure the application for the first time or re-initialize the translation tables.
PFProjectSettings currentApplicationClass: PFSample1ApplicationClass.
PFSample1ApplicationClass uniqueInstance translator: nil.
PFSample1StandardWindow open.
To use this layout, subclass the PFStandardProjectWindow as shown in the example above.
To launch an example window, please evaluate:
PFSample1RecentsWindow open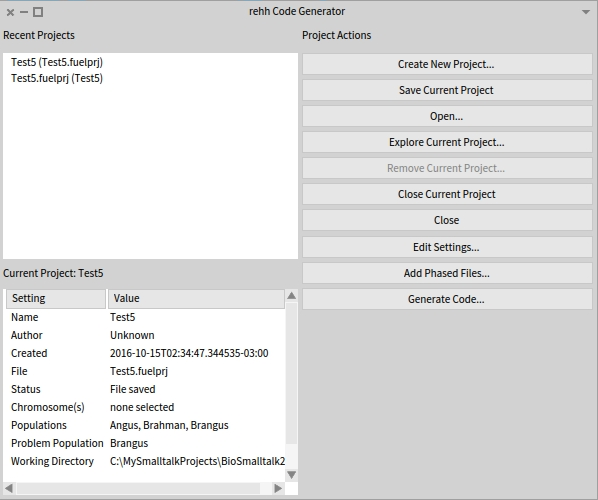
To use this layout, subclass the PFProjectDetailsWindow
To launch an example window, please evaluate:
PFSample1RecentsDetailsWindow openThe docking project window is based in the DockingBarMorph class, and enables to use the ProjectFramework without Spec (or other higher-level library) dependency.
The SState package provides a Finite State Machine (FSM) implementation. To manage common project events, actions and states the ProjectFramework configures an extremely simple FSM: Every project (subclass of PFProjectBase) contains, almost free of charge, a FSM with a predefined set of states and transitions:
- The actions, events and state names are configured in the #initializeFSM method.
- You can customize the FSM in the #initializeFSM method in your subclass of PFProjectApplication.
- To perform actions before entering the initial state of your application, for example when opening the main window, implement your own #updateStateInit in your subclass of PFProjectManager.
- The initial state is named "stateWaitNewOrOpen" which means, "wait for a new project or open project" event.
- Upon opening or creating a new project, the FSM transitions to a new state "stateWaitChangeOrClose".
- When a project changes, the FSM performs another transition to "stateWaitSaveOrClose".
Which translates in the following method (used if no FSM is specified):
initializeFSM
	" Private - Initialize receiver's state machine "

	self fsm: SsStateMachine new.
	(self fsm addStateNamed: #stateWaitNewOrOpen)
    	entryAction: [ self entryStateWaitNewOrOpen ];
		exitAction: [ self exitStateWaitNewOrOpen ];
		when: #actionOpened do: [ : ctx : ev | ctx at: #pfTrans put: ev ] to: #stateWaitChangeOrClose;
		when: #actionNew do: [ : ctx : ev | ctx at: #pfTrans put: ev ] to: #stateWaitChangeOrClose.

	(self fsm addStateNamed: #stateWaitChangeOrClose)
		entryAction: [ self entryStateWaitChangeOrClose ];
		exitAction: [ self exitStateWaitChangeOrClose ];
		when: #actionSave do: [ : ctx : ev | ctx at: #pfTrans put: ev ] to: #stateWaitChangeOrClose;
		when: #actionSaveAs do: [ : ctx : ev | ctx at: #pfTrans put: ev ] to: #stateWaitChangeOrClose;
		when: #actionChange do: [ : ctx : ev | ctx at: #pfTrans put: ev ] to: #stateWaitSaveOrClose;
		when: #actionClose do: [ : ctx : ev | ctx at: #pfTrans put: ev ] to: #stateWaitNewOrOpen.

	(self fsm addStateNamed: #stateWaitSaveOrClose)
		entryAction: [  self entryStateWaitSaveOrClose ];
		exitAction: [  self exitStateWaitSaveOrClose ];
		when: #actionClose do: [ : ctx : ev | ctx at: #pfTrans put: ev ] to: #stateWaitNewOrOpen.
And it can be visualized in the following transition graph:

To define your own FSM, specialize the #initializeFSM method in your PFProjectManager subclass (MyAppProjectManager). You can access the FSM through the #fsm getter.
The following example method contains how FSM events could be triggered in user's code:
createNewProject
	" Request a project name and answer a new project if valid name is supplied "

	| answer |

	(answer := self requestMessage: self translator tNewProjectName) isEmptyOrNil
		ifFalse: [
			self createAppProject: answer.
			self fsm handleEvent: #actionNew  ]
ifTrue: [ self informMessage: self translator tNewProjectEmptyName ].The ProjectFramework provides also a class PFProjectSettingsPharo (using the Settings Framework of Pharo) to manage configuration of application and project.
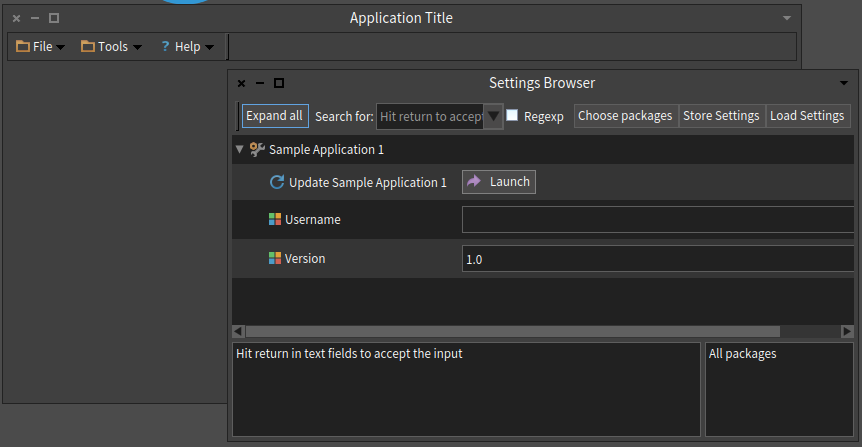
To open a settings window for the sample application, please evaluate:
PFSample1ProjectSettings openSettings.To use this feature, subclass PFProjectSettingsPharo and add the following methods in class side:
applicationClass
	" Private - See superimplementor's comment "

	^ PFSample1ApplicationClass
You will have to create a pragma keyword which you will use in your specific methods with settings code:
projectFrameworkPragmaKeywords

	^ Array with: 'projectSample1Settings'
For example a setting to configure the user name of the Application:
usernameSettingsOn: aBuilder
	<projectSample1Settings>

	(aBuilder setting: #usernameSetting)
		target: self;
		description: 'Set the user name';
		label: 'Username';
parent: #projectSettingsThe Project Framework currently uses the i18N package to add translation support to menu items and messages. The abstract class to check for implementing i18N to your application is PFTranslator. Translation is defined per-application, and you should subclass PFTranslator for your application to add custom translations.
The current default PFTranslator adds two catalogs with related project operations. One catalog for english (see #addTranslationsForEN) and another one for spanish (#addTranslationsForES).
To set the default language for your application, define a #defaultTranslatorClass method in your application class (instance side):
defaultTranslatorClass
	" Answer the default translation class for the receiver "

	^ PFTranslator
Note: You can also completely replace the underlying translation library by replacing with another class from other available library such as GetText.
and a method to specify the default language if you want other than english:
defaultLanguageCode
	" Answer a language code <Symbol> to set the default project language "

	^ #ES
Specialize the #initialize method in your PFTranslator subclass to add more languages to your application, for example:
initialize
	" Private - Initialize the receiver's translation maps "

	super initialize.
self addTranslationsForFR.- Recent project behavior is implemented via Traits, this means that if you implement your own UI you could import the Trait as shown in the following expression:
MyComposablePresenter subclass: #MyCustomAppWindow
	uses: TPFRecents
	instanceVariableNames: 'projectManager'
	classVariableNames: ''
package: 'ProjectFrameworkSpec-Layouts'- The ProjectFramework installs and set as default the native file dialogs developed by Peter Uhnak. If you want to switch back to the Morphic dialogs (however, the open file dialog will be unable to filter files by extension), please evaluate:
MorphicUIManager new beDefaultWorking on your first Pull Request? You can learn how from this free series How to Contribute to an Open Source Project on GitHub
If you have discovered a bug or have a feature suggestion, feel free to create an issue on Github. If you have any suggestions for how this package could be improved, please get in touch or suggest an improvement using the GitHub issues page. If you'd like to make some changes yourself, see the following:
- Fork this repository to your own GitHub account and then clone it to your local device
- Do some modifications
- Test.
- Add to add yourself as author below.
- Finally, submit a pull request with your changes!
- This project follows the all-contributors specification. Contributions of any kind are welcome!
This software is licensed under the MIT License.
Copyright Hernán Morales Durand, 2018-2022
Permission is hereby granted, free of charge, to any person obtaining a copy of this software and associated documentation files (the "Software"), to deal in the Software without restriction, including without limitation the rights to use, copy, modify, merge, publish, distribute, sublicense, and/or sell copies of the Software, and to permit persons to whom the Software is furnished to do so, subject to the following conditions:
The above copyright notice and this permission notice shall be included in all copies or substantial portions of the Software.
THE SOFTWARE IS PROVIDED "AS IS", WITHOUT WARRANTY OF ANY KIND, EXPRESS OR IMPLIED, INCLUDING BUT NOT LIMITED TO THE WARRANTIES OF MERCHANTABILITY, FITNESS FOR A PARTICULAR PURPOSE AND NONINFRINGEMENT. IN NO EVENT SHALL THE AUTHORS OR COPYRIGHT HOLDERS BE LIABLE FOR ANY CLAIM, DAMAGES OR OTHER LIABILITY, WHETHER IN AN ACTION OF CONTRACT, TORT OR OTHERWISE, ARISING FROM, OUT OF OR IN CONNECTION WITH THE SOFTWARE OR THE USE OR OTHER DEALINGS IN THE SOFTWARE.
Hernán Morales Durand