This Home Assistant integration provides support for ecoMAX controllers manufactured by Plum Sp. z o.o.
It's based on PyPlumIO package and supports connection to ecoMAX controller via RS-485 to Ethernet/Wifi converters or via RS-485 to USB adapter.
With this integration you have two ways of connecting to your ecoMAX controller. One is directly connecting the PC that runs Home Assistant via RS485 to USB adapter.
Other way is to use RS485 to WiFi converter. This has a benefit of being able to move PC that runs Home Assistant away from the boiler and connect to it wirelessly.
Regardless of the chosen method, you'll need to find RS485 port on your ecoMAX controller. If you have ecoSTER thermostat, it's easy, as ecoSTERs also use RS485 port and you'll just have to connect your adapter/converter in parallel with it.
If you don't have ecoSTER, look for pins that are labeled as "D+" and "D-" then connect your device as follows:
Adapter ->  ecoMAX
[A]     ->  [D+]
[B]     ->  [D-]
[GND]   ->  [GND] (optional, less interference)
While this integration is built on top of PyPlumIO library, which from the start was intended as ecoNET 300 alternative, Patryk B has originally developed awesome HASS integration that communicates with ecoMAX controller via ecoNET 300 device.
Development of this integration has recently been picked up by @jontofront, so it's getting regular updates and fixes again! If you have an ecoNET 300 device, be sure to check it out!
Click the following My button to install the integration via HACS:
HACS is recommended method to install and update the plum-ecomax integration.
If you still don't use it, give it a try, I'm sure you'll love it!
- Clone this repository with:
git clone https://github.com/denpamusic/homeassistant-plum-ecomax- Move
custom_componentsdirectory fromhomeassistant-plum-ecomaxto your Home Assistant configuration directory. (next to configuration.yaml)
cp -r ./homeassistant-plum-ecomax/custom_components ~/.homeassistant- Restart Home Assistant.
Adding Plum ecoMAX integration to your Home Assistant instance can be done via user interface, by using this My button:
Manual configuration (click to expand)
If the above My button doesn’t work, you can also perform the following steps manually:
- Browse to your Home Assistant instance.
- In the sidebar click on Settings.
- From the configuration menu select: Devices & Services.
- In the bottom right, click on the Add Integration button.
- From the list, search and select "Plum ecoMAX".
- Select you connection type. Choose serial port if your ecoMAX controller is connected directly to the PC that is running Home Assistant, choose network if ecoMAX is connected via RS-485 to WiFi converter
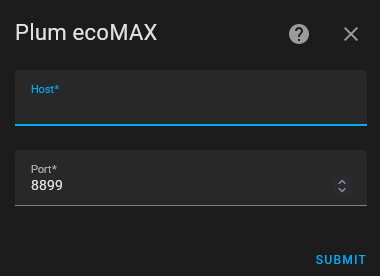
To connect via the network you'll need to fill in Host and Port:
To connect via serial port you'll need to fill in the Device path and Baudrate:
⚠️ If you're running your Home Assistant in the docker container, don't forget to map your adapter/converter device, as described here.
- Your device should now be available in your Home Assistant installation.
This integration provides the following entities, split between controller device and sub-devices.
Not all entities might be available for your controller model and entities that are deemed as unsupported during initial setup will be disabled.
ecoMAX pellet boiler controller model names has a p suffix (e. g. ecoMAX 850p), while ecoMAX installation controller model names have an i suffix (e. g. ecoMAX 850i).
The following section lists entities that are added to the ecoMAX device.
Legend:
- i - ecoMAX installation controller
- p - ecoMAX pellet boiler controller
🌡️Sensors (click to expand)
ℹ️ Temperature changes of less than 0.1°C are ignored.
- Heating temperature
- Water heater temperature
- Outside temperature
- Heating target temperature
- Water heater target temperature
- Heating mode
- Exhaust temperature
- Feeder temperature
- Return temperature
- Heating load
- Fan power
- Fuel level
- Fuel consumption
- Total fuel burned 1
- Heating power
- Lower buffer temperature 2
- Upper buffer temperature 2
- Flame intensity 2
- Lower buffer temperature 2
- Upper buffer temperature 2
- Flame intensity 2
- Oxygen level 3
- Solar temperature i
- Fireplace temperature i
1 Special meter entity. It counts burned fuel when HomeAssistant is running.
2 Controller support is required.
3 ecoLAMBDA module is required.
🔛Binary sensors (click to expand)
- Heating pump state
- Water heater pump state
- Circulation pump state
- Fan state
- Lighter state
- Exhaust fan state
- Fireplace pump state i
- Solar pump state i
✅Selects (click to expand)
- Summer mode (on, off, auto)
💡Switches (click to expand)
- Controller power switch
- Water heater disinfection switch
- Water heater pump switch
- Weather control switch p
- Fuzzy logic switch p
- Heating schedule switch p
- Water heater schedule switch p
🔢Numbers (click to expand)
- Heating temperature p
- Minimum heating power p
- Maximum heating power p
- Minimum heating temperature p
- Maximum heating temperature p
- Grate mode temperature p
- Fuel calorific value p
🛠️Diagnostics (click to expand)
- Alert
- Connection status
- Service password
- Connected modules
- Detect sub-devices
The integration provides full control for the connected indirect water heater using Home Assistant's internal water heater platform.
This includes ability to set target temperature, switch into priority, non-priority mode or turn off.
Please note, that due to the way base water heater entity is implemented, custom modes are not allowed. Please use the following reference to convert between water heater operation modes displayed in Home Assistant and ecoMAX.
HA heater state ->  ecoMAX heater mode
[Performance]   ->  [Priority mode]
[Eco]           ->  [Non-priority mode]
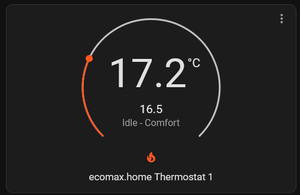
This integration provides Home Assistant's climate platform entity for each ecoSTER thermostat connected to the ecoMAX controller.
This allows to check current room temperature, set target room temperature and change between ecoSTER operation modes.
Following section lists entities that are added to each virtual device.
Please note, that for the ecoMAX installation controllers mixers are listed as circuits.
Mixers are added as sub-devices for the ecoMAX controller. They are detected only once, when integration is added to HomeAssistant.
If you connected them after setting up the integration, you can use Detect sub-devices button in Diagnostics section to force re-detection.
Legend:
- i - ecoMAX installation controller
- p - ecoMAX pellet boiler controller
🌡️Sensors (click to expand)
- Mixer temperature
- Target mixer temperature
🔛Binary sensors (click to expand)
- Mixer pump
✅Selects (click to expand)
- Work mode (off, heating, floor, pump_only) p
💡Switches (click to expand)
- Enable mixer i
- Enable in summer mode
- Weather control p
- Disable pump on thermostat p
🔢Numbers (click to expand)
- Mixer temperature
- Minimum mixer temperature
- Maximum mixer temperature
- Day target mixer temperature 1 i
- Night target mixer temperature 1 i
1 Only available on second circuit.
The integration uses following events:
Event is fired when ecoMAX controller issues an alert.
- name (config entry name)
- code (alert code)
- from (datetime object representing the alert start time)
- to 1 (datetime object representing the alert end time)
1 Only present if the alert has already ended.
This integration provides following actions:
Provides ability to get the device parameter by name.
- name
- ecomax
- mixer
- name
- value
- min_value
- max_value
- device_type
- device_uid
- device_index 1
1 This will help identify which sub-device (mixer) this parameter belongs to. Root device (controller) is always 0, while connected mixers can have 1-5.
Provides ability to set device/sub-device parameter by name. Any parameter that is supported by the device/sub-device can be used with this service. To get parameter names, please download and open diagnostics data.
- name
- value
- ecomax
- mixer
Allows to get different schedules from the device.
- type (heating, water_heater)
- weekdays (monday, tuesday, ..., etc)
- schedules (dictionary containing schedule states, keyed by start times)
Allows to set different schedules on the device.
- type (heating, water_heater)
- weekdays (monday, tuesday, ..., etc)
- preset (day, night)
- start
- end
Allows to set meter entity to a specific value. This can be used to set a value of a Total fuel burned sensor which is only available on pellet burner controllers.
- value
- total_fuel_burned
Allows to reset the meter entity value. This can be used to reset a value of the Total fuel burned sensor which is only available on pellet burner controllers.
- total_fuel_burned
This product is distributed under MIT license.


