dsf configure jenkins

Here you are going to learn how you should configure the jenkinsfile of your project to apply CI/CD operations and enables automated application deployment.
Here you can find examples of the Jenkinsfile generated by cicdgen:
Next you could find an explanation about what is done in these Jenkinsfiles.
At the top of the pipeline you should add the environment variables. in this tutorial you need the next variables:
    // sonarQube
    // Name of the sonarQube tool
    sonarTool = 'SonarQube'
    // Name of the sonarQube environment
    sonarEnv = "SonarQube"

    // Nexus
    // Artifact groupId
    groupId = '<%= groupid %>'
    // Nexus repository ID
    repositoryId = 'pl-nexus'
    // Nexus internal URL
    repositoryUrl = 'http://nexus3-core:8081/nexus3/repository/'
    // Maven global settings configuration ID
    globalSettingsId = 'MavenSettings'
    // Maven tool id
    mavenInstallation = 'Maven3'

    // Docker registry
    dockerRegistry = 'docker-registry-<%= plurl %>'
    dockerRegistryCredentials = 'nexus-docker'
    dockerTool = 'docker-global'

    // OpenShift
    openshiftUrl = '<%= ocurl %>'
    openShiftCredentials = 'openshift'
    openShiftNamespace = '<%= ocn %>'
The pipeline consists of stages, and at the beginning of each stage it is declared for which branches the step will be executed.
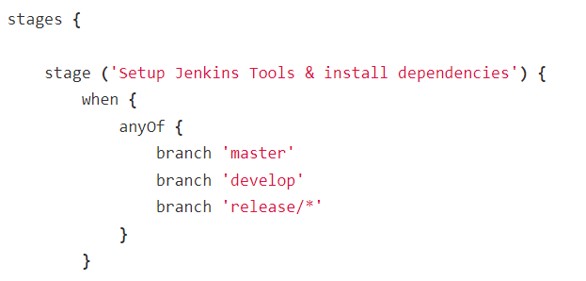
Now it is time to create the stages.
The first stage is one of the most dangerous, because in it on one hand the tools are added to the pipeline and to the path and on other hand the values are tagged depending on the branch that is being executed. If you are going to create a ci/cd for a new branch or you are going to modify something, be very careful with everything that this first step declares.
This is an example of this stage:
script {
    tool yarn
    tool Chrome-stable
    tool dockerTool

    if (env.BRANCH_NAME.startsWith('release')) {
        dockerTag = "release"
        repositoryName = 'maven-releases'
        dockerEnvironment = "_uat"
        openShiftNamespace += "-uat"
        sonarProjectKey = '-release'
    }

    if (env.BRANCH_NAME == 'develop') {
        dockerTag = "latest"
        repositoryName = 'maven-snapshots'
        dockerEnvironment = "_dev"
        openShiftNamespace += "-dev"
        sonarProjectKey = '-develop'
    }

    if (env.BRANCH_NAME == 'master') {
        dockerTag = "production"
        repositoryName = 'maven-releases'
        dockerEnvironment = '_prod'
        openShiftNamespace += "-prod"
        sonarProjectKey = ''
    }

    sh "yarn"
}
The next stage is to analyze the code making a lint analysis. To do it your project should have a tslint file with the configuration (tslint.json).
analyzing the code in your pipeline is as simple as executing the following command:
sh """yarn lint"""
|
Note
|
Your project need to have an script with tslint configuration (tslint.json). |
To test you application first of all your application should have created the tests and you should use one of the next two options:
Execute test with maven (It should be used by devon4j).
withMaven(globalMavenSettingsConfig: globalSettingsId, maven: mavenInstallation) {
    sh "mvn clean test"
}
Execute test with yarn (It should be used by devon4ng or devon4node).
sh """yarn test:ci"""
|
Note
|
Remeber that your project should have the tests created and in case of do it with yarn or npm, you package.json should have the script declared. This is an example "test:ci": "ng test --browsers ChromeHeadless --watch=false".
|
It is time to see if your application complies the requirements of the sonar analysis.
To do it you could use one of the next two options:
Execute Sonar with sonarTool (It should be used by devon4ng or devon4node).
script {
    def scannerHome = tool sonarTool
    def props = readJSON file: 'package.json'
    withSonarQubeEnv(sonarEnv) {
        sh """
            ${scannerHome}/bin/sonar-scanner \
                -Dsonar.projectKey=${props.name}${sonarProjectKey} \
                -Dsonar.projectName=${props.name}${sonarProjectKey} \
                -Dsonar.projectVersion=${props.version} \
                -Dsonar.sources=${srcDir} \
                -Dsonar.typescript.lcov.reportPaths=coverage/lcov.info
        """
    }
    timeout(time: 1, unit: 'HOURS') {
        def qg = waitForQualityGate()
        if (qg.status != 'OK') {
            error "Pipeline aborted due to quality gate failure: ${qg.status}"
        }
    }
}
Execute Sonar with maven (It should be used by devon4j).
script {
    withMaven(globalMavenSettingsConfig: globalSettingsId, maven: mavenInstallation) {
        withSonarQubeEnv(sonarEnv) {
            // Change the project name (in order to simulate branches with the free version)
            sh "cp pom.xml pom.xml.bak"
            sh "cp api/pom.xml api/pom.xml.bak"
            sh "cp core/pom.xml core/pom.xml.bak"
            sh "cp server/pom.xml server/pom.xml.bak"

            def pom = readMavenPom file: './pom.xml';
            pom.artifactId = "${pom.artifactId}${sonarProjectKey}"
            writeMavenPom model: pom, file: 'pom.xml'

            def apiPom = readMavenPom file: 'api/pom.xml'
            apiPom.parent.artifactId = pom.artifactId
            apiPom.artifactId = "${pom.artifactId}-api"
            writeMavenPom model: apiPom, file: 'api/pom.xml'

            def corePom = readMavenPom file: 'core/pom.xml'
            corePom.parent.artifactId = pom.artifactId
            corePom.artifactId = "${pom.artifactId}-core"
            writeMavenPom model: corePom, file: 'core/pom.xml'

            def serverPom = readMavenPom file: 'server/pom.xml'
            serverPom.parent.artifactId = pom.artifactId
            serverPom.artifactId = "${pom.artifactId}-server"
            writeMavenPom model: serverPom, file: 'server/pom.xml'

            sh "mvn sonar:sonar"

            sh "mv pom.xml.bak pom.xml"
            sh "mv api/pom.xml.bak api/pom.xml"
            sh "mv core/pom.xml.bak core/pom.xml"
            sh "mv server/pom.xml.bak server/pom.xml"
        }
    }
    timeout(time: 1, unit: 'HOURS') {
        def qg = waitForQualityGate()
        if (qg.status != 'OK') {
            error "Pipeline aborted due to quality gate failure: ${qg.status}"
        }
    }
}
If SonarQube is passed, you could build your application. To do it, if you are using devon4ng or devon4node you only need to add the next command:
sh """yarn build"""
|
Note
|
If you are using devon4j this and the next step Store in Nexus are making together using mvn deploy.
|
One time the application has been built the code of the application you could find the the artifacts stored in the dist folder. You should push these artifacts to store them in Nexus.
You can do it following one of the next options:
Use maven deploy config of your project (It should be used by devon4j).
withMaven(globalMavenSettingsConfig: globalSettingsId, maven: mavenInstallation) {
    sh "mvn deploy -Dmaven.test.skip=true"
}
Configure maven deploy in your pipeline (It should be used by devon4ng and devon4node).
script {
    def props = readJSON file: 'package.json'
    zip dir: 'dist/', zipFile: """${props.name}.zip"""
    version = props.version
    if (!version.endsWith("-SNAPSHOT") && env.BRANCH_NAME == 'develop') {
        version = "${version}-SNAPSHOT"
        version = version.replace("-RC", "")
    }

    if (!version.endsWith("-RC") && env.BRANCH_NAME.startsWith('release')) {
        version = "${version}-RC"
        version = version.replace("-SNAPSHOT", "")
    }

    if (env.BRANCH_NAME == 'master' && (version.endsWith("-RC") || version.endsWith("-SNAPSHOT"))){
        version = version.replace("-RC", "")
        version = version.replace("-SNAPSHOT", "")
    }

    withMaven(globalMavenSettingsConfig: globalSettingsId, maven: mavenInstallation) {
        sh """
            mvn deploy:deploy-file \
                -DgroupId=${groupId} \
                -DartifactId=${props.name} \
                -Dversion=${version} \
                -Dpackaging=zip \
                -Dfile=${props.name}.zip \
                -DrepositoryId=${repositoryId} \
                -Durl=${repositoryUrl}${repositoryName}
        """
    }
}
Now we need to use this artifacts to create a Docker image. To create the docker image you need an external server to do it. You could do it using one of the next:
Create docker image using OpenShift cluster
To create the docker image with this option you need to configure your OpenShift. You could read how to configure it here.
props = readJSON file: 'package.json'
withCredentials([usernamePassword(credentialsId: "${openShiftCredentials}", passwordVariable: 'pass', usernameVariable: 'user')]) {
    sh "oc login -u ${user} -p ${pass} ${openshiftUrl} --insecure-skip-tls-verify"
    try {
        sh "oc start-build ${props.name} --namespace=${openShiftNamespace} --from-dir=dist --wait"
        sh "oc import-image ${props.name} --namespace=${openShiftNamespace} --from=${dockerRegistry}/${props.name}:${dockerTag} --confirm"
    } catch (e) {
        sh """
            oc logs \$(oc get builds -l build=${props.name} --namespace=${openShiftNamespace} --sort-by=.metadata.creationTimestamp -o name | tail -n 1) --namespace=${namespace}
            throw e
        """
    }
}
|
Note
|
if your project is a maven project you should read the pom.xml file instead of the package.json, you could do it with the next command def pom = readMavenPom file: 'pom.xml'. Due to the fact that there are different variable names between those two files, remember to modify ${props.name} for ${pom.artifactId} in the code.
|
Create docker image using docker server
To create the docker image with this option you need to install docker and configure where is the docker host in your jenkins.
docker.withRegistry("""${dockerRegistryProtocol}${dockerRegistry}""", dockerRegistryCredentials) {
    def props = readJSON file: 'package.json'
    def customImage = docker.build("${props.name}:${props.version}", "-f ${dockerFileName} .")
    customImage.push()
    customImage.push(dockerTag);
}
|
Note
|
if your project is a maven project you should read the pom.xml file instead of the package.json, you could do it with the next command def pom = readMavenPom file: 'pom.xml'. Due to the fact that there are different variable names between those two files, remember to modify ${props.name} for ${pom.artifactId} and ${props.version} for ${pom.version} in the code.
|
Once you have the docker image in the registry we only need to import it into your deployment environment. We can do it executing one of the next commands:
Deploy docker image in OpenShift cluster
To deploy the docker image with this option you need to configure your OpenShift. You could read how to configure it here.
script {
    props = readJSON file: 'package.json'
    withCredentials([usernamePassword(credentialsId: "${openShiftCredentials}", passwordVariable: 'pass', usernameVariable: 'user')]) {
        sh "oc login -u ${user} -p ${pass} ${openshiftUrl} --insecure-skip-tls-verify"
        try {
            sh "oc import-image ${props.name} --namespace=${openShiftNamespace} --from=${dockerRegistry}/${props.name}:${dockerTag} --confirm"
        } catch (e) {
            sh """
                oc logs \$(oc get builds -l build=${props.name} --namespace=${openShiftNamespace} --sort-by=.metadata.creationTimestamp -o name | tail -n 1) --namespace=${openShiftNamespace}
                throw e
            """
        }
    }
}
|
Note
|
if your project is a maven project you should read the pom.xml file instead of the package.json, you could do it with the next command def pom = readMavenPom file: 'pom.xml'. Due to the fact that there are different variable names between those two files, remember to modify ${props.name} for ${pom.artifactId} in the code.
|
Deploy docker image using docker server
To deploy the docker image with this option you need to install docker and configure your docker server and also integrate it with Jenkins.
script {
    docker.withRegistry("""${dockerRegistryProtocol}${dockerRegistry}""", dockerRegistryCredentials) {
        def props = readJSON file: 'package.json'
        docker.image("${props.name}:${props.version}").pull()

        def containerId = sh returnStdout: true, script: """docker ps -aqf "name=${containerName}${dockerEnvironment}" """
        if (containerId?.trim()) {
            sh "docker rm -f ${containerId.trim()}"
        }

        println """docker run -d --name ${containerName}${dockerEnvironment} --network=${networkName} ${dockerRegistry}/${props.name}:${props.version}"""
        sh """docker run -d --name ${containerName}${dockerEnvironment} --network=${networkName} ${dockerRegistry}/${props.name}:${props.version}"""
    }
}
|
Note
|
if your project is a maven project you should read the pom.xml file instead of the package.json, you could do it with the next command def pom = readMavenPom file: 'pom.xml'. Due to the fact that there are different variable names between those two files, remember to modify ${props.name} for ${pom.artifactId} and ${props.version} for ${pom.version} in the code.
|
Now is time to check if your pods are running ok.
To check if your pods are ok in OpenShift you should add the next code to your pipeline:
script {
    props = readJSON file: 'package.json'
    sleep 30
    withCredentials([usernamePassword(credentialsId: "${openShiftCredentials}", passwordVariable: 'pass', usernameVariable: 'user')]) {
        sh "oc login -u ${user} -p ${pass} ${openshiftUrl} --insecure-skip-tls-verify"
        sh "oc project ${openShiftNamespace}"

        def oldRetry = -1;
        def oldState = "";

        sh "oc get pods -l app=${props.name} > out"
        def status = sh (
            script: "sed 's/[\t ][\t ]*/ /g' < out | sed '2q;d' | cut -d' ' -f3",
            returnStdout: true
        ).trim()

        def retry = sh (
            script: "sed 's/[\t ][\t ]*/ /g' < out | sed '2q;d' | cut -d' ' -f4",
            returnStdout: true
        ).trim().toInteger();

        while (retry < 5 && (oldRetry != retry || oldState != status)) {
            sleep 30
            oldRetry = retry
            oldState = status

            sh """oc get pods -l app=${props.name} > out"""
            status = sh (
                script: "sed 's/[\t ][\t ]*/ /g' < out | sed '2q;d' | cut -d' ' -f3",
                returnStdout: true
            ).trim()

            retry = sh (
                script: "sed 's/[\t ][\t ]*/ /g' < out | sed '2q;d' | cut -d' ' -f4",
                returnStdout: true
            ).trim().toInteger();
        }

        if(status != "Running"){
            try {
                sh """oc logs \$(oc get pods -l app=${props.name} --sort-by=.metadata.creationTimestamp -o name | tail -n 1)"""
            } catch (e) {
                sh "echo error reading logs"
            }
            error("The pod is not running, cause: " + status)
        }
    }
}
This documentation is licensed under the Creative Commons License (Attribution-NoDerivatives 4.0 International).
