Windows 9x
Table of index (click to expand)
As stated in DOSBox Staging's Vision, supporting Win9x is a non-goal and outside the current scope of the project. Running Windows 9x and any other unsupported systems on DOSBox Staging may cause file corruption inside your .img file. This is for advanced users only. Always backup your data.
With commit #78993a2, DOSBox Staging is now capable of booting 2 GiB+ HDD images containing Windows 9x with no issues. However, unbeknownst to the team at the time of adding a large disk test branch, DOSBox Staging was able to run Windows 9x without any code specifically written for it. This wiki page contains some of the information compiled by the efforts and help of @kcgen, @rderooy, @FeralChild64, @Wengier, @johnnovak, the author of the commit @shermp and the tester @ThomasEricB.
Before you boot Windows 9x in DOSBox Staging for the first time, here are some of the tools you might need:
-
You will need a .img to run Windows 9x on. In case you don't want to go through the entire windows installation, you can find working setups on the internet.
-
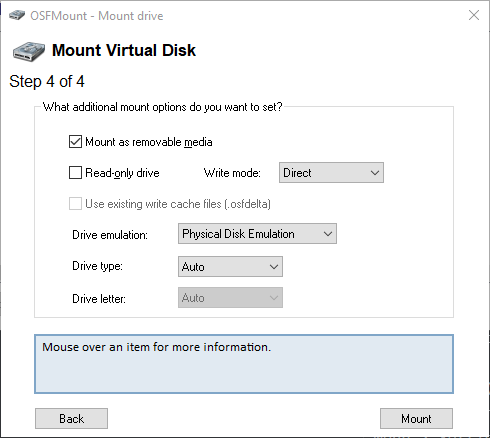
OSFMount for Windows or similar — If for whatever reason need to add or remove files that are inside your .img file containing Windows 9x. To edit your .img on OSFMount, click
Mount newor press Alt+N. Then on Step 1 selectMount as RAM Drive, Step 2 selectMount entire image as virtual diskand on Step 4 unselectRead-only driveand selectMount as removable media. Like this:
- OPTIONAL: DOSBox-X — Commit #78993a2 addresses the issues that previously made this a requirement. However, if you still run into some crashes installing programs, you may need to install them through Dosbox-X so you can use them on Dosbox Staging.
The following dosbox-staging.conf Settings are recommended:
-
output = openglpporoutput = texturepp— While it is unknown if this makes a tangible difference on stability or if causes fewer errors, stick with the pixel perfect modes for now. -
mouse_capture = onclickandmouse_middle_release = true— "Captures the mouse when clicking any button in the window" and "middle-click will release the captured mouse". This is recommended because using default mouse behavior will result in your cursor leaving the DOSBox Staging window constantly, making it annoying to move the mouse on Windows. -
machine = svga_s3— While you may be able to run other machines with Windows 9x, testing revealed the S3 (which is already the default) to be more compatible than the rest. After many tries, Windows 98 refused to recognize svga_et3000, svga_et4000 and svga_paradise, even though it comes with Tseng Labs ET4000 drivers! -
Set
memsize = 63or higher, to prevent Windows 9x from possibly swapping. Note, that Windows 95 can handle up to 480 MB RAM, Windows 98/ME up to 512 MB. To use more, install PATCHMEM by Rudolph R. Loew first. Swapping causes page faults - those are currently not handled properly and can cause Windows 9x to blue screen. Therefore, it is recommended to disable the swap file on Windows 95 by right click on My Computer, select Properties -> Performance -> Virtual memory... and choose own settings with disabled virtual memory. ATTENTION: Do not try disabling the Swap File on Windows 98, due to issue #2359. It will corrupt your data. -
For late 90's games, such as Descent 3, WC: Prophecy and Lego Island, it's recommended for you to set
cputype = pentium_slowandvmemsize = 8. -
mcb_fault_strategy = repair— Testing showed this option to be more reliable and stable than the other modes. Howevermcb_fault_strategy = allowis also somewhat stable. -
core = dynamic— As any other cores will cause errors; -
Testing showed that Windows 9x benefits (throws fewer errors) from having a large amount of cycles during startup. So choose between the following options:
cycles = max 105%orcycles = max 90%
- or a setup like this one below, if your games need to be run on a certain amount of cores. Here Windows starts with a big amount of cores it needs, but pressing the default key CTRL + F11 lowers the cycle amount to a manageable 60,000 cores for your games. Feel free to change these numbers as you see fit, but keep in mind that your goal is the
cycleamount minus thecycledownamount:
cycles = 300000
cycleup = 240000
cycledown = 240000
Some other tips to be aware of:
- We recommend you to change your resolution to
640 by 480 pixelsandTrue Color (32 bit)at Start Menu > Settings > Control Panel > Display > Settings. Like this:

-
If you are on Windows 95 especifically, We recommend you to disable the swap file as explained above. Swapping may cause crashes and disabling it may improve stability.
-
We recommend you to disable your startup programs, by either removing them inside the startup folder or inside the individual programs themselves. This decreases the possibility of errors when your system is booting.