-
Notifications
You must be signed in to change notification settings - Fork 0
3 Variables And Symbols
FitNesse has two ways to represent an amount of text: variables and symbols. They look similar but there are distinct differences. This section will go through both, explains how to use them and how they are different.
Variables allow you to store values that you want to use multiple times, or to make the test cases easier to read. For example, if you test an HTML page and you want to locate certain element via an XPath query, then it makes sense to store that query into a variable with a meaningful name, so you know what the query represents. Variables only exist when the page is being rendered.
You define a variable on a page using the !define command. Below page defines a variable named CF_Equality with value -40, and shows how to use it in a test: by using the variable name between the curly braces in ${ }. Names can contain letters, numbers, periods and underscores. Here is an example:
!define CF_Equality {-40}

!|script|TemperatureFixture                          |
|check  |convert|68 F            |to|C|20            |
|check  |convert|${CF_Equality} C|to|F|${CF_Equality}|
FitNesse will substitute the variable definitions during the page rendering, so in the test result you will see the substituted values and not the variable names.

Variable substitution is done before the test is run, so you cannot use a variable to store the result of a fixture operation. However, you can define a variable via formulas involving other variables. Formulas to be evaluated must be surrounded by ${= =}. Here is an example page:
!define TemperatureC {20}
!define TemperatureF {${=${TemperatureC} * 9/5 + 32=}}

!|script|TemperatureFixture                            |
|check  |convert|${TemperatureF} F|to|C|${TemperatureC}|

The evaluation of the formula is done when it is used on the page. So, if you change the value of a variable that is used in a formula, the result will be changed as well. Add the following to above test:
!define TemperatureC {25}

!|script|
|check  |convert|${TemperatureF} F|to|C|${TemperatureC}|
That will lead to this result:

You can define or override definitions of variables in the page URL. For example, the figure below shows the result you will see if you run above test with the URL http://localhost:8080/FeatureDemoSuite.TemperatureTest?test&TemperatureC=30. Notice that even though there are definitions for the variable on the page, FitNesse only uses the value that was specified in the URL.
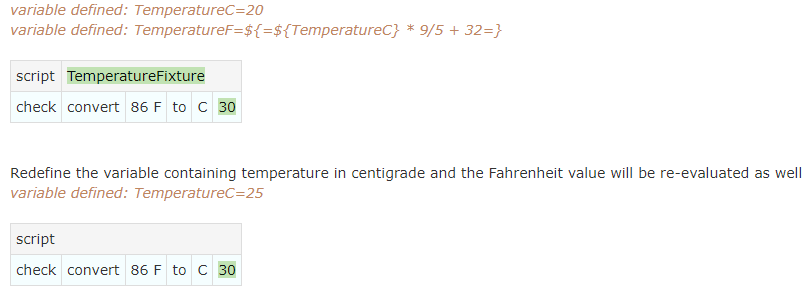
This feature is useful to provide FitNesse with configuration data that may differ when running the test on different environment. For example, when testing Web services, you could specify the base URL for your development, integration test, or acceptance test environments. This allows you to run the same test on different environments. The mechanism is especially useful if you kick off FitNesse tests from within automated build and deploy scripts.
As shown in the previous section, when evaluating a variable, FitNesse will first look for a definition in the URL, and then on the page itself. If it cannot find a variable definition there, it will recursively inspect the parents for a definition until it reaches the root page. If it still cannot find the definition, it will check the file plugins.properties in the FitNesse data folder. Notice that this simply defines several variables:
Port=8080
TEST_SYSTEM=slim
slim.timeout=35
# etc.
We can create a page FitSharpDemos.VariableDemo to show that:
|Test System:            |${TEST_SYSTEM}     |
|Slim timeout:            |${slim.timeout}   |
|!-FitSharp-! home folder:|${FITSHARP_HOME}  |
|FitNesse root:           |${FITNESSE_ROOT}  |
|Command pattern:         |${COMMAND_PATTERN}|
|Test Runner:             |${TEST_RUNNER}    |

The final fallback that the Wiki will try is checking if there is a Java environment variable with the name of the variable. For example, user.dir is used in Java to denote the working folder of the application. Prepend the following line to VariableDemo to show this:
|Working folder |${user.dir} |

This implies that you can also set variables when starting FitNesse, by using the Java –D option:
java -DMyJavaVariable="My Value" -jar %LOCALAPPDATA%\FitNesse\fitnesse-standalone.jar -d %LOCALAPPDATA%\FitNesse -e 0
After running FitNesse this way, prepend the following line to the VariableDemo page:
|My Java Variable |${MyJavaVariable} |

See the FitNesse Quick Reference Guide on Varlables
It should be clear by now that variables are powerful. You can use them to make the test cases clearer, to prevent you from having to repeat yourself, to configure environment specifics, and to configure FitNesse itself. However, they also have limitations. As said in one of the previous sections, you cannot assign the output of a fixture function to a variable – they only exist when the page is being rendered, not when the test is executed. Quite often, you want to be able to store intermediate test results, so you can use these later in your tests. This is where symbols come in. Since we are focusing this book on SLIM, we discuss SLIM symbols here. In FIT symbols work differently, and they are very dependent on the implementation. In SLIM they work the same for all implementations.
You can assign a value to a symbol by placing $symbol= into an output column of a script table or decision table. You can use the value by using $symbol as part of the input table cell.
Here is a test page that shows both a variable and two symbols in action. The variable and one of the symbols have the same name, to show that they are different entities. We define the temperature in Celsius as a variable ${TemperatureC}, and then we define a symbol $TemperatureC to contain that value with “ C” added to it. This symbol is then provided as the input to the Convert function, and its return value is put into the $TemperatureF symbol. That is then again used as input for another conversion, but this time appending “ F” is done in line. This should result in the value of the original variable (since we converted from Celsius to Fahrenheit and back). Notice that indeed ${TemperatureC} and $TemperatureC are different entities with different values.
!define TemperatureC {40}

|script|Echo Fixture|
|$TemperatureC=|echo|${TemperatureC} C|

|Script|Temperature Fixture|
|$TemperatureF=|Convert|$TemperatureC|to|F|
|Check|Convert|$TemperatureF F|to|C|${TemperatureC}|
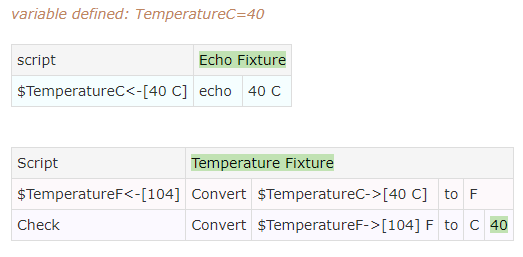
Symbols defined in include pages are available to the pages they are included in. So, for example, you can define symbols in a SetUp page of a suite (see section 6.3.4), and refer to them in the test pages that use it. Don’t define symbols in SuiteSetup pages if you can avoid it, as that results in non-intuitive behavior: FitNesse creates a new symbol context for every page, but the system under test (in our case FitSharp) doesn’t have this page context, so all symbols stay available. This implies e.g. that you can assign values defined in SuiteSetup pages and use them as fixture parameters in pages of that suite, but you can’t use them e.g. to evaluate validity of the responses. Here is an example showing that:
SuiteSetup
!|import |
|TestSlim|

|script:echo fixture|
|$x=   |echo  |foo  |
SetUp
|script:echo fixture| |$y= |echo |bar |
SymbolScopeTest
There is a peculiarity with symbols defined in suite setup pages.
You can use  the value as parameters for fixtures, but not to check result values.
Workaround is to redefine the symbol as itself.
For symbols defined in the setup page all seems to work fine.

|script:echo fixture|
|check |echo |$x|foo|
|check |echo |foo|$x|
|check |echo |$y|bar|
|check |echo |bar|$y|
|$x=   |echo |$x    |
|check |echo |$x|foo|


FitNesse doesn’t recognize $x as a defined symbol (you don’t see $x->[foo] in the first check, and the value is $x instead of foo in the second check), but you can use its value as parameter for fixture functions. You can synchronize FitNesse and FitSharp by assigning the symbol to itself. That is shown in the last two lines of the test.
Variables only exist during page rendering. When the tests run, they have already been replaced by their values. You can assign variables to input values of SLIM tables, but you cannot assign output values of SLIM tables to variables. Symbols on the other hand do not exist outside of the context of test tables. You cannot use their values in the Wiki text around the tables. But as the example in the previous section shows, they will persist between two different tables on the same page.
The example below shows another difference. As we have seen before, if you place an exclamation mark before a table definition, that will stop the Wiki engine from interpreting the text in the table, so e.g. URLs are not replaced by HTML links and PascalCase words are not seen as page references. It also means that special markup as !today will not be substituted by its value. That may sometimes cause somewhat counter-intuitive behavior if you use these widgets in variables, which we will show.
First, we define a variable ${today} containing today’s date in the format yyyyMMdd. Then we assign the value of the variable to symbol $today via the Echo function. We do that in a table which is not using the exclamation mark. The Wiki engine will see the variable and replace it by its value: the !today markup. Since the engine is interpreting the result, it will replace it by today’s date in the specified format. That value is assigned to the symbol $today. The second script does have the exclamation mark. So, when the Wiki engine substitutes the variable reference by its value, it returns the !today string without interpreting it. So, the test should fail.
Use of variables can be tricky. Note how it is different when you use the ! before a table start row.

!define today {!today (yyyyMMdd)}

The variable value gets resolved in the symbol here

|script |Echo Fixture |
|$today=|echo|${today}|

But here the value does not get resolved.

!|script                      |
|$today2= |echo|${today}      |
|show     |echo|$today        |
|show     |echo|$today2       |
|check not|echo|$today|$today2|
The difference that makes this happen is that the symbol gets its value from the assignment in the table, while every variable reference causes a re-evaluation from its definition.
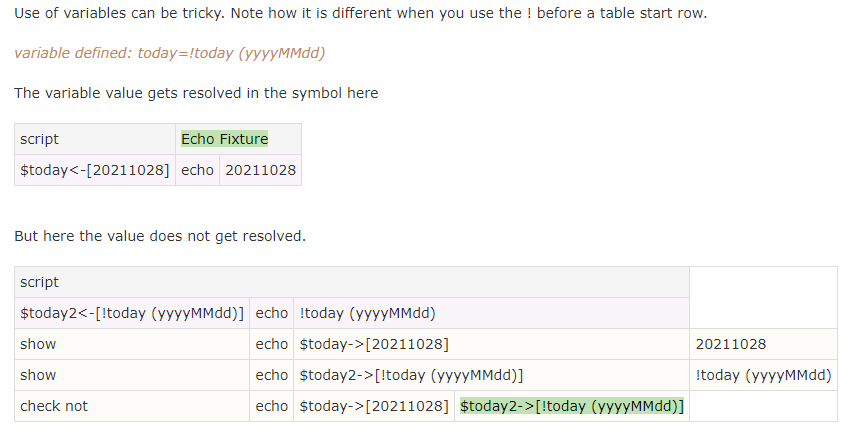
A final difference worth mentioning is that variables can be inherited from parent pages, but symbols cannot, since they only exist in the test context. For more information about symbols see the FitNesse User Guide on symbols in tables, for variables see the Guide on Variables.
If you develop and/or test applications for larger or more controlled organizations, then you will undoubtedly have encountered the need to perform the same test suites against multiple environments. Many organizations use a DTAP structure where you first test your application on your Development environment, if all tests pass you deploy the application to the Test environment and run the tests again; then when all tests pass there you deploy the application to the Acceptance environment, and finally after successfully testing it there it goes into Production, where at least some smoke tests are executed to ensure all was deployed correctly. There is increasing rigor in change management from the Development environment which is usually developer controlled, to the Test environment which is already locked down a bit more as multiple development teams use it to do integration testing, to the Acceptance environment which should be as close to the Production environment as possible, including change management policies. This process is intended to spot conflicts with e.g. lockdown policies well before your application is deployed to production.
We do not want to create different test suites for each environment; ideally, we want to run the same tests with only the configuration (e.g. server names) changed. FitNesse has a feature called Symbolic Links to support that. Basically, you define your configuration data in variables in a parent page, and define the suites you want to be able to run in different environments as its child pages. Since all children inherit the variables from their parents, all suites will then use the same configuration data. You configure the parent page for one of the environments to be tested, for example Development. This especially works well for testing web services or other remotely accessible functionality.
EnvironmentDemo is going to be our root. It contains any definitions that are the same across all the environments. We use it here to register our fixture (which is the same no matter what environment is chosen in this case), and to define a variable ${blank}, containing a regular expression to check if a cell is empty. We also add a table of contents widget of 2 levels deep showing page property suffixes.
!define blank {=~/^$/}
!contents -R2 -p
The parent page we are going to use is EnvironmentDemo.DevelopmentEnvironment, and here is where we define the environment specifics for the Development Environment. We also add a !contents widget for easier navigation.
!define Server {http://localhost}
!contents -R2 -p
As the “test suite” we use a single test called EnvironmentDemo.DevelopmentEnvironment.TestCase. All it does is verifying that the ${Server} variable is not empty. In normal cases, here is where the heavy lifting would be done.
!|script|TestSlim.EchoFixture     |
|check not|echo|${Server}|${blank}|
Verify that it runs:

Now we have the test case working for our development environment, the next phase is to make it work for our test environment. Make a new page EnvironmentDemo.TestEnvironment:
!define Server {http://testserver}
!contents -R2 -p
Now, we are creating a symbolic link to the existing TestCase page as follows:
Go to the Properties page (Tools > Properties from the menu) and scroll to the Symbolic Links section. There, enter page name TestCase and link it to path DevelopmentEnvironment.TestCase.

Press Create/Replace. The TestEnvironment page now contains a symbolic link called TestCase, and it links to the TestCase page under the sibling page of TestEnvironment which is called DevelopmentEnvironment.
Go back to the EnvironmentDemo page. Verify that it looks as follows:
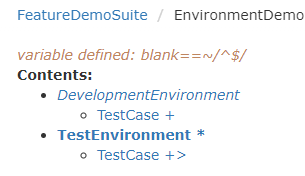
The TestEnvironment now also has a TestCase page, and it is marked with a > in the Contents to show that it is a symbolic link. If you go to that page, you will see that it behaves just like a normal page, and it looks just like the TestCase page under DevelopmentEnvironment. The only thing different is that now the ${Server} variable has a different value:
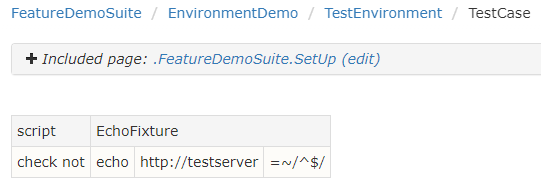
In conclusion, the combination of variables and symbolic links allows you to setup configuration pages for different environments, and use one set of test pages and/or suite pages under all configurations. This means you only need to manage the test suites once, and there is no need to keep changes in sync: FitNesse uses the same tests for all environments. The only difference is that the files have different parents for each of the environments, which results in different values for the configuration variables.
Now let's have a closer look at Scenario Tables