MGMT-CENTER is an open source home automation project to make your home more intelligent. The main features are the management of temperature, humidity, light and alarm. The behaviour of the app is implemented as responsive design to provide the best support for several devices. The software is based on one raspberry pi (master) and any count of arduinos (slaves). Each arnuino acts as satellite station which can measure the environment. Furthermore it's full-responsive and extendable by other developers.
This tool is supposed to be an alternative to the mostly expensive home automation systems which are purchasable. For this software only some components from the chinese of my trust (e.g. ebay) are necessary.
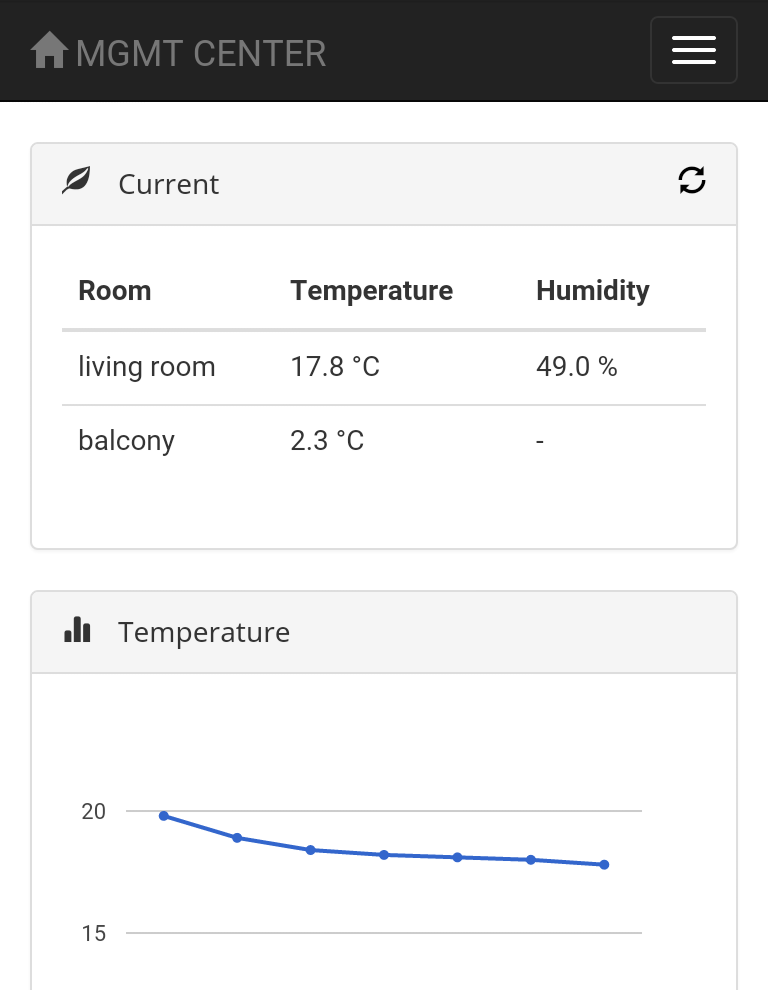
- Readout of temperature and humidity and display a graph for each arduino slave
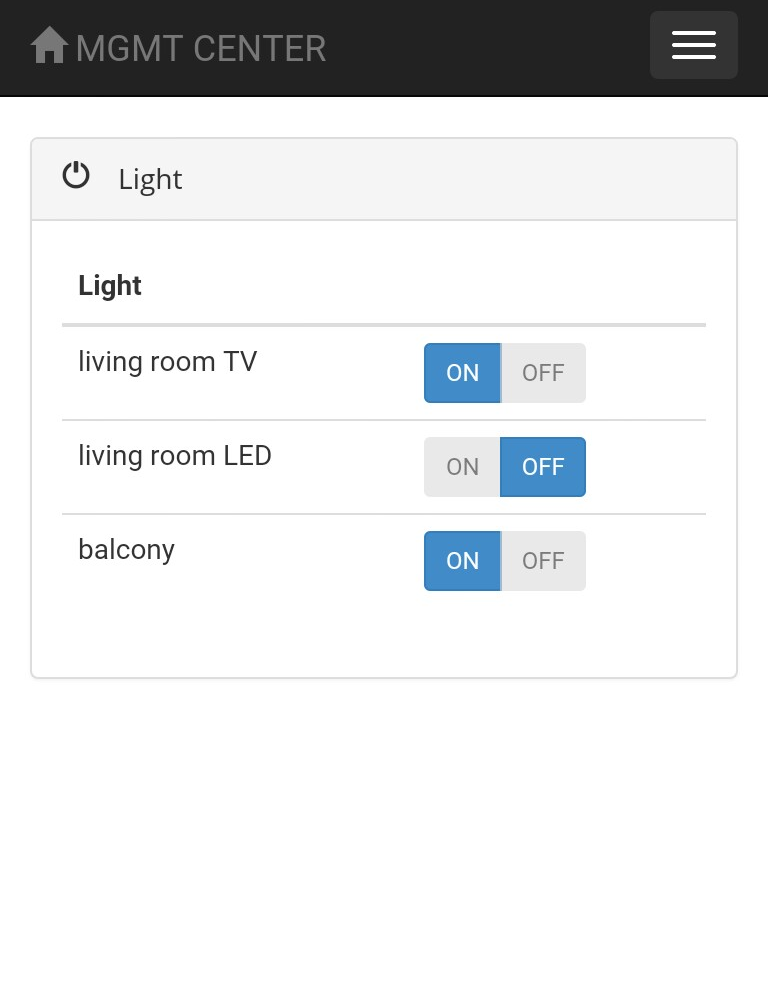
- LED control
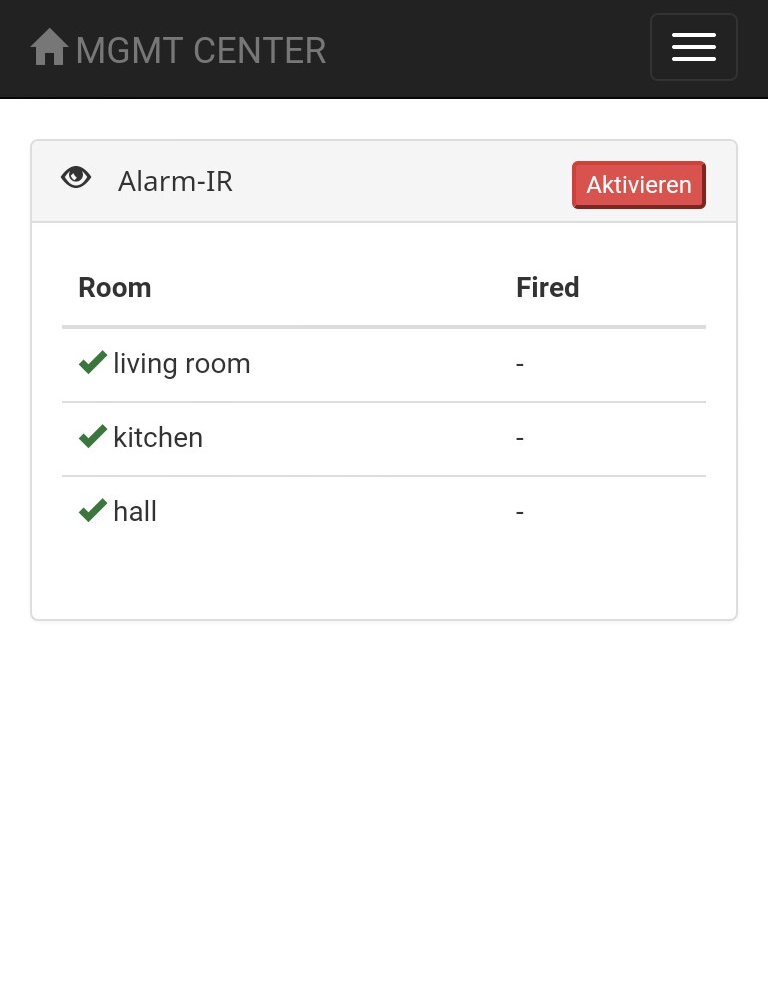
- Alarm with IR sensor
- LED strip controlling
- Alarm notification by email or some other communication (e.g. enable light).
- Alarm en-/disabling via RFID or other techniques.
- Burglar confusion via toggling light on and off in undeterminated time intervals.
- There are several things to parameterize (e.g. addresses in the scripts)
- One step build script. It's very valuable for new developers or even if the rasbparry crashes. For me there is no benefit of an update anymore. Just if you need the database entries of the environment (temperature and humidity).
Feel free to ask questions or make improvement advices in the issue section. Also feel free to start developing directly. If you have problems to set up the system, just ask.
First of all, you have to install some additional software which is needed for the management center. Currently I'm working on a script to set up the environment immediately, but it isn't finished yet.
If you use static ip, please first install mysql client and then configure the static ip. After that, configure the ip as bind-address property in /etc/mysql/my.ini. Otherwise the mysql-server could not be started!
sudo apt-get install mysql-server mysql-client
Flask is a lightweight python web framework which is a good choice for raspberry applications. Especially open source home automation software is easy to write in flask.
There are several tutorials for flask available, e.g. this or this.
sudo pip install flask
Most of the additional software is loaded by pip (sudo apt-get install python-pip).
sudo pip install flask-sqlalchemy
sudo apt-get install libmysqlclient-dev
sudo pip install mysql-python
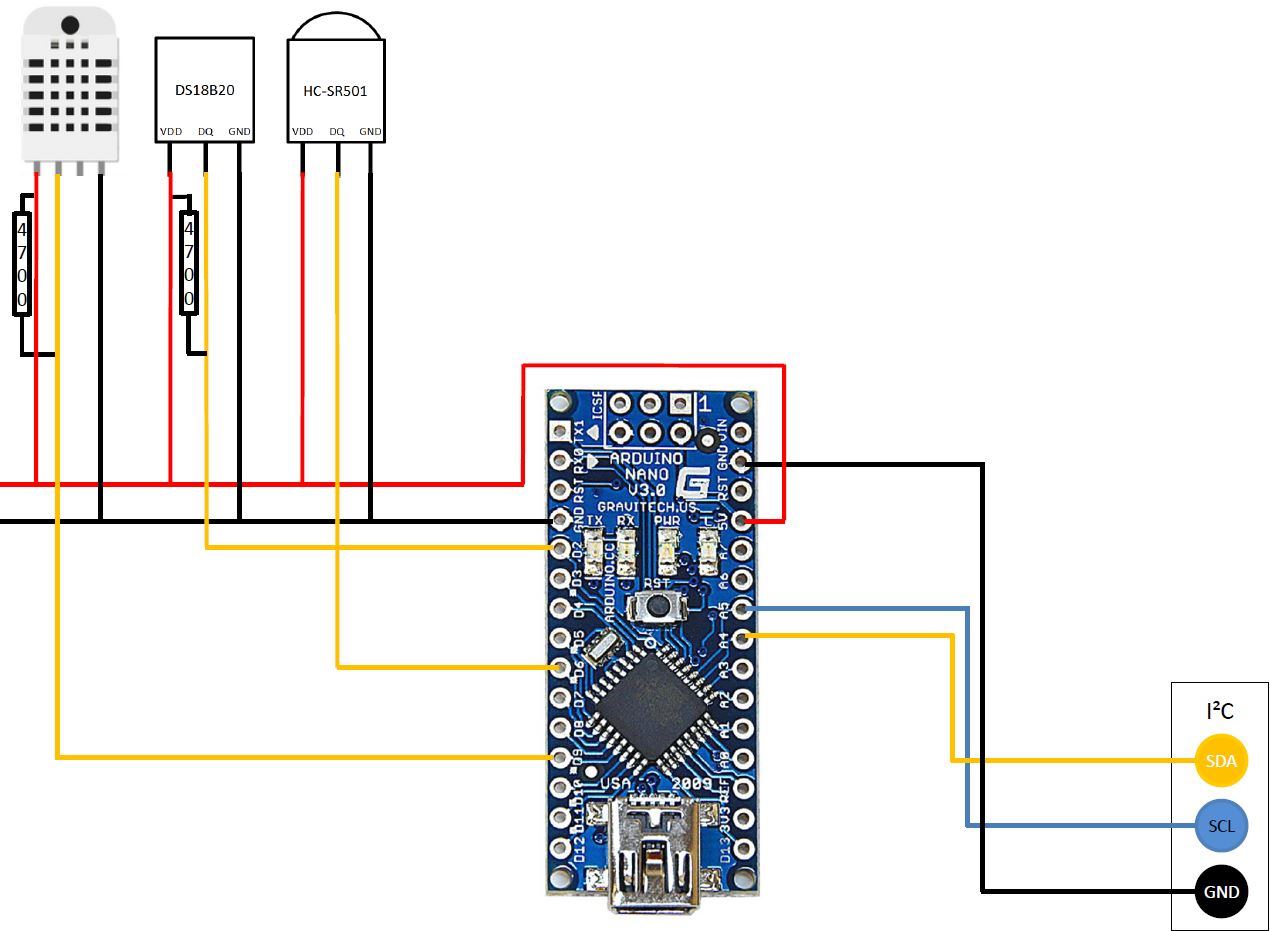
DHT is the first environment component which is used to feel your home. It's responsible for temperature and humidity. One of the most important basics of home automation.
git clone https://github.com/adafruit/Adafruit_Python_DHT.git
cd Adafruit_Python_DHT
sudo apt-get upgrade
sudo apt-get install build-essential python-dev
sudo python setup.py install
I have written a script for testing the DHT sensor.
The DS18B20 is an 1-wire temperature sensor. 1-wire has to be activated on your raspberry pi.
The file /etc/modules has to be appended with following content:
w1-gpio pullup=1
w1-therm
I have written a script to test the sensor.
If you have bought a standard sensor, the wiring is as follows: Red -> Vdd; Black -> GND; White -> DQ Wiring intern: Red -> GreenRed; White -> WhiteRed; Black -> White
For convenience reasons I prefer to develop on my computer and push the current files to the raspberry as soon as possible. For that I mount the development folder from my computer to the raspberry. On the raspberry I start the sever with reload mode enabled. So a fresh server with all changes is guaranteed any time.
sudo mount -t cifs -o username=NAME,password=PW //IP_ADDRESS/mgmt-center ~/mgmt-center_dev
There are several jobs which have to be executed. A first approach is to use cron based jobs by calling the action url. But then, the jobs aren't defined inside the tool itself and you have to synchronize the cron tab with the tool. A second approach (which I use) is to use thread based scheduling inside the MGMT-CENTER code.
The thread based scheduling is active by default. The environment update and environment persisting is executed automatically. If you will use the cron based solution, please modify your code and disable the event loops.
The scheduling of the threads only works reliable in production mode (debug = False in run.py), because if the project is reloaded automatically, the job background threads are started multiple. In production mode the auto reload is disabled.
The raspberry (master) is communicating with several arduino nanos (slaves). For that, the I2C protocol is used. The setup and some other thing are described below. To test your I2C connection, you can use this script. There you can use all commands which are described in the protocol section below.
Remove i2c from blacklist:
$ cat /etc/modprobe.d/raspi-blacklist.conf

# blacklist spi and i2c by default (many users don't need them)
blacklist spi-bcm2708
# blacklist i2c-bcm2708
Add this to the end of /etc/modules:
i2c-dev
Install i2c tools and allow access to user pi:
sudo apt-get install i2c-tools
sudo adduser pi i2c
Then reboot and check the bus:
i2cdetect -y 1
Install python support:
sudo apt-get install python-smbus
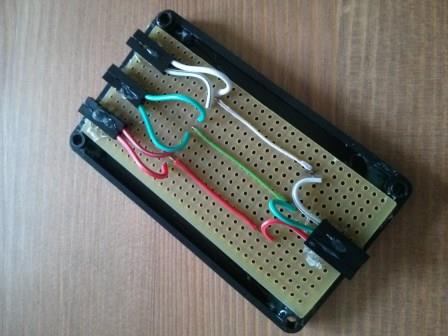
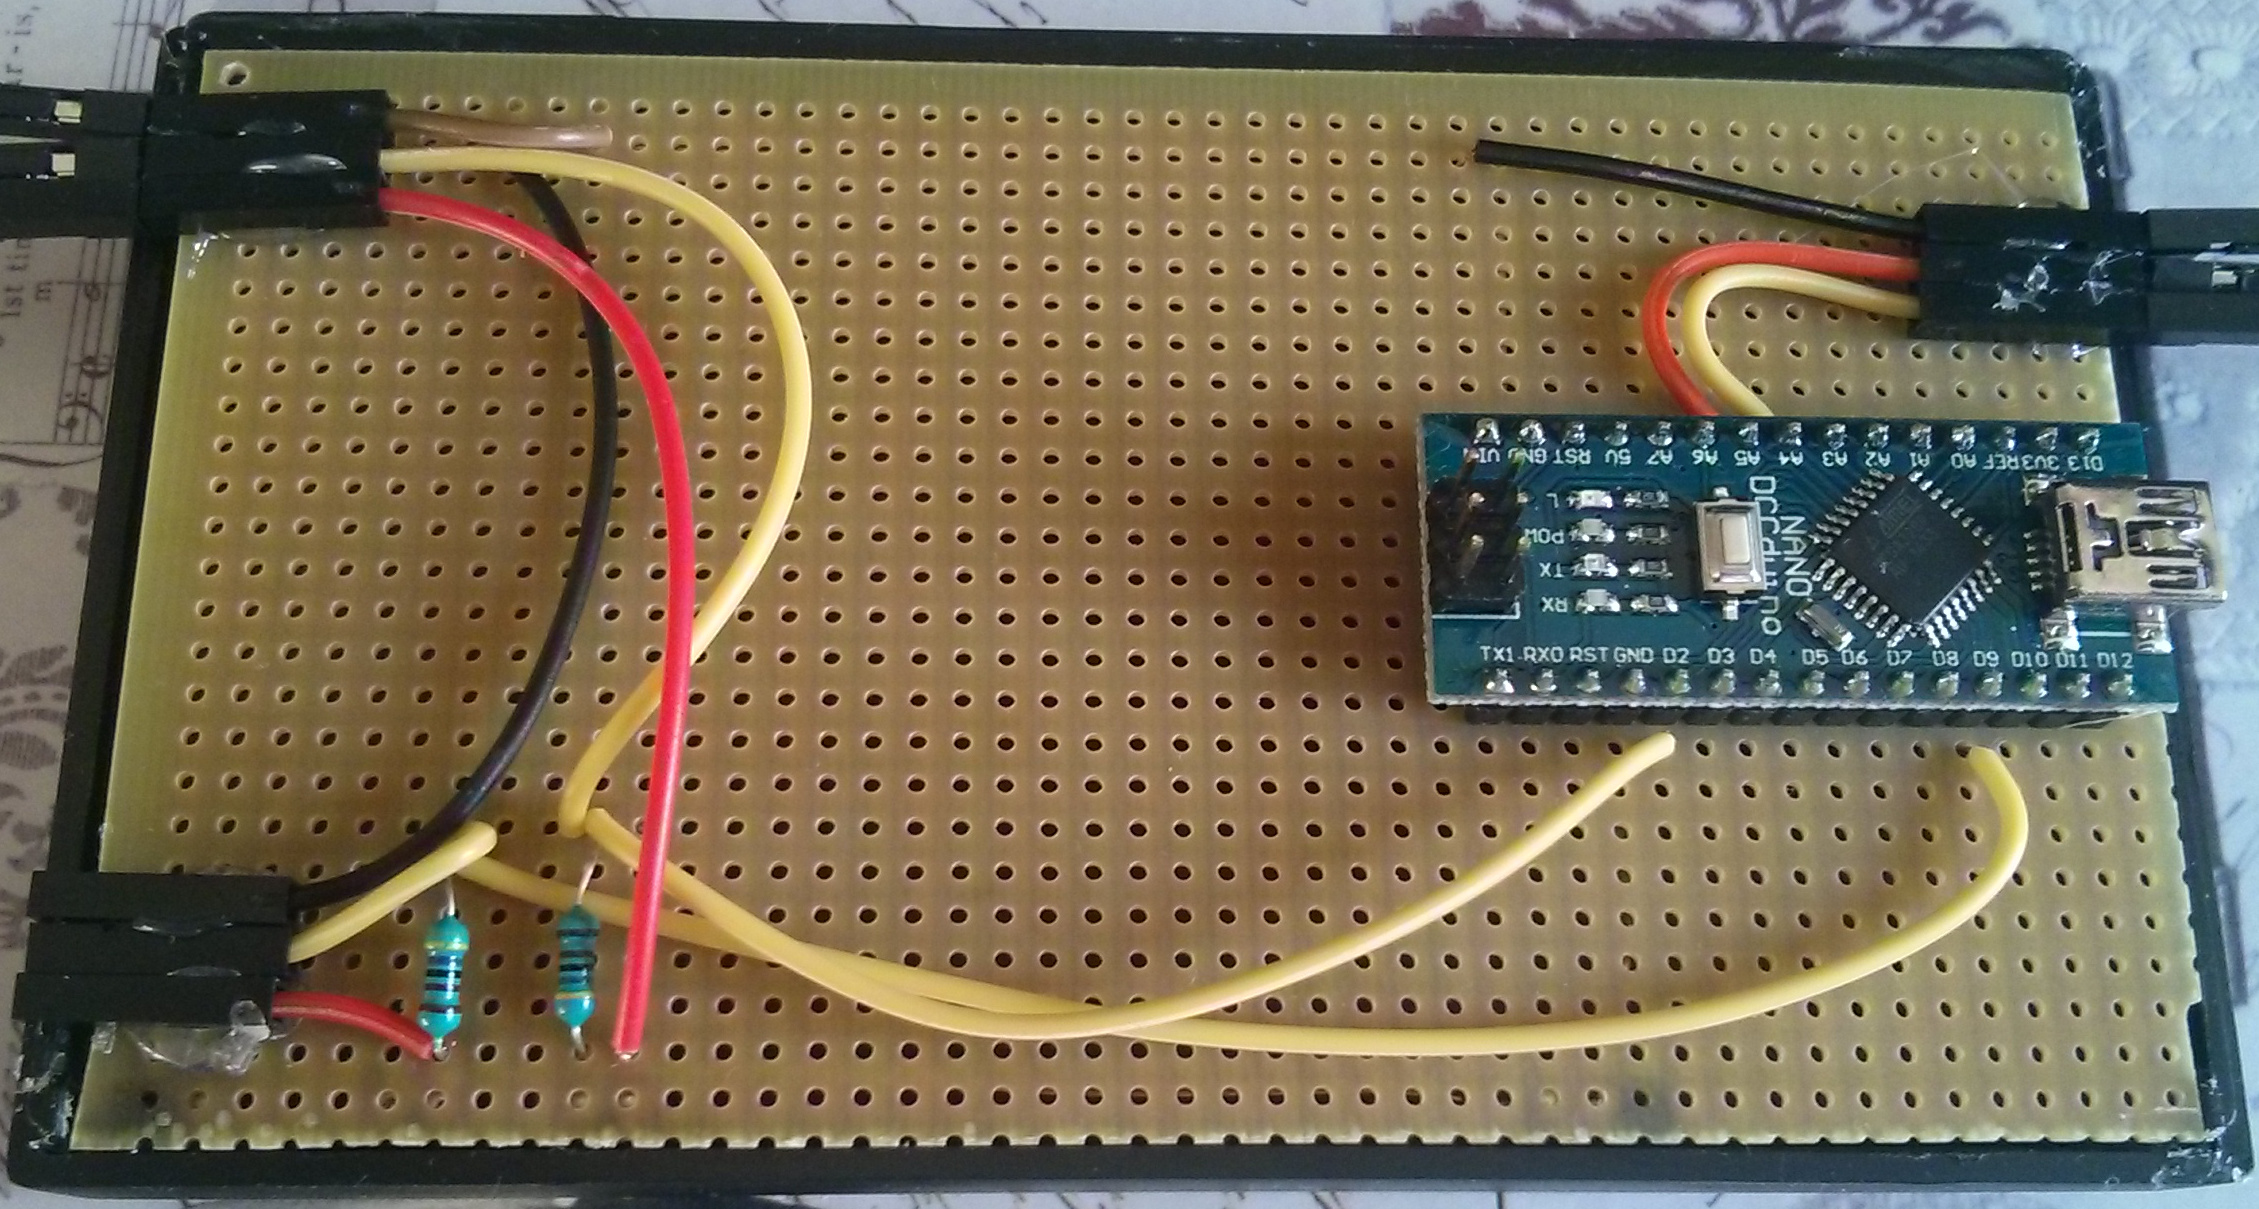
The raspberry and the several arduinos are connected with the I2C bus protocol. I have build the following connector box. But you can just connect the three cables as described below:

pi(IO2) <-> nano(A4) <-> nano2(A4) <-> ..
pi(IO3) <-> nano(A5) <-> nano2(A5) <-> ..
pi(GND) <-> nano(GND) <-> nano2(GND) <-> ..
The arduinos have to be set up like the following circuit. You just have to connect the sensors which are needed. For example I don't use a DS18B20 in my living room.
And this is the result on the board within the box:
This is the used protocol for the I2C communication. The raspberry is the master device which calls the slaves with the following commands. The communication can be tested with this script. Don't forget to configure the addresses of the arduino nanos. One TODO is to parameterize them.. ;)
CMD: 10 -> read ir sensor -> res: 0/1
CMD: 20 ... 29 -> toggle led with id (cmd - 20) -> res: 0/1
CMD: 3 -> refresh environment -> res: nothing
CMD: 30 ... 39 -> read environment with id (cmd - 30) -> res: -11.1:99.9 (temp and hum delemitted by :)