Use the package manager pip to install Keras and Tensorflow :
There are two ways of installing Keras . The first is by using the Python PIP installer or by using a standard GitHub clone install. We will install Keras using the PIP installer since that is the one recommended.
pip install keras Again , we check the output of the version installed.
pip list | grep Keras Here is the alternative install method for Keras using the GitHub source. (This assumes you have Git installed and working.) First, clone Keras using the following git command.
git clone https://github.com/keras-team/keras.git
python setup.py install
Then, cd into the Keras folder and run the installation .
cd keras
python setup.py install
Because Keras uses TensorFlow as it's main tensor manipulation library, it's backend framework can be configured by using a Keras specific configuration file once we run Keras for the first time. The location of the file can be found here.
$HOME/.keras/keras.jsonThe default configuration file will look similar to the following info.
{
    “image_data_format”: “channels_last”,
    “epsilon”: 1e-07,
    “floatx”: “float32”,
    “backend”: “tensorflow”
}
More specifically, you'll tackle the following topics :
-
You will be introduced to convolutional neural networks.
-
Then, you'll first try to understand the data. You'll use Python and its libraries to load, explore and analyze your data.
-
After that, you ll preprocess your data : you'll learn how to resize, rescale, convert your labels into one-hot encoding vectors and split up your data in training and validation sets.
-
With all of this done, you can construct the neural network model: you'll learn how to model the data and form the network. Next, you'll compile, train and evaluate the model, visualizing the accuracy and loss plots.
-
Then, you will learn about the concept of overfitting and how you can overcome it by adding a dropout layer .
-
With this information, you can revisit your original model and re-train the model. You'll also re-evaluate your new model and compare the results of both the models.
-
Next, you'll make predictions on the test data, convert the probabilities into class labels and plot few test samples that your model correctly classified and incorrectly classified.
-
Finally, you will visualize the classification report which will give you more in-depth intuition about which class was (in)correctly classified by your model.
By now, you might already know about machine learning and deep learning , a computer science branch that studies the design of algorithms that can learn. Deep learning is a subfield of machine learning that is inspired by artificial neural networks, which in turn are inspired by biological neural networks.

A specific kind of such a deep neural network is the convolutional network, which is commonly referred to as CNN or ConvNet . It's a deep, feed-forward artificial neural network. Remember that feed-forward neural networks are also called multi-layer perceptrons(MLPs), which are the quintessential deep learning models. The models are called feed-forward because information right through the model. There are no feedback connections in which outputs of the model are fed back into itself.
CNNs specifically are inspired by the biological visual cortex. The cortex has small regions of cells that are sensitive to the specific areas of the visual field. This idea was expanded by a captivating experiment done by Hubel and Wiesel in 1962. In this experiment, the researchers showed that some individual neurons in the brain activated or fired only in the presence of edges of a particular orientation like vertical or horizontal edges. For example, some neurons fired when exposed to vertical sides and some when shown a horizontal edge. Hubel and Wiesel found that all of these neurons were well ordered in a columnar fashion and that together they were able to produce visual perception. This idea of specialized components inside of a system having specific tasks is one that machines use as well and one that you can also find back in CNNs.
Convolutional neural networks have been one of the most influential innovations in the field of computer vision. They have performed a lot better than traditional computer vision and have produced state-of-the-art results. These neural networks have proven to be successful in many different real-life case studies and applications, like:
- Image classification, object detection, segmentation, face recognition.
- Self driving cars that leverage CNN based vision systems.
- Classification of crystal structure using a convolutional neural network .
To understand this success, you'll have to go back to 2012, the year in which Alex Krizhevsky used convolutional neural networks to win that year's ImageNet Competition, reducing the classification error from 26% to 15%.
Note that ImageNet Large Scale Visual Recognition Challenge (ILSVRC) began in the year 2010 is an annual competition where research teams assess their algorithms on the given data set and compete to achieve higher accuracy on several visual recognition tasks.
Alright, you know that you'll be working with feed-forward networks that are inspired by the biological visual cortex, but what does that actually mean?
Take a look at the picture below:
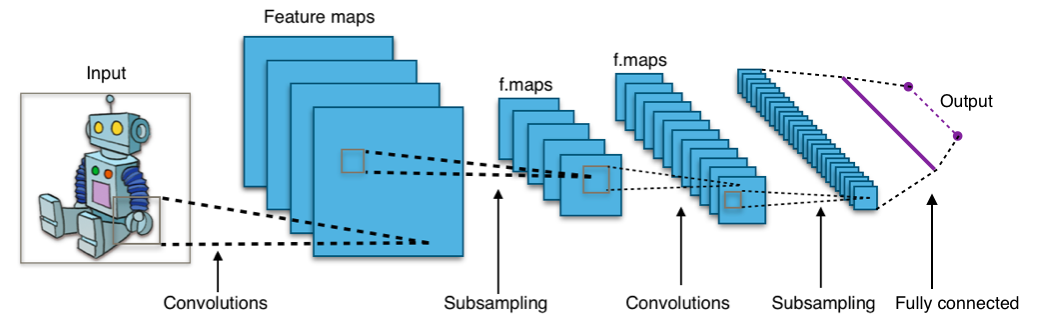
The image shows you that you feed an image as an input to the network, which goes through multiple convolutions, subsampling, a fully connected layer and finally outputs something.
But what are all these concepts?
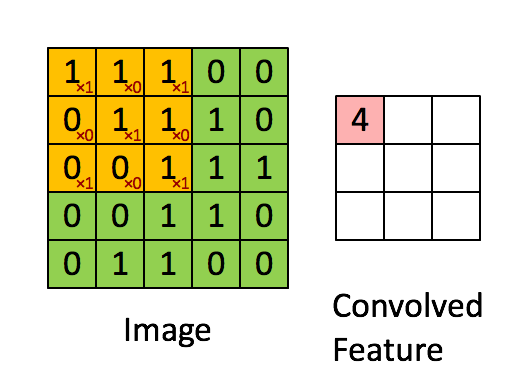
- Convolution layer : The convolution layer computes the output of neurons that are connected to local regions or receptive fields in the input, each computing a dot product between their weights and a small receptive field to which they are connected to in the input volume. Each computation leads to extraction of a feature map from the input image. In other words, imagine you have an image represented as a (5x5) matrix of values, and you take a (3x3) matrix and slide that (3x3) window or kernel around the image. At each position of that matrix, you multiply the values of your (3x3) window by the values in the image that are currently being covered by the window. As a result, you'll get a single number that represents all the values in that window of the images. You use this layer to filtering : as the window moves over the image, you check for patterns in that section of the image. This works because of filters, which are multiplied by the values outputted by the convolution.
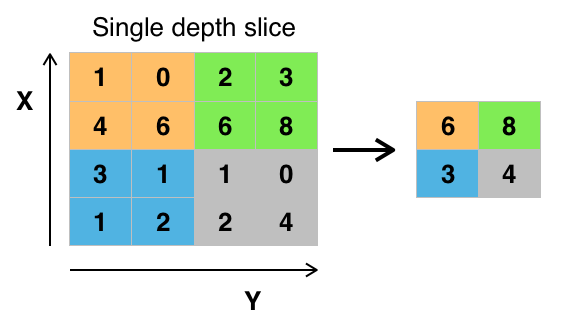
- Subsampling : The objective of subsampling is to get an input representation by reducing its dimensions, which helps in reducing overfitting . One of the techniques of subsampling is max pooling. With this technique, you select the highest pixel value from a region depending on its size. In other words, max pooling takes the largest value from the window of the image currently covered by the kernel. For example, you can have a max-pooling layer of size (2 x 2) will select the maximum pixel intensity value from (2 x 2) region . You're right to think that the pooling layer then works a lot like the convolution layer ! You also take a kernel or a window and move it over the image , The only difference is the function that is applied to the kernel and the image window isn't linear.
- Fully Connected Layer : The objective of the fully connected layer is to flatten the high-level features that are learned by convolutional layers and combining all the features. It passes the flattened output to the output layer where you use a softmax classifier or a sigmoid to predict the input class label.
For more information, you can go here
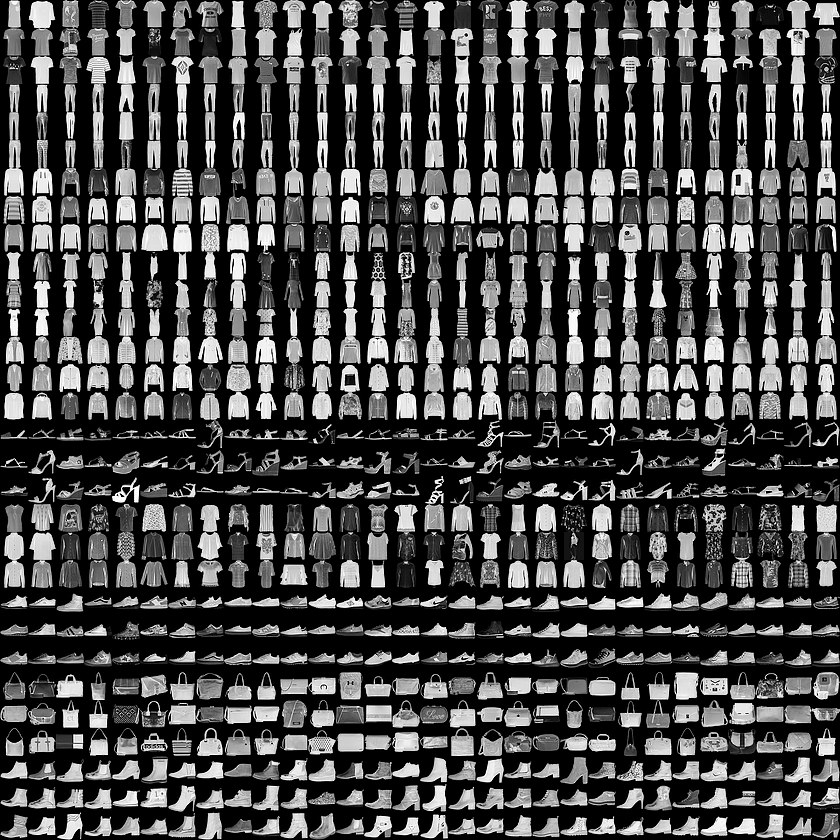
Fashion-MNIST is a dataset of Zalando's article images—consisting of a training set of 60,000 examples and a test set of 10,000 examples. Each example is a (28x28) grayscale image, associated with a label from 10 classes. We intend Fashion-MNIST to serve as a direct drop-in replacement for the original MNIST dataset for benchmarking machine learning algorithms. It shares the same image size and structure of training and testing splits.
Here's an example how the data looks (each class takes three-rows):

Each training and test example is assigned to one of the following labels:
| Label | Description |
|---|---|
| 0 | T-shirt/top |
| 1 | Trouser |
| 2 | Pullover |
| 3 | Dress |
| 4 | Coat |
| 5 | Sandal |
| 6 | Shirt |
| 7 | Sneaker |
| 8 | Bag |
| 9 | Ankle boot |