MBot Developers Test Harness This information is based on mBlock 3.2.2 and Arduino 1.6.5
I used code blocks to build a test harness that I can develop programs in and run easily from within the mBlock IDE as well as upload to Arduino.
Checkout demo video on youtube
This project provides a simple development harness for building mBot programs.
- The harness starts up up with a distinctive tone and flashing green lights to let the user know it is ready to run.
- Once the user pushes and releases the button on the mBot, the lights go blue and the user's code is run
- Once the user's code completes, the lights go red, all the motors are shutdown and a different distinctive tone is played.
Additionally, the user can debug and test his program in the mBlock IDE. In addition to the lights and sounds, the user will be able to monitor a variable called state. These different ways of giving the user feedback can help speed up development, diagnosis and debugging.

The source for this test harness is under src/scratch/botOS.sb2
These are the two ways to launch the program you write:
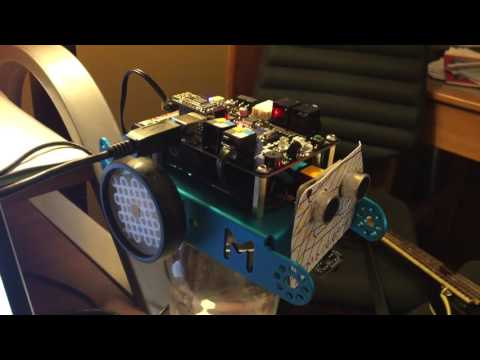
This is what I call dev mode. It lets me run the user program while still connected to the USB. I also tend to perch the mBot on top of a small drinking glass. This acts like a mini car lift to keep the wheels off the ground while developing and testing.
This is the code that will be uploaded to Arduino and run on the mBot
Note mBot programs can only use a subset of scratch commands. Things like Motion and Looks and Pen are just for desktop Scratch programs designed to run on your computer. It makes no sense, for example, to make the Panda say something in or move him across the screen when the program is meant to run on the mBot (which has no keyboard, no screen).
You can write hybrid programs, for instance, steering the mBot with arrows in the keyboard. But you will only be able to run in dev mode with a USB cable or Bluetooth connection. You will not be able to send these programs to Arduino and have them run independently on the mBot.
This code block gives the user feedback as it works through several steps to run the users program. Think of it as the worlds simplest operating system. The main program can be launched either in dev mode as an mBot program. There is a variable state that you can monitor in the staging area when running in dev mode. This will tell you where your program is at that moment. The values of state are:
- 0 - started
- 1 - intro routine started. Distinctive tone played and lights are flashing green. Waiting for the user to push the button on the mBot
- 2 - user has pushed button on the mBot, but not released it yet. Light is a solid green.
- 3 - user has released the button and the user program is being invoked. Light is solid blue.
- 4 - user program has ended, running exit routine. Light is solid red. Motors have been stopped. Distinctive toned played.
- 5 - main program has exited. Will need to hit reset on mBot to rerun.
The user code goes here. It will be invoked as described above. It is important to only use the subset of Scratch together with the Robots library since the user program must run in dev mode as well as an mBot program.
The simplest user programs might have no loops, but rather using the block wait n secs command. For instance the program might make the robot drive forward at speed 100 for 5 seconds and then stop.
run forward at speed 100
wait 5 secs
run forward at speed 0
Double check that the USB cable is plugged in and the serial port connected again before trying to run something in dev mode or upload an update to arduino. The head in the GUI should tell you if you are connected or not.
You can connect via bluetooth to run stuff in dev mode, but to reset the default program or upload your updated code, it seems you must use the USB cable.
If you have uploaded your own software to arduino then you will need to Reset Default Program from the Connect menu.
You can not run in dev mode without doing this first. This can be very confusing the bot may appear to be running your latest program updates, but it is actually running that last version to uploaded to arduino. You most recent changes are not running and the bot is not responding to the green flag button in the IDE.
Also the IR remote will not work without the default program.
The motor starts up immediately every time you power up ond the mBot tries to run off the table? Does it immediately start blaring an onoxious tone and you can't get it to stop? You probably have a misbehaving program that you uploaded to arduino. That program starts immediately when you power up the robot.
- power off the robot and take a deep breath
- put the robot on something (like a coffee cup) to get the wheels off the ground
- make sure the USB cable is hooked up
- power on the robot and cover your ears or make sure it does not roll away
- confirm that the serial port is connected
- reset the default program
- now rework your program so that you can a) control when the action starts and b) stop the action when you want
A typical strategy would be to use a repeat until <> block and trigger on a bot event like button pressed or ir remote D pressed. This way you have an on and off button. And hitting reset will take you back to the point where the robot is still and silent waiting foe the "on" signal. You may also want to run forward at speed 0 at the end of your program just to make sure the motors power down. You can get creative with other trigger events: use the light sensor or distance sensor to detect when your hand is covering them. That could be an on or off signal.
Do you have a program that is still running on the bot? Hit the reset button on the bot to start your program over. Or reset the default program if needed.
Are you expecting the bot to respond but it is not; for instance not responding to a button press? Hit the reset button on the bot to make sure the your program is running from the beginning. Once the program finishes from one run, you must do this to run a second time.
If you just can't get the serial port working after power cycling the bot and swapping out your UBS cable, reboot your machine and then consider reinstalling the Arduino driver.
mBlock will allow you to do back things, especially with variables and code blocks. The generated Arduino code may not be valid and can cause your program to not run, have errors or even crash the IDE. May sure you did not
- name a variable or code block using an arduino reserved word (e.g. for, switch, break, continue, return, etc)
- use the name of a global variable or function that already exists in the arduino program (e.g. main, INPUT, HIGH)
- use a name that is not a valid Arduino identifier (e.g. does not start with a number, contains spaces or invalid punctionation )
As the size of the Scratch program grows or the load on your computer increases, you may notice things slowing down. There may be longer pauses between musical notes, It seems sluggish when you hit the reset button. But when you upload your program to Arduino and notice that it will likely run nice and peppy at normal speed. This is because when running in dev mode there is emulation happening to bridge your Scratch code with the mBot hardware. If your machine is heavily loaded or the Scratch program is very large then things can get sluggish. There may be long pauses between those eith notes in your song. Try rebooting your machine and relaunching the mBlock IDE. Try running a simpler Scratch program and definitely try uploading to Arduino to confirm that the problem is with Scratch and not a bug in your code. You may also want to check the batteries. Things do start to get sluggish when the batteries get low.
https://github.com/Makeblock-official/mBot You need to clone the whole repo, not just pick out the mBot-default-program.ino source. This file depends on header files in the same directory. After cloning simply open up mBot-default-program.ino in the Arduino IDE
Scratch and the Arduino Uno lends themselves best to very simple, imperative, procedural code. There are no functions, no multithreading, no fancy data structures, only the most simple of scoping for variables. The tools at your disposal include:
- OUTPUTS - motor 1, motor 2, on board leds, playing musical tones
- INPUTS - light sensor, distance sensor, line tracker, remote, on board button, timer
- CONTROL -
if/then/else,repeat until,wait n sec, - OPERATORS -
+,-,*,/,<,>,and,or,not,pick random 1 to 6 - MISC - variables, lists, code blocks
So it is best to start with simple recipes with the output devices:
go forward for 5 sec at speed 100
turn around
go forward for 2.5 sec at speed 200
turn around
stop
This is a very simple imperative program with no loops, no control structures. Like a recipe for cookies. You can adapt such a program to play a recipe of sounds, or flash the LEDs in a prescribed manner.
But you will find this getting boring quickly. The next step is to integrate inputs from sensors (light sensor, distance sensor, remote, the button, the timer) together with one or more of the outputs.
But all of these inputs require "sampling" or "polling". That means you have to check over and over to check what the sensor value is. For instance, if you want to use the light sensor to control the speed of the motors (brighter means faster), you will need a loop. Something like:
wait until <button pressed>
repeat until <ir remote F pressed> {
  set motorSpeedVariable to (light sensor light sensor on board / 10)
  run forward at speed motorSpeedVariable
}
Here the button acts like the "on switch" and the F button on the remote acts like an "off switch". The light sensor acts like the accelerator pedal.
The light sensor value is constantly changing, and our program has to repeatedly poll in order to know the value. The same is true for the distance sensor, the line tracker and the timer. We are polling or sampling a (potentially) changing value periodically.
The other inputs (the ir remote and the button) are binary. They are either on or off. You could view this as a special case of the other sensors, but rather than allowable values of 0-255, the buttons just have 2 possible values. In Stratch you also poll or sample these values, but rather than getting back a number you get back a boolean. For example and . We usually want to pair these boolean values with a wait until <> or a repeat until <>. This is what the outer repeat util <> block in the example above does.
After discussing the inputs a bit, we must consider the actions we take in response to those inputs. The OUTPUTS could be playing a note or short song, turning lights on, moving the motors, or stopping the motors.
We need to understand that some outputs are "blocking". By this we mean that the Arduino board will execute the task (say playing a tone) in a way that nothing else will be happening in our program. In other words, our program is blocked waiting for the task to complete. If you kick off a blocking task that takes a long time to run, it will disrupt any poll loops. So while your robot plays that fancy song in response to the distance sensor, the robot will not be able to poll to see if the button has been pressed or what the latest value on the line follower is. It may veer off course and not respond to you mashing the buttons on the remote until the sounds are done playing.
It is worth going through each output:
this does block. While the tone is playing you will be blocking the poll loop
play tone on note C4 beat Half
play tone on note G4 beat Whole
play tone on note F4 beat Whole
Your mBot is going to be unresponsive for several seconds while these tones are played. If you put this in a loop, it will play over and over again and you will only be polling every several seconds. If you are polling for a button press, you might miss it if you don't time things correctly.
There is not an easy way around this in Scratch, so just be careful with how you use tones so that you do not wind up polling too slow and undersampling continuous inputs (sensors) or missing events on the binary inputs (switches).
this returns immediately and will not block, but the motor speed will remain set and the wheels keep on turning, even after the program exits. Remember to set the speed to zero at the end of your program so that the motor does not keep running.
It is great that this does not block, but it presents a new problem... How to do tell the motor to go forward for 5 seconds?
You can simply set the speed and then add a wait n sec afterwards.
run forward at speed 100
wait 5 sec
Setting the motor speed does not block, but the wait 5 sec does.
You could also use the timer if you don't want to block. Perhaps you want to keep polling and adjusting the speed, but you only want the motor on for a maximum of 5 sec.
reset timer
repeat until <timer > 5> {
  set motorSpeedVariable to (light sensor light sensor on board / 10)
  run forward at speed motorSpeedVariable
}
like the motors, this does not block. Also like the motor you sometimes want to block for a little bit, for example to make them flash at differnet rates. You can use the same solutions: wait n sec or repeat until <timer > n>
And in both cases you can use the playing of tones much like wait statement: it blocks and uses up a small about of time
Like the motor, LEDs will stay on even when the program exists. You may want to set them to be off at the end of your program.
TBD
TBD
- Download the
src/scratch/botOS.sb2file from this project. - Open that up in your mBlock application
- Start adding your code under the
userProgramcode block - Make sure you are connected to your mBot via USB cable
- Make sure the serial port is connected
- Make sure you have reset to the default program
- Click the green flag and the main program should run
- You should hear a tone (like the NBC jingle) and the LEDs should be flashing green
- Press the button on the mBot and the LED should go blue and run your program (whatever you added to the botOS file)
- After your program finishes the LED should go red and the mBot should stop
- You can hit the green flag icon again to rerun the main program
To upload your program to the mBot:
- Make sure you are connected to your mBot via USB cable
- Make sure the serial port is connected
- Make sure you have reset to the default program
- Right click on the
mBot Program - Choose
upload to arduino - Click the
Upload to Arduinobutton - Wait for the code to compile and upload to the mBot
- Dismiss the
Upload Finishpop up - Unplug the USB cable
- You should hear a tone (like the NBC jingle) and the LEDs should be flashing green
- Press the button on the mBot and the LED should go blue and run your program (whatever you added to the botOS file)
- After your program finishes the LED should go red and the mBot should stop
- You can hit the reset button on the mBot to relaunch the main program
- Remember to plug back in the USB cable, connect to the serial port and reset the default program if you want to do further development.
- You can export the Arduino code that Scratch generates to the Arduino IDE. Make sure to download and install the correct version of the Arduino development environment to match your mBlock version.
- After clicking the
Edit in Arduino IDEbutton, the Arduino GUI will launch with your code in an editor window. - Make sure to shut down mBlock so there are not conflicts around the serial port.
- Choose the board from the
Toolsmenu. The mBot is based upon theArduino Uno - Double check that the serial port is correct and connected
- Double check that the programmer is AVRISP mkii
- You can now compile/verify or upload to the mBot just as you did from the mBlock IDE.
- But at this point you have more control writing Arduino code.
- If you go back to mBlock you will need to reset the default program again.
Do not use a separate download of the Arduino GUI. You want to use the version that comes bundled with mBlock. You can launch it via the method described above. Once it is running you can save a shortcut back to this executable. If you use a "vanilla" version that you downloaded separately, you are likely to have compile errors and missing librarries (e.g. MeMCore.h: file not found)
Here is the language reference https://www.arduino.cc/en/Reference/HomePage?from=Reference.Extended