
ManyMiles is a minimalistic website that teaches you about your driving habits.

- Main features
- Getting set up
- API documentation
- Database schema
- Future improvements
- Contributors
- Acknowledgements
- Create secure user accounts, with the ability to delete them as well
- Track their driving habits using a sleek, responsive interface
- Download their records to a csv file for storage and analysis
- Learn about their driving habits via metrics and visualizations
- Interact with their data from anywhere using an API
The source code can be viewed on GitHub here. Keep in mind that ManyMiles was not built with the intention of being run locally, so there are a few hoops to jump through if you want to do so.
Before you start, you're going to need to have a local instance of MySQL installed on your machine. I recommend using MySQL Workbench, although I won't be going into too much detail about how to work with it here.
The first step to setting up a local version of ManyMiles is to clone this repository. To do this, open a command line instance and change your working directory to the directory you'd like to clone the repository to.
cd path/to/clone/repository/toThen, use the following command to clone the repository.
git clone https://github.com/jakebrehm/manymiles.git
Once that's done, change your working directory to the directory you just cloned.
cd manymilesOptionally, create a virtual environment to run the project in.
python3 -m venv env
If you chose to create the virtual environment, you need to activate it using source env/bin/activate (Unix) or .\env\Scripts\activate (Windows). You can deactivate the environment using deactivate whenever you'd like.
Now you can install all of the dependencies required to properly get ManyMiles up and running.
pip3 install -r requirements.txt
Next, you'll need to actually create a database in MySQL, which is relatively simple if you run this query in MySQL Workbench. We can call the database manymiles.
CREATE DATABASE `manymiles`;Then, you'll need to grab the host, port, username, and password in order to create the connection string, which should have the following format for our purposes. Replace the values in brackets with the appropriate values (get rid of the brackets too).
mysql+pymysql://{username}:{password}@{host}:{port}/{database}
You'll add this connection string to the configuration file in the following steps.
There is a file in the cfg directory named .env.example that is intended to be a template for your configuration file. Create a copy of this file, rename it to .env, and open it in a text editor.
Two of the configuration variables are already filled in for you. You do not need to change these unless you have a good reason to do so.
DEBUGtells the application whether or not to run in debug mode (True/False).PORTis an environmental variable used by Flask to determine what port to host the application on.
The other two variables, however, you do need to change.
SECRET_KEYis the value that Flask uses to protect the user session. This should ideally be a lengthy and completely random string.DATABASE_URIis the connection string that you constructed in Creating the database.
Almost there! Now that you've updated the configuration file, you can initialize the database by running create.py, which will create all of the necessary tables and preemptively fill out any tables that require it.
python3 create.pyNote that you can reverse this process and delete the local database by running delete.py in the same way.
Now you should finally be able to use the following command to run ManyMiles locally.
python3 app.py
ManyMiles features an API that allows users to perform operations such as add a new record or delete their most recent record. The main documentation lives here, but you can view the Swagger UI version as well.
A few Siri Shortcuts are available for iOS and MacOS devices to make recording your mileage and interacting with your data as painless as possible. Once you've set up the shortcuts in your Shortcuts app, you should be able to use the following voice commands with Siri:
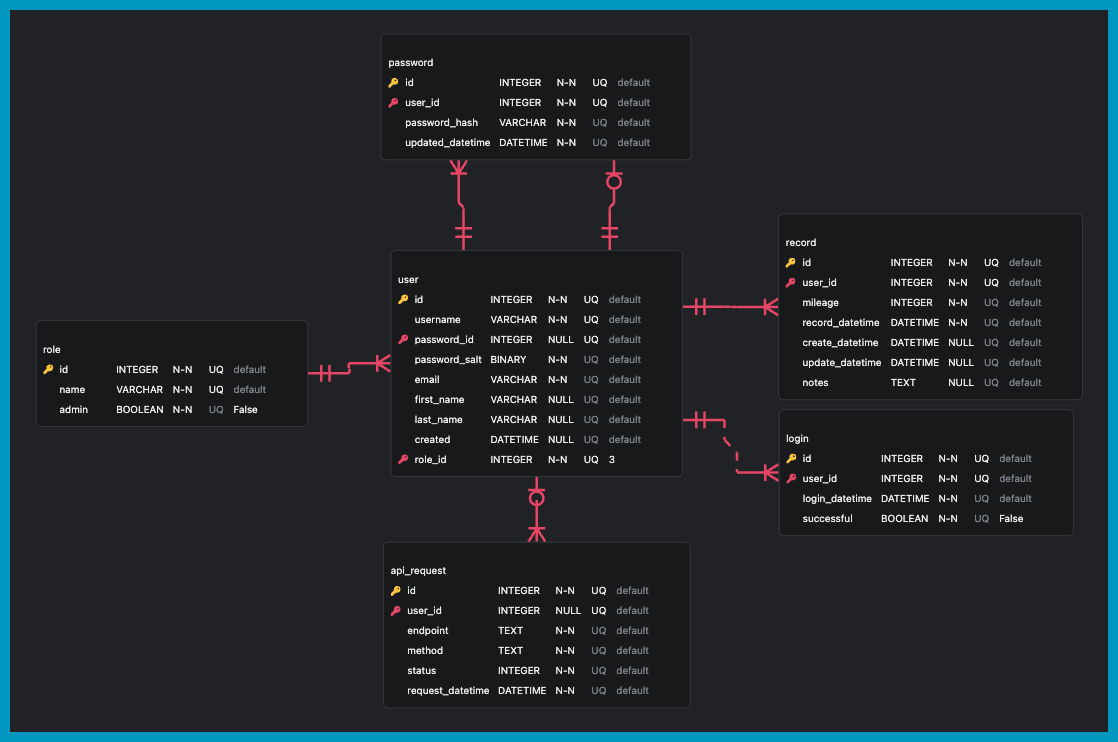
For anyone curious to see how the database was modeled, an entity relationship diagram is included below.
- Create a demo for prospective users
- Allow users to reset their password via email
- Provide more metrics and visualizations
- Set up an admin dashboard
- Incorporate extensive unit testing
Thank you to Muhammad Haroon for designing the ManyMiles logo.
All credit for the hero image goes to Photo by Jack Anstey on Unsplash.