We absolutely love our Flex radios! We just wish we had a Linux-native way to work with them so that Windows or Maestro isn't required.
nDAX creates a PulseAudio device for your slice, and then connects up the audio for RX and TX.
$ ./nDAX -station station_name -slice A -daxch 1 -source flex.sliceA.rx -sink flex.sliceA.tx
- Download the latest binary using the Releases icon above or Releases
- Make it executible:
chmod +x nDAX
$ ./nDAX -h
Usage of ./nDAX:
  -daxch string
        DAX channel # to use (default "1")
  -latency float
        Target RX latency (ms, higher = less sample rate variation) (default 100)
  -log-level string
        minimum level of messages to log to console (trace, debug, info, warn, error) (default "info")
  -radio string
        radio IP address or discovery spec (default ":discover:")
  -rt
        Attempt to acquire realtime priority (default true)
  -sink string
        PulseAudio sink for audio to transmit (default "flexdax.tx")
  -slice string
        Slice letter to use (default "A")
  -source string
        PulseAudio source for received audio (default "flexdax.rx")
  -station string
        station name to bind to (default "Flex")
  -tx
        Create a TX audio device (default true)
To run multiple nDAX instances, see the scripts directory.
The best way to adjust nDAX receive audio levels is with the Flex's "AGC-T" control. If you are running nCAT, you can
adjust this using rigctl. The .30 value should be between 0 and 1, and the port needs to correspond to your port number from nCAT:
$ rigctl -m 2 -r localhost:4532 L RF .30
You can also adjust receive and transmit audio levels on a per-slice basis using a mixer app like pavucontrol or the KDE or GNOME mixers.
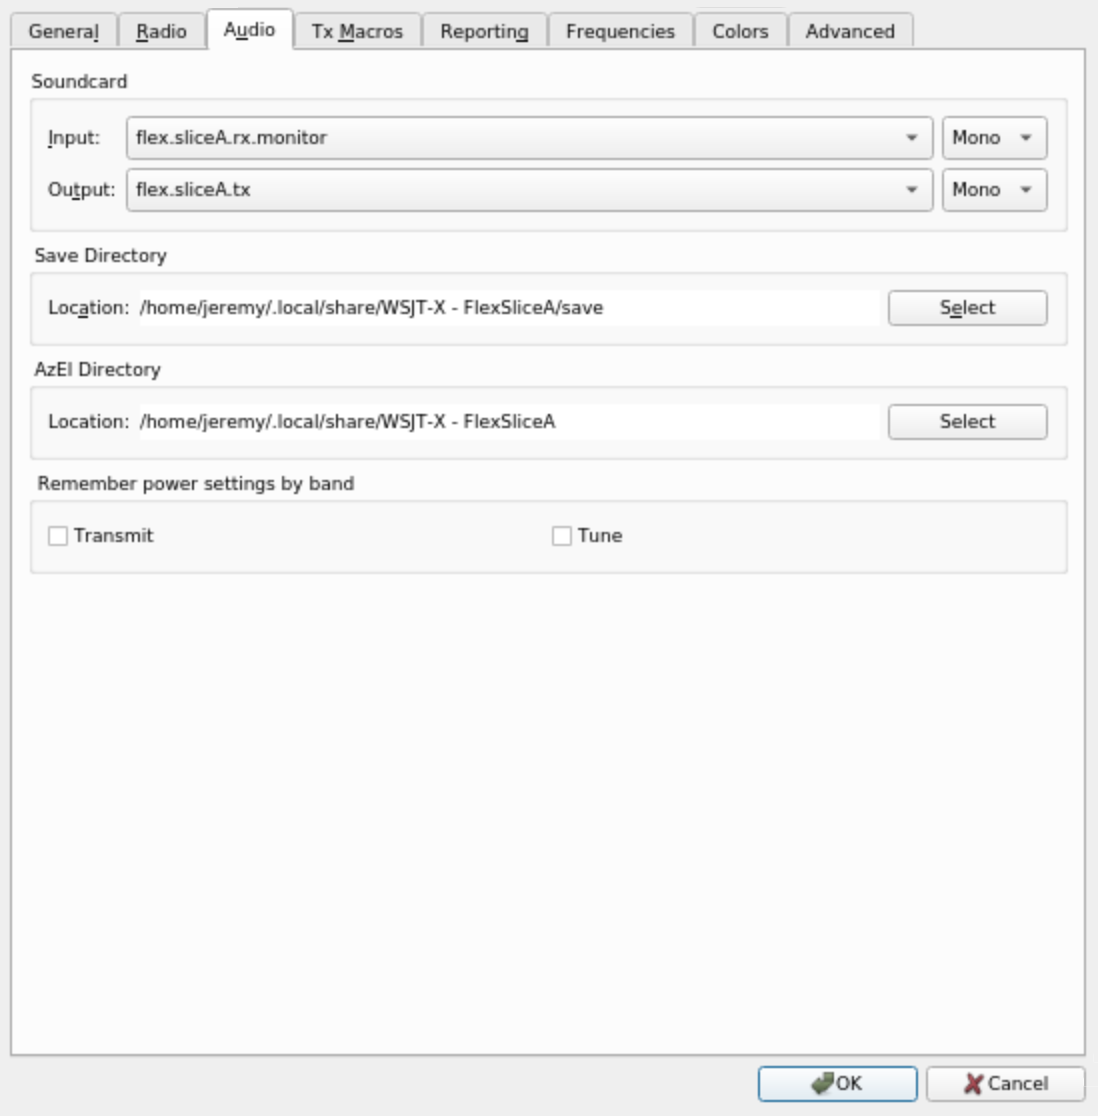
To setup WSJT-X with nCAT and hamlib, use the following settings:
fldigi's audio setup doesn't know how to select different PulseAudio devices. To make things work, you will need an
audio mixer program that has the ability to assign different audio devices to different programs. Many Linux
desktop environments have such a program built-in, but if you're not sure about yours, pavucontrol is a good choice.
- Start nDAX.
- Start fldigi.
- Open the config dialog ("Configure" → "Config Dialog).
- Under "Soundcard" → "Devices", select the "PulseAudio" checkbox, and leave "Server string" blank. Save and close.
- Open pavucontrol and go to the Playback tab.
- Find the entry with the fldigi icon (fldigi doesn't set its name properly, so the place where the name appears is blank!) and use the dropdown to change its device to "Flex Slice A TX", or whatever nDAX device you wish to use.
- On the Recording tab, find fldigi and change the device to "Flex Slice A RX", or similar.
- You can now exit pavucontrol and start using fldigi. PulseAudio automatically remembers the device assignments, so as long as nDAX is running when you start fldigi in the future, it will automatically use the nDAX devices.
See the open issues for a list of proposed features (and known issues).
Contributions are what make the open source community such an amazing place to be learn, inspire, and create. Any contributions you make are greatly appreciated.
- Fork the Project
- Create your Feature Branch (
git checkout -b feature/AmazingFeature) - Commit your Changes (
git commit -m 'Add some AmazingFeature') - Push to the Branch (
git push origin feature/AmazingFeature) - Open a Pull Request
MIT License. See LICENSE file.