This assignment is about using AJAX to fetch data in text and JSON format and process it using DOM manipulation. You will only be writing JavaScript in this assignment - HTML and CSS are provided!
In addition to this README.md, you will be able to find the video demonstrated the expected behavior of this assignment on the course homework page.
In this assignment, you will implement views for a Pokedex and two Pokemon cards. (Note: You will not need to know anything about the Pokemon game throughout this assignment, although we hope you enjoy having a more fun twist to your homework!) A Pokedex is an encyclopedia (or album) of different Pokemon species, representing each Pokemon as a small "sprite" image. In this assignment, a Pokedex entry (referenced by the sprite image) will link directly to a Pokemon card, which is a card of information for a single Pokemon species, containing a larger image of the Pokemon, its type and weakness information, its set of moves, health point data, and a short description.
Each Pokemon has one of 18 types (fire, water, grass, normal, electric, fighting, psychic, fairy, dark, bug, steel, ice, ghost, poison, flying, rock, ground, and dragon) and one weakness type (also from this set of 18 types). Again, you don’t need to know about the strength/weakness of different types - this information will be provided to you as needed.
Here, we will simplify things by assuming that each Pokemon has no more than 4 moves (some have fewer, but all Pokemon have at least one move). In addition, we assume that the complete Pokedex has 151 Pokemon (more have been added over the game’s history, but these comprise the original set of Pokemon species).
In this HW3 repository you will find the following starter files:
| File/folders | Repository files to stay unchanged |
|---|---|
pokedex.html |
The HTML page for displaying a user's Pokedex and two game cards card and game data. |
pokedex.css |
The stylesheet for pokedex.html |
Your repository should be submitted with these (unchanged) starter files as well as the following files you are to implement:
| File | Repository file you will implement and turn in |
|---|---|
pokedex.js |
JS file for managing game UI and behavior |
Your solution will be graded only on pokedex.js - any changes you
make to pokedex.html or pokedex.css will not be eligible for full credit.
Your JS will retrieve image names for different images on the page, depending on the current Pokemon card(s) in view and the populated Pokedex. You should use absolute paths to display any image files, prepending the url https://courses.cs.washington.edu/courses/cse154/webservices/pokedex/ to any of the necessary image directories as follows:
| Folders | Image directory |
|---|---|
icons/ |
.jpg icons for types, weaknesses, .gif icon for loading animation |
images/ |
.jpg card images for the 151 Pokemon |
sprites/ |
.png sprite images for the 151 Pokemon |
You will use JavaScript and AJAX requests to update pokedex.html as needed. Your program will
read data from the following two web services we have provided for the assignment:
- https://courses.cs.washington.edu/courses/cse154/webservices/pokedex/pokedex.php
- https://courses.cs.washington.edu/courses/cse154/webservices/pokedex/game.php
We have provided documentation for each of these APIs. You will need to read through this documentation in order to use the APIs properly for this assignment. You may assume that the data returned from both of these web services follows the formats given.
Your webpage should match the overall appearance/behavior of the provided screenshots and it must match the appearance/behavior specified in this document.
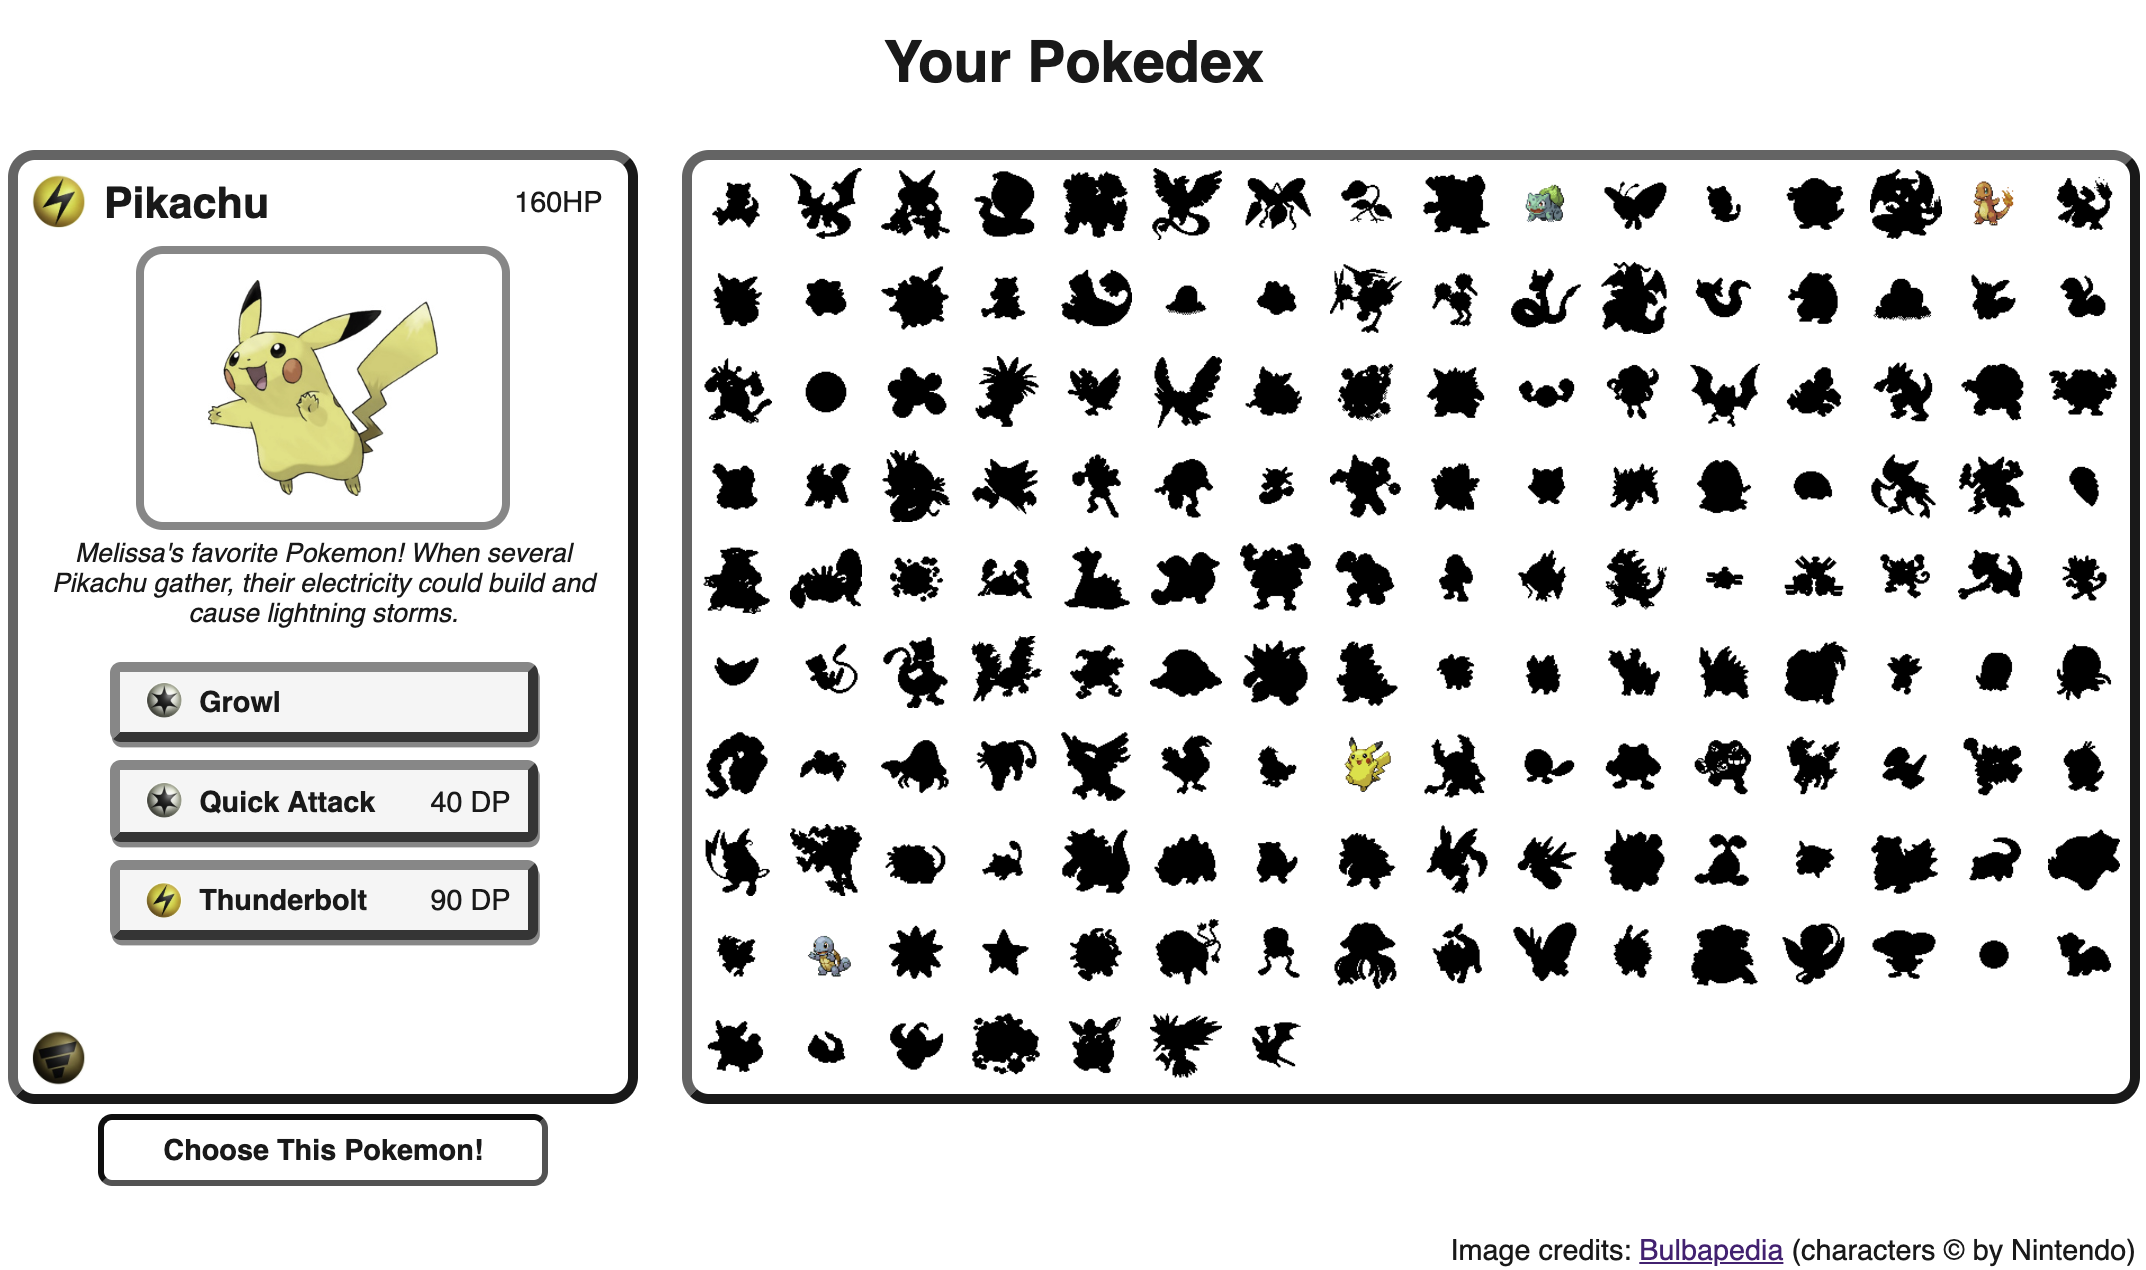
The provided HTML and CSS files display the main view by default when the page is loaded. Below is an example of this template:

For the first part of this assignment, you will populate the right container (#pokedex-view)
with all 151 Pokemon sprite icons by making an AJAX GET request to pokedex.php?pokedex=all.
You should also initialize your current "found" Pokemon in your JS file with the three default starter Pokemon: Bulbasaur, Charmander, and Squirtle. Throughout the game, you will have the
chance to collect Pokemon to add to your collection. Below is an image of the expected output (just
displaying the #pokedex-view) when the Pokedex has been populated:
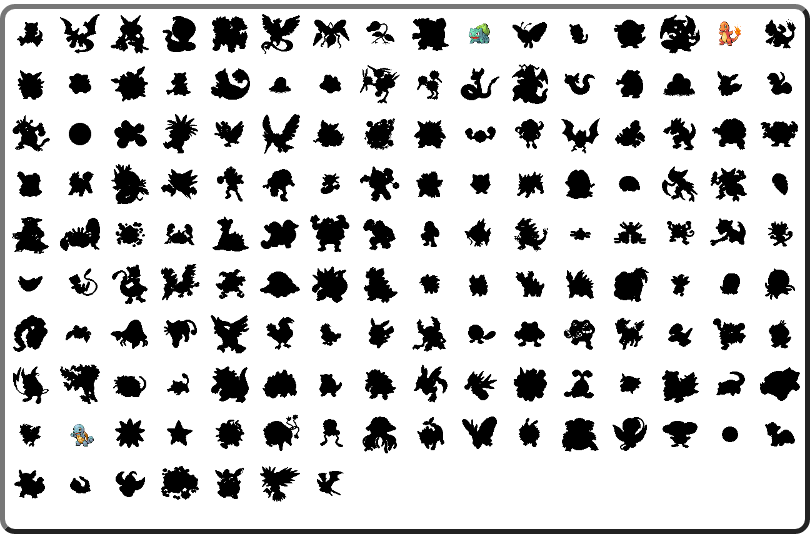
All 151 imgs added to the #pokedex-view should have a class of .sprite and have
their src attribute set to the absolute image path based on the shortname returned in
the plain text response (see Query 1 details in API documentation). You may find it helpful to save the shortname as a module-global variable. As mentioned in the
Image Paths section of this spec, you will need to prepend the absolute path
https://courses.cs.washington.edu/courses/cse154/webservices/pokedex/sprites/
to the src to correctly link the corresponding sprite image and append ".png" as the file extension with the shortname. By default, all images
with the .sprite class will show up as black shadows until they have the additional
.found class added (implemented in the provided CSS), which will add color to the
respective sprite image. Remember to give all img created in JS a descriptive alt text.
For each "found" sprite added to the #pokedex-view during the game, you will need to
add the .found class as well as an event handler so that when the sprite is clicked,
the card on the left is populated with that Pokemon's data. You will retrieve this data
using the pokedex.php?pokemon=parameter request, passing the clicked Pokemon's shortname as
the parameter. You may find it helpful to give each sprite an id with the
second "shorthand" name token in the API response, which handles special characters such as spaces
in a few Pokemon names (e.g. "mr-mime" is the shorthand name for "Mr. Mime"). For each Pokemon, the shortname represented in the pokedex.php response is the same that is returned by game.php responses. See the API documentation for more details.
If a Pokemon sprite without the class .found class clicked, nothing should happen.
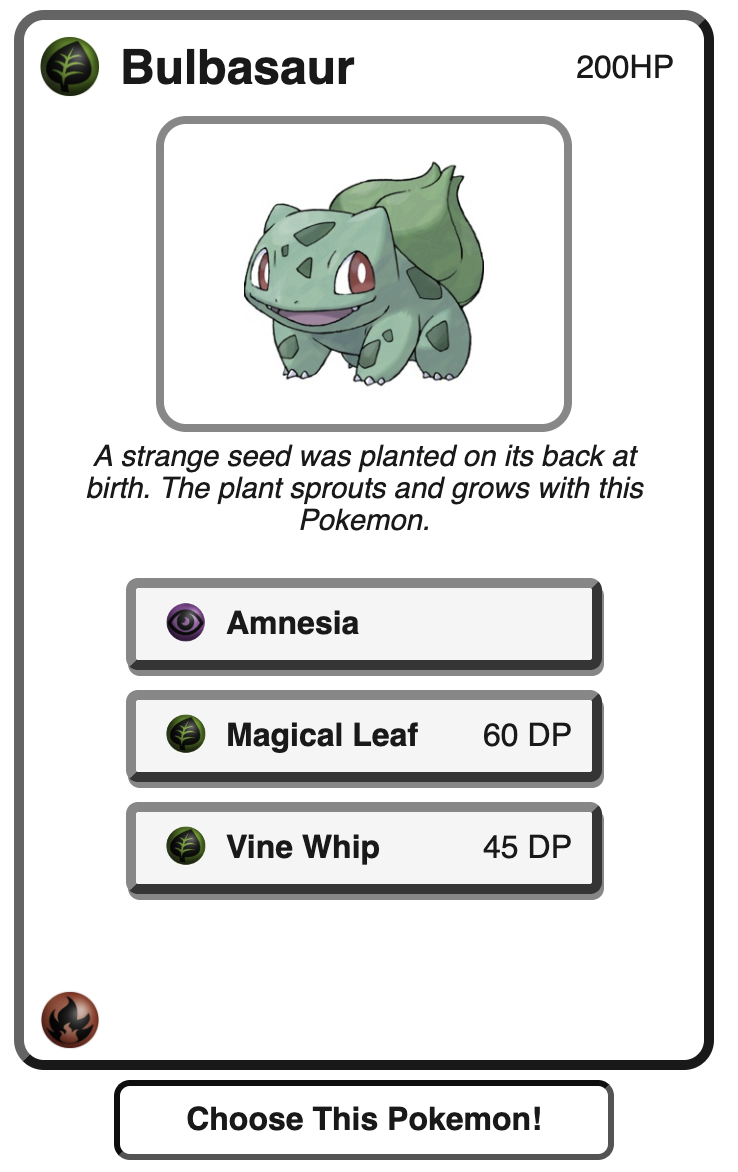
Once a found Pokemon is clicked, the card data for that Pokemon populates the card on the left
side of the page. This card is in a div with the id of #p1. You should use the
returned JSON object from the pokedex.php?pokemon=parameter request to populate the card
with the Pokemon's information, as explained below:
- The
"name"value should be used to populate the#p1 .nameheading with the name of the Pokemon. - The
"images"value is a collection of three relative folder paths, the first being photo to link to the Pokemon's photo (referenced by#p1 .pokepic), the second being"typeIcon"to link to the type icon of the Pokemon in the top-left corner (#p1 .type), and the third being the"weaknessIcon"to link to the weakness type icon of the Pokemon in the bottom-left corner#p1 .weakness). Hint: use a module-global constant for the absolute path of the API which can be prepended to each relative image path in the response. - The "hp" (health point) value should be used to populate the
#p1 .hpspan positioned at the top-right corner of the card. You will need to append"HP"(without any spaces) to the provided hp value, as shown in the example card image to the right. - The
"description"value should be used to populate the card with the Pokemon's description. The description should be placed in the provided#p1 .infoparagraph. - The
"moves"value is an array of objects containing information about the Pokemon's moves (between 1 and 4 moves, depending on the Pokemon). You should populate only enough move buttons in#p1 .movesfor the Pokemon's move count. - If there are fewer than four moves for a Pokemon, you should set the extra buttons to have the
class of
.hiddenso that they do not display visible on the card for that Pokemon. Any hidden move buttons should be below the visible ones within in the.movescontainer. Make sure to unhide move buttons for later Pokemon as needed. - Each move button's
.movespan element should have its text set to the provided move name, and theimgicon set to have asrcattribute of that move's type (similar to how you did the type and weakness for the Pokemon). These type images will show to the left of the move's name. - If a move has a
"dp"key, the corresponding value should be displayed in the move button's.dp spanelement with " DP" appended (see image to right for an example). Note the space between the number and DP. Moves should be displayed on the card in the order they are returned in the moves array.
Finally, you should make visible the #start-btn once a user has clicked any of their
found Pokemon. In other words, the button should not be visible until the card is populated
with a Pokemon's information.
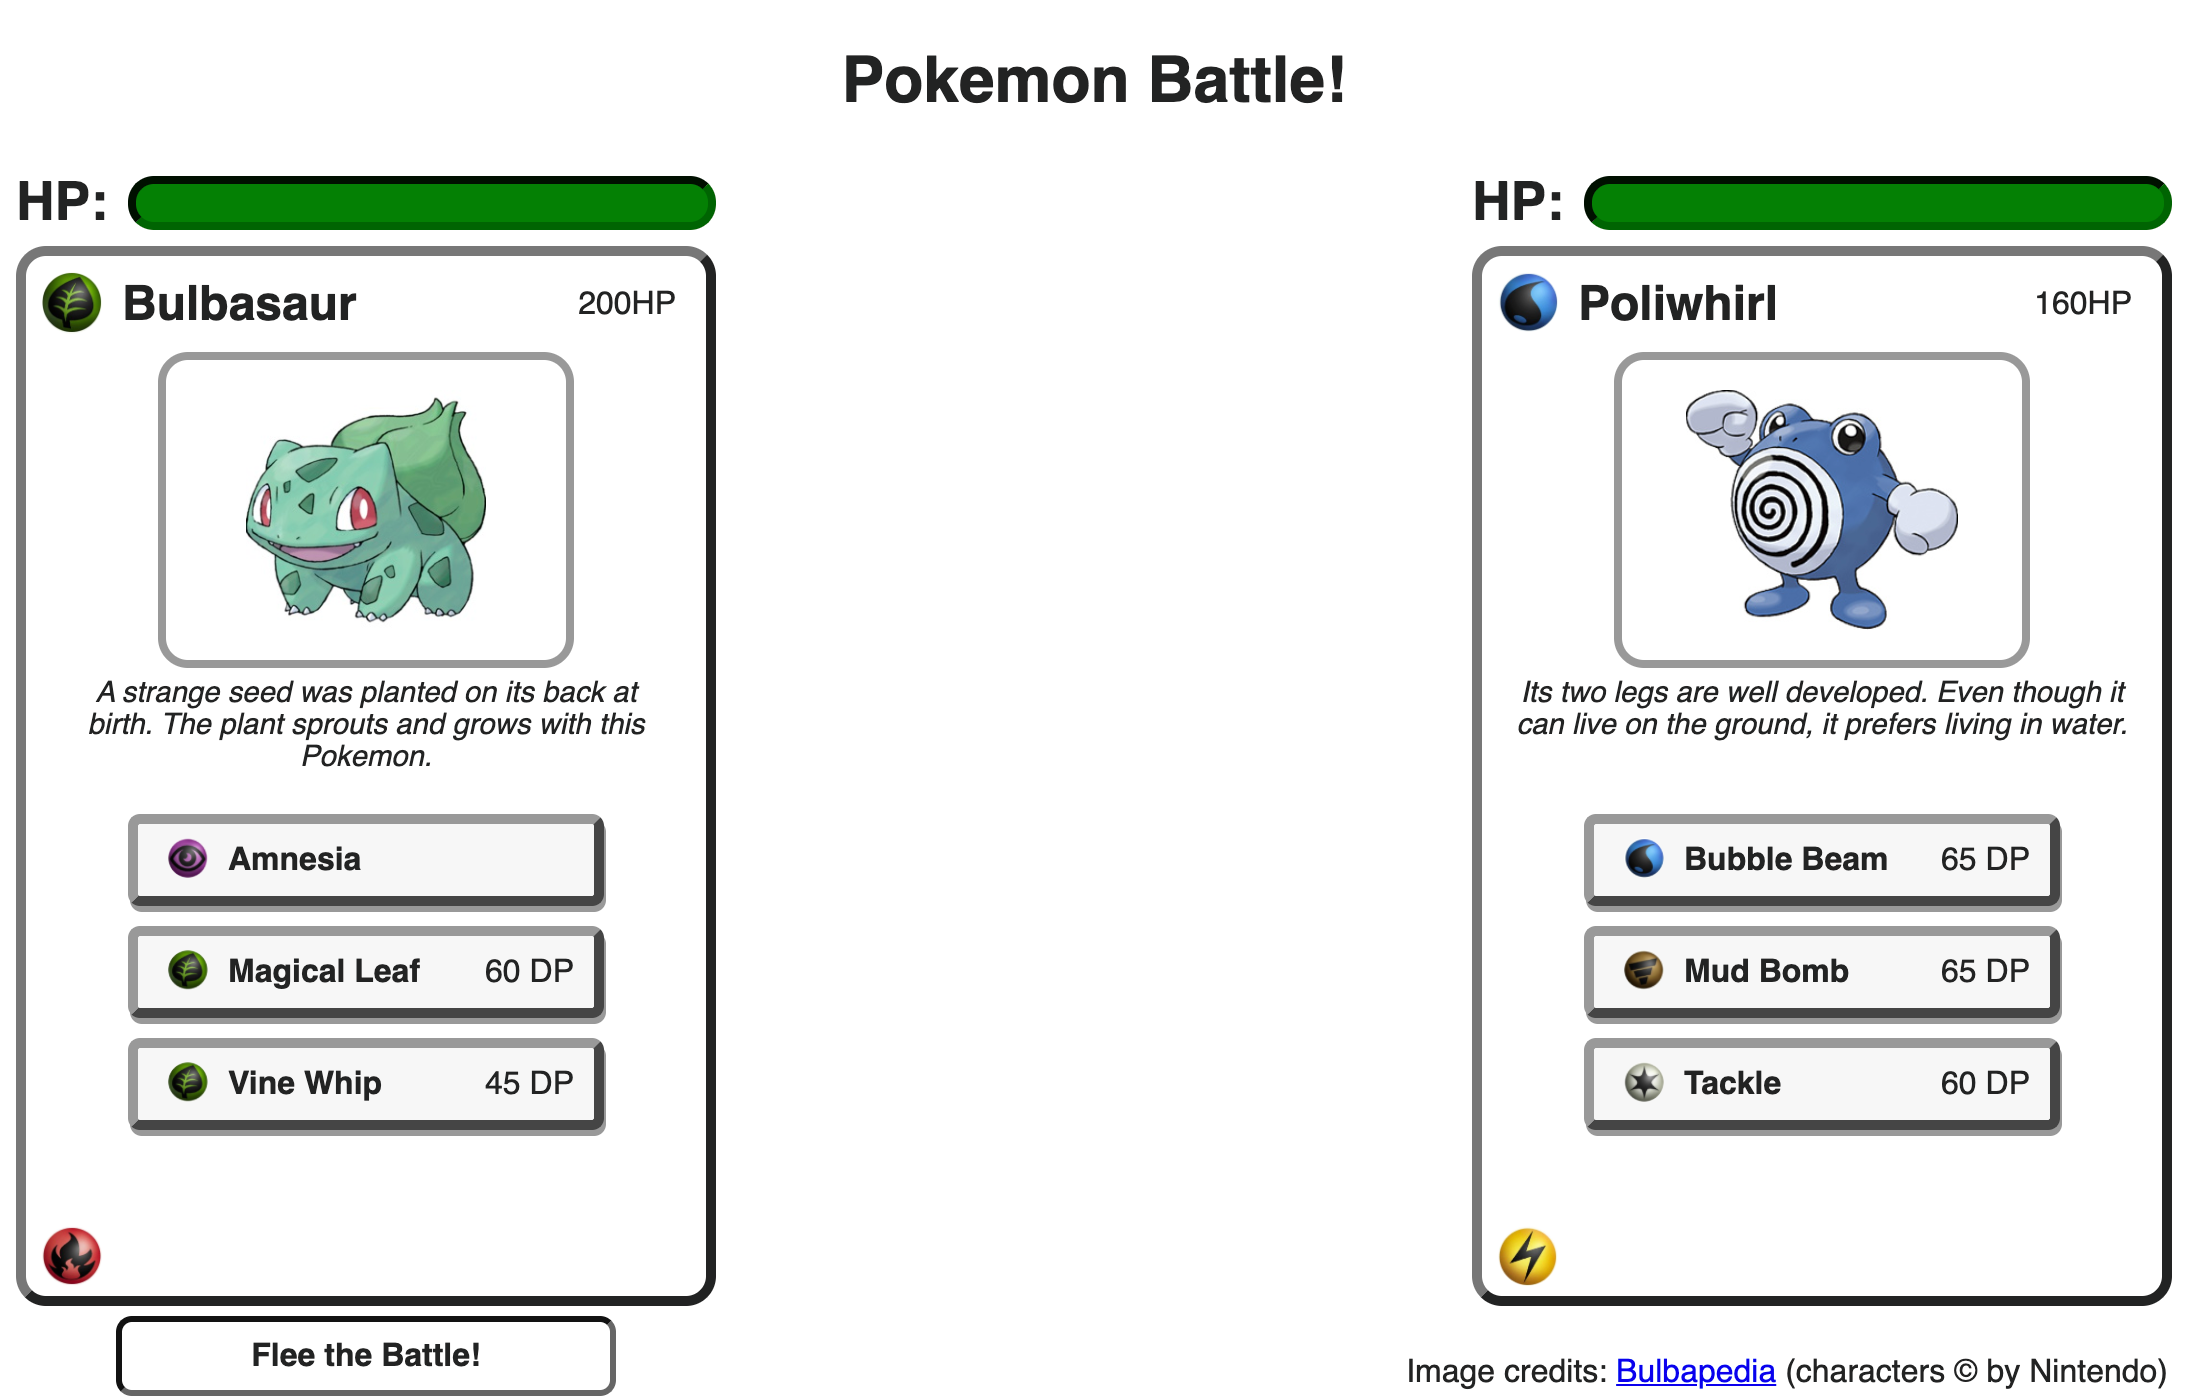
From the Main View (see Part I), clicking the "Choose This Pokemon" button under #p1 should:
- Hide the
#pokedex-viewand show the second player's card (#p2), resulting in the view similar to that below (in this example, "your" Pokemon is chosen as Bulbasaur, and the opponent's Pokemon is Dratini).- (Hint: You should redunce redundancy here since you already have code to populate
#p1)
- (Hint: You should redunce redundancy here since you already have code to populate
- Show your Pokemon's HP bar (it should start full) by removing the
.hiddenclass on.hp-info. - Make the
#results-containervisible at this point, which will populate the center of the page with turn results for each move made. - Show the
#flee-btnunderneath#p1. - Hide the
#start-btnunderneath#p1 - Enable all of the visible move buttons for
#p1. The providedpokedex.htmlcomes with these buttons having thedisabledattribute by default - to enable a button, you should set this attribute tofalse, and to disable, it should be reset totrue. - Change the heading text on the page from Your Pokedex to Pokemon Battle!
To initialize the game, you will need to make a POST
request to game.php with the POST parameters of startgame=true and
mypokemon=yourpokemonsname. This request will return the initial game state, including
data for your card and data for the opponent's card. This request will also return unique
guid (game ID) and pid (player ID) values that you should store as module-global variables in your
file (see
the api documentation).
These values will be necessary to play moves during the game.
You will use this game state data to populate each card with image, stats, and move data for each Pokemon. Note that you already should have the necessary data populated in your card, so won't necessarily need to re-populate at this point. Your opponent's card will be given as a random Pokemon (in the example output image above, the random Pokemon is called Dratini), and should be populated with the data similar to how you populated your card on the previous step. Note that there is quite a bit of redundancy here, so you should factor out redundant DOM manipulation code with functions as much as possible.
In the Game View, all .move buttons in #p1 should stay enabled until either player wins/loses.
Each move that you make has an effect on the game state which is handled by the server. All you need
to do to keep track of the game state is update the game with the data returned by the
game.php play move POST request. You should make this request whenever a user
clicks on their Pokemon's moves during a game, and remove the .hidden class from the
#loading image to display a loading animation while the request is being processed. Below is a
screenshot of the page when a user clicks a move button on the left card and is waiting for a
request from the game.php API.

Once the server responds with the data successfully, this animation should become hidden again. The
returned game data includes a results object that provides the results of both Pokemon's moves
(which moves were played and whether they were a hit or miss) and you should display these in the
#p1-turn-results and #p2-turn-results paragraphs in the #results-container in the center of the
page, as shown in the above example.
There are a few changes that may result from the updated game state, each of which you need to handle:
- Damage is dealt to your Pokemon and/or the opponent's Pokemon: The returned game
state provides data about the current health of both Pokemon. You should update the health bar
(the
.health-bardiv on each card) to make its width a percentage of the max width, where the percentage is calculated ascurrent-hp / hpusing these values from the returned JSON. If the percentage is less than 20% (this includes 0), the health-bar should have a class of.low-healthadded to make it red (see image above for an example). When the health is greater than or equal to 20% of the total health, it should never have a.low-healthclass.
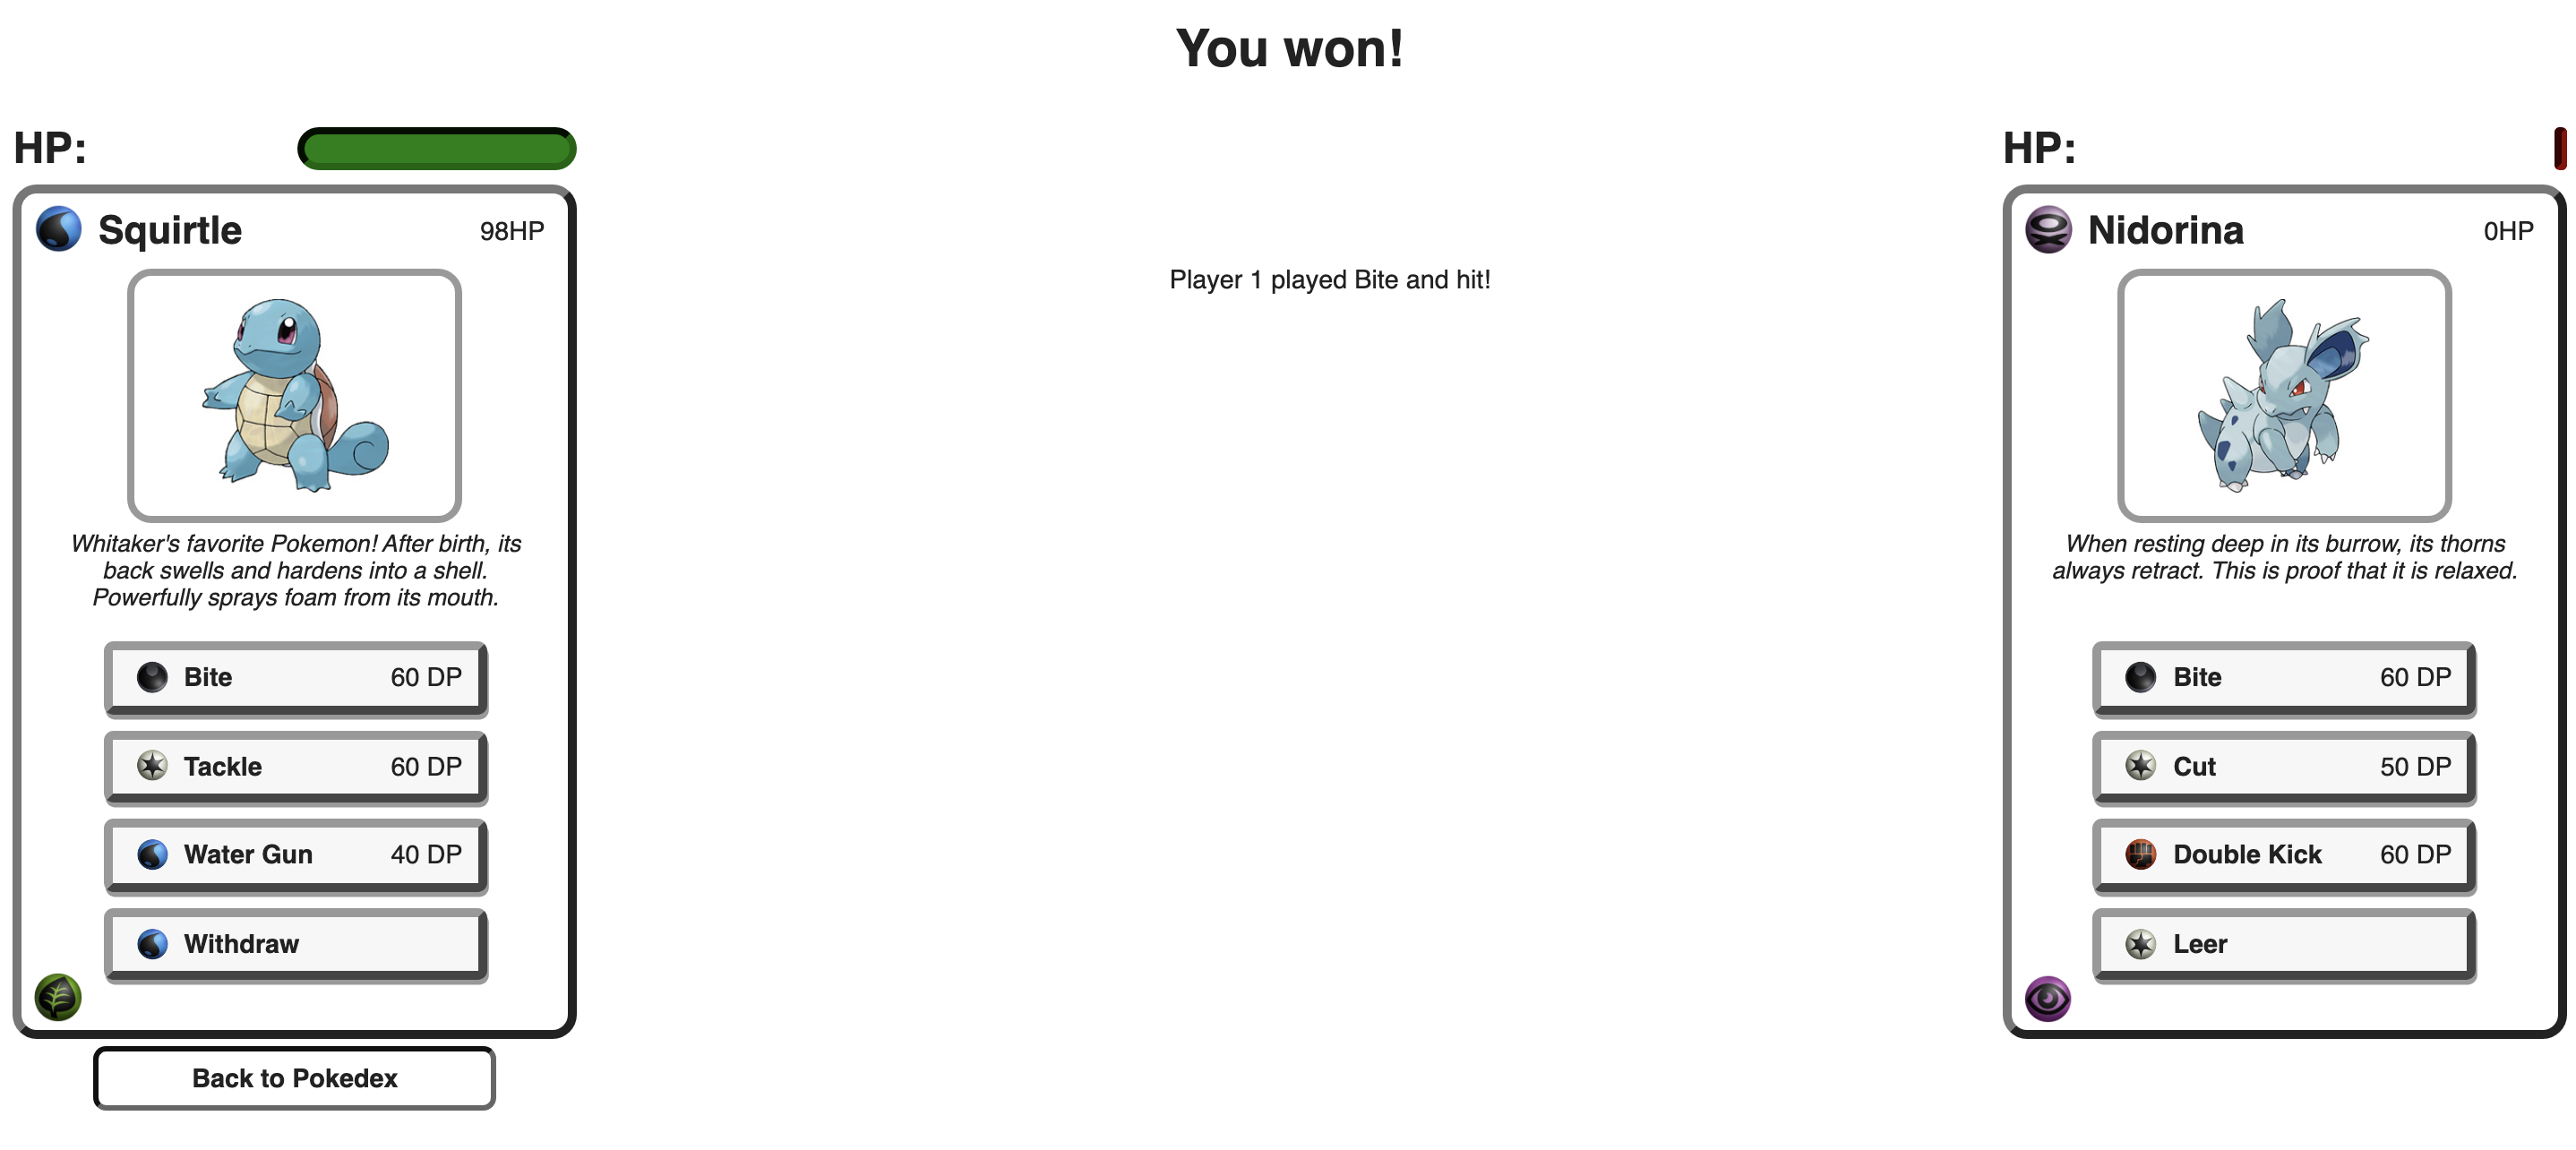
Winning/Losing: The game ends when one of the Pokemon has 0 hp points (this includes fleeing, discussed later). You should change the
message in the h1 as "You won!" or "You lost!" depending on the results of
the game, displaying #endgame and hiding #flee-btn. You may assume that a game state will never
be returned with both Pokemon having HP values of 0. At this point, all move buttons in
#p1 should be disabled (using the disabled property) so that no fetch requests are made when clicked (these buttons
will need to be re-enabled in a new game).
Below is an example output after you have won the game.
Below is an example output after you have lost the game.
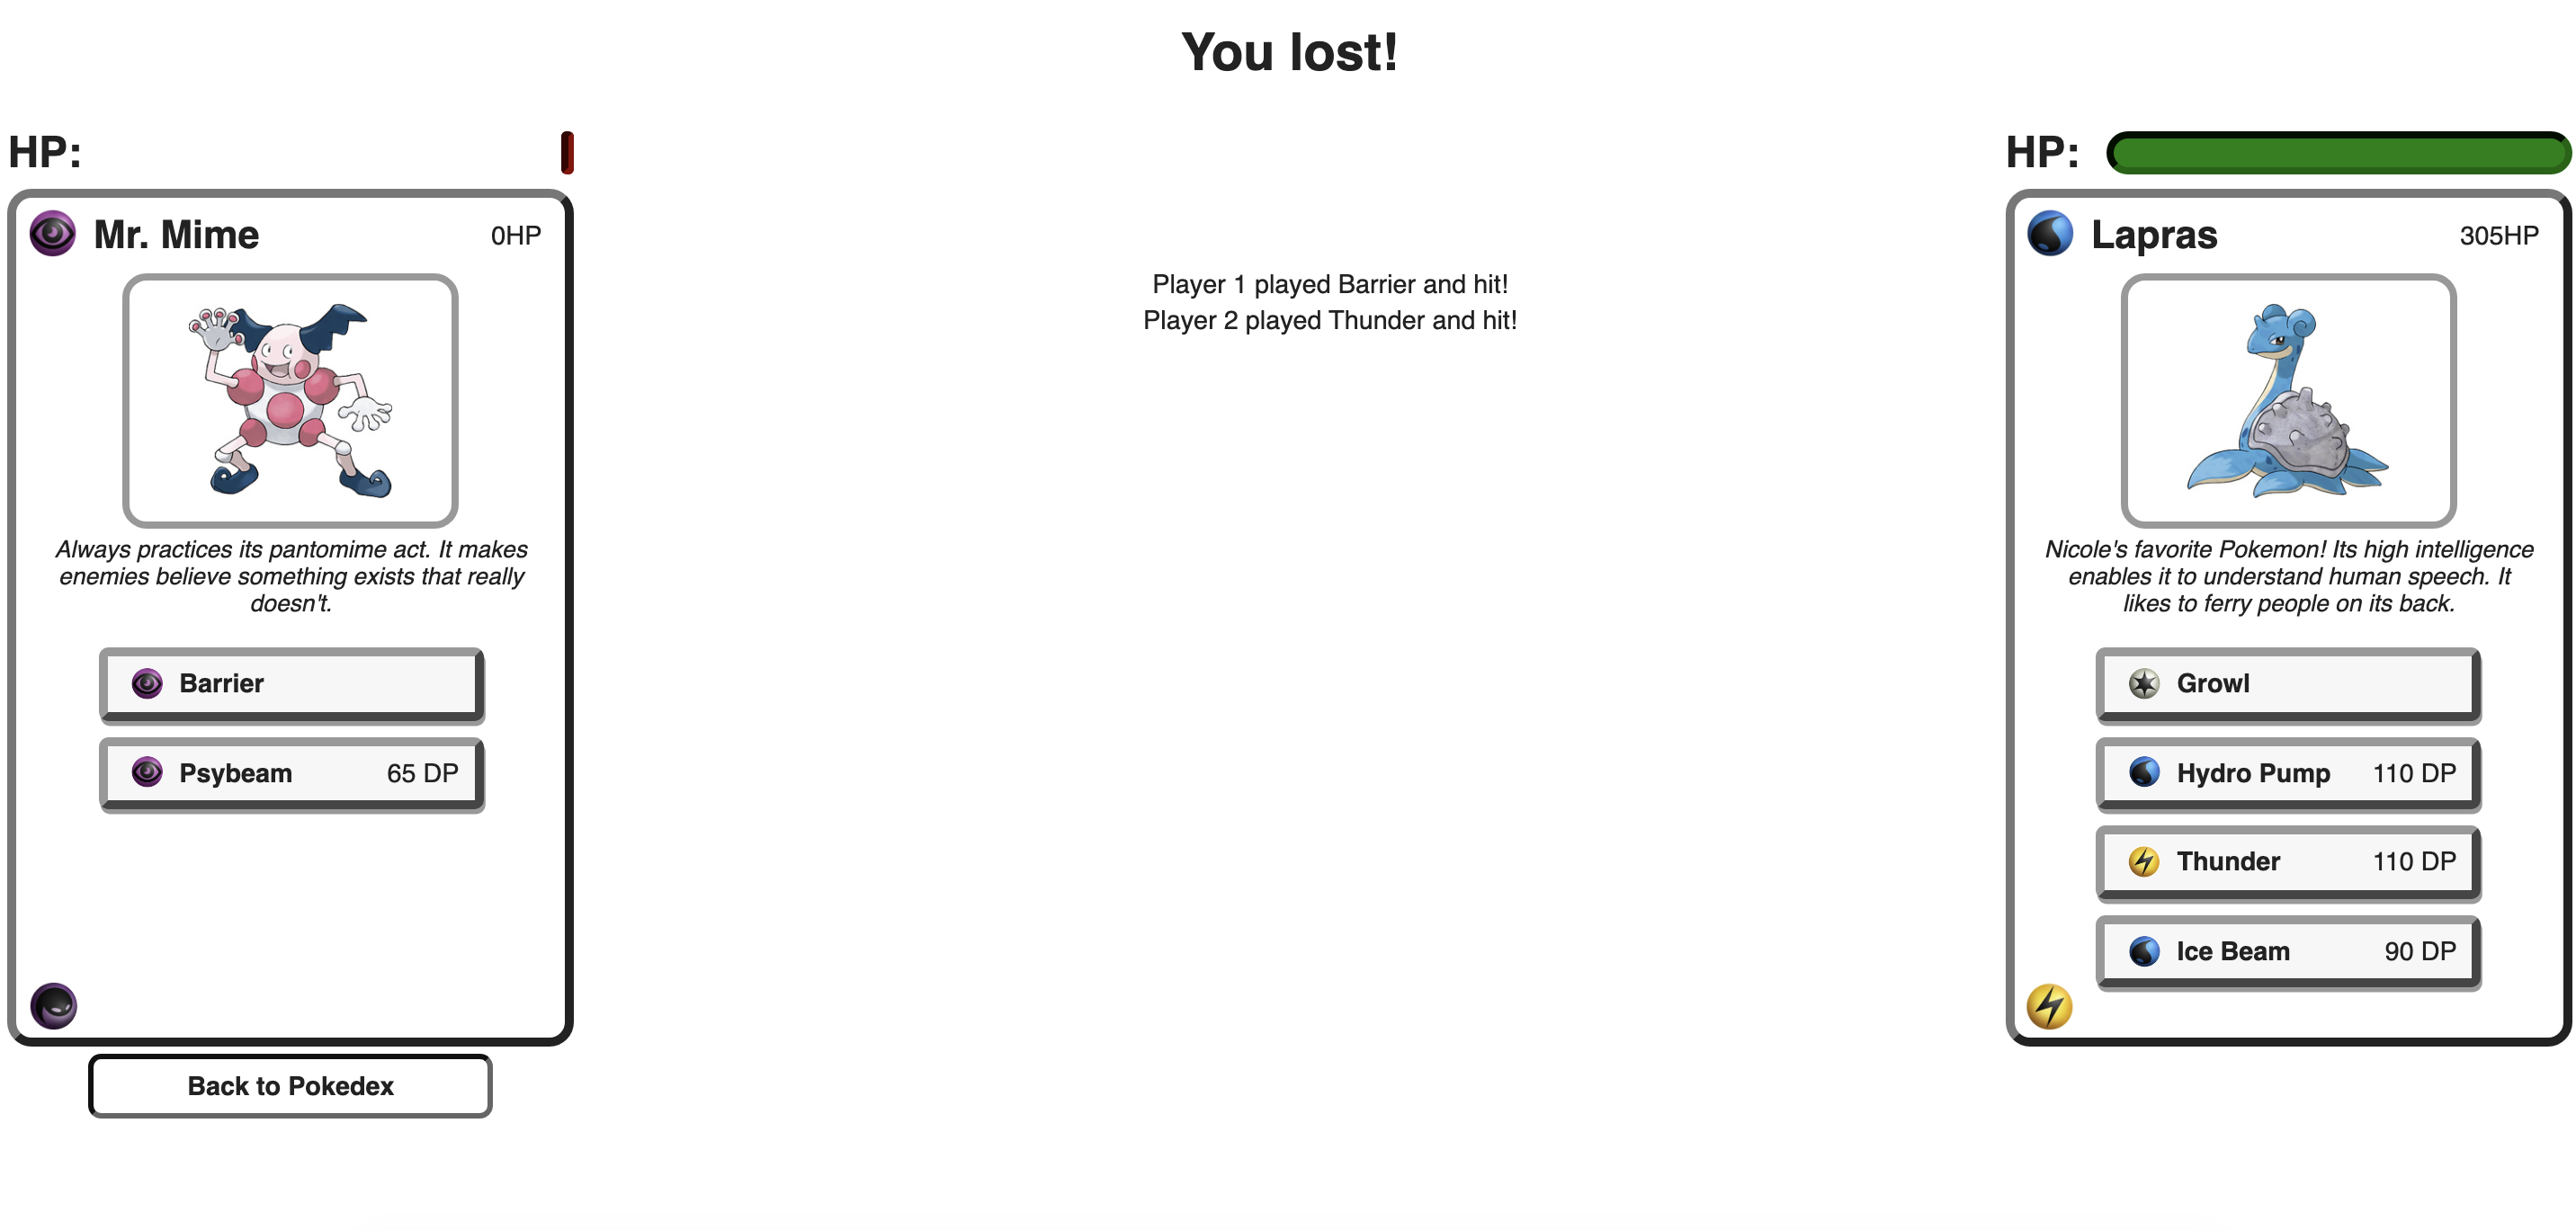
The #endgame button will appear underneath the left card when visible.
You should display #p1-turn-results with the data populated in p1-move and
p1-result, but if you were the last one to make a move (e.g., your move causes P2's HP to
go to 0 before they make a move), p2-result and p2-move will be returned as null. Whenever
either p2-result or p2-move are returned as null, #p2-turn-results should be hidden.
When clicked, the #endgame button should switch back to the Pokedex View and the following should happen:
- The
#endgamebutton,#results-container, and#p2should become hidden. - The
.hp-infocontainer for#p1should be hidden. - The
#start-btnshould be re-displayed. - Whatever Pokemon you chose most-recently should populate
#p1, in case the user wants to use that Pokemon again for a subsequent game. - The heading (
h1) text should change to Your Pokedex. - The default HP value and health bar for your Pokemon should be reset in the Main View. Because you are to update the Pokemon's current HP on the card for each move made in the game, you'll need to have some way to have access to the original move when changing back to the Main View. You may save the current Pokemon's original HP as a module-global variable to do so, but this value should not change during the game mode.
If you win the game and the opponent has a Pokemon that you have
not found, you should add it to your Pokedex by adding it to your collection of found Pokemon (ie.
adding the .found class to the corresponding sprite icon in the Pokedex). You should also
add a click event handler to the found sprite to allow it to be chosen for another game (similar to
how you did with the three starter Pokemon).
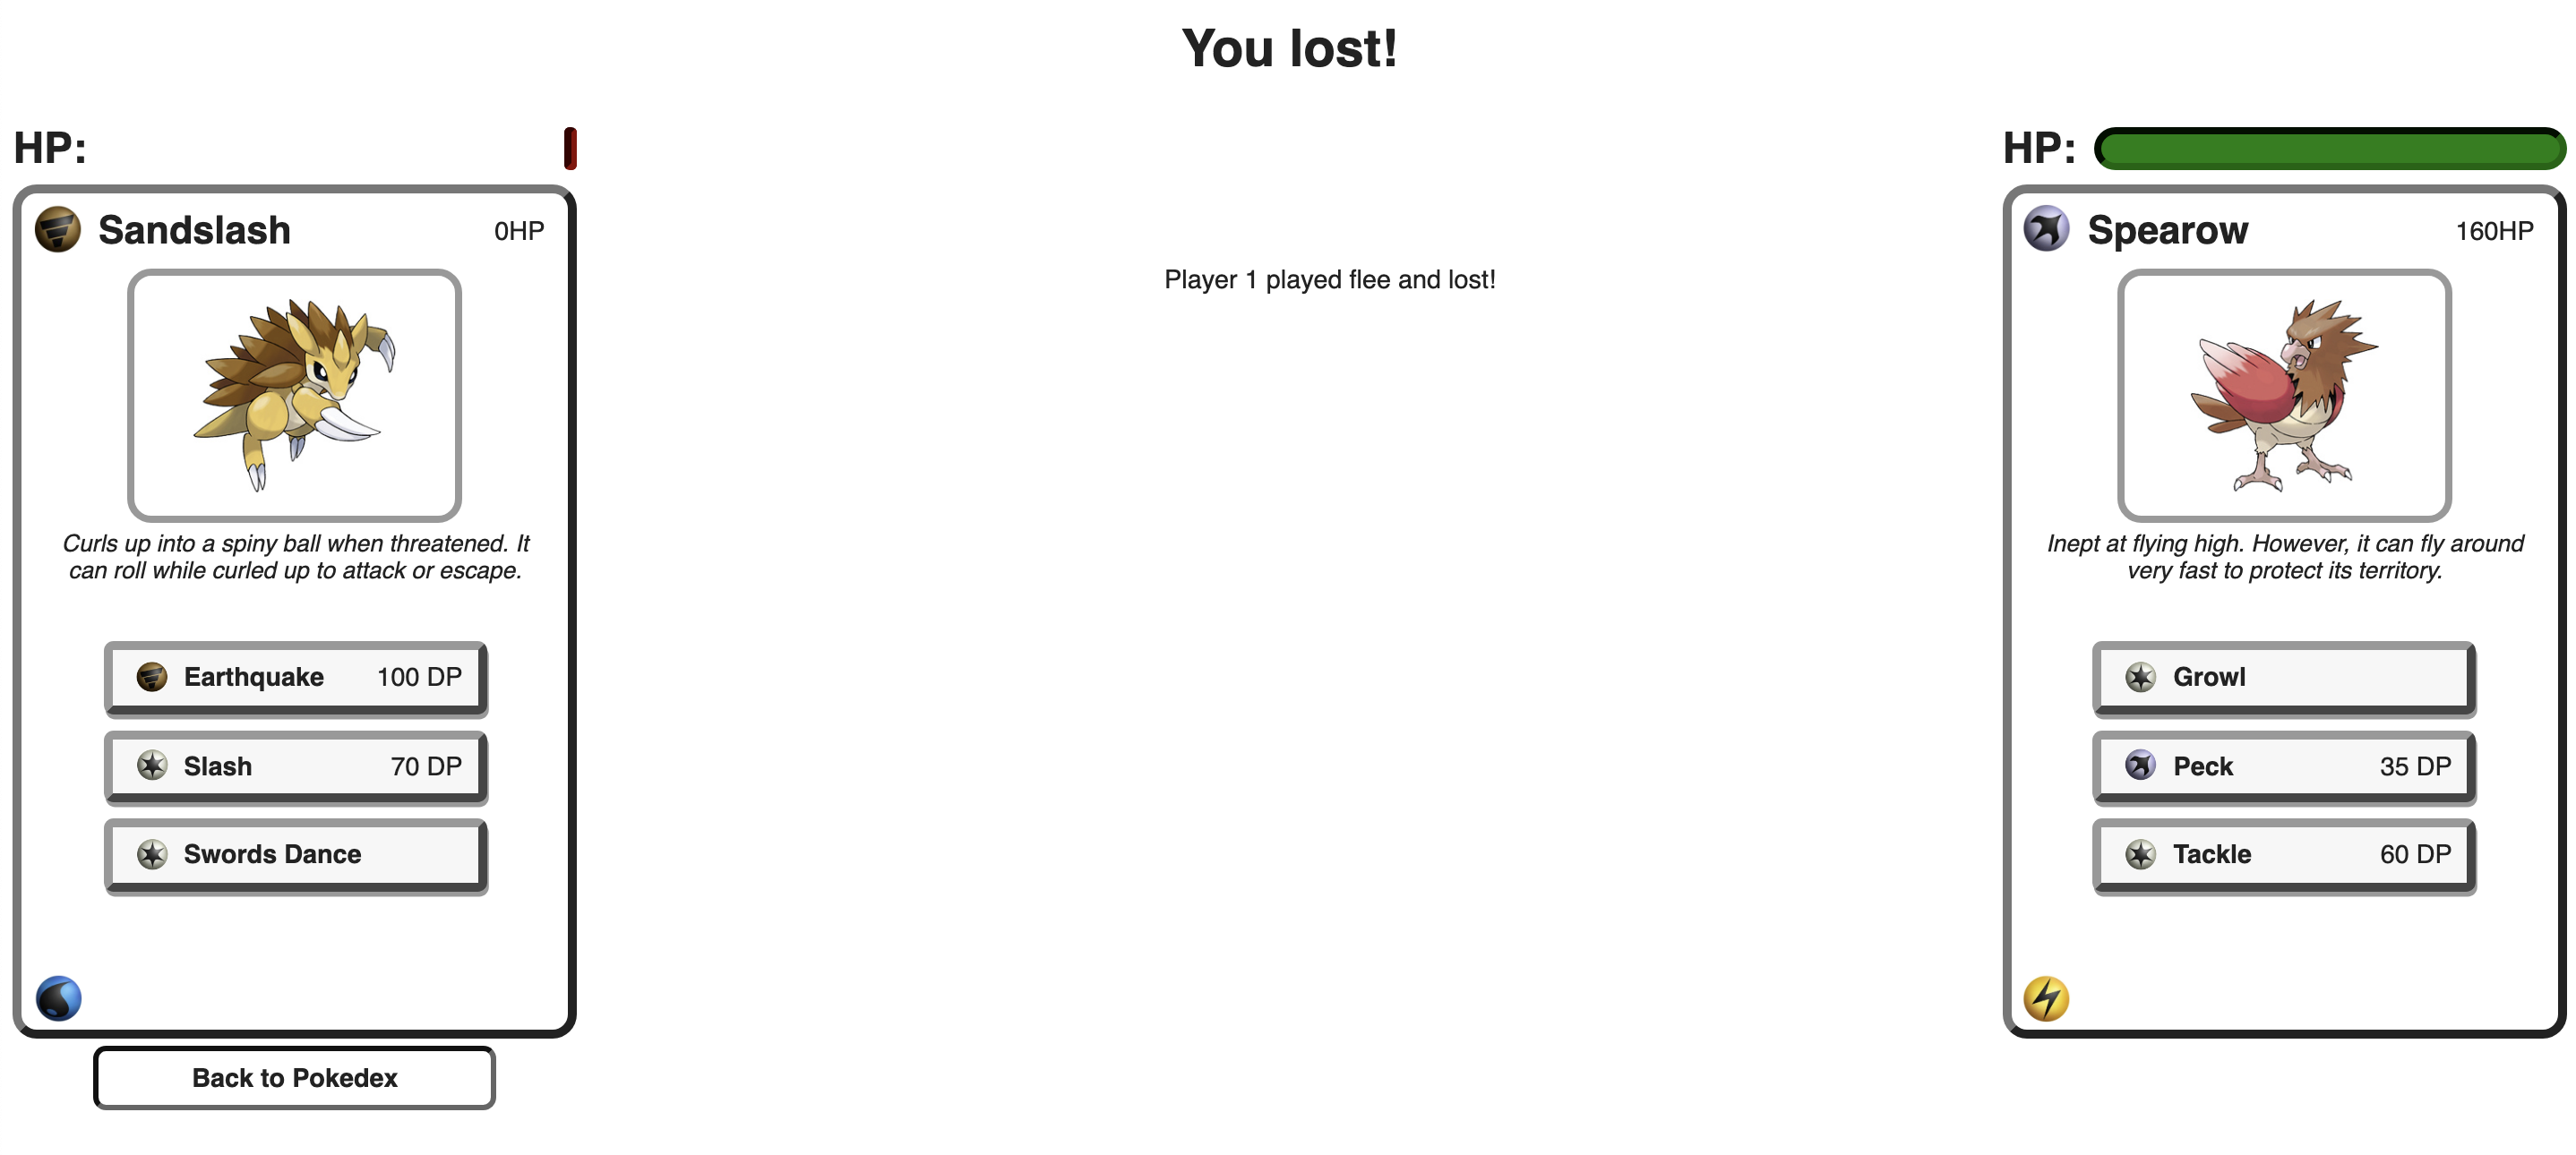
Fleeing: There is a button under your card during the game labeled "Flee the Battle". "Flee" is
a move that causes you to lose the game immediately. If clicked, this should make a POST request to
game.php similar to other moves but passing a value flee for the move parameter (Hint: Make sure to reduce redundancy). This request will terminate your game and declare your opponent as the winner by automatically setting your HP
to 0. You should display a message as described in the "lose case" above when your receive the
response to playing this move. Note that your Pokemon will flee immediately before the second
player makes a move, so they will not have any move results returned (you should not display any
results for Player 2, just your flee move results).
The screenshot below is an example expected output after a player clicks the flee button and updates the view
based on a successful response from game.php.
Handling errors: There are a few possible error-cases that could happen when making requests to the web services, and ideally you'd want to show user-friendly error messages and disable/enable different elements appropriately. However for the scope of HW3 and consistency with grading, you should handle error cases in the "catch" statement of a fetch call chain with console.error to log error information in the console as follows:
... // rest of fetch pipeline
.catch(console.error);
Use checkStatus with fetch shown in class to throw an Error if a response has a bad status code. As a reminder, this thrown Error will be caught in the fetch catch statement. Similar to using checkStatus in CP3, you are expected to document the provided checkStatus function with JSDoc. Please do not modify the provided checkStatus function.
For full credit, your page must not only match the external requirements listed above, you must also demonstrate that you understand what it means to write code following a set of programming standards. This includes the following requirements:
- Your JS should maintain good code quality as demonstrated in class and detailed in the CSE 154 Code Quality Guidelines. We also expect you to implement relevant feedback from previous assignments. As usual, we have included some common things relevant to this assignment below.
- You should be reducing redundancy throughout your code.
- All programatically-generated image DOM elements should be given an alt tag.
- Your
.jsfile must be in the module pattern and"use strict"; - Do not use any global variables, and minimize the use of module-global variables. Do not ever
store DOM element objects, such as those returned by the
document.getElementByIdfunction, as module-global variables. Other variables should be localized as much as possible. - If a particular literal value is used frequently, declare it as a module-global "constant" (
const)IN_UPPER_CASEand use the constant in your code. - Avoid unnecessary fetch requests to web services - you should only make requests where needed to update DOM elements based on the expected behavior outlined in this spec. We strongly recommend walking through different interactions on your page with the Networks table to see how often you are making fetch requests.
- You should make an extra effort to minimize redundant JavaScript code. Capture common operations as functions to keep code size and complexity from growing. You can reduce your code size by using the
thiskeyword in your event handlers. - Separate content (HTML), presentation (CSS), and behavior (JS). Your JS code should use styles and classes from the CSS when provided rather than manually setting each style property in the JS. For example, rather than setting the
.style.displayof a DOM object to make it hidden/visible, instead, add/remove the.hiddenclass in the provided CSS to the object'sclassList. You may find theclassList's toggle function helpful for toggling certain classes. - Note that when you are computing a style property (such as width percentages), you will need to set the values in JS (make sure you understand why classes won't work easily here!)
- Your page must pass the CSE 154 ESLint (which runs every time you push to Gitlab)
- Do not include any files in your final repository other than those outlined in "Starter Files and Final Deliverables".
- Proper documentation on the
.jsfile and all functions
The grading distribution for this assignment will be broken down as follows (subject to small changes):
- External Correctness: 45-55%
- Internal Correctness: 35-45%
- Documentation: 5-10%
As with other CSE 154 HW assignments, you may not work with other students on HW3, and all work must be your own. Submissions found sharing code or using code from resources online will be subject to the University's Academic Misconduct process. You may also not place your solution to a publicly-accessible web site, neither during nor after the school quarter is over. Doing so is considered a violation of our course academic integrity policy. As a reminder: This page page states:
The Paul G Allen School has an entire page on Academic Misconduct within the context of Computer Science, and the University of Washington has an entire page on how Academic Misconduct is handled on their Community Standards and Student Conduct Page. Please acquaint yourself with both of those pages, and in particular how academic misconduct will be reported to the University.