Mortar is a software to drive an altazimuth mounted (eg. dobsonian) telescope using input from Stellarium. Mortar runs on a Raspberry Pi and it is connected with Stellarium running on the same Pi, or on a remote computer. It can use popular DRV8825 or less common DRV8814 drivers.
I wanted to make a simple to use interface to drive a dobsonian telescope. It should use original mount, common electronics and 3D-printed parts. It should not need extensive calibration (eg. searching Polaris). It should not need doing conversion between equatorial and altazimuth coordinates.
- Stellarium
- pigpio library
- Qt and qmake
- Qt serialport module
- Qt gamepad module
- Qt charts module
- xdo3 library
- Altzimuth telescope
- 3D-printed parts and bearings - see mechanical/teleskop.FCStd Parts are made with FreeCAD Assembly3 branch.
- Raspberry Pi
- Two bipolar stepper motors
- Two stepper motor drivers DRV8814 OR two DRV8825 drivers (L298 is deprecated in master, see wiringpi-legacy branch)
- (Optional) Gamepad
- (Optional) GPS module
- (Optional) touch screen
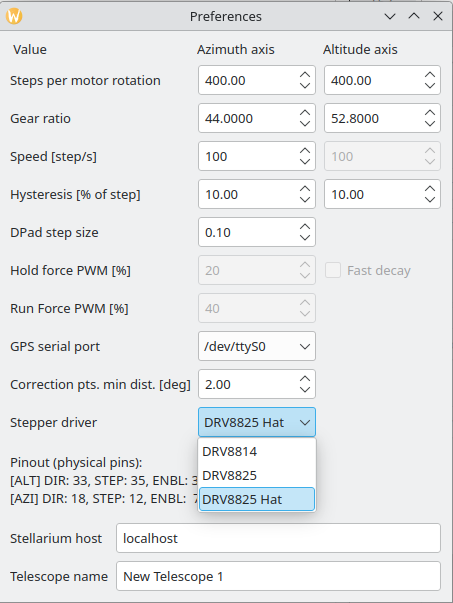
Mortar can use DRV8825 drivers, one per motor. User chooses between DRV8814 and DRV8825 selecting the required one in the preferences. Pinout is also shown here.

"DRV8825 Hat" has pinout adjusted for single board WaveShare Stepper Motor HAT
An integrated shield board for Raspberry Pi is available in a separate repository MortarShield.
 It can be cloned as submodule for this repository.
Pins for DRV8814 drivers are described in MotorWorker.cpp
Both drivers:
Decay: GPIO 22, physical pin 15
xI0: GPIO17, physical pin 11, current regulation
xI1: GPIO27, physical pin 13
Altitude driver:
AENBL: GPIO 4, physical pin 7
APHASE: GPIO 5, physical pin 29
BENBL: GPIO 18, physical pin 12
BPHASE: GPIO 6, physical pin 31
Azimuth driver:
AENBL: GPIO 20, physical pin 38
PHASE: GPIO 12, physical pin 32
BENBL: GPIO 21, physical pin 21
BPHASE: GPIO 26, physical pin 37
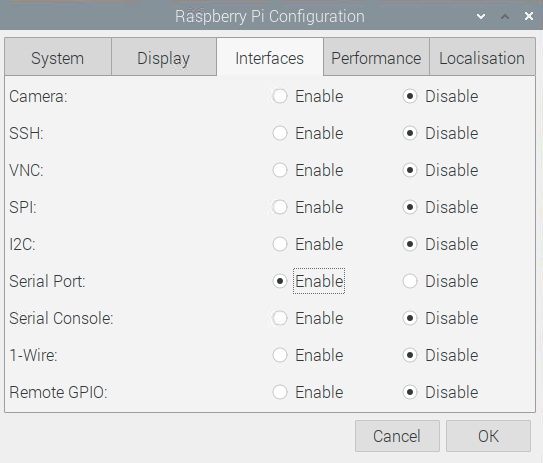
If you want use GPS, enable UART in the rpi-config utility.
Download, compile and run the software.
sudo apt install qtbase5-dev libqt5gamepad5-dev libqt5serialport5-dev libqt5charts5-dev libxdo-dev pigpio
git clone --recurse-submodules https://github.com/kwahoo2/Mortar
cd Mortar
qmake -makefile -o Makefile Mortar.pro
make
sudo ./Mortar
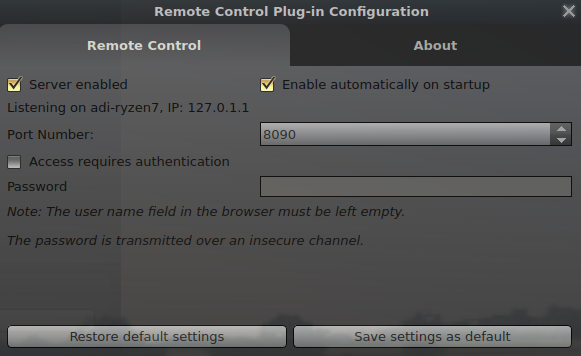
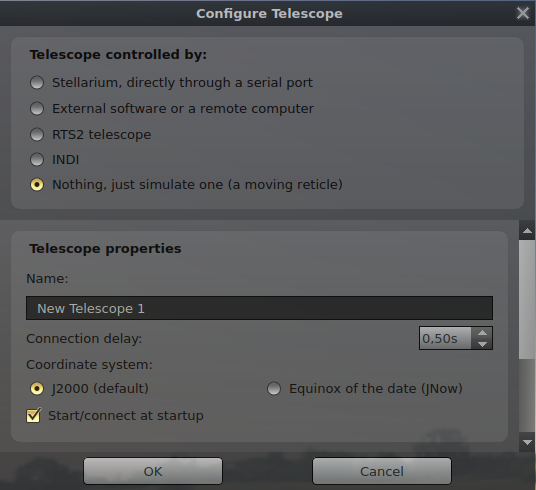
Run Stellarium. Set remote access and configure the telescope.
In the Mortar open the preferences and set the telescope name from Stellarium. If you run Stellarium from remote host replace "localhost" with its IP. Set motor driver type and gear ratios.
You may use a gamepad to move your telescope. Analog stick works as coarse adjustment, dpad moves a stepper motor by a small (size is adjustable in options) step. R2 button emulates F11, and it is useful for Stellarium fullscreen toggle. Alternatively, if you do not have a gamepad, you can move the telescope with arrows in the main window.
-
If Mortar is connected to Stellarium "Azimuth" and "Altitude" values should be same as in the Stellarium.
-
If you have a GPS module connected, you should see GPS time, date and location values in Mortar. Click "Sync Stellarium with GPS" to correct your time and position. This step is optional. You may set these values manually in Stellarium.
-
Point the telescope on an object on the sky. You may use gamepad input for this or click arrows in the Mortar window. Point the virtual telescope in the Stellarium on the same object.
-
Click "Sync with Stellarium". Both programs are synced now. Real telescope will follow the virtual one.
-
While Mortar supports fine microstepping, constant movement may introduce vibrations. To prevent this a "Start Stop mode" is available. When enabled Mortar will move the telescope in predefined intervals.
If you see something like this in the console:
2022-12-21 20:00:32 gpioPWM: pigpio uninitialised, call gpioInitialise()
2022-12-21 20:00:32 gpioPWM: pigpio uninitialised, call gpioInitialise()
that means you started Mortar as a normal user. pigpio requires root privileges for PWM. Writing password for sudo can be tedious, especially when there is no keyboard connected. There is a method that allows running sudo without password:
Edit /etc/sudoers Add following line (replacing yourname and MortarLocation):
yourname ALL = NOPASSWD:/MortarLocation/Mortar
Create a script called eg Mortar.sh that contains (replace MortarLocation):
#!/bin/sh
sudo /MortarLocation/Mortar
Make it executable:
chmod +x Mortar.sh
Now you can run Mortar by double clicking on the Mortar.sh script.
Raspberry starts GPIO in an unknown state, stepper motors may consume some energy, before Mortar is even started. To avoid this, you can set AENBL and BENBL pins to low at the RPi OS boot.
Edit:
/boot/config.txt
and add following lines:
gpio=4=op,dl
gpio=18=op,dl
gpio=20=op,dl
gpio=21=op,dl
There is a very basic Python script (mortartest.py) that allows using the MortarShield as basic stepper driver. It can be used as an example for building other scripts too.
Before running it you have to have the pigpio daemon running:
sudo pigpiod
For testing the board invoke the script:
python mortartest.py
It will move both motors 50 steps forward and backward.
To move by requester number of steps, import the script in the Python intepreter:
python
import mortartest
mortartest.move_stepper_to(50, 0) # move first (0) stepper 50 steps forward, ALT stepper is 0, AZI is 1
wiringpi-legacy branch contains a deprecated implementation using WiringPi instead of pigpio. That brach supports full-step operation only.
Check LICENSE for details.
Mortar uses parts of pigpio-cpp licensed on Unlicense License.


