Control your garage door using a secure web application running on your Raspberry Pi.
Originally based on this howchoo article by Tyler Jones.
- Rasberry Pi 1 Model A/B/B+ (not compatible)
- Raspberry Pi 2 Model B
- Raspberry Pi 2 Model B v1.2
- Raspberry Pi 3 Model B
- Rasberry Pi 3 Model B+
- Rasberry Pi 4 Model B
Any garage door opener that uses a wired wall opener. We will be wiring our Pi to the same connectors that your wired wall opener is connected to. See the example photo below in the wiring section.
- Raspbian Stretch
- Raspbian Buster (Buster 10.1-10.9)
- Raspberry Pi OS (Buster 10.10)
Links are to Amazon (not affiliate links)
- Raspberry Pi
- Optional Case with Fan to keep cool, protected, and mounted to a wall
- SainSmart 2-Channel Relay Module or similar 5v relay
- 22awg Electrical Wire 100 ft
- 2 Magnetic Reed Switches or similar
- Double sided tape or nails/screws for mounting reed switches
- Wire Connectors or Butt Connectors
- Female Jumper Wires
You can find instuctions on How to set up your Raspberry Pi without a keyboard, monitor, or mouse.
You will need to be comfortable using wire strippers in order to install the hardware for this project. The relay and the 2 magnetic reed switches are much easier to connect to the Raspberry Pi if you cut your wires and use a butt connector to attach it to a female jumper wire.
First we will connect the Raspberry Pi to the garage door opener. Find the correct connections for your garage door opener. You can find them by tracing the wires from your wall mounted button to the opener. See the picture below.

Attach wires from the garage door opener to your relay.
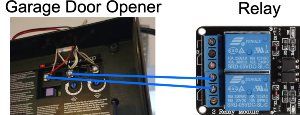
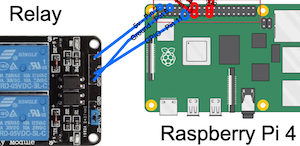
- Connect the VCC pin on the relay to pin 2 on the Raspberry Pi (5v).
- Connect the ground pin on the relay to pin 6 on the Raspberry Pi (ground).
- Connect IN1 pin on the relay to pin 11 on the Raspberry Pi (GPIO).
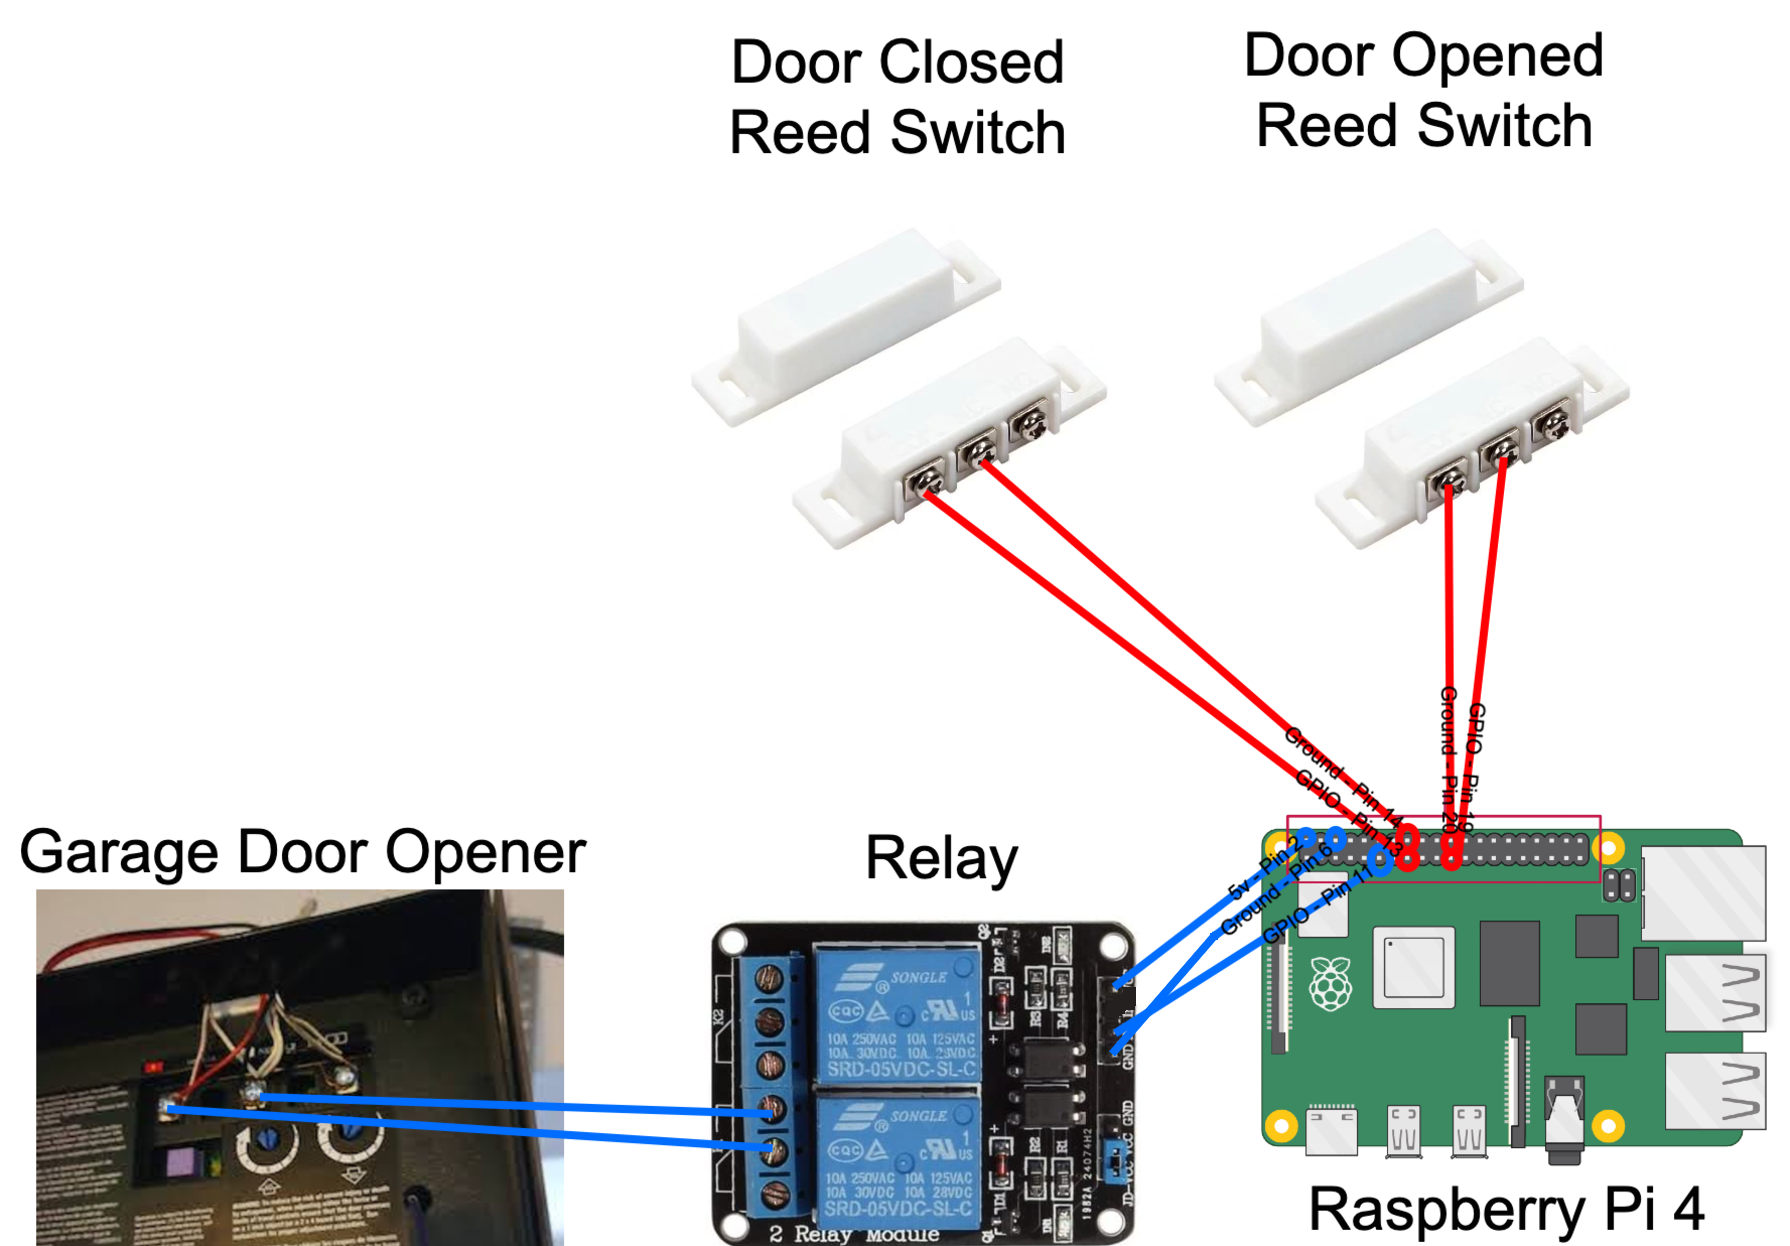
Close your garage door and then find a place on the garage door frame where you can attach one of the magnetic reed switches. Attach the side with the wire connections to the frame using tape/screws/nails, and then connect the magnet half to the actual garage door. Make sure that when you open and close the garage door, the reed switches don't get knocked off.
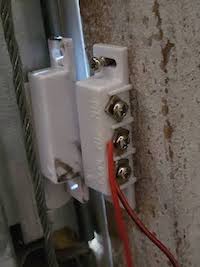
- Attach a wire from the NC connection on the magnetic reed switch to pin 13 on the Raspberry Pi (GPIO)
- Attach a wire from the COM/Ground connection on the magnetic reed switch to pin 14 on the Raspberry Pi (ground)
Open your garage door and then find a place on the garage door grame where you can attach the second magnetic reed switch. Attach the side with the wire connections to the frame using tape/screws/nails, and then connect the magnet half to the actual garage door. If you have a wooden garage door, then you may find it easier to attach near the top of the frame. If you have a sectional/roll-up garage door, then you may find it easier to attach this to the metal structure near the ceiling.

- Attach a wire from the NC connection on the magnetic reed switch to pin 19 on the Raspberry Pi (GPIO)
- Attach a wire from the COM/Ground connection on the magnetic reed switch to pin 20 on the Raspberry Pi (ground)
The open sensor, close sensor, and relay can be wired to the following physical pins:
- 3, 5, 7, 8, 10, 11, 12, 13, 15, 16, 18, 19, 21, 22, 23, 24, 26, 29, 31, 32, 33, 35, 36, 37, 38, 40.
- These are physical pins of the Raspberry Pi
- Default Pins:
- Open Sensor - Pin 19
- Close Sensor - Pin 13
- Relay - Pin 11
This is extremely dangerous. Only do this if you understand the risks involved.
- Go to a DDNS service provider Dynu.com is recommended
- Create a dynamic DNS domain with the provider
- Make sure you link the domain to your IPv4 and/or IPv6 address whatismyipaddress.com
- This domain will be used to access your garage and during the installation process
- Make sure that if your IP address changes that dynu.com updates the DDNS record
- Follow the instructions here https://www.dynu.com/DynamicDNS/IPUpdateClient/RaspberryPi-Dynamic-DNS
This will make your network visible to the public internet. Make sure you have correctly configured your router and any firewalls.
- Access your Raspberry Pi over the internet
- You'll need to find your routers manual to learn how to configure port fowarding to Port 443 and Port 80 on your Pi. You need to forward external ports 443 and 80 to internal ports 443 and 80 respectively
You have two options for install the Garage-Pi-v2 Software. It is recommended that you build the software from source. This will ensure that any small changes made to your raspberry pi's setup and OS are accounted for when the software is setup.
- Open up a terminal
- ssh into your Pi
ssh pi@192.168.1.1- Use the IP address of your Pi
- default password is "raspberry"
- Install docker
curl -sSL https://get.docker.com | sh- This will run the install script right from docker.com
- Copy the source files to the Pi from Github
sudo apt-get -y install gitsudo git clone https://github.com/kylejramstad/garage-pi-v2.git
- Build the Docker Image
sudo ./garage-pi-v2/scripts/build.sh --setup- This may take some time. Be patient.
Don't do this step if you installed Garage-Pi-v2 by Building from source
- Open up a terminal
- ssh into your Pi
ssh pi@192.168.1.1- Use the IP address of your Pi
- default password is "raspberry"
- Download Docker & Garage-Pi by running
bash <(curl -s https://raw.githubusercontent.com/kylejramstad/garage-pi-v2/master/scripts/download.sh)
- Open a web browser to the domain you setup
- You should notice that a http address should redirect to a https address
- Follow the onscreen instructions to create your first user
- After logging in, click the setting to add users, delete users, change your password, setup your Amazon Alexa or Google Assistant, adjust the logs, etc.
- Original Garage-Pi Created by Tyler Jones at Howchoo.com and on Github
- Favicon made by Freepik from www.flaticon.com is licensed by CC 3.0 BY