(Live Demo of NuttX on TinyEMU)
Read the articles...
-
"Too many Embedded Logs? PureScript might help (Ox64 BL808 SBC / Apache NuttX RTOS)"
-
"(Homage to MakeCode) Coding Ox64 BL808 SBC the Drag-n-Drop Way"
-
"QuickJS JavaScript Engine on a Real-Time Operating System (Apache NuttX RTOS)"
-
"Zig runs ROM FS Filesystem in the Web Browser (thanks to Apache NuttX RTOS)"
-
"TCC RISC-V Compiler runs in the Web Browser (thanks to Zig Compiler)"
-
"Automated Testing with Ox64 BL808 Emulator (Apache NuttX RTOS)"
-
"Apache NuttX RTOS in a Web Browser? Adventures with TinyEMU and VirtIO"
Apache NuttX RTOS is a tiny operating system for 64-bit RISC-V Machines and many other platforms. (Arm, x64, ESP32, ...)
TinyEMU is a barebones RISC-V Emulator that runs in a Web Browser. (Thanks to WebAssembly)
Can we boot NuttX in a Web Browser, with a little help from TinyEMU? Let's find out!
Why are we doing this?
We might run NuttX in a Web Browser and emulate the Ox64 BL808 RISC-V SBC. Which is great for testing NuttX Apps like Nim Blinky LED! Or even LVGL Apps with VirtIO Framebuffer?
Also imagine: A NuttX Dashboard that lights up in Real-Time, as the various NuttX Modules are activated! This is all possible when NuttX runs in a Web Browser!
(Sorry QEMU Emulator is a bit too complex to customise)
Read the article...
How to run TinyEMU in the Command Line?
We begin with TinyEMU in the Command Line, then move to WebAssembly. To install TinyEMU on macOS:
brew tap fernandotcl/homebrew-fernandotcl
brew install --HEAD fernandotcl/fernandotcl/tinyemu
temu https://bellard.org/jslinux/buildroot-riscv64.cfg
Or build TinyEMU on Ubuntu and macOS with these steps.
(Generate the Emscripten JavaScript)
Read the article...
Where in RAM will NuttX boot?
TinyEMU is hardcoded to run at these RISC-V Addresses (yep it's really barebones): riscv_machine.c
#define LOW_RAM_SIZE   0x00010000 /* 64KB */
#define RAM_BASE_ADDR  0x80000000
#define CLINT_BASE_ADDR 0x02000000
#define CLINT_SIZE      0x000c0000
#define DEFAULT_HTIF_BASE_ADDR 0x40008000
#define VIRTIO_BASE_ADDR 0x40010000
#define VIRTIO_SIZE      0x1000
#define VIRTIO_IRQ       1
#define PLIC_BASE_ADDR 0x40100000
#define PLIC_SIZE      0x00400000
#define FRAMEBUFFER_BASE_ADDR 0x41000000

#define RTC_FREQ 10000000
#define RTC_FREQ_DIV 16 /* arbitrary, relative to CPU freq to have a
                           10 MHz frequency */
Thus we shall compile NuttX Kernel to boot at 0x8000_0000.
We begin with the NuttX Port for QEMU 64-bit RISC-V...
(CLINT and PLIC Addresses are defined here in NuttX)
Later we'll change the above addresses to emulate a RISC-V SoC, like Ox64 BL808.
Read the article...
What's inside a TinyEMU Config?
RISC-V Virtual Machines for TinyEMU are configured like this: buildroot-riscv64.cfg
/* VM configuration file */
{
  version: 1,
  machine: "riscv64",
  memory_size: 256,
  bios: "bbl64.bin",
  kernel: "kernel-riscv64.bin",
  cmdline: "loglevel=3 swiotlb=1 console=hvc0 root=root rootfstype=9p rootflags=trans=virtio ro TZ=${TZ}",
  fs0: { file: "https://vfsync.org/u/os/buildroot-riscv64" },
  eth0: { driver: "user" },
}
bbl64.bin is the Barebox Bootloader. (Similar to U-Boot)
Will NuttX go into bios or kernel?
According to copy_bios, the BIOS is mandatory, the Kernel is optional.
Thus we put NuttX Kernel into bios and leave kernel empty.
copy_bios will load NuttX Kernel at RAM_BASE_ADDR (0x8000_0000).
Read the article...
Will NuttX boot on TinyEMU?
NuttX for QEMU RISC-V is already configured to boot at 0x8000_0000: ld.script
SECTIONS
{
  . = 0x80000000;
  .text :
    {
      _stext = . ;
So we build NuttX for QEMU RISC-V (64-bit, Flat Mode)...
## Download WIP NuttX
git clone --branch tinyemu https://github.com/lupyuen2/wip-pinephone-nuttx nuttx
git clone --branch tinyemu https://github.com/lupyuen2/wip-pinephone-nuttx-apps apps

## Configure NuttX for QEMU RISC-V (64-bit, Flat Mode)
cd nuttx
tools/configure.sh rv-virt:nsh64
make menuconfig
## Device Drivers
##   Enable "Simple AddrEnv"
##   Enable "Virtio Device Support"

## Device Drivers > Virtio Device Support
##   Enable "Virtio MMIO Device Support"

## Build Setup > Debug Options >
##   Enable Debug Features
##   Enable "Debug Assertions > Show Expression, Filename"
##   Enable "Binary Loader Debug Features > Errors, Warnings, Info"
##   Enable "File System Debug Features > Errors, Warnings, Info"
##   Enable "C Library Debug Features > Errors, Warnings, Info"
##   Enable "Memory Manager Debug Features > Errors, Warnings, Info"
##   Enable "Scheduler Debug Features > Errors, Warnings, Info"
##   Enable "Timer Debug Features > Errors, Warnings, Info"
##   Enable "IPC Debug Features > Errors, Warnings, Info"
##   Enable "Virtio Debug Features > Error, Warnings, Info"

## Application Configuration > Testing >
##   Enable "OS Test Example"

## RTOS Features > Tasks and Scheduling >
##   Set "Application Entry Point" to "ostest_main"
##   Set "Application Entry Name" to "ostest_main"
## Save and exit menuconfig

## Build NuttX
make

## Export the Binary Image to nuttx.bin
riscv64-unknown-elf-objcopy \
  -O binary \
  nuttx \
  nuttx.bin

## Dump the disassembly to nuttx.S
riscv64-unknown-elf-objdump \
  --syms --source --reloc --demangle --line-numbers --wide \
  --debugging \
  nuttx \
  >nuttx.S \
2>&1Read the article...
How to boot NuttX on TinyEMU?
We create a TinyEMU Config for NuttX and run it: root-riscv64.cfg
$ cat nuttx.cfg
/* VM configuration file */
{
  version: 1,
  machine: "riscv64",
  memory_size: 256,
  bios: "nuttx.bin",
}

$ temu nuttx.cfg
TinyEMU hangs, nothing happens. Let's print something to TinyEMU HTIF Console...
Read the article...
What's HTIF?
From RISC-V Spike Emulator...
HTIF is a tether between a simulation host and target, not something that's supposed to resemble a real hardware device. It's not a RISC-V standard; it's a UC Berkeley standard.
Bits 63:56 indicate the "device".
Bits 55:48 indicate the "command".
Device 1 is the blocking character device.
Command 0 reads a character
Command 1 writes a character from the 8 LSBs of tohost
TinyEMU handles HTIF Commands like this: riscv_machine.c
static void htif_handle_cmd(RISCVMachine *s)
{
uint32_t device, cmd;
device = s->htif_tohost >> 56;
cmd = (s->htif_tohost >> 48) & 0xff;
if (s->htif_tohost == 1) {
/* shuthost */
printf("\nPower off.\n");
exit(0);
} else if (device == 1 && cmd == 1) {
uint8_t buf[1];
buf[0] = s->htif_tohost & 0xff;
s->common.console->write_data(s->common.console->opaque, buf, 1);
s->htif_tohost = 0;
s->htif_fromhost = ((uint64_t)device << 56) | ((uint64_t)cmd << 48);
} else if (device == 1 && cmd == 0) {
/* request keyboard interrupt */
s->htif_tohost = 0;
} else {
printf("HTIF: unsupported tohost=0x%016" PRIx64 "\n", s->htif_tohost);
}
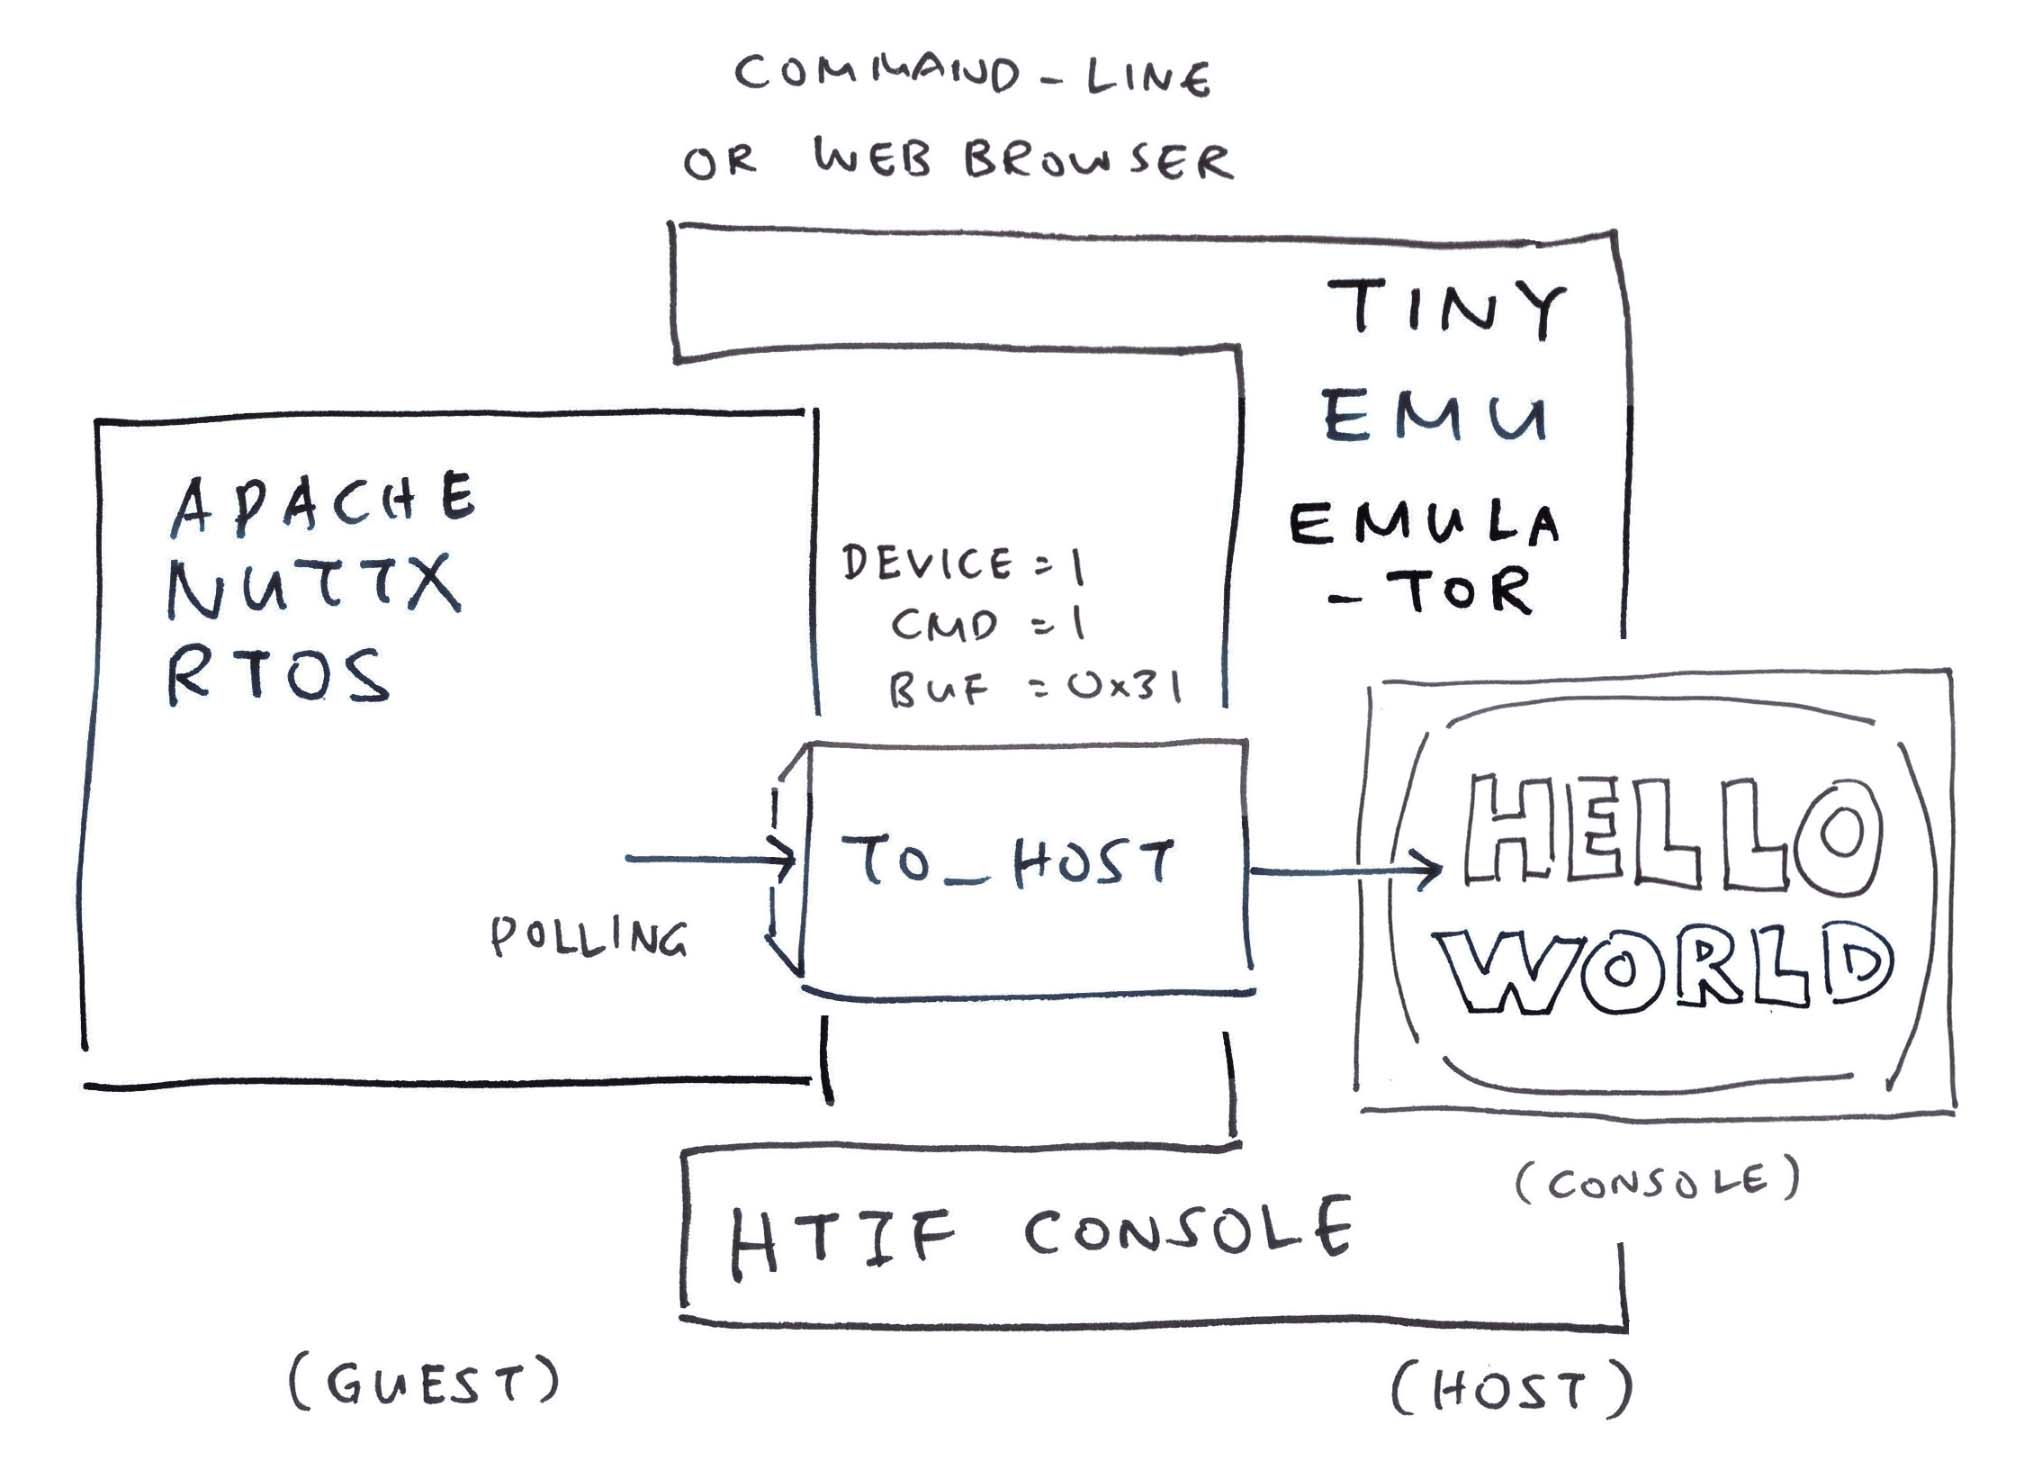
}So to print 1 (ASCII 0x31) to the HTIF Console...
-
device
= (htif_tohost >> 56)
= 1 -
cmd
= (htif_tohost >> 48)
= 1 -
buf
= (htif_tohost & 0xff)
= 0x31
Which means we write this value to htif_tohost...
- (1 << 56) | (1 << 48) | 0x31
= 0x0101_0000_0000_0031
Where is htif_tohost?
According to riscv_machine_init and htif_write, htif_tohost is at DEFAULT_HTIF_BASE_ADDR: 0x4000_8000
Thus we print to HTIF Console like this...
// Print `1` to HTIF Console
*(volatile uint64_t *) 0x40008000 = 0x0101000000000031ul;
Let's print something in our NuttX Boot Code...
Read the article...
How to print to HTIF Console in the NuttX Boot Code? (RISC-V Assembly)
Based on Star64 Debug Code, we code this in RISC-V Assembly...
/* Load HTIF Base Address to Register t0 */
li  t0, 0x40008000

/* Load to Register t1 the HTIF Command to print `1` */
li  t1, 0x0101000000000031
/* Store 64-bit double-word from Register t1 to HTIF Base Address, Offset 0 */
sd  t1, 0(t0)

/* Load to Register t1 the HTIF Command to print `2` */
li  t1, 0x0101000000000032
/* Store 64-bit double-word from Register t1 to HTIF Base Address, Offset 0 */
sd  t1, 0(t0)

/* Load to Register t1 the HTIF Command to print `3` */
li  t1, 0x0101000000000033
/* Store 64-bit double-word from Register t1 to HTIF Base Address, Offset 0 */
sd  t1, 0(t0)
We insert the above code into the NuttX Boot Code: qemu_rv_head.S
Does it work?
NuttX prints to the HTIF Console yay! Now we know that NuttX Boot Code is actually running on TinyEMU...
$ temu nuttx.cfg
123
Let's fix the NuttX UART Driver...
Read the article...
NuttX on TinyEMU has been awfully quiet. How to fix the UART Driver so that NuttX can print things?
NuttX is still running on the QEMU UART Driver (16550). Let's make a quick patch so that we will see something in the TinyEMU HTIF Console: uart_16550.c
// Write one character to the UART (polled)
static void u16550_putc(FAR struct u16550_s *priv, int ch) {

  // Hardcode the HTIF Base Address
  *(volatile uint64_t *) 0x40008000 = 0x0101000000000000ul | ch;

  // Previously:
  // while ((u16550_serialin(priv, UART_LSR_OFFSET) & UART_LSR_THRE) == 0);
  // u16550_serialout(priv, UART_THR_OFFSET, (uart_datawidth_t)ch);
}
We skip the reading and writing of other UART Registers, because we'll patch them later: uart_16550.c
// Read UART Register
static inline uart_datawidth_t u16550_serialin(FAR struct u16550_s *priv, int offset) {
  return 0; ////
  // Commented out the rest
}

// Write UART Register
static inline void u16550_serialout(FAR struct u16550_s *priv, int offset, uart_datawidth_t value) {
  // Commented out the rest
}
And we won't wait for UART Ready, since we're not accessing the Line Control Register: uart_16550.c
// Wait until UART is not busy. This is needed before writing to Line Control Register.
// Otherwise we will get spurious interrupts on Synopsys DesignWare 8250.
static int u16550_wait(FAR struct u16550_s *priv) {
  // Nopez! No waiting for now
  return OK; ////
}
Now we see NuttX booting OK on TinyEMU yay!
+ temu nuttx.cfg
123ABCnx_start: Entry
mm_initialize: Heap: name=Umem, start=0x80035700 size=33335552
mm_addregion: [Umem] Region 1: base=0x800359a8 size=33334864
mm_malloc: Allocated 0x800359d0, size 48
mm_malloc: Allocated 0x80035a00, size 288
mm_malloc: Allocated 0x80035b20, size 32
mm_malloc: Allocated 0x80035b40, size 720
mm_malloc: Allocated 0x80035e10, size 80
mm_malloc: Allocated 0x80035e60, size 64
mm_malloc: Allocated 0x80035ea0, size 240
mm_malloc: Allocated 0x80035f90, size 464
mm_malloc: Allocated 0x80036160, size 176
mm_malloc: Allocated 0x80036210, size 336
mm_malloc: Allocated 0x80036360, size 464
mm_malloc: Allocated 0x80036530, size 464
mm_malloc: Allocated 0x80036700, size 528
builtin_initialize: Registering Builtin Loader
elf_initialize: Registering ELF
uart_register: Registering /dev/console
mm_malloc: Allocated 0x80036910, size 80
mm_malloc: Allocated 0x80036960, size 80
uart_register: Registering /dev/ttyS0
mm_malloc: Allocated 0x800369b0, size 80
mm_malloc: Allocated 0x80036a00, size 80
mm_malloc: Allocated 0x80036a50, size 80
mm_malloc: Allocated 0x80036aa0, size 32
mm_malloc: Allocated 0x80036ac0, size 160
mm_malloc: Allocated 0x80036b60, size 32
mm_malloc: Allocated 0x80036b80, size 32
mm_malloc: Allocated 0x80036ba0, size 32
nx_start_application: Starting init thread
task_spawn: name=ostest_main entry=0x80006fde file_actions=0 attr=0x80035670 argv=0x80035668
mm_malloc: Allocated 0x80036bc0, size 272
mm_malloc: Allocated 0x80036cd0, size 288
mm_malloc: Allocated 0x80036df0, size 32
mm_malloc: Allocated 0x80036e10, size 720
mm_malloc: Allocated 0x800370e0, size 32
mm_malloc: Allocated 0x80037100, size 32
mm_malloc: Allocated 0x80037120, size 32
mm_malloc: Allocated 0x80037140, size 32
mm_malloc: Allocated 0x80037160, size 160
mm_malloc: Allocated 0x80037200, size 3088
mm_free: Freeing 0x80036b60
mm_free: Freeing 0x80036ba0
mm_free: Freeing 0x80036b80
mm_malloc: Allocated 0x80036b60, size 32
mm_malloc: Allocated 0x80036b80, size 32
mm_malloc: Allocated 0x80037e10, size 48
mm_free: Freeing 0x800370e0
mm_free: Freeing 0x80036b60
mm_free: Freeing 0x80036b80
mm_malloc: Allocated 0x800370e0, size 32
nx_start: CPU0: Beginning Idle Loop
Let's boot NuttX in the Web Browser...
Read the article...
Will NuttX boot in the Web Browser?
Yep! WebAssembly Demo is here: Demo of NuttX on TinyEMU
WebAssembly Files are located here: nuttx-tinyemu/docs
We copied the TinyEMU Config and NuttX Kernel to the Web Server...
## Copy to Web Server: NuttX Config, Kernel, Disassembly (for troubleshooting)
cp nuttx.cfg ../nuttx-tinyemu/docs/root-riscv64.cfg
cp nuttx.bin ../nuttx-tinyemu/docs/
cp nuttx.S ../nuttx-tinyemu/docs/
The other files were provided by TinyEMU...
-
jslinux-2019-12-21.tar.gz: Precompiled JSLinux demo
TODO: Where is the updated source code for the WebAssembly? What is the implementation of console_resize_event? Hmmm...
How to test this locally?
To test on our computer, we need to install a Local Web Server (because our Web Browser won't load WebAssembly Files from the File System)...
## Based on https://github.com/TheWaWaR/simple-http-server
$ cargo install simple-http-server
$ git clone https://github.com/lupyuen/nuttx-tinyemu
$ simple-http-server nuttx-tinyemu/docs
Then browse to...
http://0.0.0.0:8000/index.html
But there's no Console Input?
To do Console Input, we need to implement VirtIO Console in our NuttX UART Driver...
Read the article...
How will we implement Console Input / Output in NuttX TinyEMU?
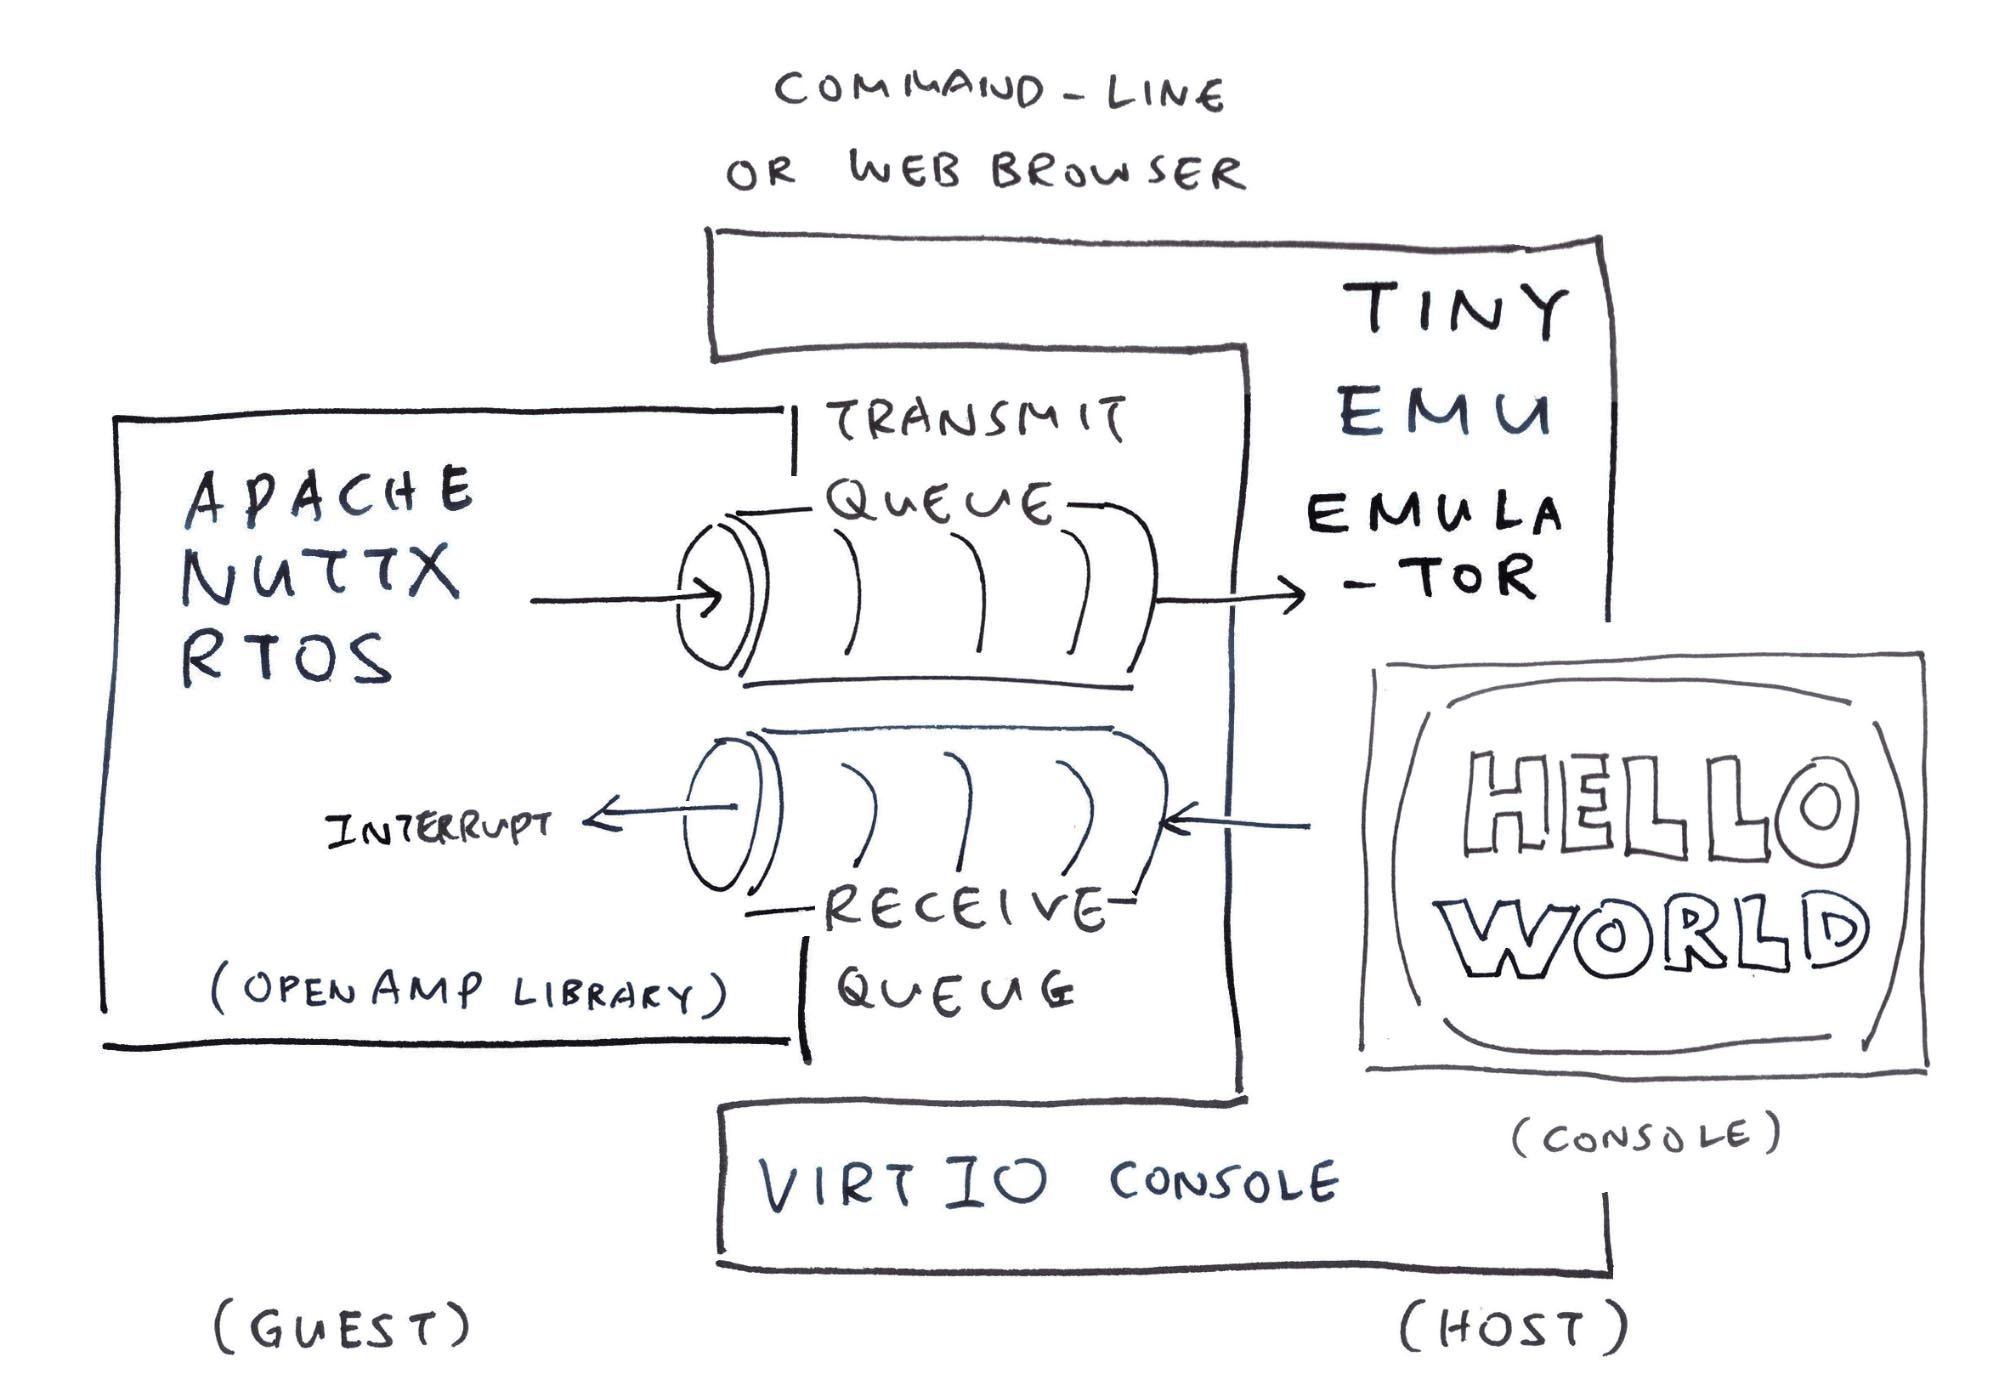
TinyEMU supports VirtIO for proper Console Input and Output...
And NuttX supports VirtIO, based on OpenAMP...
But let's create a simple VirtIO Console Driver for NuttX with OpenAMP...
-
Create Queue: Call OpenAMP virtqueue_create
(See virtio_mmio_create_virtqueue or virtio_create_virtqueues)
-
Send Data: Call OpenAMP virtqueue_add_buffer
(See virtio_serial_dmasend)
-
Start Processing: Call OpenAMP virtqueue_kick
(See virtio_serial_dmasend)
This will help us understand the inner workings of VirtIO and OpenAMP! But first we enable VirtIO and OpenAMP in NuttX...
Read the article...
How do we call VirtIO and OpenAMP?
To enable VirtIO and OpenAMP in NuttX:
make menuconfig
## Device Drivers
##   Enable "Simple AddrEnv"
##   Enable "Virtio Device Support"

## Device Drivers > Virtio Device Support
##   Enable "Virtio MMIO Device Support"

## Build Setup > Debug Options >
##   Enable "Virtio Debug Features > Error, Warnings, Info"
Why "Simple AddrEnv"?
up_addrenv_va_to_pa is defined in drivers/misc/addrenv.c. So we need CONFIG_DEV_SIMPLE_ADDRENV (Simple AddrEnv)
Otherwise we see this...
riscv64-unknown-elf-ld: nuttx/staging/libopenamp.a(io.o): in function `metal_io_phys_to_offset_':
nuttx/openamp/libmetal/lib/system/nuttx/io.c:105: undefined reference to `up_addrenv_pa_to_va'
riscv64-unknown-elf-ld: nuttx/staging/libopenamp.a(io.o): in function `metal_io_offset_to_phys_':
nuttx/openamp/libmetal/lib/system/nuttx/io.c:99: undefined reference to `up_addrenv_va_to_pa'
Now we configure NuttX VirtIO...
Read the article...
How to make NuttX VirtIO talk to TinyEMU?
Previously we saw the TinyEMU config: riscv_machine.c
#define VIRTIO_BASE_ADDR 0x40010000
#define VIRTIO_SIZE      0x1000
#define VIRTIO_IRQ       1
Now we set the VirtIO Parameters for TinyEMU in NuttX: qemu_rv_appinit.c
#define QEMU_VIRTIO_MMIO_BASE    0x40010000 // VIRTIO_BASE_ADDR. Previously: 0x10001000
#define QEMU_VIRTIO_MMIO_REGSIZE 0x1000     // VIRTIO_SIZE
#ifdef CONFIG_ARCH_USE_S_MODE
#  define QEMU_VIRTIO_MMIO_IRQ   26 // TODO: Should this be 1? (VIRTIO_IRQ)
#else
#  define QEMU_VIRTIO_MMIO_IRQ   28 // TODO: Should this be 1? (VIRTIO_IRQ)
#endif
#define QEMU_VIRTIO_MMIO_NUM     1  // Number of VirtIO Devices. Previously: 8
With these settings, VirtIO and OpenAMP will start OK on NuttX yay!
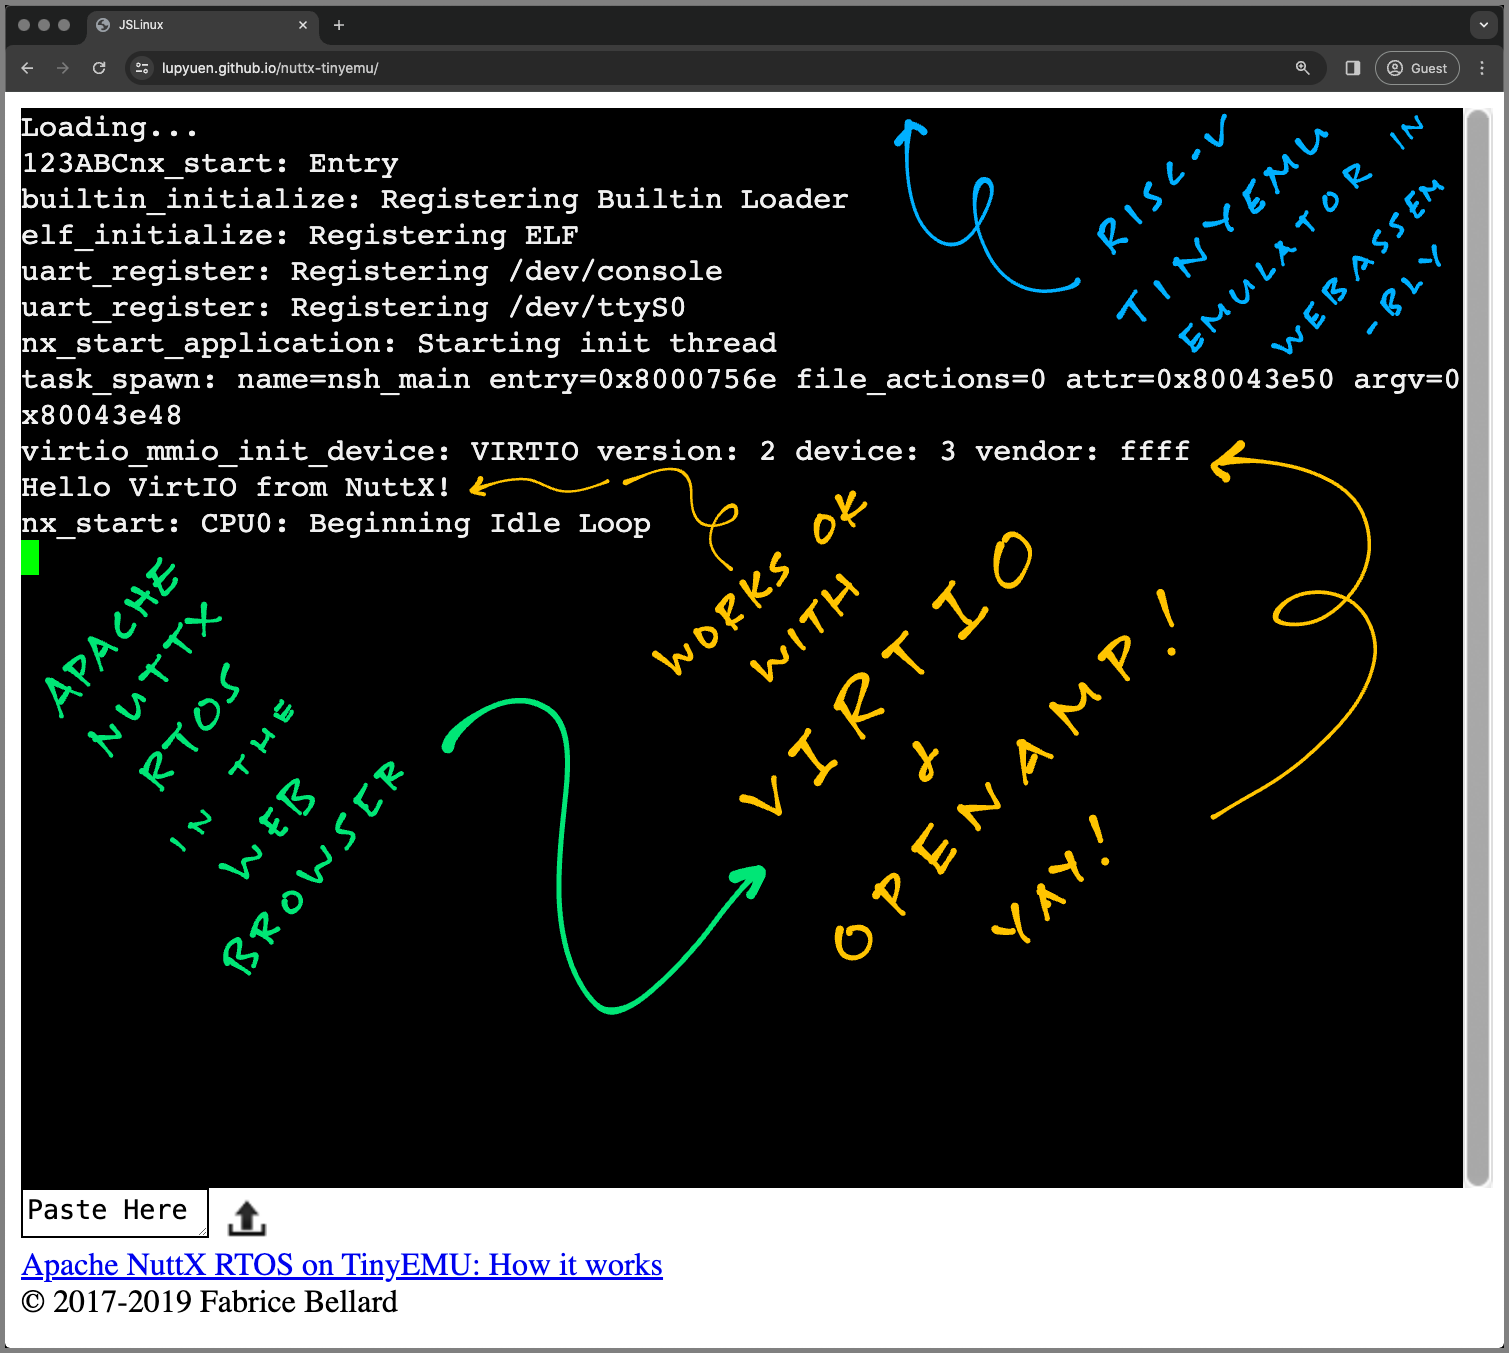
virtio_mmio_init_device: VIRTIO version: 2 device: 3 vendor: ffff
mm_malloc: Allocated 0x80046a90, size 48
test_virtio:
mm_malloc: Allocated 0x80046ac0, size 848
nx_start: CPU0: Beginning Idle Loop
Which means NuttX VirtIO + OpenAMP has successfully validated the Magic Number from TinyEMU. (Otherwise NuttX will halt)
How does it work?
At NuttX Startup: board_app_initialize calls...
-
qemu_virtio_register_mmio_devices (to register all VirtIO MMIO Devices) which calls...
-
virtio_register_mmio_device (to register a VirtIO MMIO Device, explained below)
Let's create a VirtIO Queue for the VirtIO Console and send some data...
Read the article...
NuttX has started VirtIO and OpenAMP and they talk nicely to TinyEMU. What next?
We dig around NuttX and we see NuttX creating a VirtIO Queue for VirtIO Console: virtio_serial_init calls...
- OpenAMP virtio_create_virtqueues (create data queues, explained below)
Also we see NuttX sending data to VirtIO Console: virtio_serial_dmasend calls...
-
OpenAMP virtqueue_add_buffer (send data to queue) and...
OpenAMP virtqueue_kick (start queue processing, explained below)
Let's do all these in our NuttX Test Code: virtio-mmio.c
  // Testing: Init VirtIO Device
  // Based on virtio_serial_init
  // https://github.com/apache/nuttx/blob/master/drivers/virtio/virtio-serial.c#L445-L511

  struct virtio_device *vdev = &vmdev->vdev;
  DEBUGASSERT(vdev != NULL);

  virtio_set_status(vdev, VIRTIO_CONFIG_STATUS_DRIVER);
  virtio_set_features(vdev, 0);
  virtio_set_status(vdev, VIRTIO_CONFIG_FEATURES_OK);

  #define VIRTIO_SERIAL_RX           0
  #define VIRTIO_SERIAL_TX           1
  #define VIRTIO_SERIAL_NUM          2
  const char *vqnames[VIRTIO_SERIAL_NUM];
  vqnames[VIRTIO_SERIAL_RX]   = "virtio_serial_rx";
  vqnames[VIRTIO_SERIAL_TX]   = "virtio_serial_tx";

  vq_callback callbacks[VIRTIO_SERIAL_NUM];
  callbacks[VIRTIO_SERIAL_RX] = NULL; // TODO: virtio_serial_rxready;
  callbacks[VIRTIO_SERIAL_TX] = NULL; // TODO: virtio_serial_txdone;
  ret = virtio_create_virtqueues(vdev, 0, VIRTIO_SERIAL_NUM, vqnames,
                                 callbacks);
  DEBUGASSERT(ret >= 0);
  virtio_set_status(vdev, VIRTIO_CONFIG_STATUS_DRIVER_OK);

  // Testing: Send data to VirtIO Device
  // Based on virtio_serial_dmasend
  // https://github.com/apache/nuttx/blob/master/drivers/virtio/virtio-serial.c#L310-L345

  DEBUGASSERT(vdev->vrings_info != NULL);
  struct virtqueue *vq = vdev->vrings_info[VIRTIO_SERIAL_TX].vq;
  DEBUGASSERT(vq != NULL);

  /* Set the virtqueue buffer */
  static char *HELLO_MSG = "Hello VirtIO from NuttX!\r\n";
  struct virtqueue_buf vb[2];
  vb[0].buf = HELLO_MSG;
  vb[0].len = strlen(HELLO_MSG);
  int num = 1;

  /* Get the total send length */
  uintptr_t len = strlen(HELLO_MSG);

  // TODO: What's this?
  // if (xfer->nlength != 0)
  //   {
  //     vb[1].buf = xfer->nbuffer;
  //     vb[1].len = xfer->nlength;
  //     num = 2;
  //   }

  /* Add buffer to TX virtiqueue and notify the VirtIO Host */
  virtqueue_add_buffer(vq, vb, num, 0, (FAR void *)len);
  virtqueue_kick(vq);
  // End of Testing
Does it work?
Yep NuttX prints correctly to TinyEMU's VirtIO Console yay!
Demo of NuttX on TinyEMU: lupyuen.github.io/nuttx-tinyemu
+ temu nuttx.cfg
123ABCnx_start: Entry
builtin_initialize: Registering Builtin Loader
elf_initialize: Registering ELF
uart_register: Registering /dev/console
uart_register: Registering /dev/ttyS0
nx_start_application: Starting init thread
task_spawn: name=nsh_main entry=0x8000756e file_actions=0 attr=0x80043e80 argv=0x80043e78
virtio_mmio_init_device: VIRTIO version: 2 device: 3 vendor: ffff
Hello VirtIO from NuttX!
nx_start: CPU0: Beginning Idle Loop
Now we implement Console Input / Output with the NuttX Serial Driver for VirtIO:
Device Drivers > Virtio Device Support
  Enable "Virtio Serial Support"

Device Drivers > Serial Driver Support
  Disable "16550 UART Chip support"
Which will start a tiny bit of NuttX Shell...
+ temu nuttx.cfg
123Ariscv_earlyserialinit:
BCnx_start: Entry
riscv_serialinit:
virtio_mmio_init_device: VIRTIO version: 2 device: 3 vendor: ffff
uart_register: Registering /dev/console
virtio_register_serial_driver: ret1=0
virtio_register_serial_driver: ret2=0
nx_start_application: Starting init thread
task_spawn: name=nsh_main entry=0x80008874 file_actions=0 attr=0x80044b30 argv=0x80044b28

NuttShell (NSH) NuttX-12.3.0-RC1
nx_start: CPU0: Beginning Idle Loop
NuttX Console crashes because we didn't initialise VirtIO early enough. So we moved the VirtIO Init from qemu_rv_appinit.c...
int board_app_initialize(uintptr_t arg) {
  ...
#ifdef CONFIG_DRIVERS_VIRTIO_MMIO
  //// Moved to nuttx/arch/risc-v/src/qemu-rv/qemu_rv_start.c
  //// Previously: qemu_virtio_register_mmio_devices();
#endif
To qemu_rv_start.c...
void riscv_serialinit(void) {
  // Init the VirtIO Devices
  void qemu_virtio_register_mmio_devices(void);
  qemu_virtio_register_mmio_devices();
}
We created our own HTIF Driver, so 16550 UART Driver is no longer needed for Kernel Logging: qemu_rv_start.c
// Print to HTIF Console
static void htif_putc(int ch) {
  // Hardcode the HTIF Base Address and print: device=1, cmd=1, buf=ch
  *(volatile uint64_t *) 0x40008000 = 0x0101000000000000ul | ch;
}

int up_putc(int ch) {
  irqstate_t flags;

  /* All interrupts must be disabled to prevent re-entrancy and to prevent
   * interrupts from firing in the serial driver code.
   */

  flags = enter_critical_section();

  /* Check for LF */

  if (ch == '\n')
    {
      /* Add CR */

      htif_putc('\r');
    }

  htif_putc(ch);
  leave_critical_section(flags);

  return ch;
}
NuttX Apps will use the VirtIO Serial Driver to access the NuttX Console...
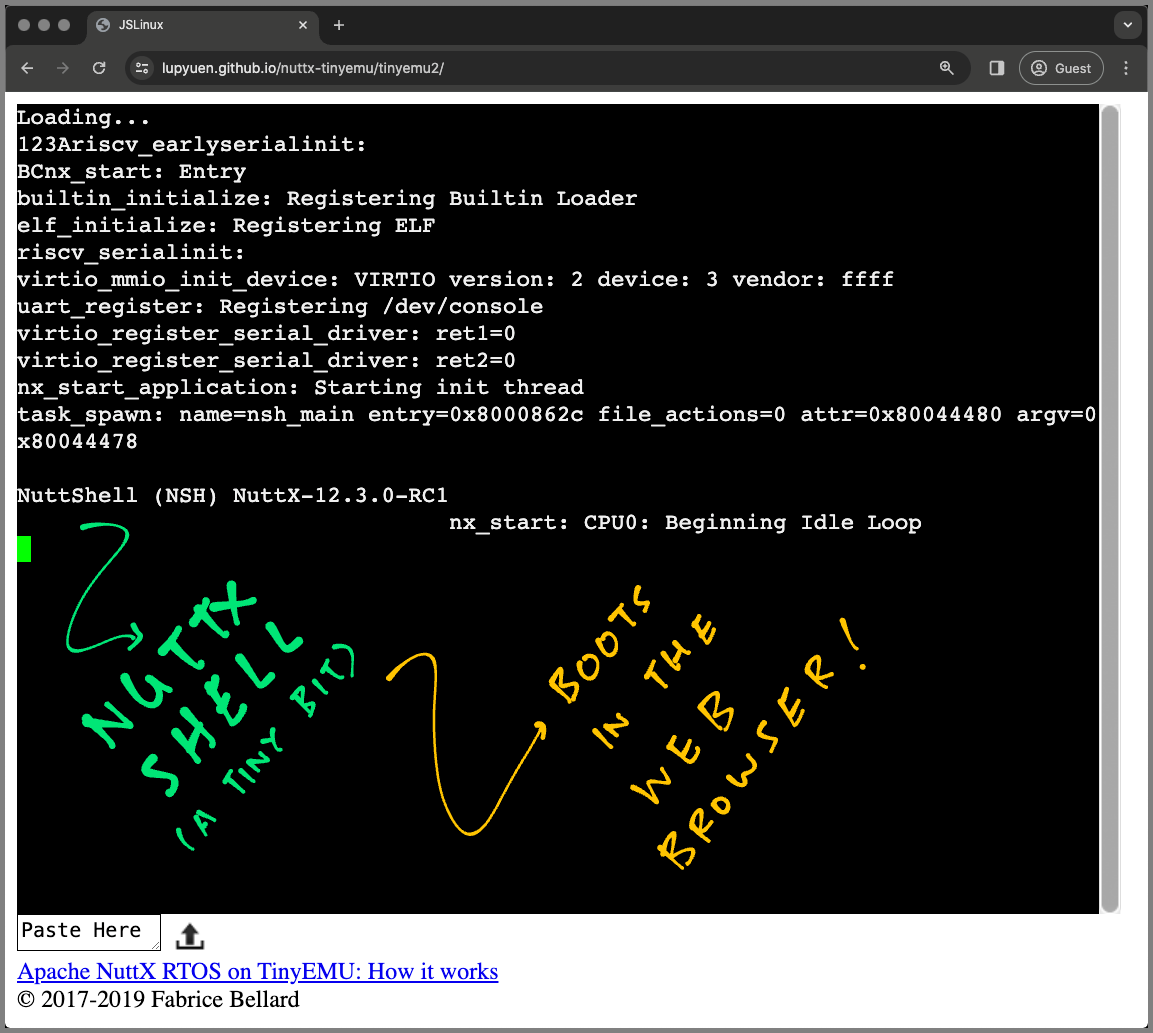
(Live Demo of NuttX on TinyEMU)
Nothing appears when we type in NuttX Shell. Why?
That's because we haven't enabled the Echoing of Keypresses! Here's the fix: virtio-serial.c
static int virtio_serial_init(FAR struct virtio_serial_priv_s *priv, FAR struct virtio_device *vdev) {
  ...
  //// TinyEMU needs NuttX to echo the keypress and change CR to NL
  udev->isconsole = true; ////
This will...
-
Echo all keys pressed
-
If the key pressed is Carriage Return
\r, convert to Line Feed\n -
TOOO: What else?
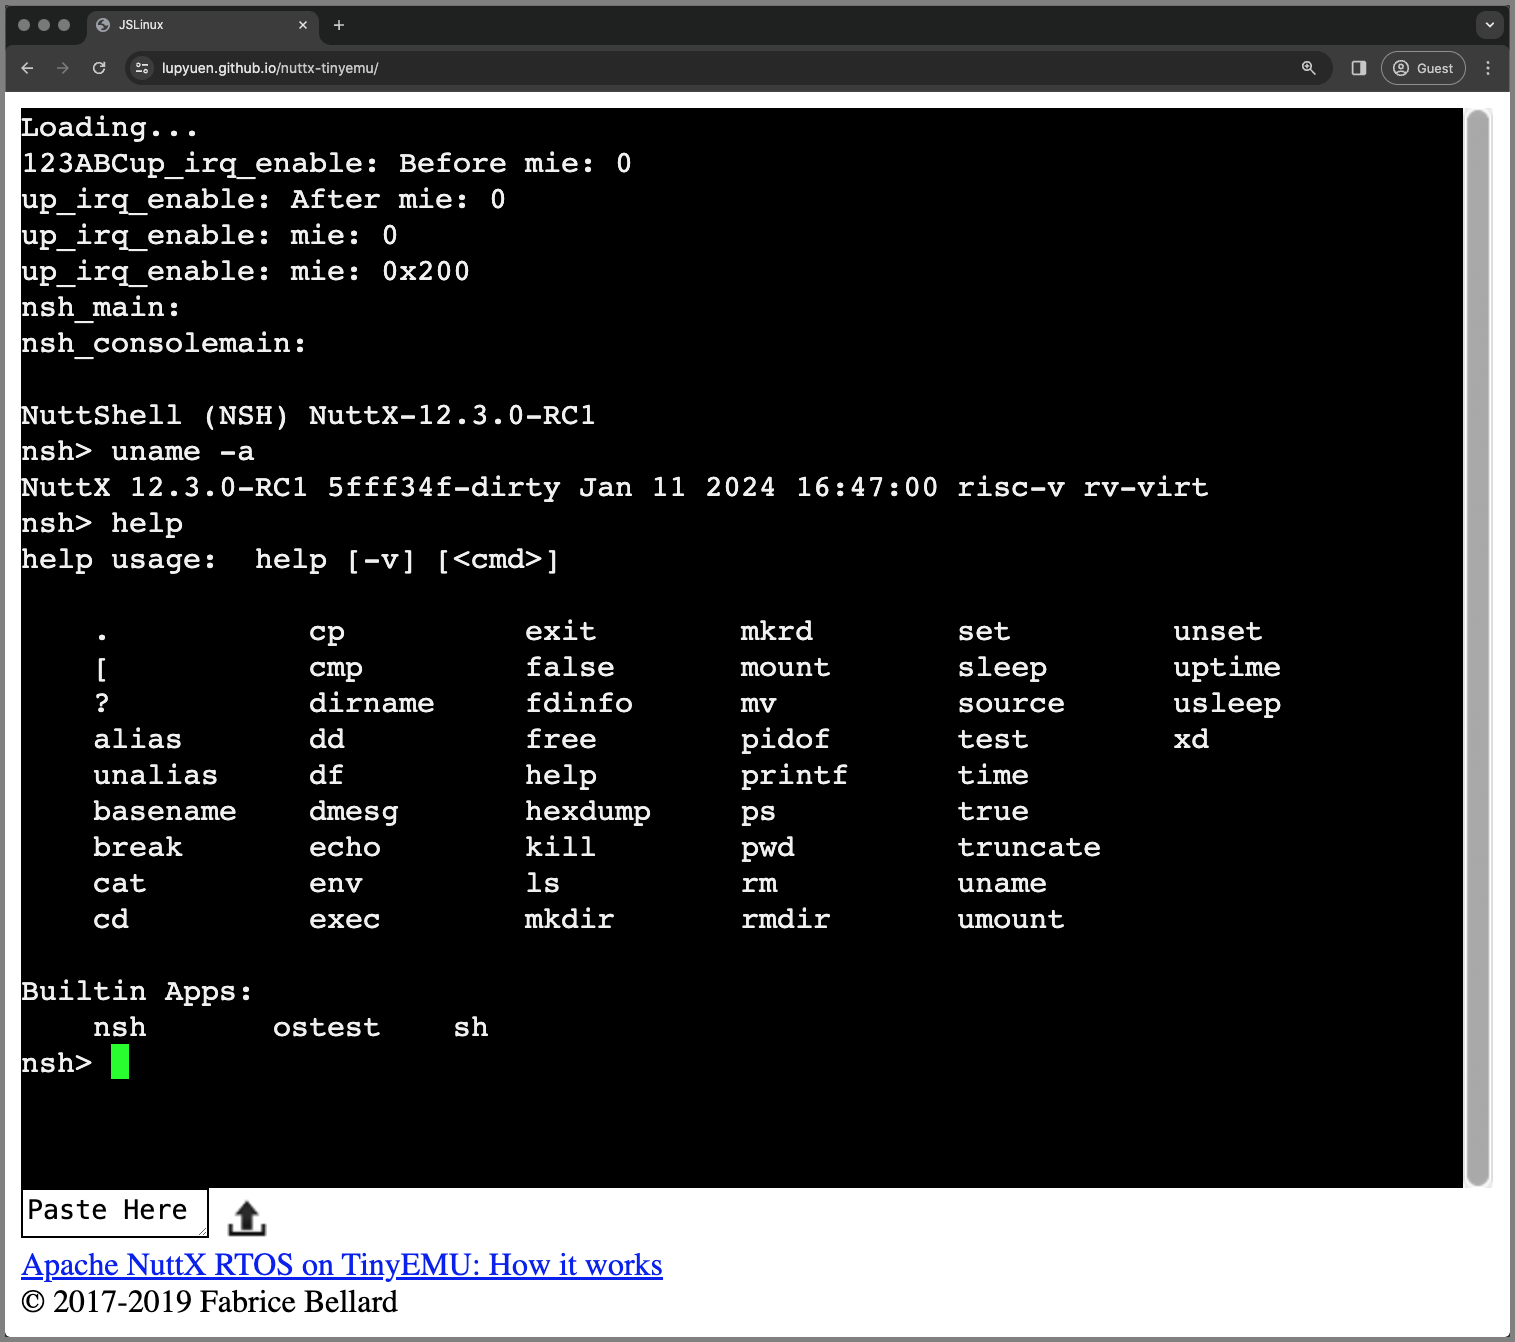
When we enable the NuttX Console for VirtIO, NuttX Shell works correctly yay!
(Live Demo of NuttX on TinyEMU)
Based on our snooping, we see that TinyEMU's VirtIO Console will Trigger an Interrupt like so...
/* check pending interrupts */
if (unlikely((s->mip & s->mie) != 0)) {
  if (raise_interrupt(s)) {
    s->n_cycles--;
    goto done_interp;
  }
}
This means that MIP (Machine-Mode Interrupt Pending Register) must have the same bits set as MIE (Machine-Mode Interrupt Enable Register).
But we have a problem: TinyEMU won't let us set the MEIE Bit (Machine-Mode External Interrupt Enable) in MIE Register!
From qemu_rv_irq.c:
  /* Enable external interrupts (mie/sie) */
  // TODO: TinyEMU won't let us set the MEIE Bit (Machine-Mode External Interrupt Enable) in MIP!
  { uint64_t mie = READ_CSR(mie); _info("Before mie: %p\n", mie); }
  // CSR_IE is MIE
  // IE_EIE is MEIE
  SET_CSR(CSR_IE, IE_EIE);
  { uint64_t mie = READ_CSR(mie); _info("After mie: %p\n", mie); }
Which shows that MEIE Bit in MIE Register is NOT SET correctly: NuttX Log:
up_irq_enable: Before mie: 0
up_irq_enable: After mie: 0
Our workaround is to use the SEIE Bit (Supervisor-Mode Externel Interrupt Enable) in MIE Register...
From qemu_rv_irq.c:
  // TODO: TinyEMU supports SEIE but not MEIE!
  uint64_t mie = READ_CSR(mie); _info("mie: %p\n", mie);

  // TODO: This doesn't work
  // Enable MEIE: Machine-Mode External Interrupt
  // WRITE_CSR(mie, mie | (1 << 11));

  // TODO: This works, but we need MEIE, not SEIE. We patch this in riscv_dispatch_irq()
  // Enable SEIE: Supervisor-Mode External Interrupt
  WRITE_CSR(mie, mie | (1 << 9));
  mie = READ_CSR(mie); _info("mie: %p\n", mie);
Which shows that SEIE Bit in MIE Register is set correctly: NuttX Log:
up_irq_enable: mie: 0
up_irq_enable: mie: 0x200
Then we patch the NuttX Exception Handler to map Supervisor-Mode Interrupts into Machine-Mode Interrupts: riscv_dispatch_irq
void *riscv_dispatch_irq(uintptr_t vector, uintptr_t *regs)
{
  int irq = (vector >> RV_IRQ_MASK) | (vector & 0xf);

  // TODO: TinyEMU works only with SEIE, not MEIE
  if (irq == RISCV_IRQ_SEXT) { irq = RISCV_IRQ_MEXT; }
TODO: Find out why TinyEMU can't set the MEIE Bit (Machine-Mode External Interrupt Enable) in MIE
We've done VirtIO Console with TinyEMU. What other VirtIO Devices are supported in Web Browser TinyEMU?
TinyEMU supports these VirtIO Devices:
More details in the TinyEMU Doc.
TODO: Are all these devices supported in the Web Browser?
File Sync is implemented here: VFsync (Virtual File Synchronization)
Let's talk about the Network Device...
Can we use TCP/IP Networking in the Web Browser TinyEMU?
Yes it works! Go to bellard.org/jslinux and click on RISC-V Buildroot Linux. The ping command works!
TinyEMU supports VirtIO Network Device, as explained in the JSLinux FAQ...
Can I access to the network from the virtual machine ?
Yes it is possible. It uses the WebSocket VPN offered by Benjamin Burns (see his blog). The bandwidth is capped to 40 kB/s and at most two connections are allowed per public IP address. Please don't abuse the service.
The WebSocket VPN is defined here: jslinux.js
net_url = params["net_url"]; /* empty string means no network */
if (typeof net_url == "undefined")
  net_url = "wss://relay.widgetry.org/";
WebSocket VPN Code is here: jslinux.js
(More about the WebSocket VPN)
Can we use the browser connection to communicate to the internet, instead of WebSocket VPN?
From our analysis below, TinyEMU and VirtIO Networking are sending Ethernet Frames / IP Packets to the internet. But Web Browsers are not allowed to send IP Packets directly.
That's why TinyEMU needs to tunnel the packets through a WebSocket VPN hosted at relay.widgetry.org. (Which is throttled at 40 kB/s for free, fair use)
Can we host our own WebSocket VPN on our Local Computer?
Possibly. But then we will have to host the Web Server on our Local Computer too. Which makes it cumbersome to install.
Can we host the WebSocket VPN on a server operated by the NuttX Project?
Possibly. But we need to throttle the internet traffic for free, fair use. And prevent abuse.
Here's how TinyEMU VirtIO Networking works with the WebSocket VPN...
In the TinyEMU WebAssembly, we see the WebAssembly Function that sends Network Packets: jsemu.c
/* called from JS */
void net_write_packet(const uint8_t *buf, int buf_len)
{
  EthernetDevice *net = global_vm->net;
  if (net) {
    net->device_write_packet(net, buf, buf_len);
  }
}
The WebAssembly Function above is called by the JavaScript Code that handles WebSocket VPN: jslinux.js
Ethernet.prototype.messageHandler = function(e)
{
  var str, buf_len, buf_addr, buf;
  if (e.data instanceof ArrayBuffer) {
    buf_len = e.data.byteLength;
    buf = new Uint8Array(e.data);
    buf_addr = _malloc(buf_len);
    HEAPU8.set(buf, buf_addr);
net_write_packet(buf_addr, buf_len);In the TinyEMU JavaScript, we see the JavaScript Function that receives Network Packets: lib.js
net_recv_packet: function(bs, buf, buf_len)
{
  if (net_state) {
    net_state.recv_packet(HEAPU8.subarray(buf, buf + buf_len));
  }
},
The JavaScript Function above is called by the WebAssembly Code: jsemu.c
if (p->eth_count > 0) {
  EthernetDevice *net;
  int i;
  assert(p->eth_count == 1);
  net = mallocz(sizeof(EthernetDevice));
  net->mac_addr[0] = 0x02;
  for(i = 1; i < 6; i++)
      net->mac_addr[i] = (int)(emscripten_random() * 256);
net->write_packet = net_recv_packet;How do we call this in NuttX?
We shall use the NuttX VirtIO Network Driver.
The VirtIO Network Driver will send VirtIO Network Packets to TinyEMU.
TODO: Test NuttX rv-virt:netnsh64 with VirtIO Networking in Web Browser TinyEMU
Read the article...
Right now we're running NuttX in Flat Mode...
Can NuttX run in Kernel Mode on TinyEMU?
NuttX Kernel Mode requires RISC-V Semihosting to access the NuttX Apps Filesystem. Which is supported by QEMU but not TinyEMU.
But we can Append the Initial RAM Disk to the NuttX Kernel. So yes it's possible to run NuttX in Kernel Mode with TinyEMU, with some additional Mounting Code.
How does VirtIO Guest work in NuttX?
NuttX VirtIO Driver is based on OpenAMP with MMIO...
At NuttX Startup: board_app_initialize calls...
-
qemu_virtio_register_mmio_devices (to register all VirtIO MMIO Devices) which calls...
-
virtio_register_mmio_device (to register a VirtIO MMIO Device) which calls...
-
virtio_mmio_init_device which passes...
-
g_virtio_mmio_dispatch which contains...
-
virtio_mmio_create_virtqueues which calls...
-
virtio_mmio_create_virtqueue which calls...
-
virtqueue_create (OpenAMP)
To create a VirtIO Queue for VirtIO Console: virtio_serial_probe calls...
-
virtio_serial_init which calls...
-
virtio_create_virtqueues (OpenAMP)
To send data to VirtIO Console: virtio_serial_send calls...
-
virtio_serial_dmatxavail which calls...
-
uart_xmitchars_dma which calls...
-
virtio_serial_dmasend which calls...
-
virtqueue_add_buffer (OpenAMP) and...
virtqueue_kick (OpenAMP)
How does VirtIO Host work in TinyEMU?
Let's look inside the implementation of VirtIO in TinyEMU...
TinyEMU supports these VirtIO Devices:
The Device IDs are: virtio_init
switch(device_id) {
case 1: /* net */ ...
case 2: /* block */ ...
case 3: /* console */ ...
case 9: /* Network Device */ ...
case 18: /* Input Device */ ...
TinyEMU supports VirtIO over MMIO and PCI:
TinyEMU Guests (like NuttX) are required to check the VIRTIO_MMIO_MAGIC_VALUE that's returned by the TinyEMU Host.
From above: VirtIO Console is Device ID 3. Here's how it works...
At TinyEMU Startup: riscv_machine_init calls...
-
virtio_console_init which calls...
-
virtio_init with Device ID 3
To print to VirtIO Console: virt_machine_run (js) and virt_machine_run (temu) call...
-
virtio_console_write_data which calls...
-
memcpy_to_queue which calls...
Which will access...
-
QueueState: For desc_addr, avail_addr, used_addr
TinyEMU Console Device:
TinyEMU Guest (like NuttX) is required to set the VirtIO Queue Desc / Avail / Used.
This is how TinyEMU accesses the VirtIO MMIO Queue: virtio.c
case VIRTIO_MMIO_QUEUE_SEL:
    val = s->queue_sel;
    break;
case VIRTIO_MMIO_QUEUE_NUM_MAX:
    val = MAX_QUEUE_NUM;
    break;
case VIRTIO_MMIO_QUEUE_NUM:
    val = s->queue[s->queue_sel].num;
    break;
case VIRTIO_MMIO_QUEUE_DESC_LOW:
    val = s->queue[s->queue_sel].desc_addr;
    break;
case VIRTIO_MMIO_QUEUE_AVAIL_LOW:
    val = s->queue[s->queue_sel].avail_addr;
    break;
case VIRTIO_MMIO_QUEUE_USED_LOW:
    val = s->queue[s->queue_sel].used_addr;
    break;
#if VIRTIO_ADDR_BITS == 64
case VIRTIO_MMIO_QUEUE_DESC_HIGH:
    val = s->queue[s->queue_sel].desc_addr >> 32;
    break;
case VIRTIO_MMIO_QUEUE_AVAIL_HIGH:
    val = s->queue[s->queue_sel].avail_addr >> 32;
    break;
case VIRTIO_MMIO_QUEUE_USED_HIGH:
    val = s->queue[s->queue_sel].used_addr >> 32;
    break;
#endif
To Select and Notify the Queue:
How does TinyEMU handle VirtIO Console Input?
Suppose we press a key in TinyEMU. From the Detailed Console Input Log...
virtio_console_get_write_len
virtio_console_write_data: ready=1
virtio_console_write_data: last_avail_idx=0, avail_idx=1
TinyEMU virt_machine_run calls...
- virtio_console_write_data to write the key pressed into the VirtIO Console's RX Queue
TinyEMU triggers an Interrupt...
plic_set_irq: irq_num=1, state=1
plic_update_mip: set_mip, pending=0x1, served=0x0
virtio_console_write_data: buf[0]=l, buf_len=1
raise_exception: cause=-2147483639
raise_exception2: cause=-2147483639, tval=0x0
virtio_console_write_data calls...
-
virtio_consume_desc (to notify the queue) which calls...
-
plic_set_irq (to set the PLIC Interrupt) which calls...
-
plic_update_mip (to set the Machine-Mode Interrupt Pending Register) which...
-
Triggers an Interrupt which calls...
/* check pending interrupts */
if (unlikely((s->mip & s->mie) != 0)) {
  if (raise_interrupt(s)) {
    s->n_cycles--;
    goto done_interp;
  }
}
-
raise_interrupt which calls...
-
raise_exception which calls...
This invokes the NuttX Exception Handler: riscv_dispatch_irq
NuttX Exception Handler handles the Interrupt...
plic_read: offset=0x200004
plic_update_mip: reset_mip, pending=0x1, served=0x1
plic_set_irq: irq_num=1, state=0
plic_update_mip: reset_mip, pending=0x0, served=0x1
NuttX riscv_dispatch_irq reads the PLIC Interrupt Claim Register at PLIC Offset 0x200004, which calls...
-
TinyEMU plic_read (to read the PLIC Interrupt Claim Register at PLIC Offset 0x200004) which calls...
-
plic_set_irq (to clear the PLIC Interrupt) which calls...
-
plic_update_mip (to clear the Machine-Mode Interrupt Pending Register)
NuttX Exception Handler calls the VirtIO Serial Driver...
virtio_serial_rxready: buf[0]=l, len=1
uart_recvchars_done:
uart_datareceived:
virtio_serial_dmarxfree: length=0
virtio_serial_dmareceive: buf[0]=, len=254
virtio_serial_dmareceive: num=1, length=254, nlength=0
uart_read: ch=l
virtio_serial_dmarxfree: length=254
uart_read: buf[0]=l, recvd=1
readline_common: ch=0x6c
virtio_serial_dmarxfree: length=254
virtio_serial_dmarxfree: length=254
We explain these in the next section.
To finish up, NuttX Exception Handler Completes the Interrupt by writing to PLIC Interrupt Claim Register at PLIC Offset 0x200004...
plic_write: offset=0x200004, val=0x1
plic_update_mip: reset_mip, pending=0x0, served=0x0
raise_exception2: cause=11, tval=0x0
TinyEMU plic_write writes to PLIC Interrupt Claim Register at PLIC Offset 0x200004, and calls...
- plic_update_mip (to clear the Machine-Mode Interrupt Pending Register)
How did we figure out all this?
We added Debug Logs to TinyEMU.
Inside NuttX: What happens when we press a key in TinyEMU?
From the Detailed Console Input Log...
virtio_serial_rxready: buf[0]=l, len=1
uart_recvchars_done:
uart_datareceived:
Which says that NuttX Exception Handler calls...
-
virtio_serial_rxready (to handle the keypress) which calls...
-
OpenAMP virtqueue_get_buffer (to read the buffer from Receive Queue) and...
uart_recvchars_done (to receive the keypress, see below)
uart_recvchars_done calls
- uart_datareceived (to notify the waiting threads)
virtio_serial_dmarxfree: length=0
virtio_serial_dmareceive: buf[0]=, len=254
virtio_serial_dmareceive: num=1, length=254, nlength=0
Then virtio_serial_rxready calls...
-
virtio_serial_dmarxfree (to free the DMA Receive Buffer) which calls...
-
uart_recvchars_dma (to receive the DMA data) which calls...
-
virtio_serial_dmareceive which calls...
-
OpenAMP virtqueue_add_buffer (to release the VirtIO Queue Buffer) and...
OpenAMP virtqueue_kick (to notify TinyEMU)
Finally the Waiting Thread reads the keypress...
uart_read: ch=l
virtio_serial_dmarxfree: length=254
uart_read: buf[0]=l, recvd=1
readline_common: ch=0x6c
virtio_serial_dmarxfree: length=254
virtio_serial_dmarxfree: length=254
The Waiting Thread calls...
-
uart_read (to read the keypress) which calls...
-
virtio_serial_dmarxfree (to free the DMA Receive Buffer)
What about NSH Shell?
From the Detailed Console Input Log...
nsh_main:
nsh_consolemain:
nsh_session:
NuttShell (NSH) NuttX-12.3.0-RC1
nsh>
At NuttX Startup: nsh_main calls...
-
nsh_consolemain which calls...
-
nsh_session (to run the NSH Session)
nsh_session: Before readline_fd
readline_fd:
readline_common:
...
uart_read: buf[0]=l, recvd=1
readline_common: ch=0x6c
After NuttX Startup: nsh_session calls...
-
readline_fd (to read one line) which calls...
-
readline_common (to read one line) which calls...
-
uart_read (to read one keypress)
-
Which is explained above
We fixed the TinyEMU Build for Emscripten: https://github.com/lupyuen/ox64-tinyemu/commit/170abb06b58a58328efa8a1874795f1daac0b7a7
Previously it fails to build...
$ sudo apt install emscripten
$ make -f Makefile.js

emcc -O3 --memory-init-file 0 --closure 0 -s NO_EXIT_RUNTIME=1 -s NO_FILESYSTEM=1 -s "EXPORTED_FUNCTIONS=['_console_queue_char','_vm_start','_fs_import_file','_display_key_event','_display_mouse_event','_display_wheel_event','_net_write_packet','_net_set_carrier']" -s 'EXTRA_EXPORTED_RUNTIME_METHODS=["ccall", "cwrap"]' -s BINARYEN_TRAP_MODE=clamp --js-library js/lib.js -s WASM=0 -o js/riscvemu32.js jsemu.js.o softfp.js.o virtio.js.o fs.js.o fs_net.js.o fs_wget.js.o fs_utils.js.o simplefb.js.o pci.js.o json.js.o block_net.js.o iomem.js.o cutils.js.o aes.js.o sha256.js.o riscv_cpu32.js.o riscv_machine.js.o machine.js.o elf.js.o
emcc: error: Invalid command line option -s BINARYEN_TRAP_MODE=clamp: The wasm backend does not support a trap mode (it always clamps, in effect)
make: *** [Makefile.js:47: js/riscvemu32.js] Error 1
So we remove -s BINARYEN_TRAP_MODE=clamp from Makefile.js...
EMLDFLAGS=-O3 --memory-init-file 0 --closure 0 -s NO_EXIT_RUNTIME=1 -s NO_FILESYSTEM=1 -s "EXPORTED_FUNCTIONS=['_console_queue_char','_vm_start','_fs_import_file','_display_key_event','_display_mouse_event','_display_wheel_event','_net_write_packet','_net_set_carrier']" -s 'EXTRA_EXPORTED_RUNTIME_METHODS=["ccall", "cwrap"]' -s BINARYEN_TRAP_MODE=clamp --js-library js/lib.jsAs we made some more fixes: See the Modified Files
Now it builds OK...
/workspaces/bookworm/TinyEMU (master) $ ls -l js
total 1160
-rw-r--r-- 1 vscode vscode   8982 Jan 13 04:17 lib.js
-rw-r--r-- 1 vscode vscode 352884 Jan 13 04:18 riscvemu32.js
-rw-r--r-- 1 vscode vscode  45925 Jan 13 04:18 riscvemu32-wasm.js
-rwxr-xr-x 1 vscode vscode 147816 Jan 13 04:18 riscvemu32-wasm.wasm
-rw-r--r-- 1 vscode vscode 401186 Jan 13 04:18 riscvemu64.js
-rw-r--r-- 1 vscode vscode  45925 Jan 13 04:19 riscvemu64-wasm.js
-rwxr-xr-x 1 vscode vscode 164038 Jan 13 04:19 riscvemu64-wasm.wasm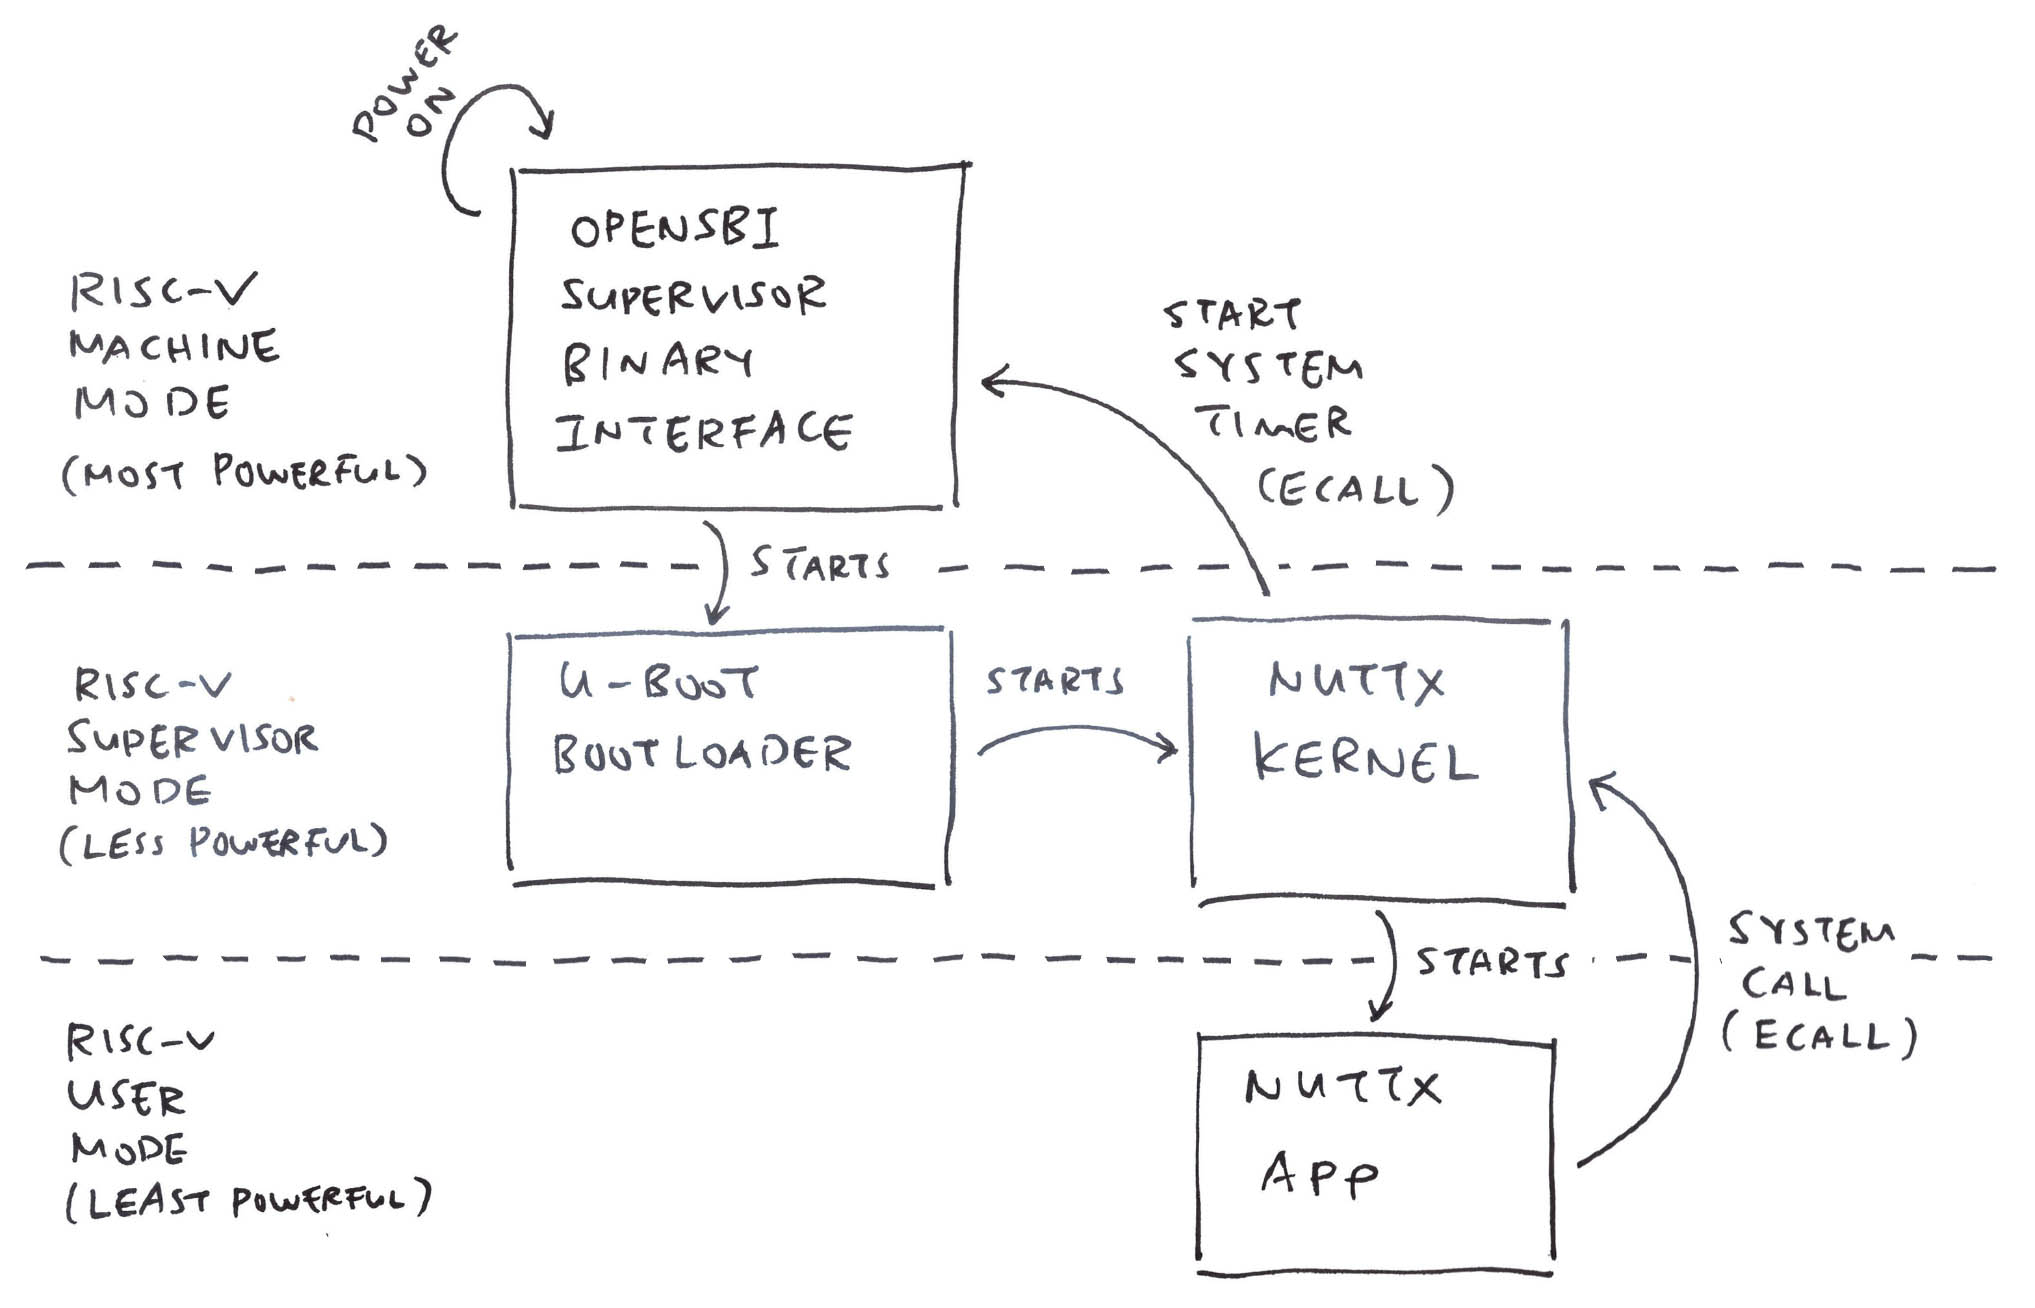
Read the article...
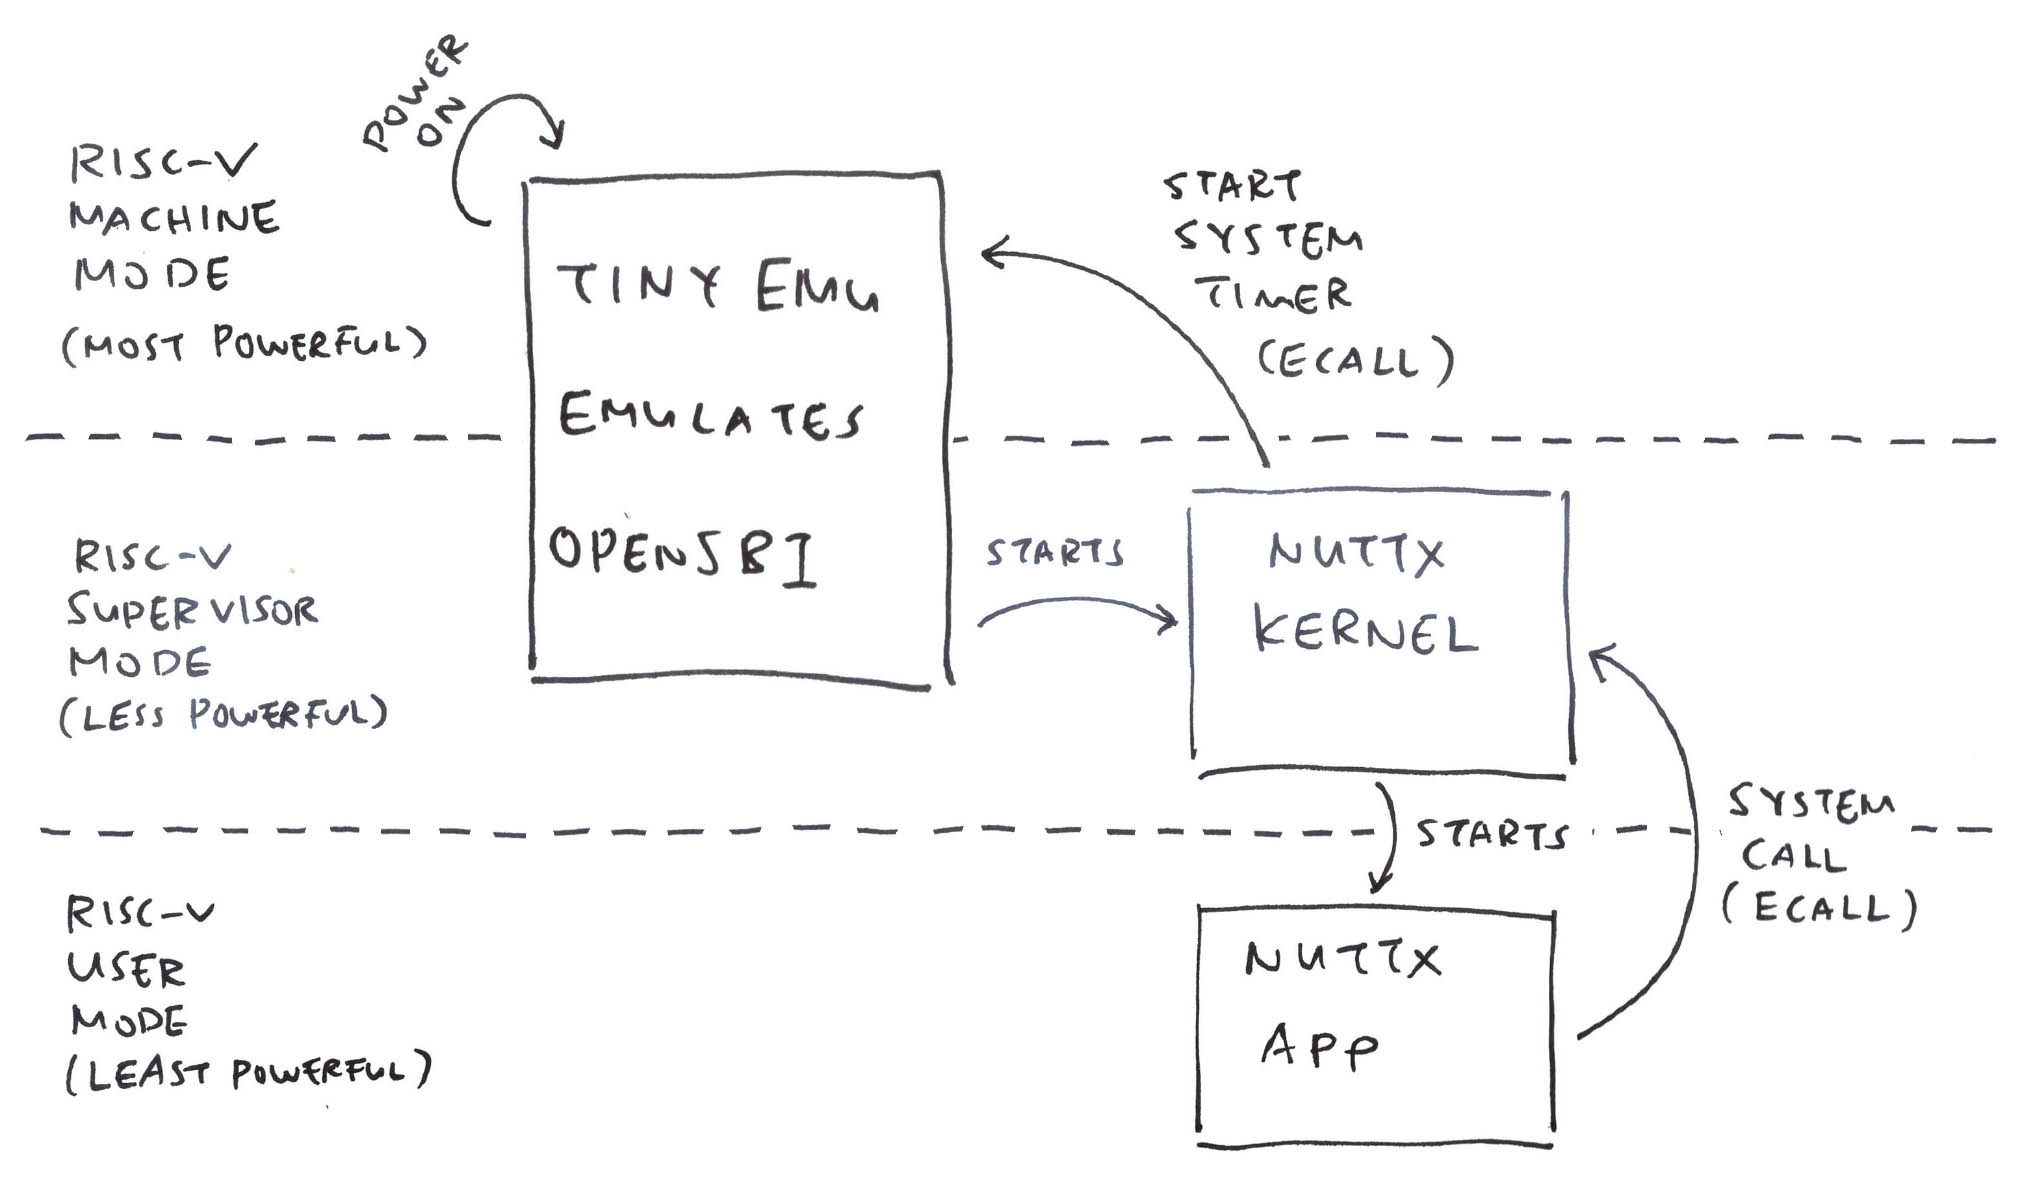
Objective: Take the NuttX Kernel built for Ox64 BL808 SBC. And boot it on TinyEMU RISC-V Emulator in the Web Browser!
-
Fix these RISC-V Addresses in TinyEMU to follow BL808 Memory Map: riscv_machine.c
#define LOW_RAM_SIZE   0x00010000 /* 64KB */
#define RAM_BASE_ADDR  0x80000000
#define CLINT_BASE_ADDR 0x02000000
#define CLINT_SIZE      0x000c0000
#define DEFAULT_HTIF_BASE_ADDR 0x40008000
#define VIRTIO_BASE_ADDR 0x40010000
#define VIRTIO_SIZE      0x1000
#define VIRTIO_IRQ       1
#define PLIC_BASE_ADDR 0x40100000
#define PLIC_SIZE      0x00400000
#define FRAMEBUFFER_BASE_ADDR 0x41000000

#define RTC_FREQ 10000000
#define RTC_FREQ_DIV 16 /* arbitrary, relative to CPU freq to have a
                          10 MHz frequency */
-
Start TinyEMU in RISC-V Supervisor Mode (instead of Machine Mode)
(So we don't need OpenSBI and U-Boot Bootloader)
-
Emulate OpenSBI Timer
(Intercept the Supervisor-To-Machine Mode ECALL)
-
Emulate BL808 UART I/O (Memory Mapped I/O and PLIC Interrupts)
(So we can run NuttX Shell)
-
Emulate BL808 GPIO Output (Memory Mapped I/O)
(So we can test Nim Blinky)
Let's try booting NuttX Ox64 on TinyEMU...
TODO: Wrap TinyEMU with Zig for Memory Safety and WebAssembly?
Read the article...
To boot NuttX Ox64 in TinyEMU: We change the RISC-V Addresses in TinyEMU, so that they match Ox64 BL808: riscv_machine.c
#define LOW_RAM_SIZE    0x00010000  // 64KB of Boot Code at 0x0
#define RAM_BASE_ADDR   0x50200000
#define CLINT_BASE_ADDR 0x02000000  // TODO: Unused
#define CLINT_SIZE      0x000c0000  // TODO: Unused
#define PLIC_BASE_ADDR  0xe0000000ul
#define PLIC_SIZE       0x00400000
...
#define PLIC_HART_BASE 0x201000  // Hart 0 S-Mode Priority Threshold
#define PLIC_HART_SIZE 0x1000
...
// At 0x0: Jump to RAM_BASE_ADDR
q = (uint32_t *)(ram_ptr + 0x1000);
q[0] = 0x297 + RAM_BASE_ADDR - 0x1000; /* auipc t0, jump_addr */
q[1] = 0x597; /* auipc a1, dtb */
q[2] = 0x58593 + ((fdt_addr - 4) << 20); /* addi a1, a1, dtb */
q[3] = 0xf1402573; /* csrr a0, mhartid */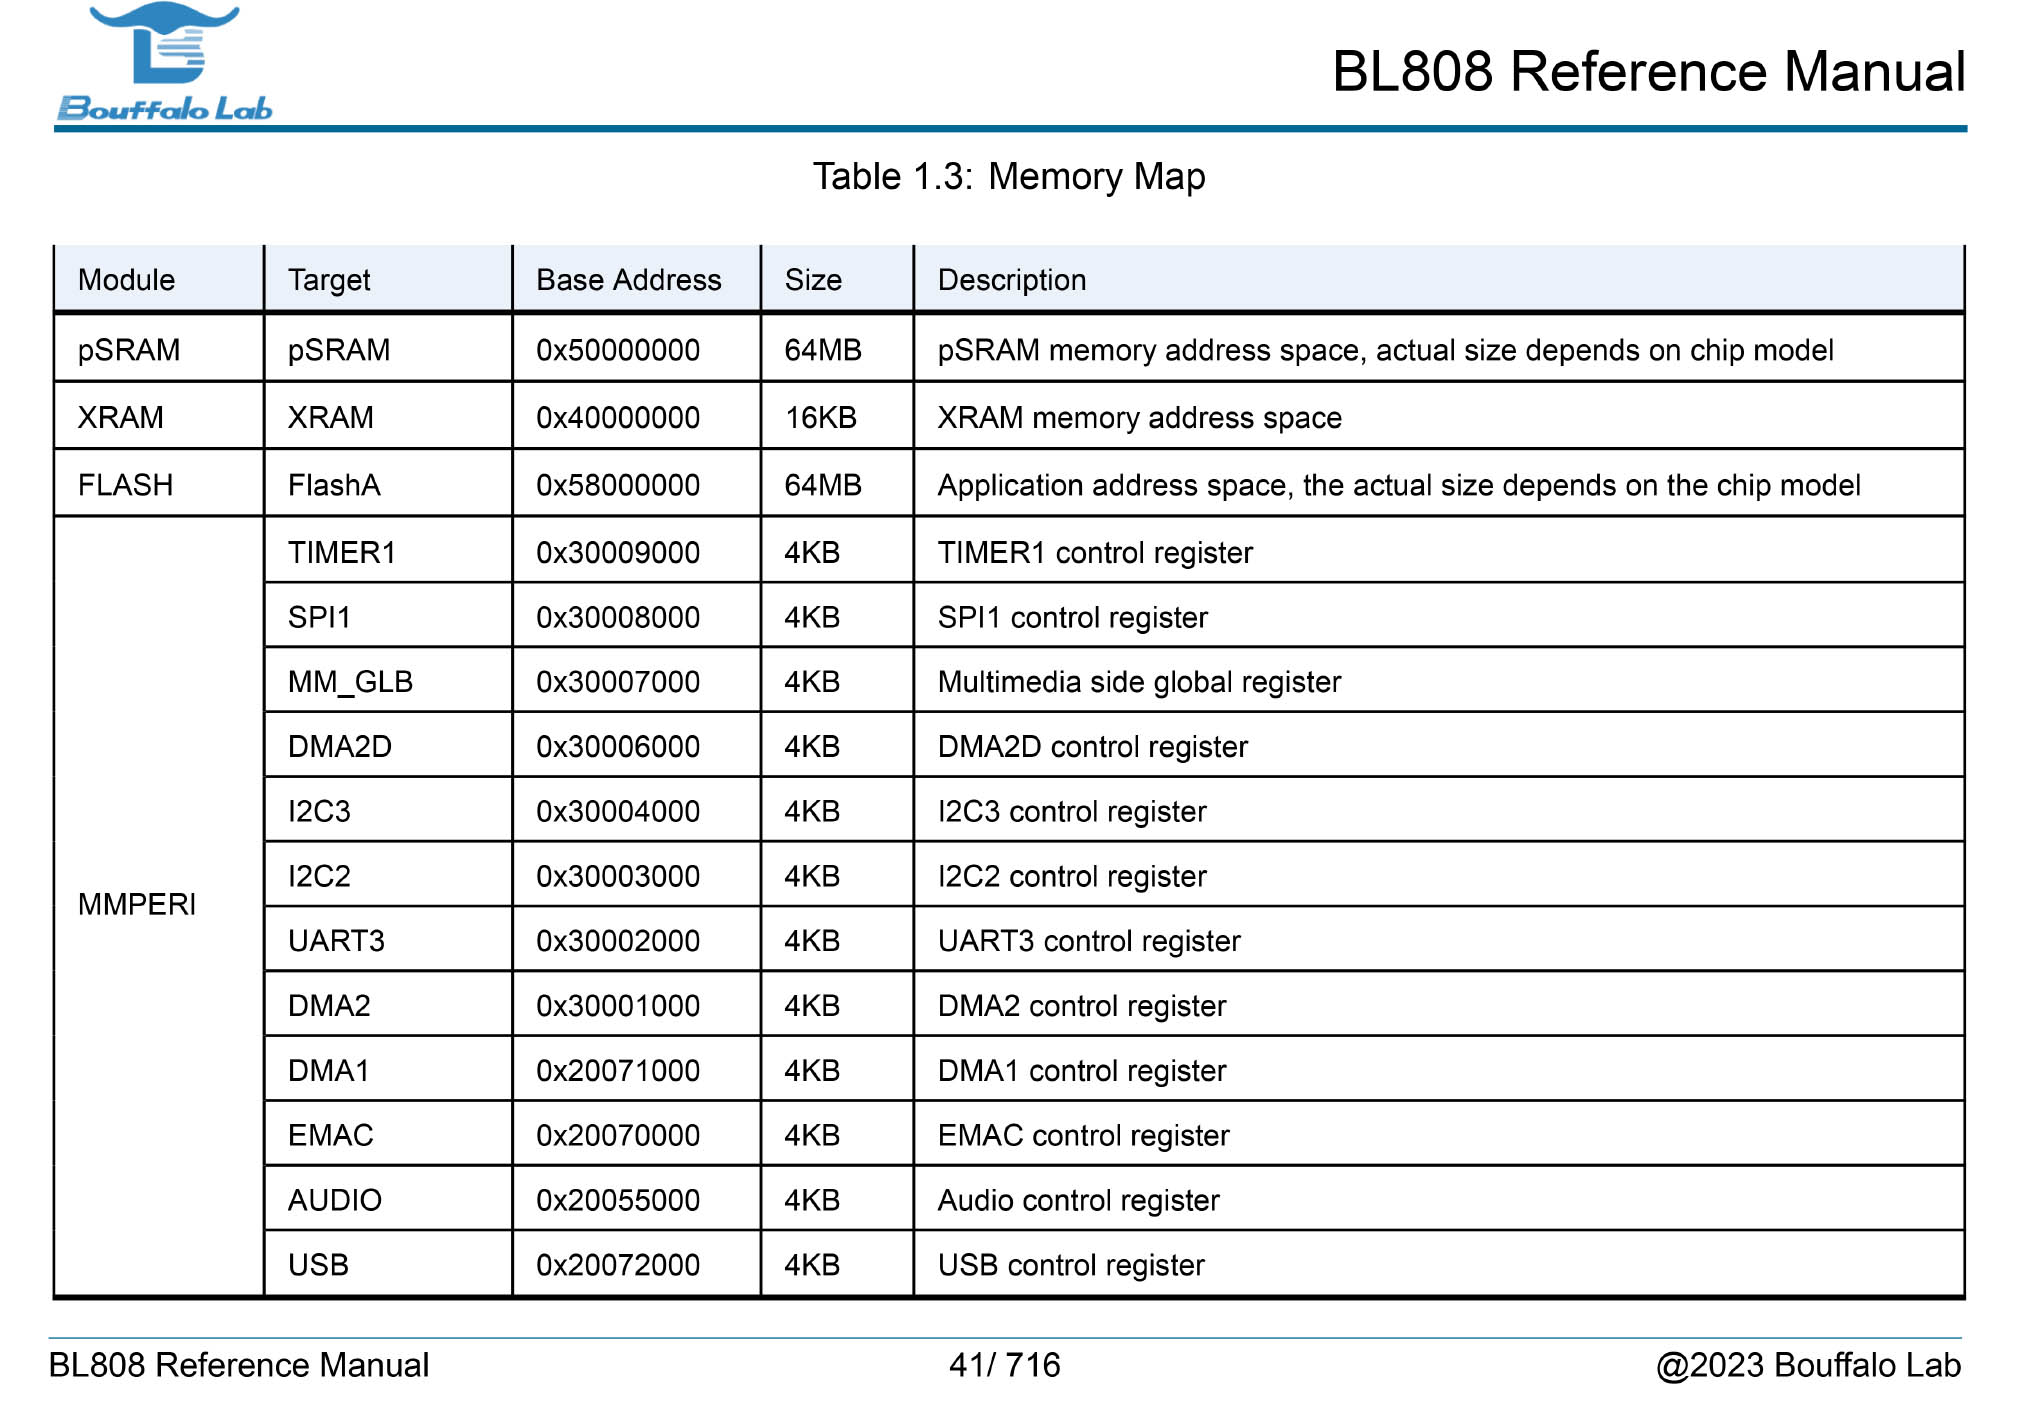
Now NuttX Ox64 boots a tiny bit on TinyEMU yay!
$ temu root-riscv64.cfg | more
virtio_console_init
csr_write: csr=0x104 val=0x0000000000000000
csr_write: csr=0x105 val=0x0000000050200090
csr_write: csr=0x100 val=0x0000000200000000
csr_write: csr=0x100 val=0x0000000200000000
csr_write: csr=0x100 val=0x0000000200000000
csr_write: csr=0x100 val=0x0000000200000000
csr_write: csr=0x140 val=0x0000000050400cd0
csr_write: csr=0x180 val=0x0000000000000000
csr_write: csr=0x105 val=0x0000000050200090
csr_write: csr=0x100 val=0x0000000200002000
csr_write: csr=0x003 val=0x0000000000000000
csr_write: csr=0x100 val=0x8000000200006000
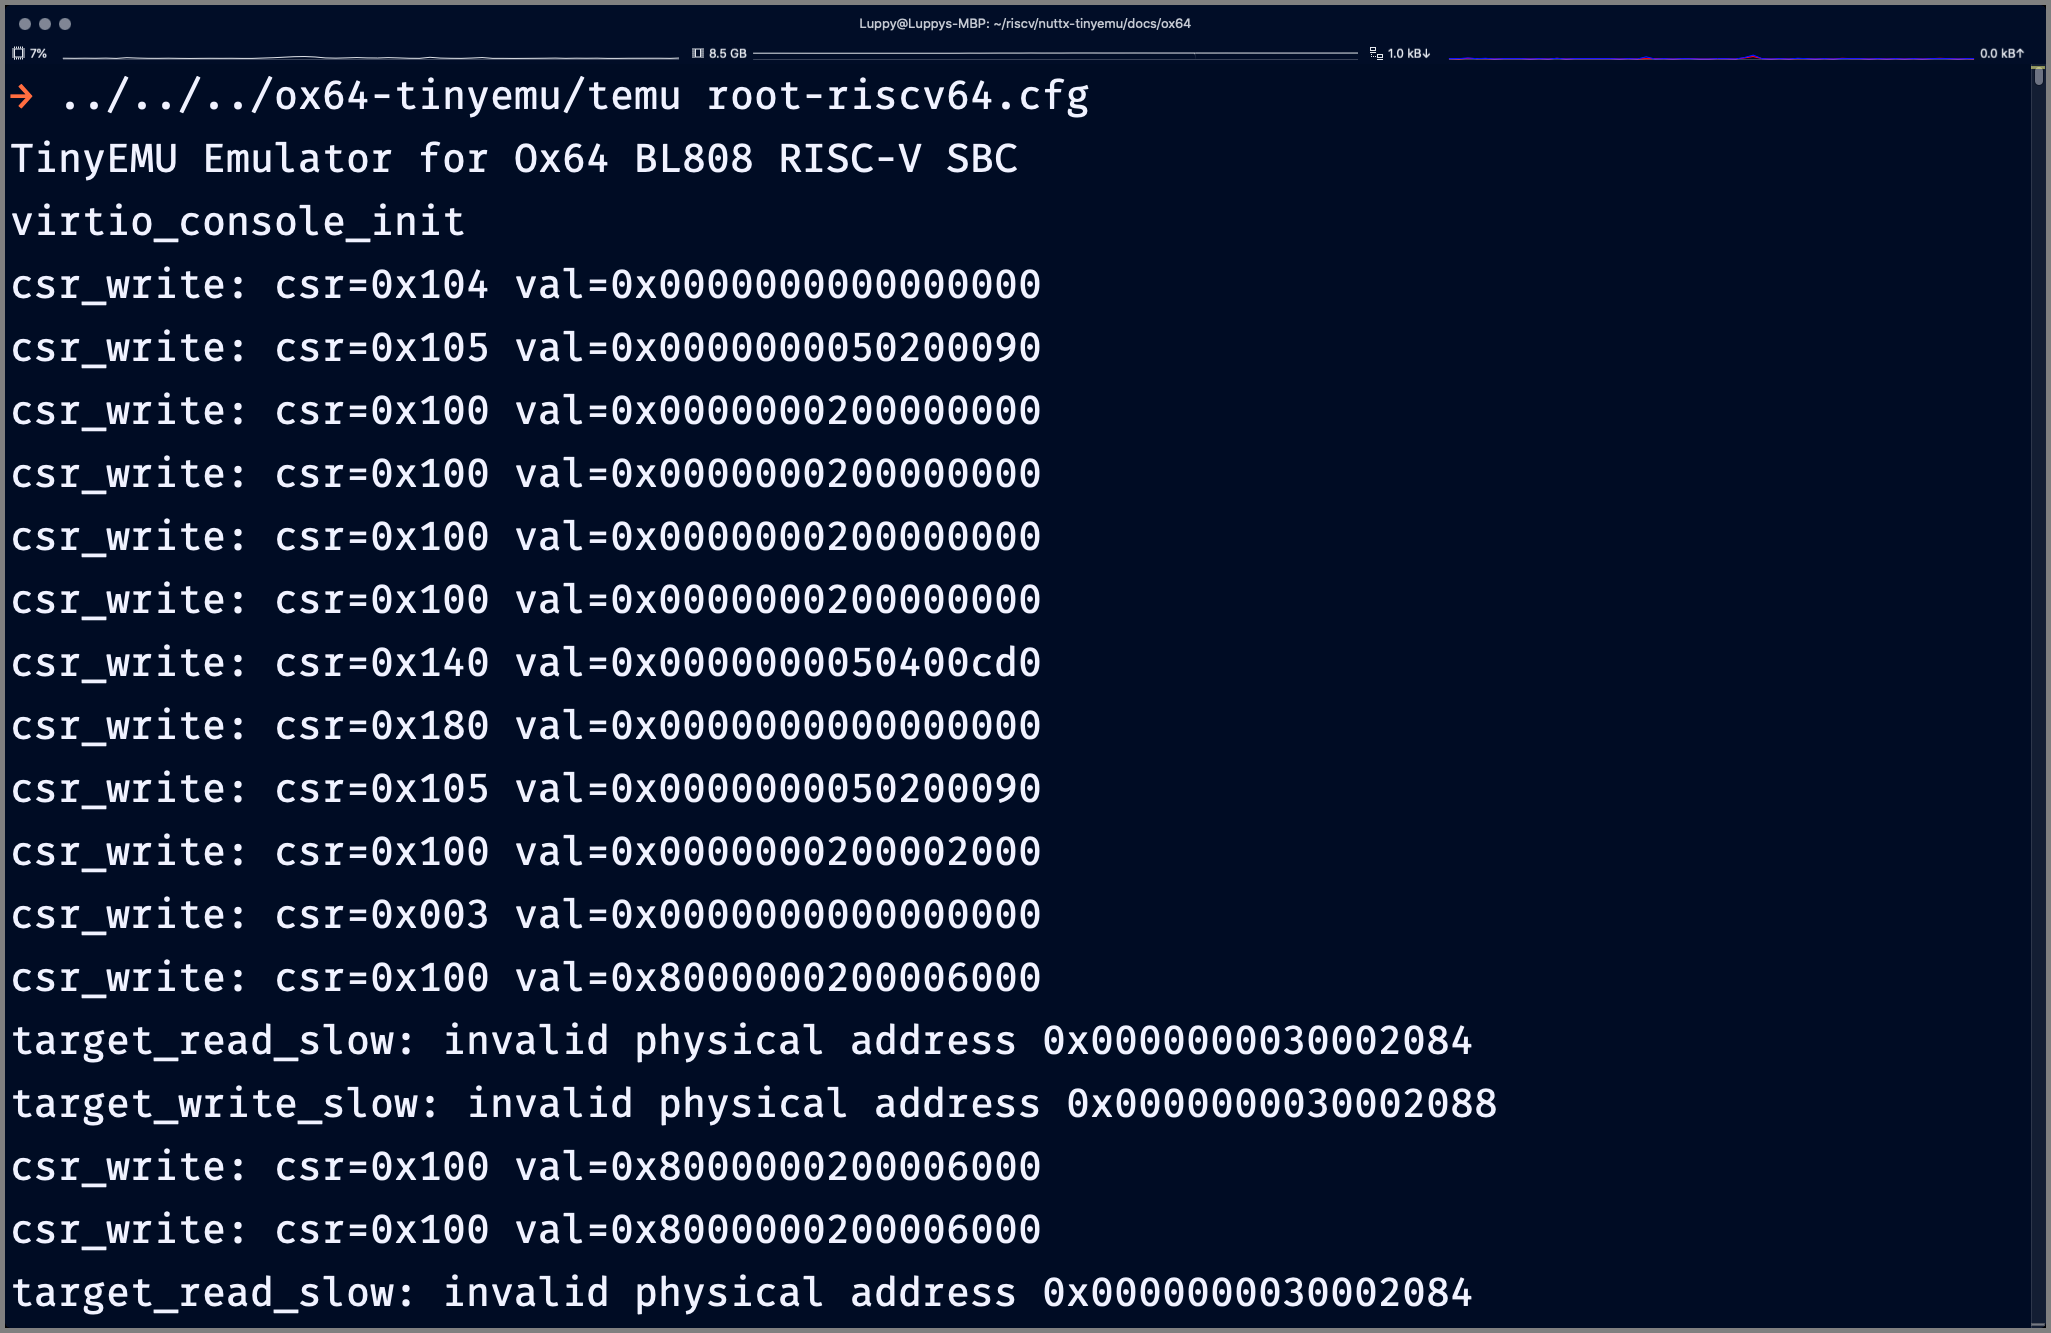
target_read_slow: invalid physical address 0x0000000030002084
target_write_slow: invalid physical address 0x0000000030002088Remember to Enable Exception Logging in TinyEMU.
What's root-riscv64.cfg?
It's the TinyEMU Config that will boot the NuttX Ox64 Image file: root-riscv64.cfg
/* VM configuration file */
{
  version: 1,
  machine: "riscv64",
  memory_size: 256,
  bios: "Image",
}
Image file comes from a typical NuttX Build for Ox64.
What are 0x30002084 and 0x30002088?
From our BL808 UART Docs...
-
0x30002088 (uart_fifo_wdata) means NuttX is writing to the UART Output Register. It's printing something to the console! (BL808 Reference Manual, Page 428)
-
0x30002084 (uart_fifo_config_1) means NuttX is checking if UART Transmit is ready. (BL808 Reference Manual, Page 427)
(
*0x30002084 & 0x3fmust be non-zero to indicate that UART Transmit is ready) -
That's why we always see "read 0x30002084" before "write 0x30002088".
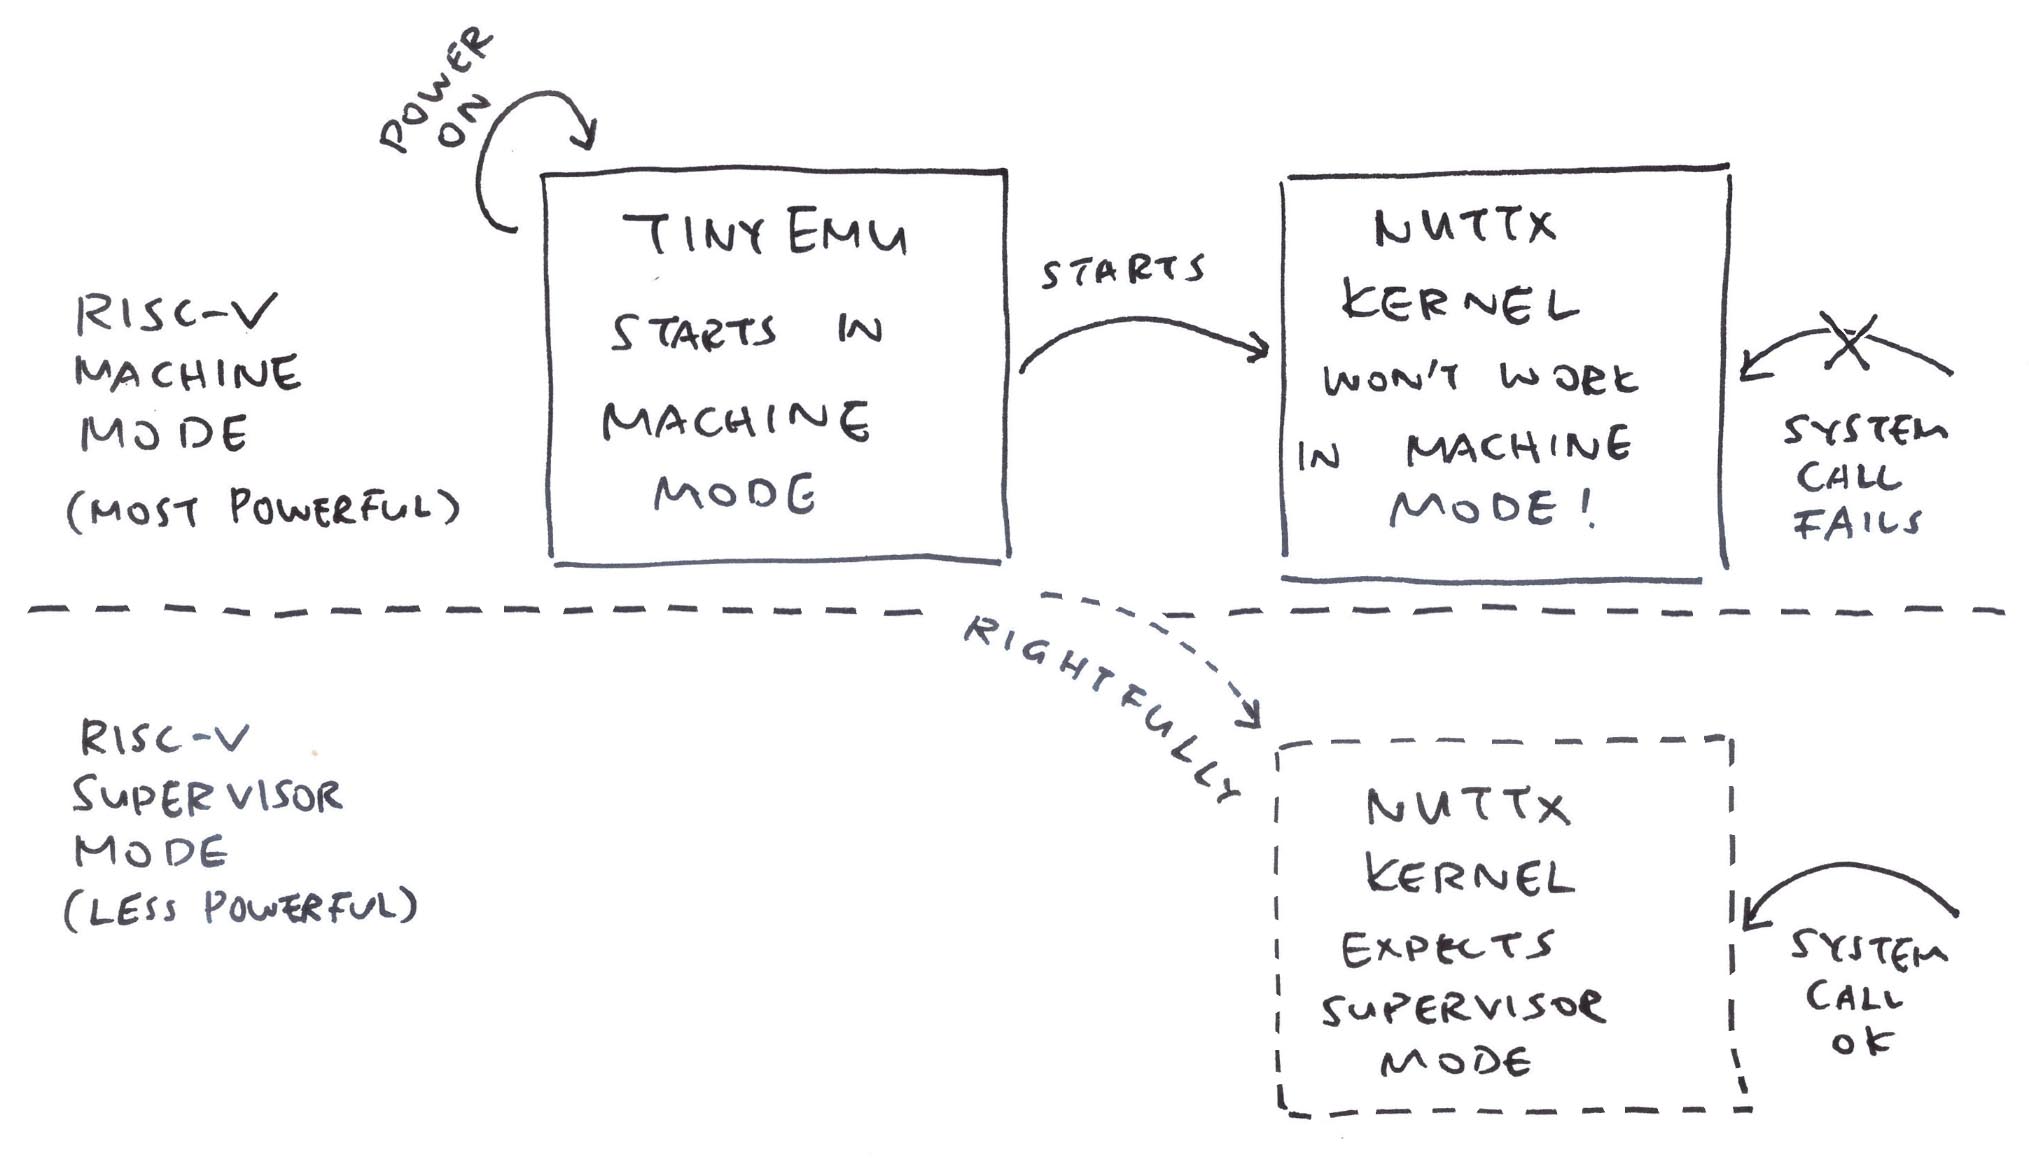
Note that we're still booting in RISC-V Machine Mode! This will cause problems later, because NuttX Ox64 expects to boot in RISC-V Supervisor Mode. (Due to OpenSBI)
Read the article...
Let's intercept the "read 0x30002084" and "write 0x30002088" in TinyEMU Emulator for Ox64 BL808, so we can print the UART Output.
We handle all "read 0x30002084" (uart_fifo_config_1) by returning 32 (TX FIFO Available Count), to tell NuttX that the UART Port is always ready to transmit: riscv_cpu.c
/* return 0 if OK, != 0 if exception */
int target_read_slow(RISCVCPUState *s, mem_uint_t *pval, target_ulong addr, int size_log2) {
...
  pr = get_phys_mem_range(s->mem_map, paddr);
  if (!pr) {
    //// Begin Test: Intercept Memory-Mapped I/O
    switch(paddr & 0xfffffffffffful) {  // TODO: Why does NuttX read from 0x4000000030002084?
    case 0x30002084:     // uart_fifo_config_1: Is UART Ready?
      ret = 32; break; // UART TX is always ready, default TX FIFO Available is 32

    default:  // Unknown Memory-Mapped I/O
#ifdef DUMP_INVALID_MEM_ACCESS
      printf("target_read_slow: invalid physical address 0x");
      print_target_ulong(paddr);
      printf("\n");
#endif
      return 0;
    }
    //// End Test
We handle all "write 0x30002088" (uart_fifo_wdata) by printing the character to the UART Output Register: riscv_cpu.c
/* return 0 if OK, != 0 if exception */
int target_write_slow(RISCVCPUState *s, target_ulong addr, mem_uint_t val, int size_log2) {
...
  pr = get_phys_mem_range(s->mem_map, paddr);
  if (!pr) {
    //// Begin Test: Intercept Memory-Mapped I/O
    switch(paddr & 0xfffffffffffful) {  // TODO: Why does NuttX write to 0x4000000030002088?
    case 0x30002088:  // uart_fifo_wdata: UART Output
      putchar(val); break;  // Print the character

    default:  // Unknown Memory-Mapped I/O
#ifdef DUMP_INVALID_MEM_ACCESS
      printf("target_write_slow: invalid physical address 0x");
      print_target_ulong(paddr);
      printf("\n");
#endif
    }
    //// End Test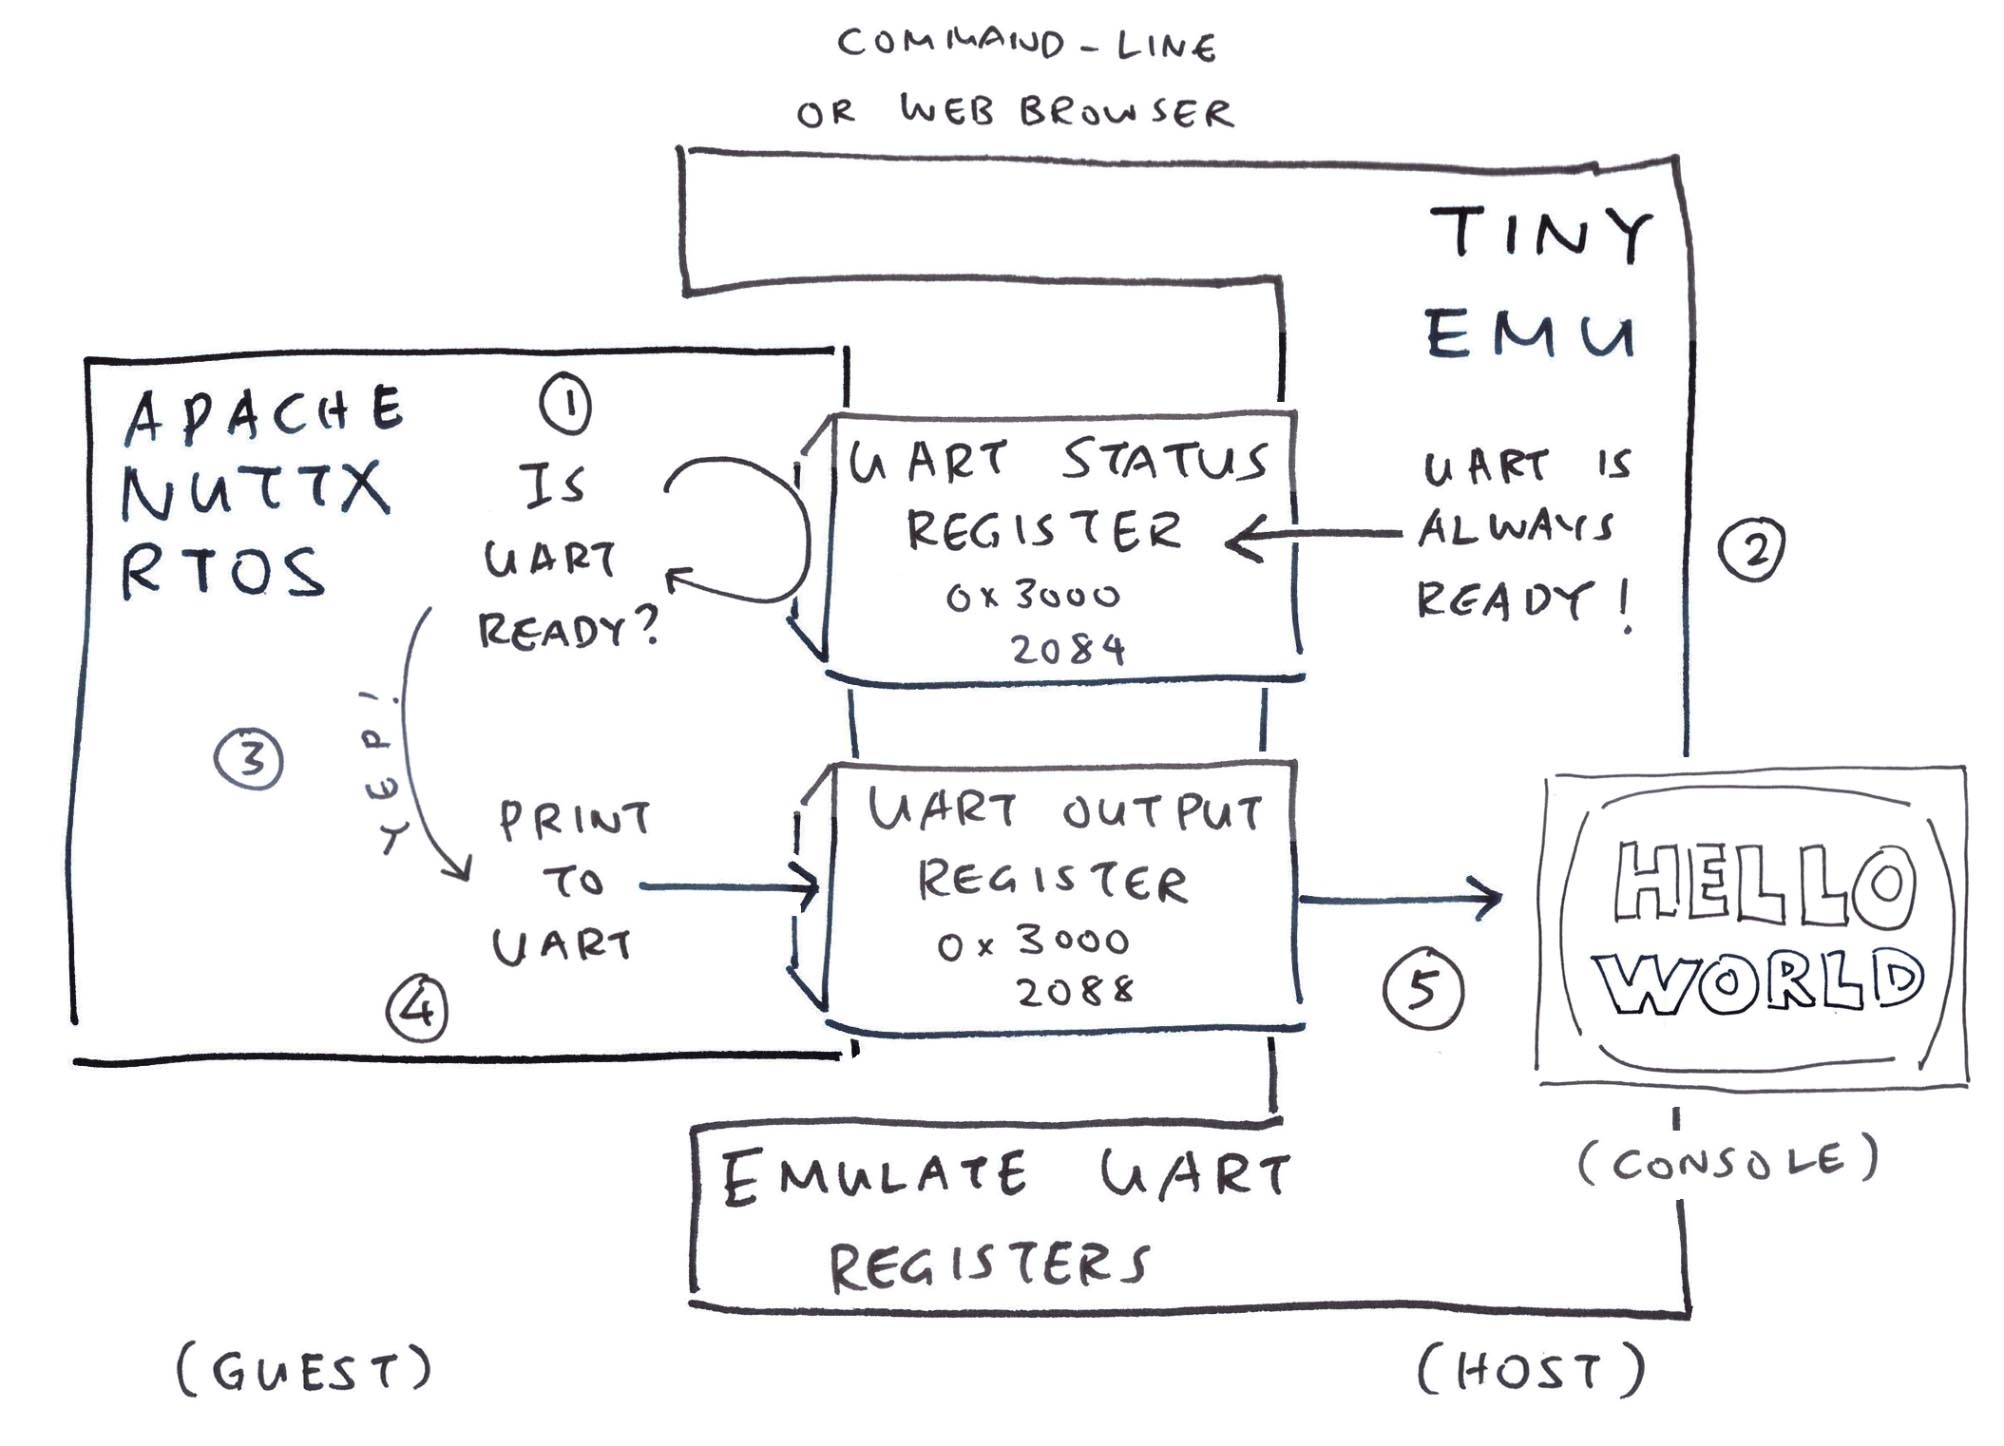
Here's the TinyEMU Log for Intercepted UART Registers. We see NuttX booting on TinyEMU yay!
$ temu root-riscv64.cfg | more
virtio_console_init
ABCnx_start: Entry
mm_initialize: Heap: name=Kmem, start=0x50407c00 size=2065408
mm_addregion: [Kmem] Region 1: base=0x50407ea8 size=2064720
mm_malloc: Allocated 0x50407ed0, size 704
mm_malloc: Allocated 0x50408190, size 48
...
uart_register: Registering /dev/console
target_read_slow: invalid physical address 0x0000000030002024
target_write_slow: invalid physical address 0x0000000030002024
work_start_lowpri kernel worker thread(s)
uart_register: Registering /dev/console
target_read_slow: invalid physical address 0x0000000030002024
target_write_slow: invalid physical address 0x0000000030002024
work_start_lowpri: Starting low-priority kernel worker thread(s)
nx_start_applicaystem/bin/init
elf_symname: Symbol has no name
elf_symvalue: SHN_UNDEF: Failed to get symbol name: -3
elf_relocateadd: Section 2 reloc 2: Undefined symbol[0] has no name: -3
nx_start_application: Starting init task: /system/bin/init
elf_symname: Symbol has no name
elf_symvalue: SHN_UNDEF: Fa: -3
elf_relocateadd: Section 2 reloc 2: Undefined symbol[0] has no name: -3
mm_initialize: Heap: name=(null), start=0x80200000 size=528384
mm_addregion: [(null)] Region 1: base=0x802002a8 size=527696
mm_initialize: Heap: name=(null), start=0x80200000 size=528384
mm_addregion: [(null)] Region 1: base=0x802002a8 size=527696
up_exit: TCB=0x504098d0 exiting
raise_exception2: cause=8, tval=0x0
pc =00000000800019c6 ra =0000000080000086 sp =0000000080202bc0 gp =0000000000000000
tp =0000000000000000 t0 =0000000000000000 t1 =0000000000000000 t2 =0000000000000000
s0 =0000000000000001 s1 =0000000080202010 a0 =000000000000000d a1 =0000000000000000
a2 =0000000080202bc8 a3 =0000000080202010 a4 =0000000080000030 a5 =0000000000000000
a6 =0000000000000101 a7 =0000000000000000 s2 =0000000000000000 s3 =0000000000000000
s4 =0000000000000000 s5 =0000000000000000 s6 =0000000000000000 s7 =0000000000000000
s8 =0000000000000000 s9 =0000000000000000 s10=0000000000000000 s11=0000000000000000
t3 =0000000000000000 t4 =0000000000000000 t5 =0000000000000000 t6 =0000000000000000
priv=U mstatus=0000000a0006806
 mideleg=0000000000000000 mie=0000000000000000 mip=0000000000000080
raise_exception2: cause=2, tval=0x0
raise_exception2: cause=2, tval=0x0
...
raise_exception2: cause=2, tval=0x0
up_exit: TCB=0x504098d0 exiting
raise_exception2: cause=8, tval=0x0
pc =00000000800019c6 ra =0000000080000086 sp =0000000080202bc0 gp =0000000000000000
tp =0000000000000000 t0 =0000000000000000 t1 =0000000000000000 t2 =0000000000000000
s0 =0000000000000001 s1 =0000000080202010 a0 =000000000000000d a1 =0000000000000000
a2 =0000000080202bc8 a3 =0000000080202010 a4 =0000000080000030 a5 =0000000000000000
a6 =00000000000001 s2 =0000000000000000 s3 =0000000000000000
s4 =0000000000000000 s5 =0000000000000000 s6 =0000000000000000 s7 =0000000000000000
s8 =0000000000000000 s9 =0000000000000000 s10=0000000000000000 s11=0000000000000000
t3 =0000000000000000 t4 =0000000000000000 t5 =0000000000000000 t6 =0000000000000000
priv=U mstatus=0000000a00040021 cycles=82846806
 mideleg=0000000000000000 mie=0000000000000000 mip=0000000000000080
raise_exception2: cause=2, tval=0x0
raise_exception2: cause=2, tval=0x0
TODO: Why does NuttX read from 0x4000000030002084? Probably due to T-Head C906 MMU Flags
TODO: What is raise_exception2: cause=2, tval=0x0?
TODO: Why is NuttX Shell started twice? Because it failed? (/system/bin/init)
Read the article...
What is raise_exception2: cause=8?
From the TinyEMU Log for Intercepted UART Registers...
up_exit: TCB=0x504098d0 exiting
raise_exception2: cause=8, tval=0x0
pc =00000000800019c6 ra =0000000080000086 sp =0000000080202bc0 gp =0000000000000000
tp =0000000000000000 t0 =0000000000000000 t1 =0000000000000000 t2 =0000000000000000
s0 =0000000000000001 s1 =0000000080202010 a0 =000000000000000d a1 =0000000000000000
a2 =0000000080202bc8 a3 =0000000080202010 a4 =0000000080000030 a5 =0000000000000000
a6 =0000000000000101 a7 =0000000000000000 s2 =0000000000000000 s3 =0000000000000000
s4 =0000000000000000 s5 =0000000000000000 s6 =0000000000000000 s7 =0000000000000000
s8 =0000000000000000 s9 =0000000000000000 s10=0000000000000000 s11=0000000000000000
t3 =0000000000000000 t4 =0000000000000000 t5 =0000000000000000 t6 =0000000000000000
priv=U mstatus=0000000a0006806
 mideleg=0000000000000000 mie=0000000000000000 mip=0000000000000080
raise_exception2: cause=2, tval=0x0
We look up the offending Code Address: pc=8000_19c6. This address comes from the NuttX App Virtual Memory: nsh/defconfig
CONFIG_ARCH_TEXT_VBASE=0x80000000
CONFIG_ARCH_TEXT_NPAGES=128
CONFIG_ARCH_DATA_VBASE=0x80100000
CONFIG_ARCH_DATA_NPAGES=128
CONFIG_ARCH_HEAP_VBASE=0x80200000
CONFIG_ARCH_HEAP_NPAGES=128
The only NuttX App we're running is the NuttX Shell. So we look up the RISC-V Disassembly for the NuttX Shell: init.S
nuttx/syscall/proxies/PROXY_sched_getparam.c:8
int sched_getparam(pid_t parm1, FAR struct sched_param * parm2) {
...
00000000000019c6 <.LVL4>:
nuttx/include/arch/syscall.h:229
  asm volatile
    19c6:	00000073          	ecall
0x19c6 is an ECALL from NuttX App (RISC-V User Mode) to NuttX Kernel (RISC-V Supervisor Mode). Our NuttX Shell is making a System Call to NuttX Kernel!
Which fails because everything runs in RISC-V Machine Mode right now. We will need to start TinyEMU in RISC-V Supervisor Mode (instead of Machine Mode).
(We quit if mcause=2, otherwise it will loop forever)
Read the article...
Will our Ox64 BL808 Emulator run in the Web Browser?
Let's find out! First we fix the TinyEMU Build for Emscripten.
Then we print to Device Console instead of JavaScript Console...
And our Ox64 BL808 Emulator runs OK in Web Browser yay!
(Live Demo of Ox64 BL808 Emulator)
Read the article...
NuttX needs to boot in Supervisor Mode, not Machine Mode. How to fix this in TinyEMU?
We copy to TinyEMU Boot Code the Machine-Mode Start Code from NuttX Start Code for 64-bit RISC-V Kernel Mode (rv-virt:knsh64)...
-
Execute the MRET Instruction to jump from Machine Mode to Supervisor Mode
-
Dump the RISC-V Registers MCAUSE 2: Illegal Instruction (for easier troubleshooting)
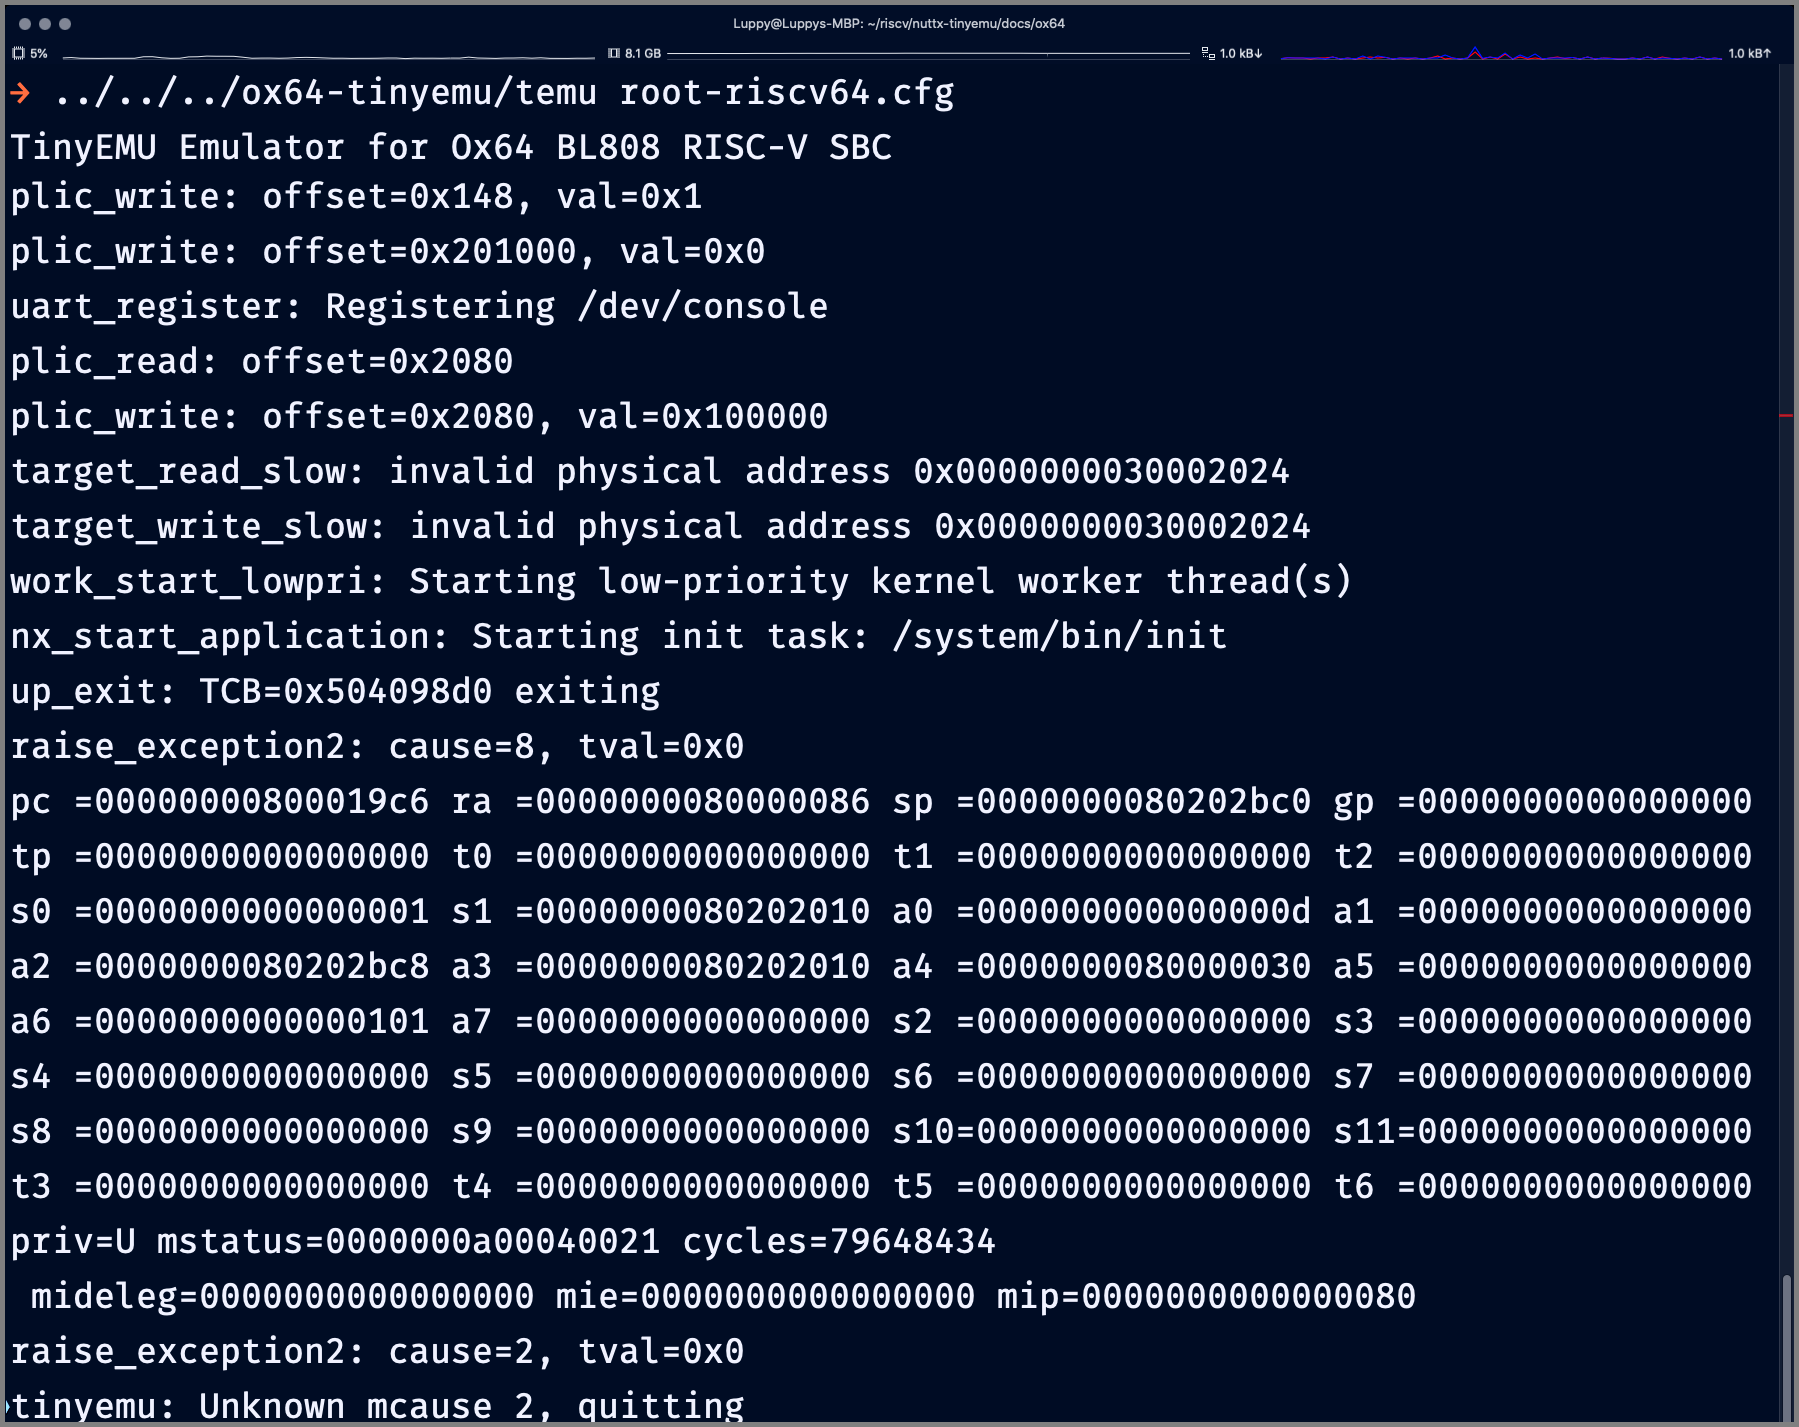
TinyEMU Emulator for Ox64 BL808 RISC-V SBC
virtio_console_init
csr_write: csr=0x341 val=0x0000000050200000
raise_exception2: cause=2, tval=0x10401073
pc =0000000050200074 ra =0000000000000000 sp =0000000050407c00 gp =0000000000000000
tp =0000000000000000 t0 =0000000050200000 t1 =0000000000000000 t2 =0000000000000000
s0 =0000000000000000 s1 =0000000000000000 a0 =0000000000000000 a1 =0000000000001040
a2 =0000000000000000 a3 =0000000000000000 a4 =0000000000000000 a5 =0000000000000000
a6 =0000000000000000 a7 =0000000000000000 s2 =0000000000000000 s3 =0000000000000000
s4 =fffffffffffffff3 s5 =0000000000000000 s6 =0000000000000000 s7 =0000000000000000
s8 =0000000000000000 s9 =0000000000000000 s10=0000000000000000 s11=0000000000000000
t3 =0000000000000000 t4 =0000000000000000 t5 =0000000000000000 t6 =0000000000000000
priv=U mstatus=0000000a00000080 cycles=13
 mideleg=0000000000000000 mie=0000000000000000 mip=0000000000000080
raise_exception2: cause=2, tval=0x0
pc =0000000000000000 ra =0000000000000000 sp =0000000050407c00 gp =
Which fails with an Illegal Instuction. The offending code comes from...
nuttx/arch/risc-v/src/chip/bl808_head.S:124
2:
  /* Disable all interrupts (i.e. timer, external) in sie */
  csrw	sie, zero
    50200074:	10401073          	csrw	sie,zero
Why is this instruction invalid?
csrw sie,zero is invalid because we're in User Mode (priv=U), not Supervisor Mode. And SIE is a Supervisor-Mode CSR Register.
So we set MSTATUS to Supervisor Mode and enable SUM.
TinyEMU Emulator for Ox64 BL808 RISC-V SBC
virtio_console_init
raise_exception2: cause=2, tval=0x879b0000
pc =0000000000001012 ra =0000000000000000 sp =0000000000000000 gp =0000000000000000
tp =0000000000000000 t0 =0000000050200000 t1 =0000000000000000 t2 =0000000000000000
s0 =0000000000000000 s1 =0000000000000000 a0 =0000000000000000 a1 =0000000000001040
a2 =0000000000000000 a3 =0000000000000000 a4 =0000000000000000 a5 =ffffffffffffe000
a6 =0000000000000000 a7 =0000000000000000 s2 =0000000000000000 s3 =0000000000000000
s4 =0000000000000000 s5 =0000000000000000 s6 =0000000000000000 s7 =0000000000000000
s8 =0000000000000000 s9 =0000000000000000 s10=0000000000000000 s11=0000000000000000
t3 =0000000000000000 t4 =0000000000000000 t5 =0000000000000000 t6 =0000000000000000
priv=M mstatus=0000000a00000000 cycles=4
 mideleg=0000000000000000 mie=0000000000000000 mip=0000000000000080
tinyemu: Unknown mcause 2, quitting
Now we hit an Illegal Instruction caused by an unpadded 16-bit instruction: 0x879b0000.
TinyEMU requires all Boot Code Instructions to be 32-bit. So we insert NOP (0x0001) to pad 16-bit RISC-V Instructions to 32-bit.
work_start_lowpri: Starting low-priority kernel worker thread(s)
nx_start_application: Starting init task: /system/bin/init
up_exit: TCB=0x504098d0 exiting

raise_exception2: cause=8, tval=0x0
pc =00000000800019c6 ra =0000000080000086 sp =0000000080202bc0 gp =0000000000000000
tp =0000000000000000 t0 =0000000000000000 t1 =0000000000000000 t2 =0000000000000000
s0 =0000000000000001 s1 =0000000080202010 a0 =000000000000000d a1 =0000000000000000
a2 =0000000080202bc8 a3 =0000000080202010 a4 =0000000080000030 a5 =0000000000000000
a6 =0000000000000101 a7 =0000000000000000 s2 =0000000000000000 s3 =0000000000000000
s4 =0000000000000000 s5 =0000000000000000 s6 =0000000000000000 s7 =0000000000000000
s8 =0000000000000000 s9 =0000000000000000 s10=0000000000000000 s11=0000000000000000
t3 =0000000000000000 t4 =0000000000000000 t5 =0000000000000000 t6 =0000000000000000
priv=U mstatus=0000000a000400a1 cycles=79648442
 mideleg=0000000000000000 mie=0000000000000000 mip=0000000000000080

raise_exception2: cause=2, tval=0x0
pc =0000000000000000 ra =0000000080000086 sp =0000000080202bc0 gp =0000000000000000
tp =0000000000000000 t0 =0000000000000000 t1 =0000000000000000 t2 =0000000000000000
s0 =0000000000000001 s1 =0000000080202010 a0 =000000000000000d a1 =0000000000000000
a2 =0000000080202bc8 a3 =0000000080202010 a4 =0000000080000030 a5 =0000000000000000
a6 =0000000000000101 a7 =0000000000000000 s2 =0000000000000000 s3 =0000000000000000
s4 =0000000000000000 s5 =0000000000000000 s6 =0000000000000000 s7 =0000000000000000
s8 =0000000000000000 s9 =0000000000000000 s10=0000000000000000 s11=0000000000000000
t3 =0000000000000000 t4 =0000000000000000 t5 =0000000000000000 t6 =0000000000000000
priv=M mstatus=0000000a000400a1 cycles=79648467
 mideleg=0000000000000000 mie=0000000000000000 mip=0000000000000080
tinyemu: Unknown mcause 2, quitting
But the ECALL goes from User Mode (priv=U) to Machine Mode (priv=M), not Supervisor Mode!
We set the Exception and Interrupt delegation for Supervisor Mode.
Finally NuttX Shell starts OK yay! User Mode ECALLs are working perfectly!
(Live Demo of Ox64 BL808 Emulator)
work_start_lowpri: Starting low-priority kernel worker thread(s)
nx_start_application: Starting init task: /system/bin/init
up_exit: TCB=0x504098d0 exiting
NuttShell (NSH) NuttX-12.4.0
nsh>
nx_start: CPU0: Beginning Idle Loop
Read the article...
How will we emulate UART Interrupts to support Console Input?
We modify the VirtIO Console Driver in TinyEMU so that it behaves like BL808 UART. And we switch the VirtIO IRQ so that it pretends to be BL808 UART3...
When we press a key, we see the UART Interrupt fired in NuttX!
nx_start: CPU0: Beginning Idle Loop
[a]
plic_set_irq: irq_num=20, state=1
plic_update_mip: set_mip, pending=0x80000, served=0x0
raise_exception: cause=-2147483639
raise_exception: sleep
raise_exception2: cause=-2147483639, tval=0x0

## Claim Interrupt
plic_read: offset=0x201004
plic_update_mip: reset_mip, pending=0x80000, served=0x80000

## Handle Interrupt in Interrupt Handler
target_read_slow: invalid physical address 0x0000000030002020
target_read_slow: invalid physical address 0x0000000030002024

## Complete Interrupt
plic_write: offset=0x201004, val=0x14

## Loop Again
plic_update_mip: set_mip, pending=0x80000, served=0x0
raise_exception: cause=-2147483639
raise_exception: sleep
raise_exception2: cause=-2147483639, tval=0x0
plic_read: offset=0x201004
plic_update_mip: reset_mip, pending=0x80000, served=0x80000
target_read_slow: invalid physical address 0x0000000030002020
target_read_slow: invalid physical address 0x0000000030002024
plic_write: offset=0x201004, val=0x14
But TinyEMU loops forever handling UART Interrupts. We check our NuttX UART Driver: bl808_serial.c
// NuttX Interrupt Handler for BL808 UART
static int __uart_interrupt(int irq, void *context, void *arg) {
  // 0x000020  /* UART interrupt status */
  int_status = getreg32(BL808_UART_INT_STS(uart_idx));

  // 0x000024  /* UART interrupt mask */
  int_mask = getreg32(BL808_UART_INT_MASK(uart_idx));

  /* Length of uart rx data transfer arrived interrupt */
  if ((int_status & UART_INT_STS_URX_END_INT) &&
      !(int_mask & UART_INT_MASK_CR_URX_END_MASK))
    {
      // 0x000028  /* UART interrupt clear */
      putreg32(UART_INT_CLEAR_CR_URX_END_CLR,
               BL808_UART_INT_CLEAR(uart_idx));
      /* Receive Data ready */
      uart_recvchars(dev);
    }
To make the NuttX Interrupt Handler work...
-
Fix the UART Interrupt Status: BL808_UART_INT_STS (0x30002020) must return UART_INT_STS_URX_END_INT (1 << 1)
-
Fix the UART Interrupt Mask: BL808_UART_INT_MASK (0x30002024) must NOT return UART_INT_MASK_CR_URX_END_MASK (1 << 1)
-
To prevent looping: Clear the interrupt after setting BL808_UART_INT_CLEAR (0x30002028)
Now it doesn't loop!
nx_start: CPU0: Beginning Idle Loop
[a]
plic_set_irq: irq_num=20, state=1
plic_update_mip: set_mip, pending=0x80000, served=0x0
raise_exception: cause=-2147483639
raise_exception2: cause=-2147483639, tval=0x0

## Claim Interrupt
plic_read: offset=0x201004
plic_update_mip: reset_mip, pending=0x80000, served=0x80000

## Handle Interrupt in Interrupt Handler
virtio_ack_irq
plic_set_irq: irq_num=20, state=0
plic_update_mip: reset_mip, pending=0x0, served=0x80000

## Complete Interrupt
plic_write: offset=0x201004, val=0x14
plic_update_mip: reset_mip, pending=0x0, served=0x0
We pass the keypress from VirtIO Console to the Emulated UART Input Register...
Console Input works OK yay!
(Live Demo of Ox64 BL808 Emulator)
Loading...
TinyEMU Emulator for Ox64 BL808 RISC-V SBC
ABCnx_start: Entry
uart_register: Registering /dev/console
work_start_lowpri: Starting low-priority kernel worker thread(s)
nx_start_application: Starting init task: /system/bin/init
up_exit: TCB=0x504098d0 exiting

NuttShell (NSH) NuttX-12.4.0
nsh> nx_start: CPU0: Beginning Idle Loop

nsh> ls
posix_spawn: pid=0x80202978 path=ls file_actions=0x80202980 attr=0x80202988 argv
=0x80202a28
nxposix_spawn_exec: ERROR: exec failed: 2
/:
 dev/
 proc/
 system/
nsh> uname -a
posix_spawn: pid=0x80202978 path=uname file_actions=0x80202980 attr=0x80202988 a
rgv=0x80202a28
nxposix_spawn_exec: ERROR: exec failed: 2
NuttX 12.4.0 96c2707 Jan 18 2024 12:07:28 risc-v ox64
Read the article...
How to emulate the OpenSBI ECALL to start the System Timer?
For now we ignore the OpenSBI ECALL from NuttX, we'll fix later...
Strangely TinyEMU crashes with an Illegal Instruction Exception at RDTTIME (Read System Timer). We patch it with NOP and handle later...
The Latest NuttX Build includes an OpenSBI ECALL. And it works OK with TinyEMU yay!
(Live Demo of Ox64 BL808 Emulator)
Loading...
TinyEMU Emulator for Ox64 BL808 RISC-V SBC
Patched RDTTIME (Read System Timer) at 0x5020bad6
ABC
NuttShell (NSH) NuttX-12.4.0-RC0
nsh> uname -a
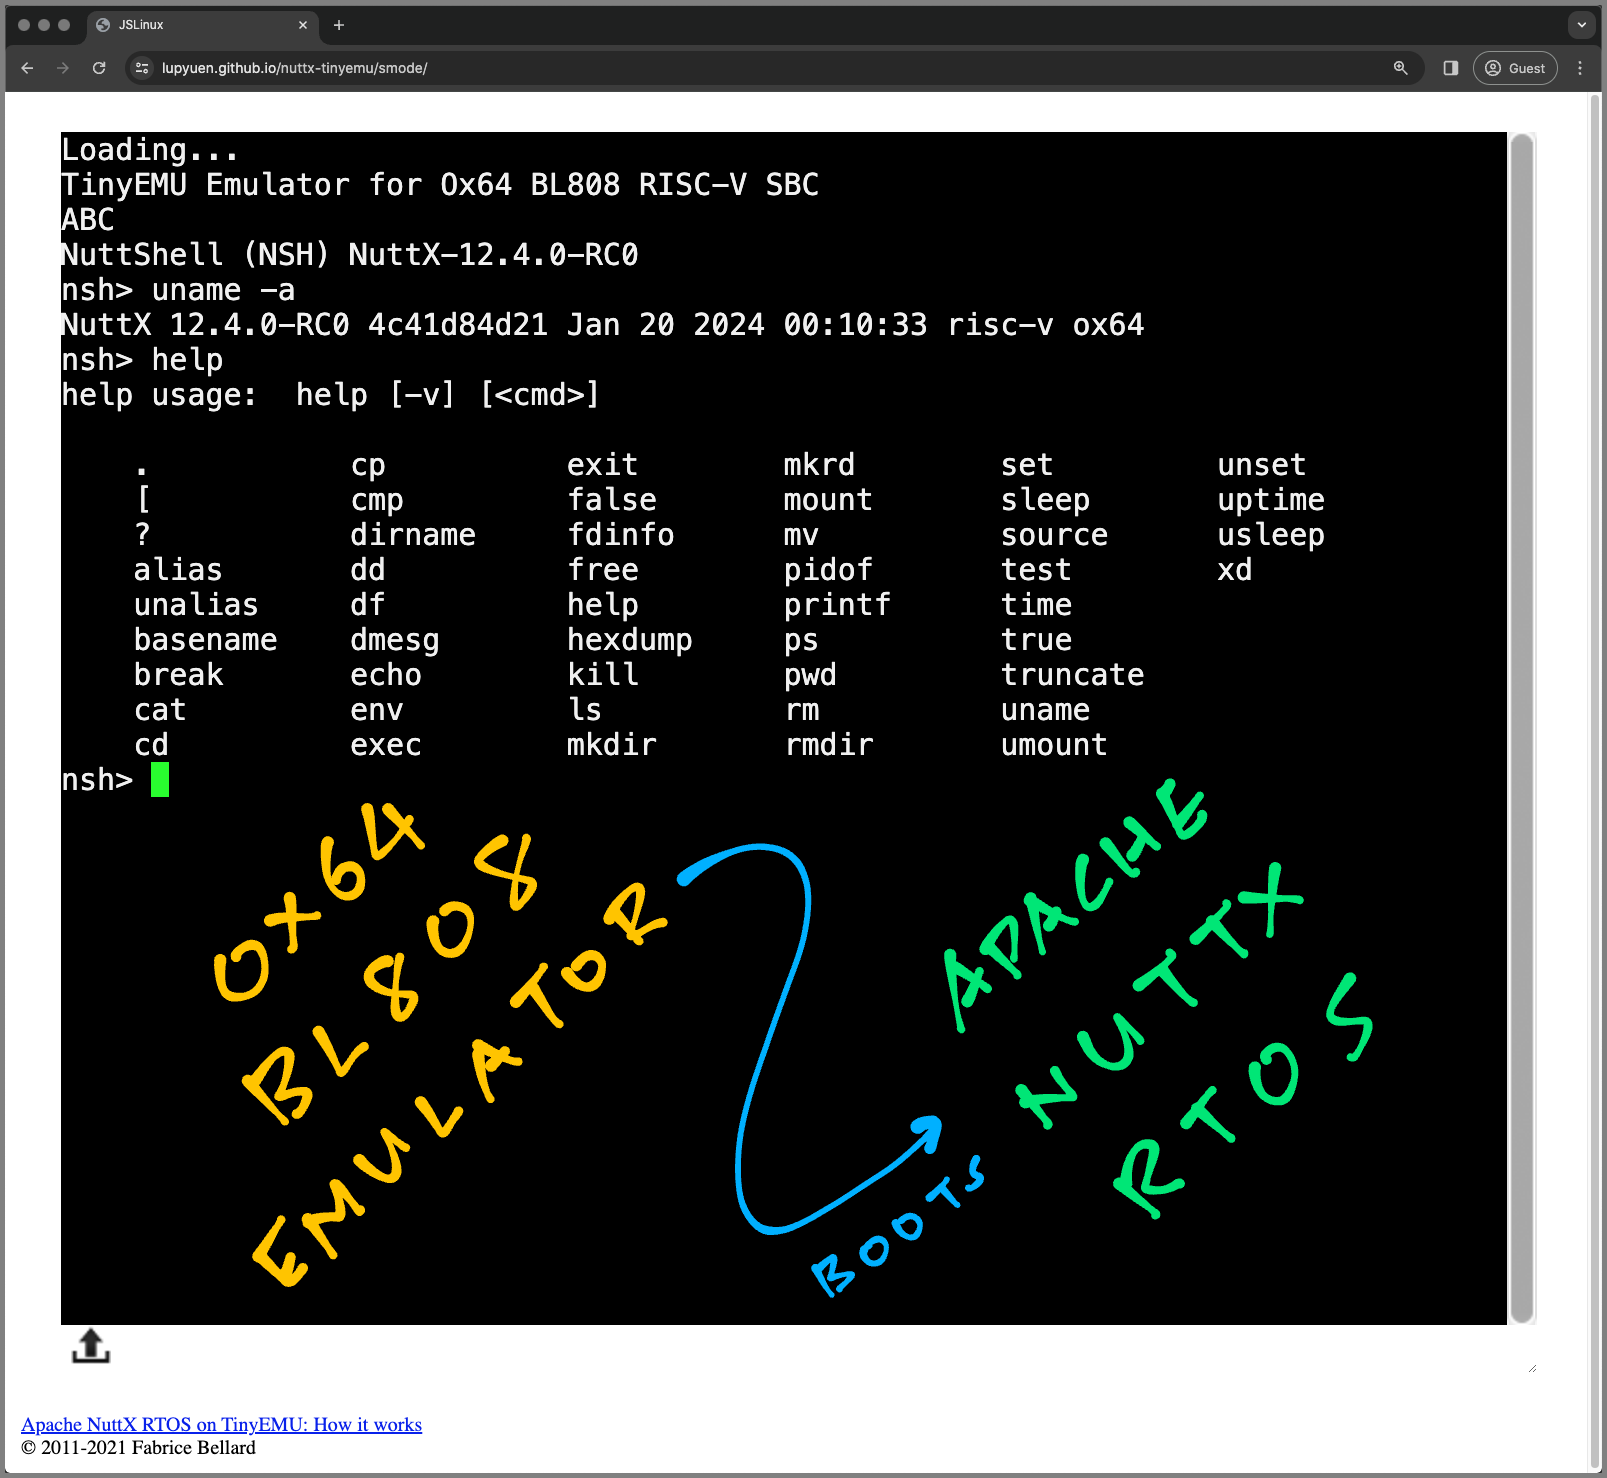
NuttX 12.4.0-RC0 4c41d84d21 Jan 20 2024 00:10:33 risc-v ox64
nsh> help
help usage: help [-v] [<cmd>]
. cp exit mkrd set unset
[ cmp false mount sleep uptime
? dirname fdinfo mv source usleep
alias dd free pidof test xd
unalias df help printf time
basename dmesg hexdump ps true
break echo kill pwd truncate
cat env ls rm uname
cd exec mkdir rmdir umount
nsh>
Read the article...
For OpenSBI Set Timer: Clear the pending timer interrupt bit
Regularly trigger the Supervisor-Mode Timer Interrupt
usleep works OK yay!
Loading...
TinyEMU Emulator for Ox64 BL808 RISC-V SBC
ABC
NuttShell (NSH) NuttX-12.4.0-RC0
nsh> usleep 1
nsh>
Patch DCACHE.IALL and SYNC.S to become ECALL
Handle System Timer with mtimecmp
Test ostest...
semtimed_test: Starting poster thread
semtimed_test: Set thread 1 priority to 191
semtimed_test: Starting poster thread 3
semtimed_test: Set thread 3 priority to 64
semtimed_test: Waiting for two second timeout
poster_func: Waiting for 1 second
semtimed_test: ERROR: sem_timedwait failed with: 110
_assert: Current Version: NuttX  12.4.0-RC0 55ec92e181 Jan 24 2024 00:11:51 risc
-v
_assert: Assertion failed (_Bool)0: at file: semtimed.c:240 task: ostest process
: ostest 0x8000004a
up_dump_register: EPC: 0000000050202008
Remove the Timer Interrupt Interval because ostest will fail
ostest is OK yay!
https://lupyuen.github.io/nuttx-tinyemu/timer/
expect script works OK with Ox64 BL808 Emulator...
#!/usr/bin/expect
set send_slow {1 0.001}
spawn /Users/Luppy/riscv/ox64-tinyemu/temu root-riscv64.cfg

expect "nsh> "
send -s "uname -a\r"

expect "nsh> "
send -s "ostest\r"
expect "ostest_main: Exiting with status -1"
expect "nsh> "
We'll run this for Daily Automated Testing, right after the Daily Automated Build.
NuttX Emulator is now integrated with TCC RISC-V Compiler in WebAssembly. So we can Build and Test NuttX Apps in the Web Browser!
Read the article...
TODO