PyXDTeleBot is a Telegram bot created using the Python programming language, specifically designed to facilitate the seamless sharing of media such as photos and videos from Twitter user posts. The bot leverages the Twitter API to extract multimedia content from a user's post and swiftly deliver it automatically to users through the Telegram platform.
Key Features:
-
Automatic Media Retrieval: PyXDTeleBot automatically fetches media such as photos and videos from desired Twitter posts. This eliminates the need for users to manually save or download media.
-
Twitter API Integration: The bot utilizes the Twitter API to directly and efficiently access user post data. Users only need to provide necessary information, and PyXDTeleBot takes care of the rest.
-
User-Friendly Interface: PyXDTeleBot is designed with a simple and easily understandable interface. Users can quickly request media from Twitter without requiring in-depth technical knowledge.
-
Customized Post Targeting: Users can easily specify the Twitter posts from which they want to retrieve media based on usernames, hashtags, or specific keywords. This provides flexibility in tailoring the desired content.
-
Direct Telegram Notifications: Once the media is successfully retrieved, PyXDTeleBot promptly sends it to users through messages on Telegram. This ensures that users receive content without the need to switch between platforms.
-
User Support: PyXDTeleBot comes with comprehensive documentation and user support to ensure users can seamlessly integrate and use the bot according to their needs.
PyXDTeleBot is an effective and efficient solution for those who want to quickly obtain media from their favorite Twitter posts directly on the Telegram platform, providing a convenient and hassle-free experience.
-
Python
Already installed Python with version 3.10.12. See the Installation and Setting up Python.
-
Telebot (Telegram Bot)
Already have a telegram bot. If you don't have one, you can follow the steps for creating a Telegram Bot.
-
Crontab
Create a crontab to run the script every time it is used without having to execute it every time in the terminal console. See the steps create Cron Job
# Change Directory
cd /path/to/yourdirectory

# Install gh
sudo apt install gh

# Auth gh
gh auth login

# Clonig Repository
gh repo clone muhfalihr/PyXDTeleBot

# Change Directory
cd PyXDTeleBot/-
Install Python version 3.
apt install python3
-
Instal Virtual environment for Python version 3.
apt install python3-venv
-
Create a Python virtual environment using the venv module.
python3 -m venv .venv/my-venv
-
Install the python package according to the requirements.txt file.
.venv/my-venv/bin/pip install -r requirements.txt
-
You need to give execute permission to the Python file. Use the following command in terminal or command prompt:
chmod +x pxdbot
-
Create an .env file and enter the values as follows:
TELEBOT_TOKEN=YOUR-TOKEN-TELEBOT
X_COOKIE='YOUR-TWITTER-COOKIE'
-
How to Get Your Bot Token
To set up a new bot, you will need to talk to BotFather. No, he’s not a person – he’s also a bot, and he's the boss of all the Telegram bots.
-
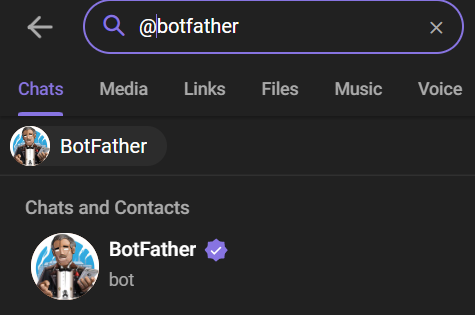
Search for @botfather in Telegram.
-
Start a conversation with BotFather by clicking on the Start button.
-
Type /newbot, and follow the prompts to set up a new bot. The BotFather will give you a token that you will use to authenticate your bot and grant it access to the Telegram API.
Note: Make sure you store the token securely. Anyone with your token access can easily manipulate your bot.
-
-
For more details, see the freeCodeCamp website.
-
Check Crontab Contents
Use the command to view the contents of the crontab:
cat /etc/crontab
This will display the contents of the system crontab. Make sure that no errors appear and that the crontab contains the appropriate entries.
-
Create Crontab
If a crontab has not been created for that user, you can try creating one with the command:
crontab -e -u [username]
or
export VISUAL=nano; crontab -e
Replace
[username]with the appropriate username. Then select number 1 for the crontab file editor. -
Add Cron Entry
Each line in the crontab represents a scheduled job. The general format is:
m h dom mon dow command-
m: Minutes (0 - 59) -
h: Hour (0 - 23) -
dom: Date of month (1 - 31) -
mon: Month (1 - 12) -
dow: Day of the week (0 - 6, 0 = Sunday) -
command: The command or script to runUsage example for running a Python script:
* * * * * /path/to/PyXDTeleBot/pxdbotThis means that the
prcscript will be run every minute, every hour, every month, each month, and every day of the week.
-
-
Save and Exit
Save changes and exit the editor.
- In the
nano editor, press Ctrl + X, then follow the instructions to save. - In
vim, press Esc, then type :wq and press Enter.
- In the
-
Check Access Rights
Make sure that the user in question has access rights to use crontab. Check if the user belongs to the
crontabgroup:grep cron /etc/group
If there are no problems, the user should usually be able to use crontab.
-
Cron Job Verification
To ensure the cron job has been added, use the following command:
crontab -l
This will display all active cron entries. If you get the message "no crontab for [username]" when running
crontab -l, it means there is no crontab configured for that user. -
Restart Crontab
systemctl restart cron.service
-
Start Crontab
systemctl start cron.service
-
Stop Crontab
systemctl start cron.service
The PyXDTeleBot project is licensed by MIT License.


