Flow for the Translators
The following instructions describe how to set up an environment on a Windows platform in order to translate Companion.
Note: You might want to also refer to the more general git usage guide: https://github.com/opentx/opentx/wiki/OpenTX-Git-Development-Workflow And the build instructions to test your changes: https://github.com/opentx/opentx/wiki/Compiling-OpenTx
If you already know Git and all its related actions, you may skip this section.
The first step is to install SourceTree in order to clone/branch/commit/etc... your modifications. This Git GUI is available for MAC and WINDOWS users: Download SourceTree
You must be register on GitHub to be able to commit your work: https://github.com
Follow the steps below:
- Click on the Clone/New button.
- Select the Git project: https://github.com/opentx/opentx
- Select the destination folder (about 220MB).
- Give a bookmark name. In this example OpenTX
- Launch the cloning procedure.

If everything went fine, you should get this screen.

First step is to ensure that your local copy is up-to-date. Pull all modifications from Git:

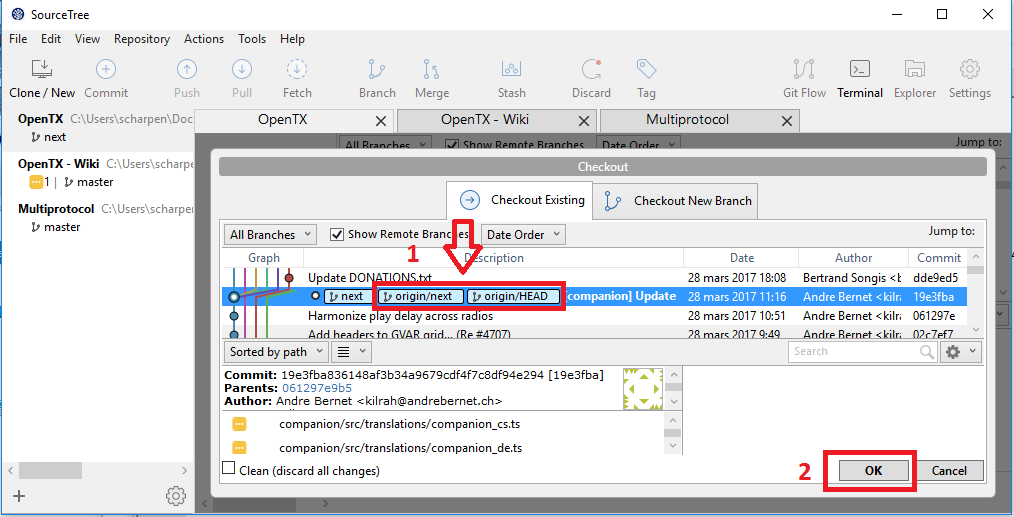
Then, checkout the next branch (shortcut Shift+Ctrl+U):

- Select
origin/next. - Click on the
OKbutton.
Now, the following rules must be observed to commit in the OpenTX project.
- Create a branch.
- When the modifications are done, push your branch in GitHub.
- Create a pull request on GitHub. This last step will run some checkers (in order to verify nothing is broken), then a developer will accept the modifications request.
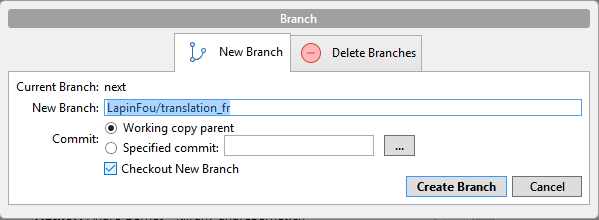
To create the branch, you must click on the Branch button (shortcut Shift+Ctrl+B):

The rule is [Git Name]/[Issue].
My registered Git name is LapinFou and I'm working on the French translation, so my branch will be:
LapinFou/translation_fr
From this point, be sure to work in your local branch. SourceTree will give you the confirmation:

From now, all the modifications you are doing can be safely Commit and Push in GitHub.
This can be handy if you are working from 2 places (at work during your break and at home).
First be sure to have all the steps below checked:
- Registered on GitHub.
- Checked out the
nextbranch. - Created your own branch.
The most complex part is done.
Before translating, you need to download Qt Linguist.
A standalone 5.7.1 version is available here: Qt Linguist tool for translators
Unzip the archive where you want.
In my case I installed it in the folder C:\Program Files (x86)\Qt Linguist and associated .ts files with Qt Linguist.
The 1st step is to update the .ts file using the lupdate.exe command. You must open a Windows command shell (shortcut Win+R, then type cmd).
The command is:
</path/to/QtLinguist>lupdate.exe </path/to/code> -no-obsolete -ts </path/to/file.ts>In my case (French translation), it will be:
"C:\Program Files (x86)\Qt Linguist\lupdate.exe" C:\Users\scharpen\Documents\github\opentx -no-obsolete -ts C:\Users\scharpen\Documents\github\opentx\companion\src\translations\companion_fr.tscompanion_fr.ts must be replaced with the language you want translate:
| File Name | Language |
|---|---|
| companion_cs.ts | Czech |
| companion_de.ts | German |
| companion_es.ts | Spanish |
| companion_fi.ts | Finnish |
| companion_fr.ts | French |
| companion_he.ts | Hebrew |
| companion_it.ts | Italian |
| companion_nl.ts | Dutch |
| companion_pl.ts | Polish |
| companion_pt.ts | Portuguese |
| companion_ru.ts | Russian |
| companion_sv.ts | Swedish |
| companion_zh_CN.ts | Chinese |
In order to automate the translation process, you can create a .bat file.
In my case, I created a UpdateTs.bat batch file which included the full command:
"C:\Program Files (x86)\Qt Linguist\lupdate.exe" C:\Users\scharpen\Documents\github\opentx -no-obsolete -ts C:\Users\scharpen\Documents\github\opentx\companion\src\translations\companion_fr.ts
pause
Note the pause command. If you double-click on the UpdateTs.bat file, the Windows command line will open and stay open until you hit a key.
If you don't add the pause command, the windows will close right after being executed.
The updated .ts file can now be modified. Its path is:
</path/to/opentx/branch>\companion\src\translations
Opened the .ts file corresponding to the language you wish to translate.
Here is a quick overview of Qt Linguist:
- Buttons to navigate through the fields which must be translated.
- The current string to translate.
- The source string (always in English).
- Sometimes, the developers can add a comment to warn the translator. It can be for special string which are used in Companion and the radio firmware itself. It can also be used to explain the context where this string is used.
- Qt Linguist can propose a translation based on the strings already translated.

The nice thing about Qt Linguist is that it will display the Companion's windows on the top right window. Very useful for the translator to understand the context of the translation.
Basic explanation how Qt Linguist does work:

Red → Used to move to the previous/next item.
Green → Used to move to the previous/next unfinished item. "Unfinished" means "not translated" or "translated, but not validated".
Blue → Validate the translation, then move to the next unfinished item.
When the translation job is done, then you should get something like that:
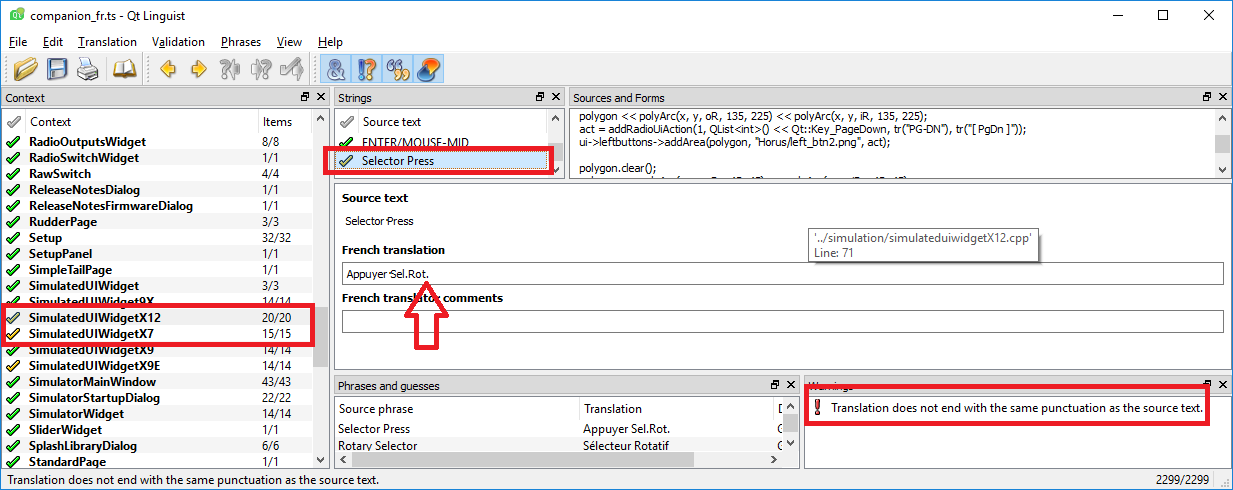
Note: the item can be sometimes highlighted in orange. This is probably because the translated string doesn't have the same end punctuation. Check if it is correct or not.
With SourceTree, you must commit yours modifications in your local branch, then push your branch in GitHub.
- Be sure to select the right project.
- Click on File Status.
- The list of the modified files will be displayed.

- Selected the modified files you want to commit, then click on
Stage Selected. At this point you are creating a list of files you want to commit. In the blue rectangle, you can selected the desired filter to help you in this process (useful to display Untracked files). By default, only the Modified filter is active. - This is the list of files you want to commit.
- Enter a meaningful explanation of the job you have done.
- Click on this button to
Commityours modifications.

Click on the Push button. A windows will show up.
Tick the case shown by the red arrow.

- SourceTree will fill-up the required field for you.
- Click on the
Pushbutton.

You should get this result:

Now go on the OpenTX GitHub https://github.com/opentx/opentx/
You should see something similar to the image below. Click on the Compare & pull request button.

- Check the title of your Pull Request.
- Leave a comment.
- You can check the differences between the original version and your version.
- Click on the
Create pull requestbutton.

Now, your are done. automate checkers will verify than your modifications can be merged with the next branch. The final step is done by a developer. Only the developer can accept and merge your modifications.
The OpenTX team thank you for your translation.