

![]()
![]()
Information about the goals and organization of the AI Incident Database can be found on the production website. This page concentrates on onboarding for the following types of contributions to the database,
- Contribute changes to the current AI Incident Database.
- Contribute a new summary to the AI Incident Database. A "summary" is a programmatically generated summary of the database contents. Examples are available here.
- Contribute a new taxonomy to the AI Incident Database. Details on taxonomies are available in the arXiv paper.
- Contribute a new application facilitating a new use case for the database.
In most cases unless you are contributing quick fixes, we recommend opening an issue before contributing to the project. You can also Contact us for an invitation to the project's Slack installation. Lurking is encouraged. Finally, for major announcements you can join the announcements-only mailing list.
Anyone can contribute code to the project. The system is being built as a "do-ocracy", meaning those who "do" have influence over the development of the code.
The steps for contributing changes are the following,
- Create a fork of the repository.
- Clone the fork to your local environment.
- Open a feature branch from whichever branch you would like to change. This is typically the
stagingbranch, so you can dogit checkout stagingthengit checkout -b feature-cool-new-thing. - Make your changes, commit them, then push them remote.
- Open a pull request to the
stagingbranch. - Update the pull request based on the review.
- See the pull request get pulled. :)
Please make sure your code is well organized and commented before opening the pull request.
The AI Incident Database is an open source project inviting contributions from the global community. Anyone with code changes that advance the change thesis of making the world better in the future by remembering the negative outcomes of the past are welcome to submit pull requests. To ensure that submitted changes are likely to be accepted, we recommend becoming familiar with the manner in which we organize our work items and open an issue on GitHub.
The process of completing work through GitHub issues at the highest level is:
Create Issue -> Assign Issue -> Review and Publish
Labels help streamline the process and ensure issues do not get lost or neglected. Label descriptions are on GitHub. The following describes when/how to use a label.
- Consider if the issue is an Initiative, Epic, or Story. All engineering issues aside from Bugs should fall in one of these categories and be assigned a label. Other types of issues (ex: Data Editor-related) may not have this label.
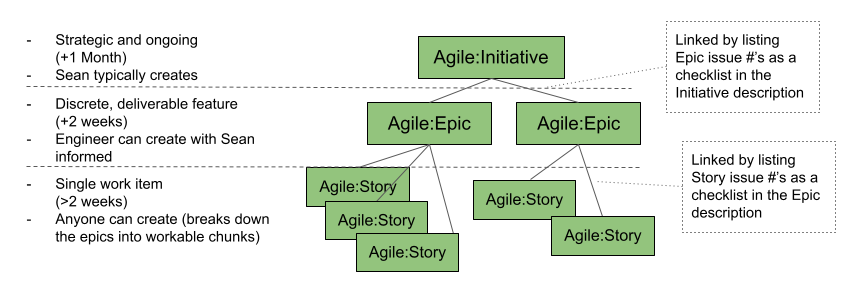
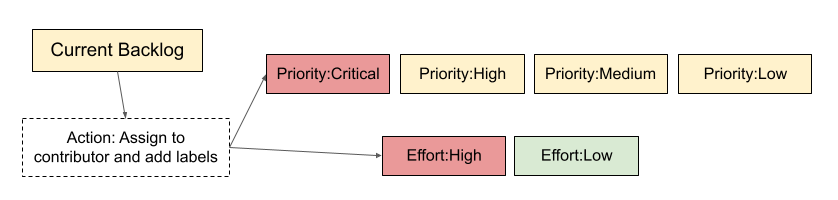
- Apply a descriptor label (when applicable):

Add the label Current Backlog to trigger assigning a contributor. Either the assigner or the contributor adds the issue’s priority and effort labels.
Once the issue has a deliverable output(s), use the Pull Request process to have the contribution reviewed and accepted.
The person opening the PR should create it in a draft status until the work is finished, then they should click on "Ready for review" button and assign it to someone as a reviewer as soon the PR is ready to be reviewed.
In general, PR reviews can be assigned to any member of the @responsible-ai-collaboraite/aiid-dev team, or to the team alias itself. Don't be shy! Above all, contributors and reviewers should assume good intentions. As such, reviewers are also encouraged to re-assign PR reviews based on familiarity and time constraints.
When something is mergeable, then someone else with maintainer permissions (not the implementer or reviewer) can merge it to staging. They can optionally do a final review.
After merging to staging, the code quality is everyone’s responsibility.
For more information on how to create built-in draft pull requests, please refer to the GitHub blog.
 |
|---|
| Site architecture diagram. This is the link to view and edit the diagram on Diagrams.net |
The site has three components that are considered "serverless," meaning there is no dynamic backend templating the application or responding to API requests. The components include:
- Web host. This is the web server hosting the Gatsby-based web application. The site is hosted in production on Netlify.
- Index. The Algolia search index.
- Database. The Atlas MongoDB service exposed via MongoDB Realm. Atlas provides the storage, and Realm supports the web API with user account provisioning. This database does not currently automatically populate the search index, but periodic dumps will be made from this database to Algolia. The full database can support documents and details that are either unsupported by Algolia, or would be too expensive to host there.
More details are available in the Production System information below. We recommend most people forego setting up a development environment with their own Index and Database. You should instead concentrate on setting up a Gatsby development site.
Style guide:
ESLintandPrettierhave been configured to help enforcing code styles. Configuration details can be found in.eslintrc.jsonand.prettierrc.- Husky and lint-staged are installed and
pre-commithook added to check lint/prettier issues on staged files and fix them automatically before making commit. formatandlintscripts can be used manually to fix style issues.
The site is hosted by Netlify and is integrated into GitHub to generate previews of all code states. This allows for seamless previewing of the application. However, the preview domains do not match the whitelisted domains known by the MongoDB service, so not all functionality is expected to work in the build previews without whitelisting the domain preview.
Builds: Builds are presently run at least every 12 hours automatically by a GitHub action. They are also run on merge requests from forks. The site deploys from the main branch automatically if the build succeeds.
See mongo.md
Algolia is the instant search provider interfaced in the Discover application. It is presently updated manually when new incident reports are ingested into the database.
Cloudinary is what we use to host and manage report images.
This project is currently undergoing a significant restructuring as we transition away from the recently deprecated Atlas GraphQL endpoint. Please note that some parts of the documentation may be outdated. For the most up-to-date information and guidance, please follow this link to the latest documentation.
Depending on what feature you are working on, there will be different systems you'll need to set up after you've forked and cloned this repository:
Get a Gatsby environment working. Most of the time, you'll only need to run:
npm install --global gatsby-cli
Create a .env file under site/gatsby-site with the following contents:
GATSBY_REALM_APP_ID=aiidstitch2-sasvc
MONGODB_CONNECTION_STRING=mongodb+srv://readonly:vNMlVM35rsTlMUTr@aiiddev.seam4.mongodb.net
MONGODB_TRANSLATIONS_CONNECTION_STRING=mongodb+srv://readonly:vNMlVM35rsTlMUTr@aiiddev.seam4.mongodb.net
MONGODB_REPLICA_SET=aiiddev-shard-00-02.seam4.mongodb.net,aiiddev-shard-00-01.seam4.mongodb.net,aiiddev-shard-00-00.seam4.mongodb.net

GATSBY_ALGOLIA_APP_ID=JD5JCVZEVS
GATSBY_ALGOLIA_SEARCH_KEY=c5e99d93261645721a1765fe4414389c
GATSBY_AVAILABLE_LANGUAGES=en,es,fr
SKIP_PAGE_CREATOR=createTsneVisualizationPage
GATSBY_PRISMIC_REPO_NAME=
PRISMIC_ACCESS_TOKEN=
IS_EMPTY_ENVIRONMENT=
For GATSBY_PRISMIC_REPO_NAME and PRISMIC_ACCESS_TOKEN variables, please follow prismic setup below
For complete empty environment (no database data, no Algolia index, no Prismic content), set IS_EMPTY_ENVIRONMENT=true. This will disable all tests that require data.
This will give you access to our staging environment, so please be sure you are on the staging branch.
In the same folder, install dependencies using npm (do not use yarn, it will ignore the package-lock.json file):
npm install
You are ready to start a local copy of the project:
gatsby develop
You should have a local copy of the project running on https://localhost:8000.
The values you placed into the env file are all associated with a staging environment that is periodically rebuilt from the production environment. While this helps you get setup more quickly, if you will be making changes to the backend you will need your own development backend that you can control, modify, and potentially break.
When building the site, some steps can take a while to run. This can be inconvenient when you are working on a feature unrelated to the steps taking the most time in the build process. To avoid this problem, you can set the environment variable SKIP_PAGE_CREATOR to a comma-separated list of page-creator functions found in gatsby-node that should be skipped. These include: createMdxPages, createCitationPages, createWordCountsPages, createBackupsPage, createTaxonomyPages, createDownloadIndexPage, createDuplicatePages, createTsneVisualizationPage, and createEntitiesPages. For instance, to run a development build skipping the creation of the TSNE (spatial) visualization and citation pages, you would run:
SKIP_PAGE_CREATOR=createTsneVisualizationPage,createCitiationPages gatsby developIn general, skipping the TSNE visualization has the most significant reduction in build time.
If the feature you are working on includes structural changes to the MongoDB database or Realm functions, you'll need to create your own project by going to https://cloud.mongodb.com and following these steps:
- Create a new MongoDB project (the free tier will be enough)
- Create a new Atlas cluster with the name:
AIIDDev- Choose "Username and Password" as authentication method.
- Choose "My Local Environment" as network access and add your current IP address.
- If your IP is dynamic, add
0.0.0.0to the list of IP addresses.
- Create a new Realm App. The name should be
AIIDStitch2. Realm will give it an id likeaiidstitch2-<REALM_APP_ID> - Once created, go to
App Settingsand update app region toGlobal - Create a new database user with admin access and another user with read-only permissions
Download the latest database backup from https://incidentdatabase.ai/research/snapshots.
Extract the archive, then from the mongodump directory, run mongorestore (included in MongoDB tools) using the admin user created in the step above to upload the database backup:
mongorestore mongodb+srv://<USER>:<PASSWORD>@aiiddev.<CLUSTER>.mongodb.net/aiidprod aiidprod
mongorestore mongodb+srv://<USER>:<PASSWORD>@aiiddev.<CLUSTER>.mongodb.net/translations translations
You can find the value for <CLUSTER> by going to your Atlas cluster's overview on cloud.mongodb.com, then selecting the "primary" shard labeled aiiddev-shard-00-<XX>.<CLUSTER>.mongodb.net.
Install the realm-cli and follow the login process: https://docs.mongodb.com/realm/cli/realm-cli-login
npm install --global mongodb-realm-cli
Once authenticated, you can deploy the realm app by going to site/realm of this repo and running:
realm-cli push --remote=aiidstitch2-<REALM_APP_ID>
Finally, update the previously created .env:
GATSBY_REALM_APP_ID=aiidstitch2-<REALM_APP_ID>
MONGODB_CONNECTION_STRING=mongodb+srv://<username>:<password>@aiiddev.<CLUSTER>.mongodb.net
MONGODB_REPLICA_SET=aiiddev-shard-00-00.<CLUSTER>.mongodb.net,aiiddev-shard-00-01.<CLUSTER>.mongodb.net,aiiddev-shard-00-02.<CLUSTER>.mongodb.net
Restart Gatsby, and your local app should fetch data from your MongoDB environment!
Suppose the feature you are developing involves mutating the Algolia index (used in the Discover app). In that case, you'll have to create your own by signing up for Algolia here: https://www.algolia.com and following these steps:
- Create a new App (free tier will be enough)
- Create a new index called
instant_search - Go to https://incidentdatabase.ai/downloadIndex and save the
new_index.jsonfile - Upload this file to your newly created index, by selecting
Use FileAlgolia's UI - Now go to your Algolia App settings, and click API Keys, using the values from there to update your
.envfile accordingly.
GATSBY_ALGOLIA_APP_ID=<YOUR APP ID>
GATSBY_ALGOLIA_SEARCH_KEY=<YOUR SEARCH KEY>
ALGOLIA_ADMIN_KEY=<YOUR ADMIN KEY>
Algolia index settings are uploaded on build time, so they will take effect after running:
gatsby build
Alternatively, you can update the settings without rebuilding if from site/gatsby-site you run:
node src/scripts/algolia-update.js
Restart Gatsby, and you should have a complete working environment!
The translation process runs on Gatsby's postBuild event and consists of 3 steps:
- Get the list of languages, which is pulled from the /src/components/i18n/languages.js using the
GATSBY_AVAILABLE_LANGUAGESenvironment variable as a filter:
GATSBY_AVAILABLE_LANGUAGES=en,es,fr
- Translate each incident report to each language, and save the translated reports to a
translationsdatabase under a collection for each language:
translations
    |-- incident_reports_en
    |   |-- { title, text, report_number }
    |   |-- { title, text, report_number }
    |
    |--incident_report_es
    |   |-- { title, text, report_number }
        |-- { title, text, report_number }
    |
    |--incident_report_fr
    |   |-- { title, text, report_number }
        |-- { title, text, report_number }
To access this database, a user with read/write permissions needs to be provided through the following environment variable:
MONGODB_TRANSLATIONS_CONNECTION_STRING=mongodb+srv://<user>:<password>@aiiddev.<host>.mongodb.net
You can use the same value defined on the MongoDB Setup environment variable MONGODB_CONNECTION_STRING
- Generate an Algolia index from each translated collection and upload them to Algolia. Each index has the following naming format:
instant_search-{language code}
After the first run, the following applies for subsequent runs:
Translations of report fields load from the existing translations/incident_reports_{language}/{doc} document, and if not found, then the Translate API is hit.
Algolia indexes are replaced every time the process runs.
Https://react.i18next.com handles UI translations. To find missing keys enable debugging by setting the following environment variable:
GATSBY_I18N_DEBUG=true
The translate API charges ~20USD per million characters and can translate to 111 languages.
At the time of writing, there are 1336 Incident Reports, each report consisting of ~4000 characters, with a total sum of ~5 million characters.
Considering the pricing above, translating all ingested reports to one language will cost (5 million / 1 million) * $20 = ~$100, and translating all incident reports to all languages $100 * 111= ~$11k.
The translation process defaults to a dry run mode that prepends a string to every translated text instead of hitting Google's API.
Therefore, Translated texts in this mode will look like: translated-{language}-YouTube to crack down on inappropriate content masked as kids’ cartoons
The dry run is disabled through an environment variable as follows:
TRANSLATE_DRY_RUN=false
In addition to the Dry Run mode, you can also limit the number of reports to translate by setting the following environment variable. This variable sets the date from which the reports will be translated (using the date_submitted report field):
TRANSLATE_SUBMISSION_DATE_START=2024-01-01
If the feature you are working on depends on Google's Geocoding API, please add the following environment variable with the appropriate value to your .env file.
GOOGLE_MAPS_API_KEY=XXXXXXXXXXXX
This project uses Prismic to fetch page content. You can still run the project without setting a Prismic account.
- Sign up for a new Prismic account or log in to your account if you already have one
- In
Create a new repositorysection chooseSomething else - Give your repository a name and choose
gatsbyin the technology dropdown - Choose your plan (if you only need one user, the free plan is enough)
- Click
Create repository - Create a new token in Settings > API & Security > Content API tab > Change Repository security to
Private API – Require an access token for any request> Create new app > Permanent access tokens > Save value for later
You can find the list of all custom types in the folder custom_types
- From the prismic left menu click
Custom Types - Click
Create new custom type - Give it a name (name of the json in custom_types folder)
- Click
JSON editor - Paste the JSON content from the predefined custom types inside the json
- Click
Save
- On the Prismic dashboard left menu click
Documents - Click
Create new - Fill in all the mandatory fields
- Click
Save - Keep in mind that the new content won't be available on your page until you Publish it.
- In order to publish it, click
Publish
In order for your recently published Prismic content to be available on your page, a Netlify build needs to be triggered. In order to do this, you need to create a Netlify Build Hook.
Add the following environment variable on Netlify:
GATSBY_PRISMIC_REPO_NAME=[name_of_your_repository] (step 3 from Prismic Setup section)
PRISMIC_ACCESS_TOKEN=[you_prismic_access_token] (step 6 from Prismic Setup section)
- Login to your Netlify
- Go to
Deploys - Go to
Deploy settings - Scroll to
Build Hooks - Click
Add build hook - Give it a name and assign a branch
- Click save
- Copy the generated URL
- Go to your Prismic repository
- Go to
Settings>Webhooks - Create a new webhook and paste the URL in the URL field
- In
TriggersselectA document is publishedandA document is unpublished - Click
Add this webhook
All site users have one or more roles assigned to them. The role determines what actions the user can take on the site.
As soon as a user is signed in, the system assigns a subscriber role by default. Role assignment is handled manually by the site administrators.
The roles are:
| User Role | Permissions |
|---|---|
subscriber |
This is the default role assigned to all users. It allows the user to subscribe to new incidents, specific incidents, entities, and anything else that is subscribeable. |
submitter |
This role allows the user to submit new incidents under their user account. |
incident_editor |
This role allows the user to: - Edit and clone incidents - See the live incident data. The live data is the data that is currently stored in the database. Keep in mind that incident pages are generated on each build, so if a user edits an incident, the change will be only visible if the live data options is activated until the next build finishes. - Add, edit, approve and delete incident variants - View and submit incident candidates - Restore previous versions of incidents and reports. - Approve and reject new submissions. Which involves converting a submission into an incident or report (create incident or report and linked notifications), or deleting the submission |
taxonomy_editor |
This role allows the user to edit all taxonomies. |
taxonomy_editor_{taxonomy_name} |
This role allows the user to edit a specific taxonomy. ie: taxonomy_editor_csetv1 role allows the user to edit the CSETv1 taxonomy. |
admin |
This role has full access to the site, including the ability to edit users' roles. |
This project uses Tailwind CSS framework with its class syntax. More specifically, we base our components on Flowbite React and Flowbite which is built on top of TailwindCSS.
In order to keep styling consistency on the site, we follow a set of steps when developing. This is also to make the development process more agile and simple.
- Develop your component using Flowbite React components
- If your components is not fully contemplated by Flowbite react, check Flowbite components and use the provided HTMLs.
- If you need to improve styling, use only Tailwind CSS classes.
Examples If you want to place a new Flowbite React button:
import { Button } from 'flowbite-react';

const YourComponent = () => {
    return <Button color='success'>New button</Button>
}
If you want to customize a Flowbite button:
const YourComponent = () => {
    return <button type="button" className="text-white bg-blue-700 hover:bg-blue-800 focus:ring-4 focus:ring-blue-300 font-medium rounded-lg text-sm px-5 py-2.5 mr-2 mb-2 dark:bg-blue-600 dark:hover:bg-blue-700 focus:outline-none dark:focus:ring-blue-800">Default</button>
}
Deployment of the site consists of two parts: deployment of the backend related features that runs as a GitHub Action and deployment of the frontend related features that runs on Netlify:
The Netlify build process runs every time a push is made to an open PR or main or develop.
To correctly set up this process, the following environment variables need to be created using Netlify's build settings UI:
ALGOLIA_ADMIN_KEY=
AWS_LAMBDA_JS_RUNTIME=nodejs18.x # required to run the Gatsby v5
GATSBY_ALGOLIA_APP_ID=
GATSBY_ALGOLIA_SEARCH_KEY=
GATSBY_REALM_APP_ID=
MONGODB_CONNECTION_STRING=
MONGODB_REPLICA_SET=
GATSBY_EXCLUDE_DATASTORE_FROM_BUNDLE=1 # specific to Netlify, for large sites
GATSBY_CPU_COUNT=2 # limits the number of Gatsby threads, helping with deployment stability
NODE_VERSION=18 # this is required by Gatsby v5
NODE_OPTIONS=--max-old-space-size=4096 # increase default heap size to prevent crashes during build
# The following "CLOUDFLARE_R2" variables are required to create the /research/snapshots/ page
CLOUDFLARE_R2_ACCOUNT_ID=[The Cloudflare R2 account ID (e.g.: 8f4144a9d995a9921d0200db59f6a00e)]
CLOUDFLARE_R2_ACCESS_KEY_ID=[The Cloudflare R2 access key ID (e.g.: 7aa73208bc89cee3195879e578b291ee)]
CLOUDFLARE_R2_SECRET_ACCESS_KEY=[The Cloudflare R2 secret access key]
CLOUDFLARE_R2_BUCKET_NAME=[The Cloudflare R2 bucket name (e.g.: 'aiid-public')]
GATSBY_CLOUDFLARE_R2_PUBLIC_BUCKET_URL=[The Cloudflare R2 public bucket URL (e.g.: https://pub-daddb16dc28841779b83690f75eb5c58.r2.dev)]
This guide walks you through the steps to set up a Netlify site for your project by importing an existing project from GitHub.
- Ensure you have a GitHub account and your project is already pushed to a repository.
- Make sure you have a Netlify account. If not, sign up at Netlify.
- Go to your Netlify dashboard.
- Click on Add New Site.
- Choose Import Existing Project.
- Select Deploy with GitHub to connect your GitHub account.
- Choose the repository where your project is located.
- Under Branch to Deploy, select
main. This setting doesn't matter for now. - Leave all other settings as default.
- Click on Deploy Site.
- Navigate to Site Configuration > Build & Deploy.
- Under Build Settings > Build Status, find Stopped Builds.
- Click Save.
- Go to Site Configuration > Site Details.
- Copy the
NETLIFY_SITE_ID. This will be useful when setting up the GitHub environment.
Two workflows take care of deploying the Realm app to both production and staging environments, defined in realm-production.yml and realm-staging.yml. Each workflow looks for environment variables defined in a GitHub Environment named production and staging.
These environments must contain the following variables:
GATSBY_REALM_APP_ID=
REALM_API_PRIVATE_KEY=
REALM_API_PUBLIC_KEY=
To get your Public and Private API Key, follow these instructions.
We have integrated our testing and deployment processes with GitHub Actions. There are three primary workflows for deployment: Deploy Previews, Staging, and Production. The goal of these workflows is to continuously test and integrate changes in pull requests across environments.
- File: /.github/workflows/preview.yml
- Trigger: This workflow is activated for pushes to pull requests that target the
stagingbranch. - Process: Executes both the integration tests and deploys the application to Netlify.
- Post-Deployment: Upon a successful deployment, the workflow automatically posts a comment on the pull request. This comment includes a link to the Netlify preview of the changes and a link to the Netlify deploy log.
- Environment: This workflow uses the
stagingGitHub environment.
- Trigger: Runs only on pushes to the
stagingbranch. - Process: Executes both the integration tests and deploys to Netlify.
- Deployment Criteria: If the tests fail, no deployment will be carried out.
- Environment: This workflow uses the
stagingGitHub environment.
- Trigger: Runs only on pushes to the
mainbranch. - Process: Executes both the integration tests and deploys to Netlify.
- Deployment Criteria: If the tests fail, no deployment will be carried out.
- Environment: This workflow uses the
productionGitHub environment.
All three workflows share a common set of environment variables, which need to be defined for each environment. (Currently, we have only two environments: staging and production.) These variables are categorized into secrets and standard variables, and are accessed via GitHub actions as such.
ALGOLIA_ADMIN_KEYCLOUDFLARE_R2_ACCESS_KEY_IDCLOUDFLARE_R2_ACCOUNT_IDCLOUDFLARE_R2_BUCKET_NAMECLOUDFLARE_R2_SECRET_ACCESS_KEYCYPRESS_RECORD_KEYE2E_ADMIN_PASSWORDE2E_ADMIN_USERNAMEGOOGLE_TRANSLATE_API_KEYMONGODB_CONNECTION_STRINGMONGODB_MIGRATIONS_CONNECTION_STRINGMONGODB_REPLICA_SETMONGODB_TRANSLATIONS_CONNECTION_STRINGNETLIFY_AUTH_TOKENPRISMIC_ACCESS_TOKENREALM_API_PRIVATE_KEYREALM_GRAPHQL_API_KEYREALM_API_PUBLIC_KEYGATSBY_ROLLBAR_TOKEN
CYPRESS_PROJECT_IDGATSBY_ALGOLIA_APP_IDGATSBY_ALGOLIA_SEARCH_KEYGATSBY_AVAILABLE_LANGUAGESGATSBY_CLOUDFLARE_R2_PUBLIC_BUCKET_URLGATSBY_PRISMIC_REPO_NAMEGATSBY_REALM_APP_IDNETLIFY_SITE_IDREALM_API_APP_IDREALM_API_GROUP_ID
For integration testing, we use Cypress. You can run the desktop app continuously as part of your development environment or run it on demand in headless mode.
First, add two new environment variables:
E2E_ADMIN_USERNAME=
E2E_ADMIN_PASSWORD=
As their names imply, they should be an existing user's credentials with the admin role.
To use the desktop version, run:
npm run test:e2e
And to run it in continuous integration (headless) mode:
npm run test:e2e:ci
Let's say you want to add the CTECH Taxonomy.
-
Create a new MongoDB collection using the lowercased Taxonomy name: ctech.
-
Define the appropriate rules, relationships, and schema for this new collection. Specifically, a schema that specifies the fields of the taxonomy. An example for the fictional
ctechschema is below. You can optionally populate the schema and use the MongoDB Realm API to generate the schema programmatically.
/site/realm/data_sources/mongodb-atlas/aiidprod/ctech/schema.json
{
    "properties": {
        "_id": {
            "bsonType": "objectId"
        },
        "classifications": {
            "bsonType": "object",
            "properties": {
                "taxonomy field 1": {
                    "bsonType": "bool"
                },
                "taxonomy field 2": {
                    "bsonType": "string"
                },
                "Publish": {
                    "bsonType": "bool"
                }
            }
        },
        "incident_id": {
            "bsonType": "int"
        },
        "namespace": {
            "bsonType": "string"
        },
        "notes": {
            "bsonType": "string"
        }
    },
    "title": "ctech"
}
- Add the new document to the
taxacollection, that lists the taxonomy fields. This annotates the classifications found in the new collection and determines properties of their display in the user interface.
{
    "_id": {
        "$oid": "61f158f4c19c105af2f3d6af"
    },
    "namespace": "ctech",
    "weight": {
        "$numberInt": "50"
    },
    "description": "# What are these resources?\n\nThe following resources have been associated with incidents in the database to provide tools and processes to persons and companies looking for best practices in the prevention or mitigation of similar incidents in the future.",
    "field_list": [
        {
            "short_name": "taxonomy field 1",
            "long_name": "taxonomy field 1",
            "short_description": "Lorem ipsum...",
            "long_description": "__Lorem ipsum__",
            "display_type": "bool",
            "mongo_type": "bool",
            "default": null,
            "placeholder": null,
            "permitted_values": null,
            "weight": {
                "$numberInt": "70"
            },
            "instant_facet": true,
            "required": false
        },
        {
            "short_name": "Publish",
            "display_type": "bool",
            "mongo_type": "bool"
        }
    ]
}
-
Update
createCitiationPages.jsto have it pull the new taxonomy definitions. The relevant lines are:- /site/gatsby-site/page-creators/createCitiationPages.js#L125
- /site/gatsby-site/page-creators/createCitiationPages.js#L180
-
Restart Gatsby
Restarting Gatsby should make the new taxonomy available on the citation pages, so you can visit /cite/1 to see a form for editing the taxonomy. Please note that you will need to be logged in to a user account on the application to see the form.
Migration files are stored in the /site/gatsby-size/migrations folder and their executions are logged in the migrations collection.
Please add a connection string with read/write permissions to the mongo database:
MONGODB_MIGRATIONS_CONNECTION_STRING=
Migrations run automatically as part of Gatsby's onPreBootstrap event, but it is also possible to run them from the command line for debugging or testing purposes:
To run all pending migrations:
node migrator up
To run a specific migration:
node migrator up --name 2022.02.18T16.29.14.increment-report-number.js
To add a new migration, execute the following command and define the up and down processes as pertinent.
node migrator create --name increment-report-number.js --folder migrations
Execution is taken care of by the umzug package. Please refer to its documentation for more information.
The site exposes a read-only GraphQL endpoint at /api/graphql, which is a reflection of the Realm's auto-generated endpoint.
You can check the endpoint here
The endpoint can be queried using any GraphQL client, but for example, if using Apollo:
    import { ApolloClient, HttpLink, InMemoryCache, gql } from '@apollo/client';

    const client = new ApolloClient({
        link: new HttpLink({
            uri: `https://incidentdatabase.ai/api/graphql`,
        }),
        cache: new InMemoryCache()
    });

    client.query({query: gql`{
        reports {
          title
          report_number
        }
    }`}).then(result => console.log(result));
The endpoint is implemented as a Gatsby function. In the context where this function runs (Netlify or your local Node), an environment variable to an Realm API Key with query introspection permission needs to be set:
REALM_GRAPHQL_API_KEY=xxxxxxxxxx
You can generate a new key following these steps:
- Go to your Realm App
- Go to
Authentication - Go to
Authentication Providers - Go to
API keys - Click on
Create API keyand copy the key value
About Realm API Keys: https://www.mongodb.com/docs/realm/authentication/api-key/
In addition to that, you have to add your Netlify site URL to the allowed origins in your Realm App.
- Go to your Realm app
- Go to
App Settings - Click on
+ Add Allowed Request Origin - Add your Netlify public site URL (ie:
https://xxxx-xxxxx.netlify.app) - Click
Save Draft - Deploy draft
To enable social network login, you will need to add the following configuration to your Atlas App Service.
Add this secret value to your Atlas App Service following the instructions in the Atlas App Services documentation.
facebookAppSecret = [Facebook App Secret, see comment below for more information]
- To get the Facebook App Secret you should go to the Facebook Developer Portal, and click on your app > Settings > Basic.
On Facebook Authentication settings, set the "Client ID" with the Facebook App Id. To get the Facebook App ID you should go to the Facebook Developer Portal, and check your app.
"Redirect URIs" is the URL that the user will be redirected to after successfully authenticating with Facebook or Google. It should point to /logincallback page. For Production the URI is https://incidentdatabase.ai/logincallback, for Staging the URI is https://staging-aiid.netlify.app/logincallback
About Facebook Authentication instructions: https://www.mongodb.com/docs/realm/web/authenticate/#facebook-authentication
- All: This subscription type is not defined yet.
{ "userId": "63320ce63ec803072c9f529c" "type": "all", } - Incident: Users with this subscription type will be notified when the incident associated is updated. This subscription type needs an incident_id value associated.
{ "userId": "63320ce63ec803072c9f529c" "type": "incident", "incident_id": 10, } - New Incident: Users with this subscription type will be notified when a new Incident is created. The notification will be sent after finish the next site build when the Incident page is actually created.
{ "userId": "63320ce63ec803072c9f529c" "type": "new-incidents", } - Entities: Users can subscribe to a specific Entity. The user with this subscription type will be notified when a new Incident associated with an specific Entity is created or when an existing Incident is updated to be associated with that Entity.
{ "userId": "63320ce63ec803072c9f529c", "type": "entity" "entityId": "openai", } - Submission Promoted: Users that submit a new Incident Report are automatically subscribed to its promotion. Once the submission has been approved by an editor, the user will recieve an email informing that the submission is now an incident/issue/report.
{
    "userId": "63320ce63ec803072c9f529c",
    "type": "submission-promoted"
}
These subscription types are also documented in subscriptions.js file.
Sendgrid is used to send email notifications.
To allow email notifications add these secret values to your Atlas App Service following the instructions in the Atlas App Services documentation.
To disable all email noticications, fill the following SendGridApiKey secret value with an empty string. If this secret value is an empty string, the emails will be ignored.
SendGridApiKey = [SendGrid API key from https://app.sendgrid.com/settings/api_keys]
publicApiKey = [Public API key from the Atlas Organization. See comment below for more information]
privateApiKey = [Private API key from the Atlas Organization. See comment below for more information]
groupId = [Atlas Service App group ID, eg: "62cc90978bc4600cafdcf16e"]
appId = [Atlas Service App ID, eg: "62cc98647e6a26c53d5b4b53"]
To get your Public and Private API Key, follow these instructions.
To get the group ID and the app ID, the easiest way is to navigate to your Atlas Service App dashboard and copy from the URL. The URL format is https://services.cloud.mongodb.com/groups/[groupId]/apps/[appId]/dashboard
Email notifications to New Incidents (subscription type New Incident), Incident updates (subscription type Incident) and Submission Promoted (subscription type Submission Promoted) are sent when the next build finishes. This is because we have to wait until the new Incident page is generated and accessible.
When a new Incident is created or updates, a pending notification item is saved into the notifications DB collection with processed=false field.
And finally, as part of the site build process, we processed all pending notifications (processed=false), send the emails to all recipients, and update the items with processed=true and sentDate=[now].
- Incident Updated
{ "type": "incident-updated", "incident_id": 374, "processed": false } - New Incident Report
{ "type": "new-report-incident", "incident_id": 374, "report_number": 2172, "processed": false } - New Incident
{ "type": 'new-incidents', "incident_id": incidentId, "processed": false, } - Entities
{ "type": "entity", "incident_id": 374, "entity_id": "openai", "isUpdate": true, "processed": false } - Submission Promoted
{
    "type": "submission-promoted",
    "incident_id": 374,
    "processed": false
}
This project uses Rollbar for error logging for the whole site, including background processes.
To log the errors a Realm secret value should be set:
rollbarAccessToken: [The access token value from your Rollbar account > Projects > Your project > Project Access Tokens > post_server_item]
In addition to that, this env variable should be set as well:
GATSBY_ROLLBAR_TOKEN: [The access token value from your Rollbar account > Projects > Your project > Project Access Tokens > post_server_item]
There is a GitHub Workflow "Restore Prod DB into Staging" that can be triggered manually to dump and restore Production database into Staging database (both aiidprod and translations databases)
Go to Actions > Restore Prod DB into Staging > Run Workflow dropdown > Run Workflow
To enable this workflow these GitHub secrets should be added:
DB_PRODUCTION_CONNECTION_STRING=[Production connection string with readonly user credentials. ie: mongodb+srv://[DB readonly user]:[DB user password]@aiiddev-xxxxxx.gcp.mongodb.net]
DB_STAGING_CONNECTION_STRING=[Staging connection string with admin user credentials. ie: mongodb+srv://[DB admin user]:[DB user password]@aiiddev-xxxxxx.gcp.mongodb.net]

NETLIFY_BUILD_STAGING_URL=[Netlify Staging build hook. This value is on https://app.netlify.com/sites/staging-aiid/settings/deploys#continuous-deployment]
For inquiries, you are encouraged to open an issue on this repository or visit the contact page.