-
Notifications
You must be signed in to change notification settings - Fork 1
Home
This wiki (thanks RodenLuo for the writeup) page is intended as auxiliary guide for the practical part of the compBio2019 course. It is recommended to roughly scan the provided course work PDFs at least once and then read this guide. After reading this guide, one can go back to the course work PDFs to do the analyses. Good luck.
First and most importantly, one needs to understand what IBEX is. This is given in the lecture before the hands-on session. I am not going to go too much deep. But the basic idea is that often times the local computer (your laptop) is not powerful enough to perform the scientific computation. One need to use much more powerful machine(s) to do that. In this case, we use ibex.
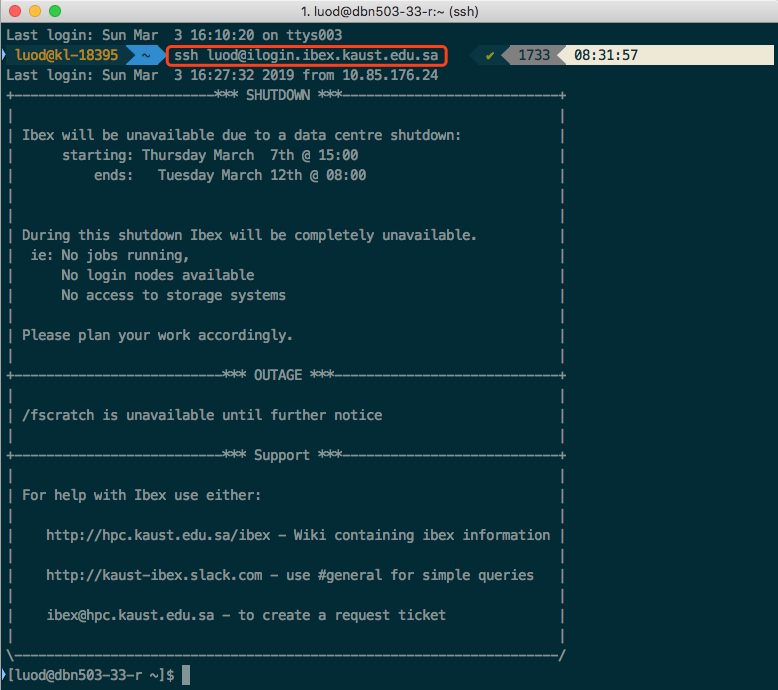
Access to ibex, if you are on Mac, open an APP called terminal; if you are one Windows, download "babun" and install it and then open it (you can install any other shell application on Windows but I suggest babun). Then type the following on the newly opened window. I will use my user name luod to demonstrate, you will need to change it accordingly. Check the screenshot below. You will need to type your password (unless you did some magic work called ssh key authentication).
Once you see the welcome message like me, you are on ibex. Once you are on ibex, you no longer have the mouse or the nice looking graphics like your laptop. Then you need to know how to navigate yourself on ibex (find folders, files, use applications). This has been covered in the lecture before. But here is the tutorial I used when I first learned unix/linux (you can also take a look at ibex training page). At least you need to go through "Tutorial One" and "Tutorial Two". You at least need to master the following commands (if not covered in the tutorial, you want to google it, when you google a command in linux, follow the word by linux, e.g. Google "pwd linux"):
ls
cd
pwd
cp
mv
cat
nano
vi # talk about this in a sec
That gives you how to enter into a certain folder.
Then you need to know how to edit a file on linux.
That where vi comes in handy. You can google "vi tutorial ".
I found this one very interesting.
You can also choose nano instead of vi
(some people find that easier),
and then google "nano tutorial".
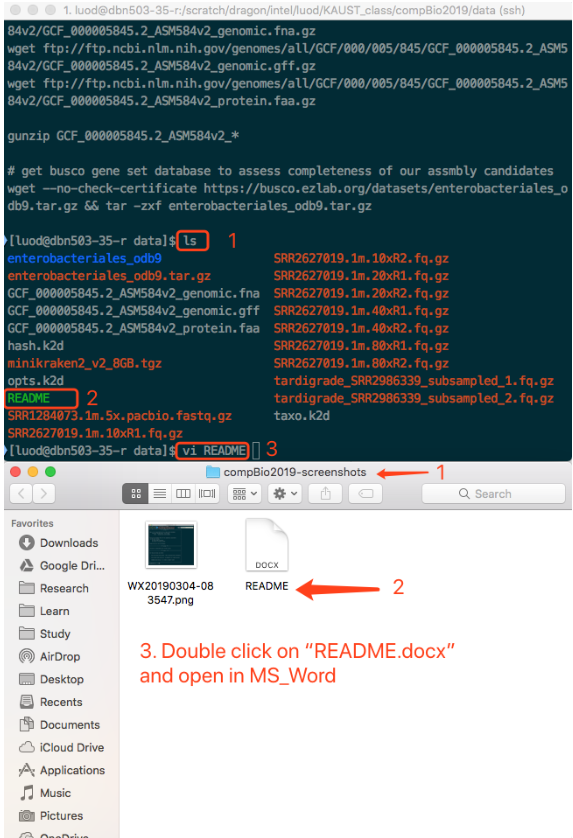
Below I will give you a comparison of graphics and command line using vi and cat as examples.
When you type vi README, is like saying, "Hey, Linux, Please use the app called vi to open README".
The corresponding operations on desktop graphics is like, double click the README.docx.
While you do that, you are using your mouse.
But behind the scene, the computer is running something like MS_Word README.docx.
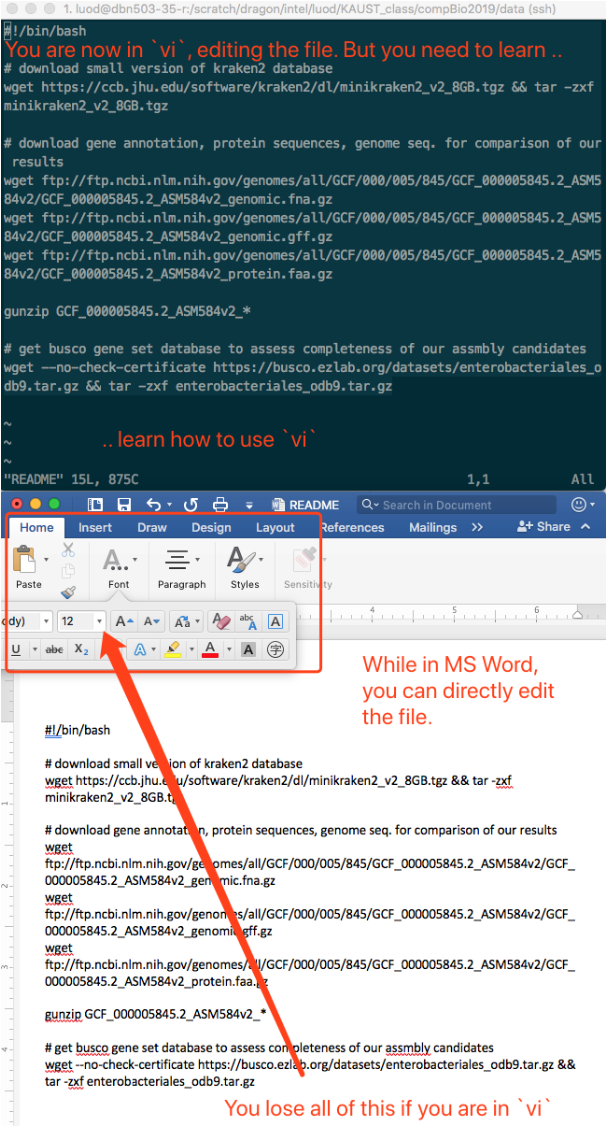
After you hit enter, you are now in the vi application, just like you are in MS Word.
You may need to learn the tutorial I mentioned above for vi.
One thing to keep in mind is, basically, if you are in Linux,
you lose all the nice features of MS Word, say,
the beautiful looking fonts,
change size of the font,
give any color you want,
insert table, pictures, etc.
You only have "plain text"!
(As you learn more, you may find something fancier things in linux too.)
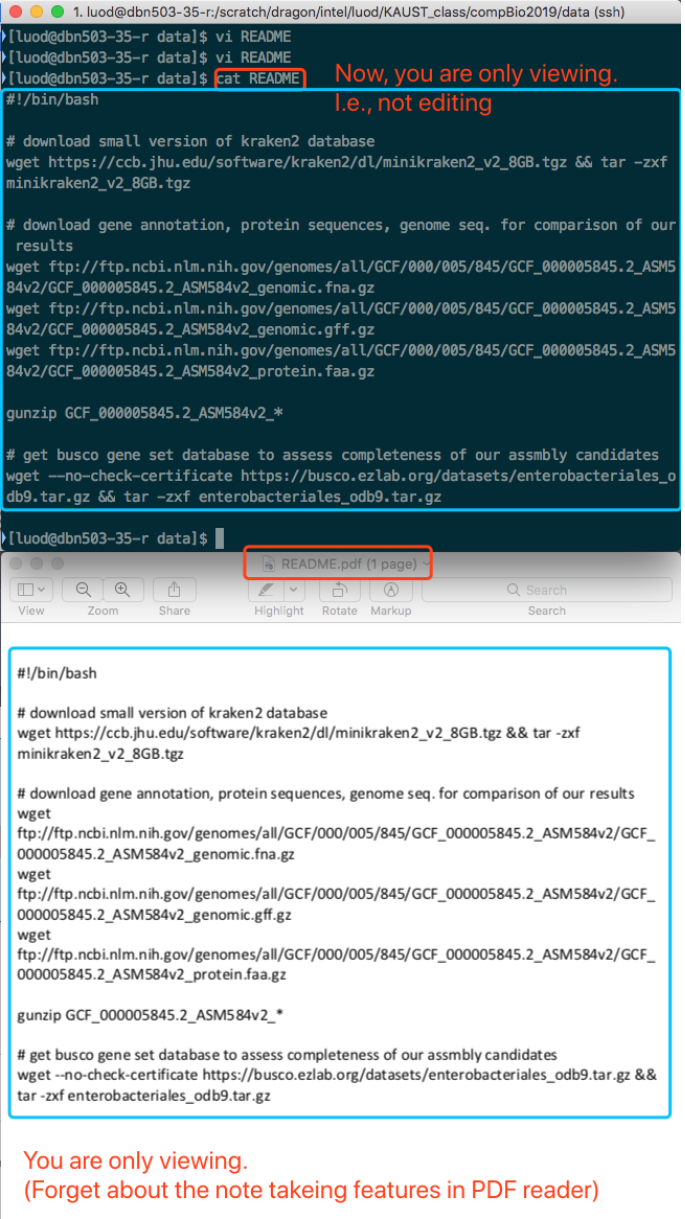
vi is for editting. cat is for viewing. (It is actually "concatenate", but we do not go that deep.) Think as vi is MS Word, and cat is "Preview" on Mac OS or "Adobe Acrobat Reader" on Windows.
Familiarize yourself with the above commands and then come to the homework. I have seen several people running code as shown in the screenshot.
This is not the intended way to run the code and finish the work (mentioned by instructors, probably get not heard or not understood).
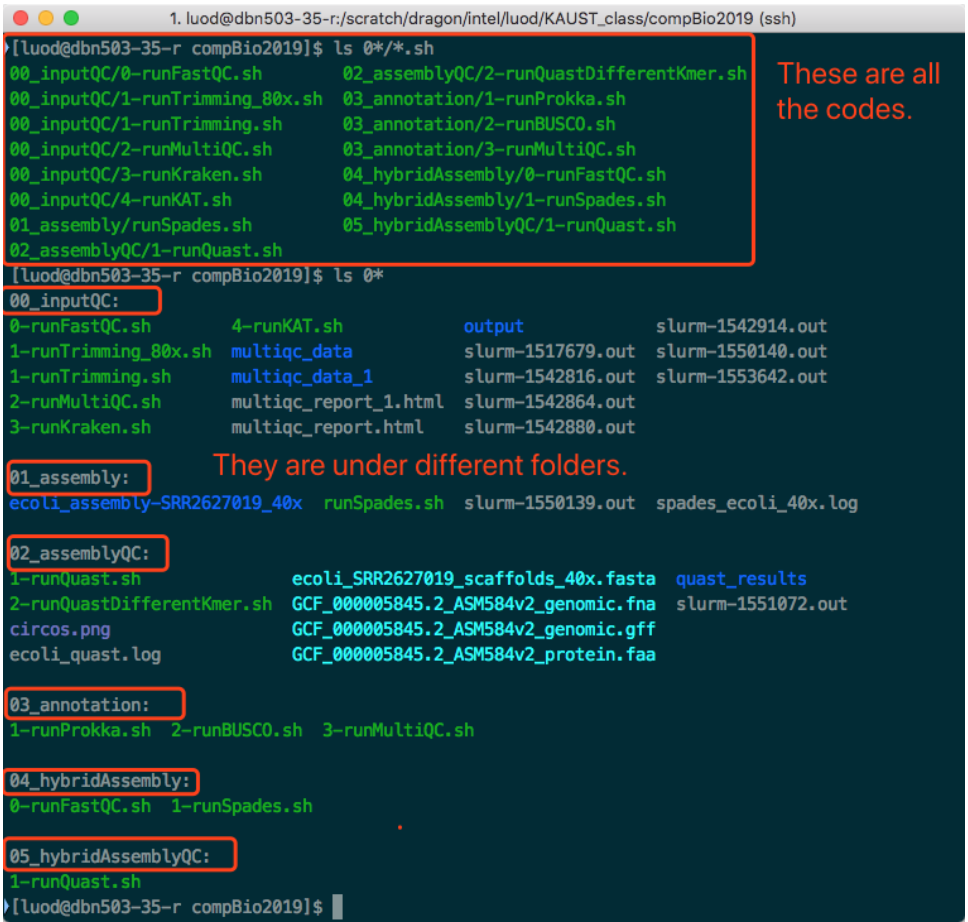
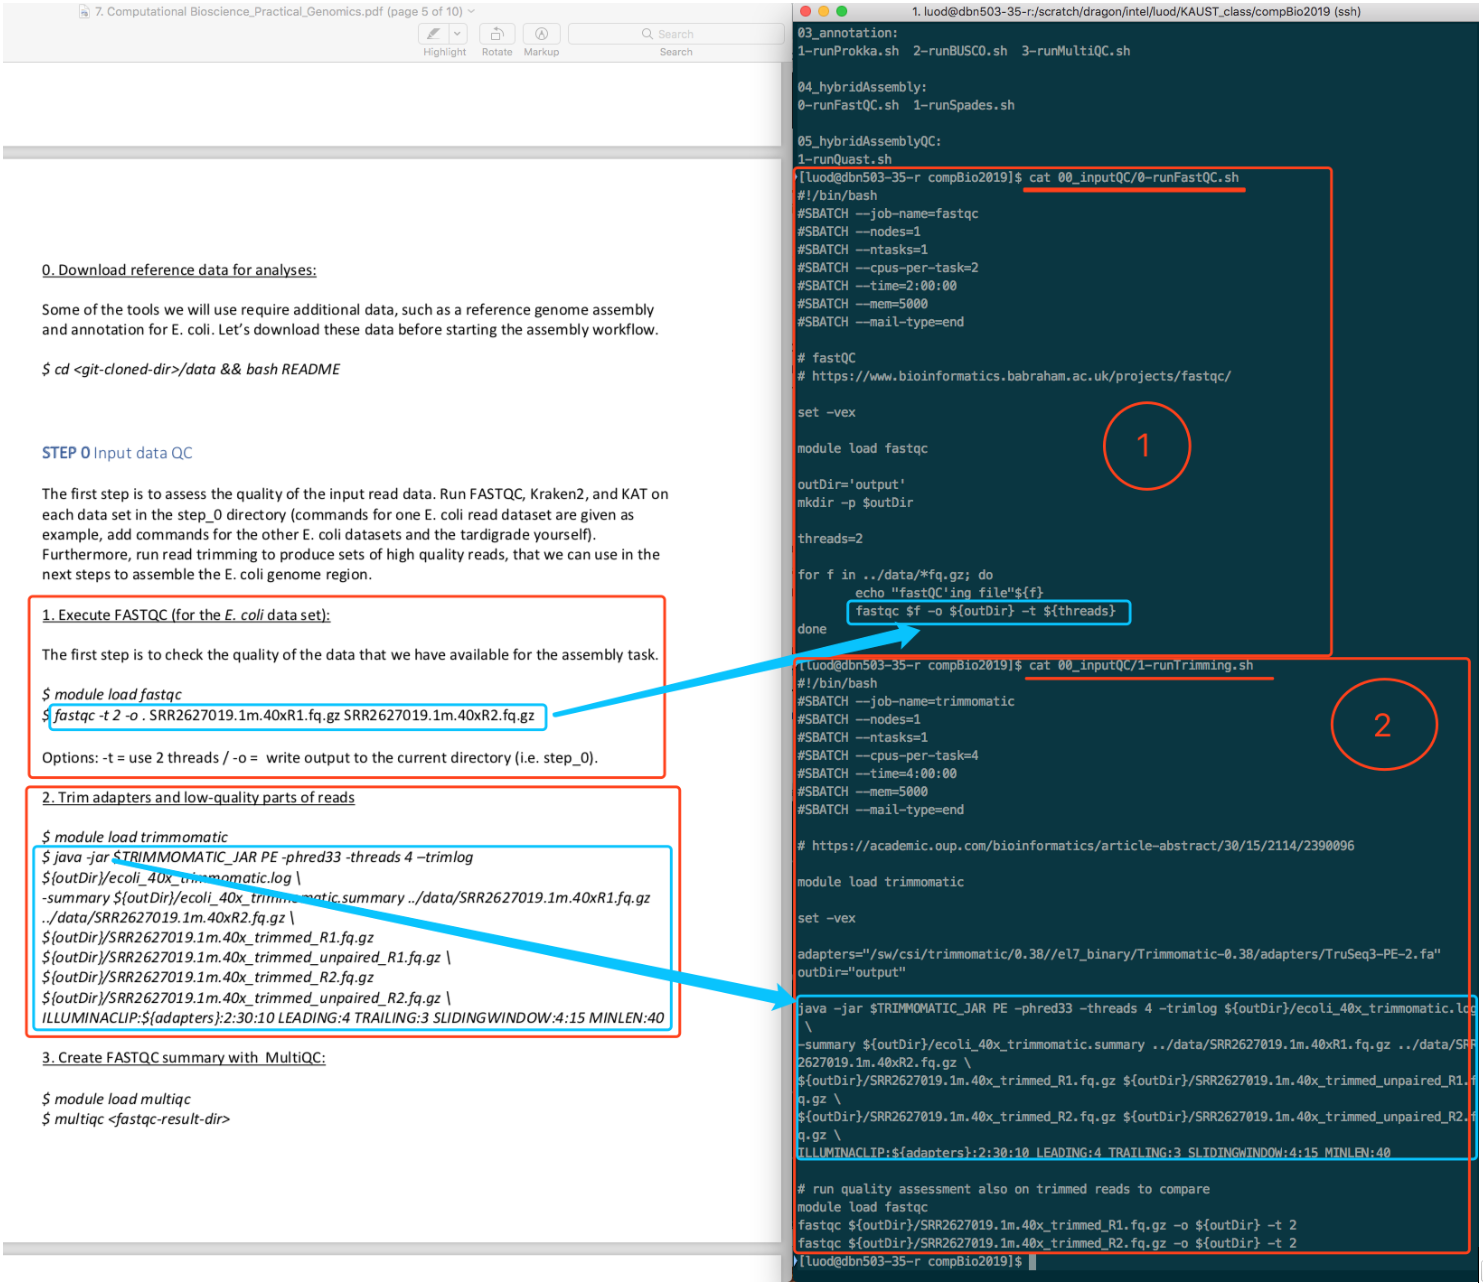
You DO NOT have to write or copy paste the code by yourself. All the code is already written there. You just need to change something.
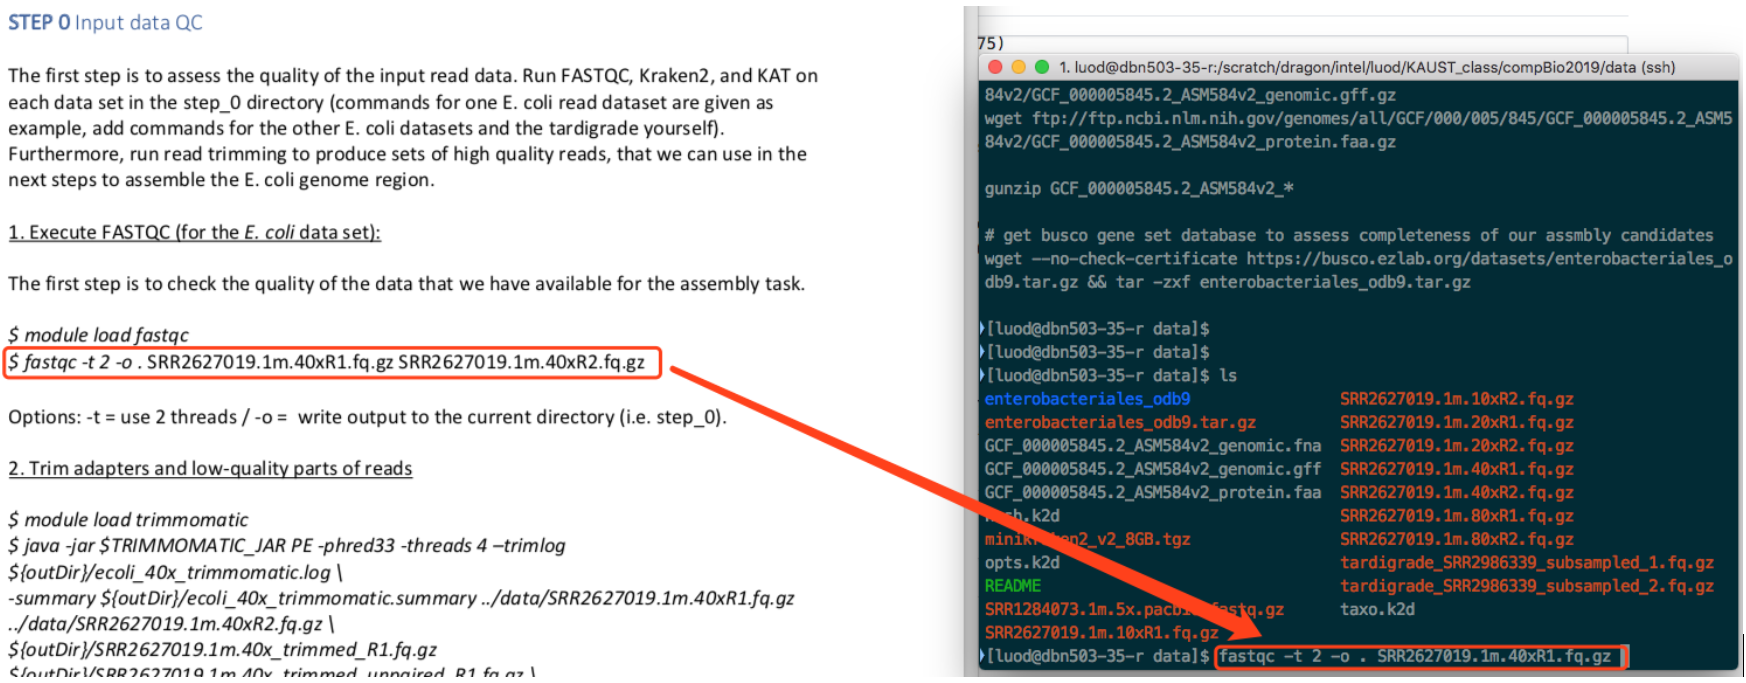
Read carefully and compare the codes in PDF and the contents of these so-called script files. You will find that they are very similar. Actually, these scripts are exactly the code we need to run.
The way you run these scripts is by typing sbatch <script_name>.
(And this is the way to submit most of your jobs to ibex.)
See screenshot below.
You can use squeue to see all jobs by all users.
Use squeue | grep <user_name> to see your own jobs.
You can see the job state in the output of squeue.
This is not of immediately interst to the course work. But understanding this will help a lot.
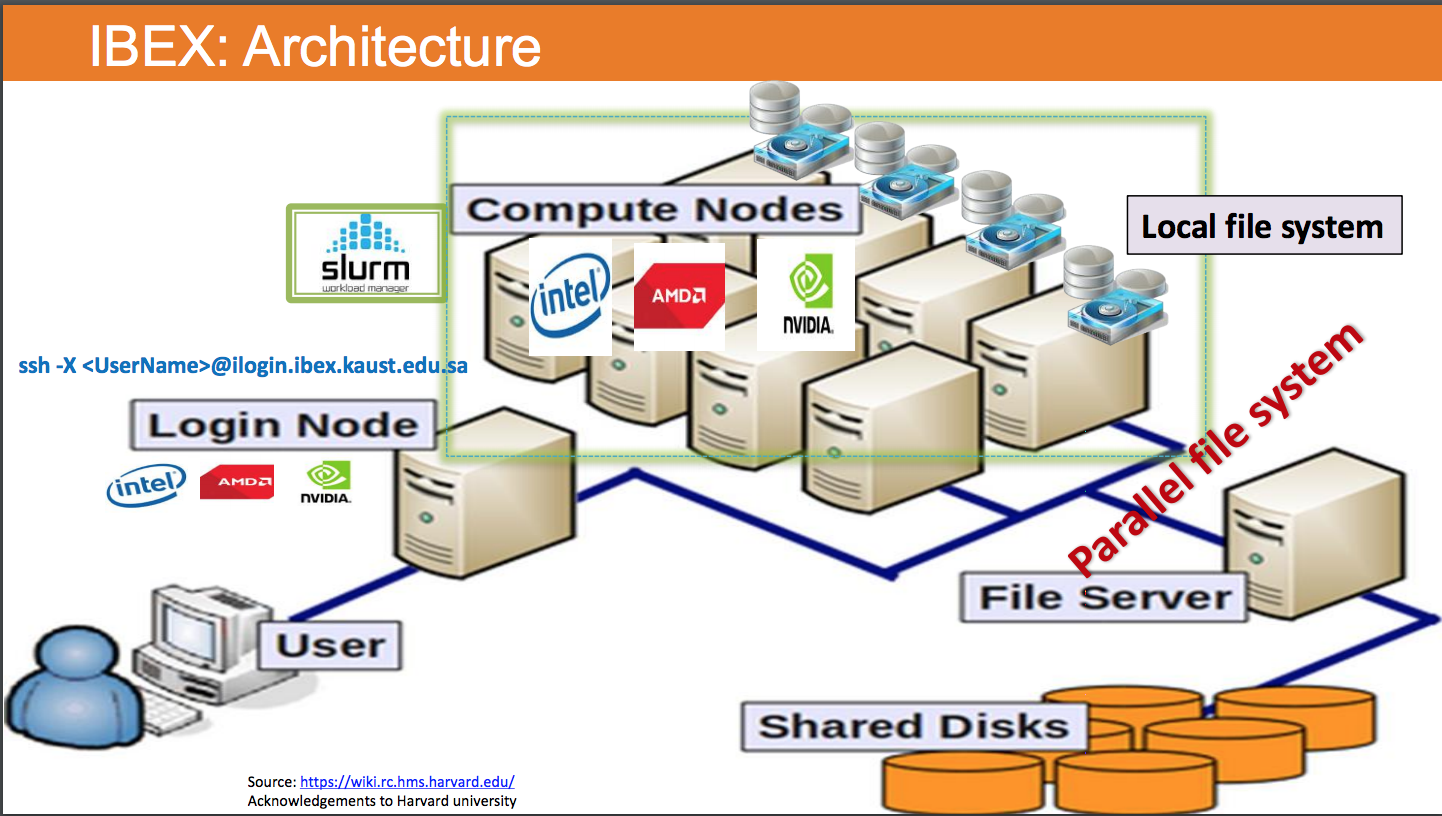
I will use one example in real world to explain this. But before that, you need to know something called "Login node vs. Compute Node", see the screenshot below (taken from page 4 of IBEX Hardware and Software stack found from ibex training, the screenshot itself is originally taken from https://wiki.rc.hms.harvard.edu/).
In short:
- When we
ssh <user_name>@<ip_address_or_domain>to login to ibex, we (user) go from local computer to the login node (a computer that is powerful, but may not that powerful as the compute nodes). - When we "
sbatch <script_name>", we are usingsbatchto send the job named "<script_name>" to "slurmjob manager",slurmwill further ask one (or more) of the computer node(s) to execute the job.
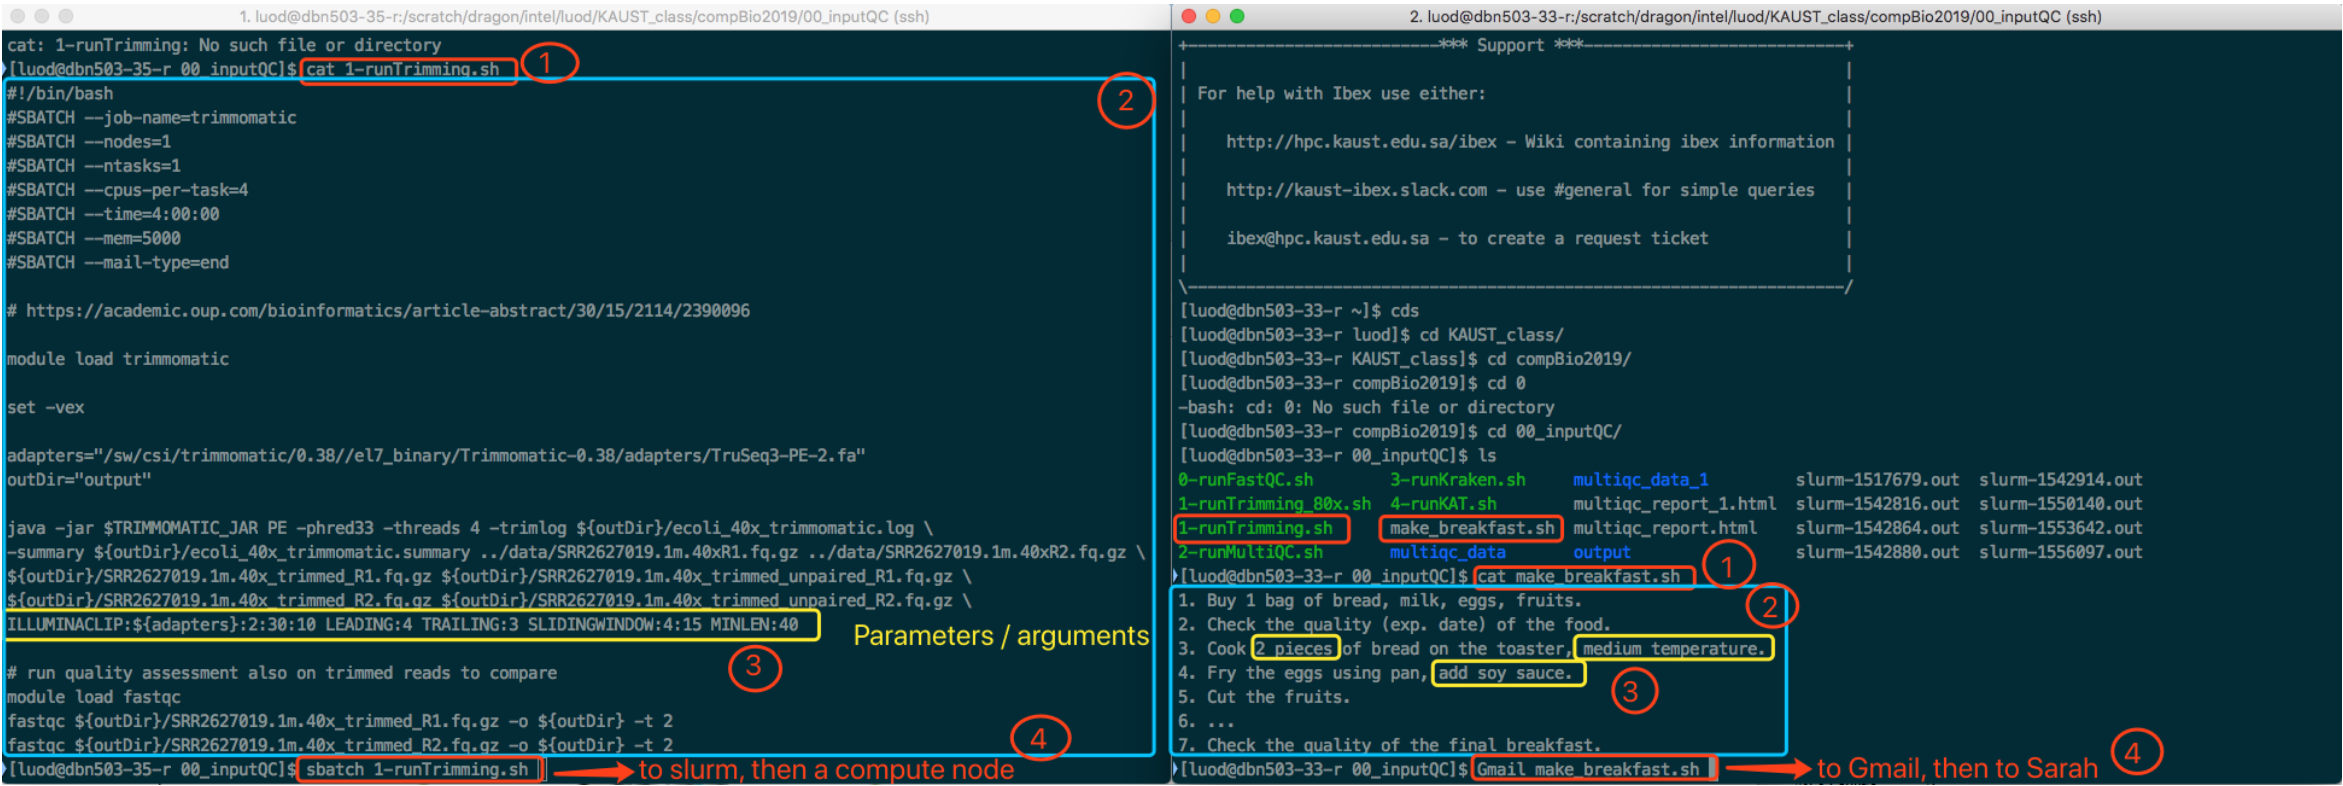
An analogy using a real-world example (simplified, not exactly match on every step, but enough to get the idea). I want someone to make the breakfast for me. I then write a document indicating what need to be done. I send the document via Gmail to someone, say Sarah. Sarah then executes all the necessary steps. Finally, I get the breakfast, which is the "result". See the below screenshot for the comparison of this example and the real bioinformatics analysis command.
Reading tips: Zoom the picture in the browser. Read left and right in parallel. Read from circled 1 to circled 4.
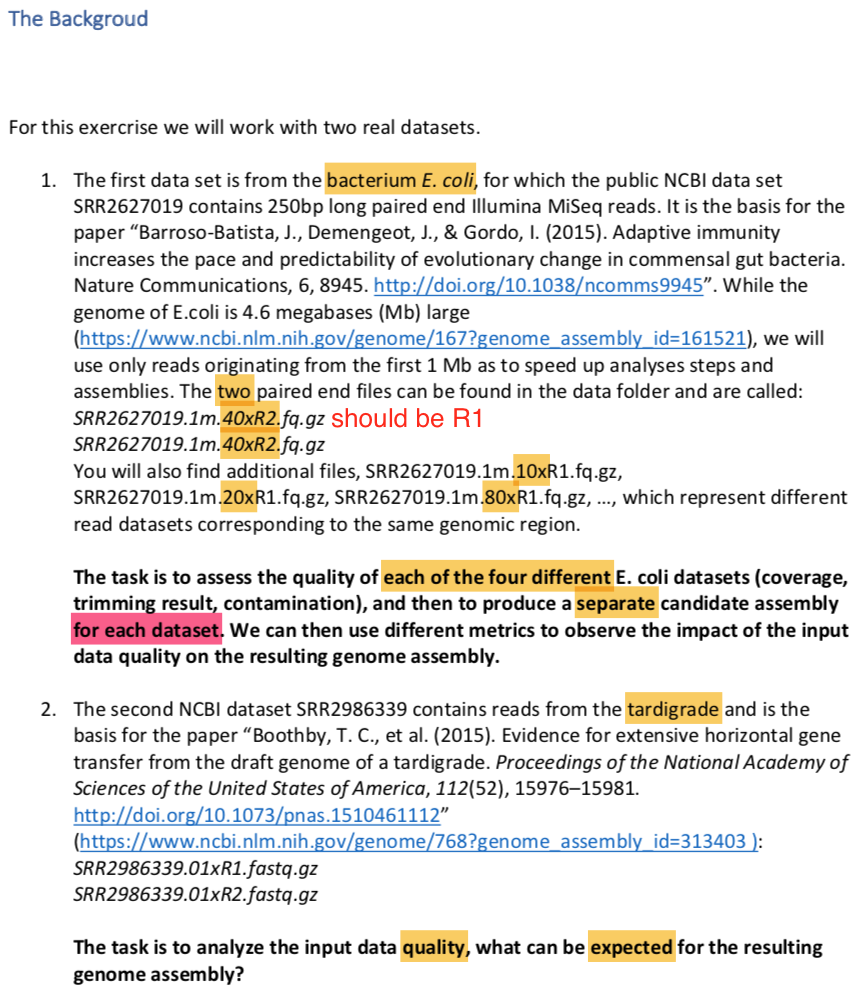
If you read carefully the course work PDF for DNA assembly, "Computational Bioscience_Practical_Genomics.pdf", you will find the following words.
In short, we are supposed to
- Run all the scripts for 40x reads. (everything is already written there, just run, i.e. just
sbatch.) - Change the input and output of each script to make everything connected, to run them for 10x, 20x, 80x. And do what have written there (observe the impact of the input data quality on the resulting genome assembly).
- Only run the QC steps for task number 2. And then, based on the results/impression/knowledge we get from the task 1, we predict the goodness of the genome assembly, rather than run the assembly steps (which could be done, but need some other databases I guess).
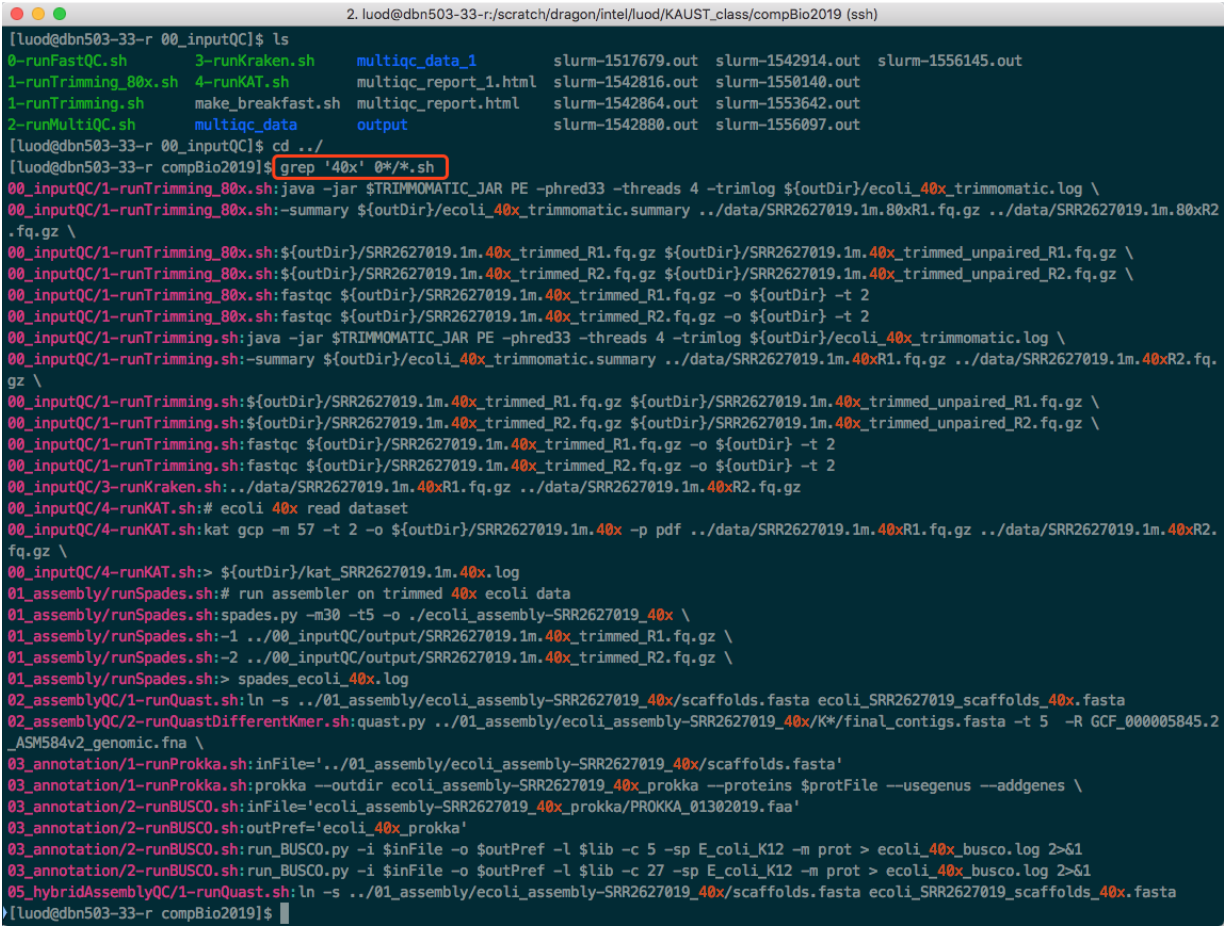
See the screenshot below. All the "40x" means that, the whole pipeline is written for "40x" dataset. You need to change them all to run for 10x, 20x, 80x.
Enter ./data/ folder, and run ./README if you have not done so. This is to download some other data, specifically the databases needed by some app (check the content of the README). This step takes some time.
Read again the course work PDF.
The RNA-seq part, DESeq2, will come soon. (If you find this useful.)
This is mentioned in the PDF at here.
What you do is:
- On your local computer, in terminal, run
scp. - But before that, you need to find the path of the file you want to download.
- Compose the full command you need to download the data.
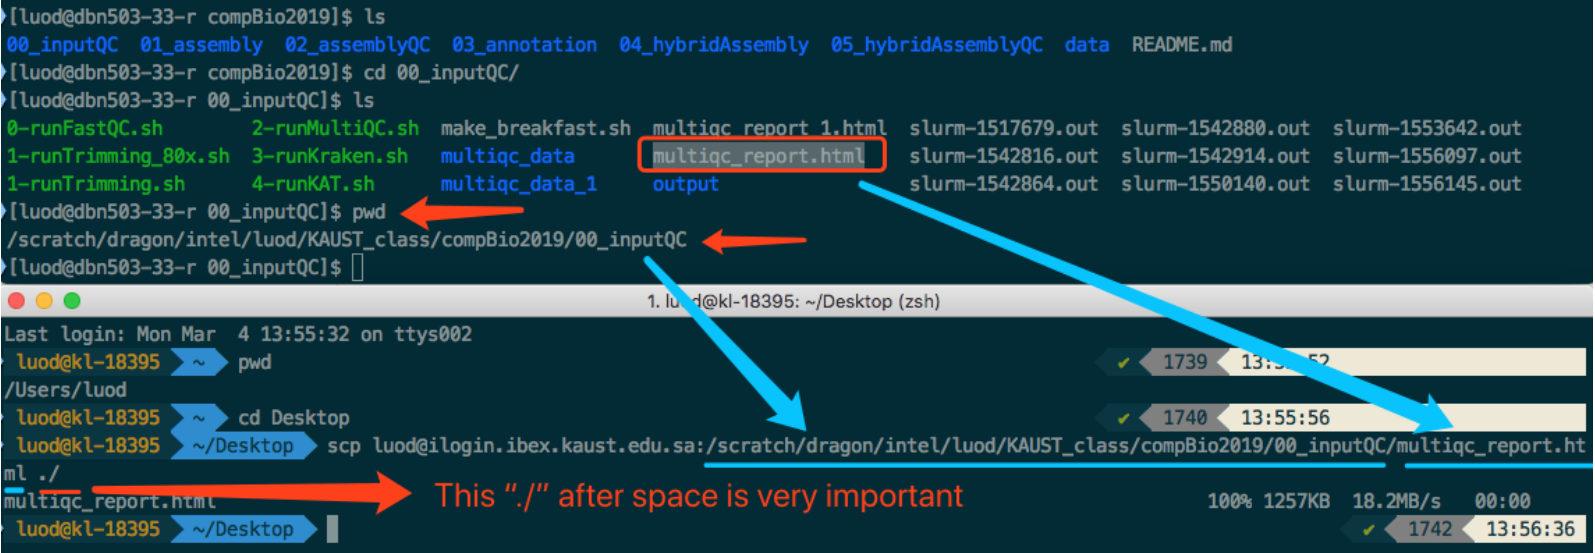
See the screenshot below for one example:
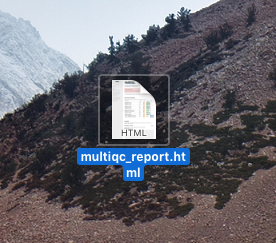
Say I want to download multiqc_report.html under compBio2019/00_inputQC/.
I first find the path to that file then compose the whole command to download it.
It is finally downloaded to my desktop.
If you are on Windows, you can use "WinSCP".
Google "WinSCP tutorial" or find videos on YouTube to learn how to use it.
This is the so-called FTP software, helping transferring data between local computer and server.
Mac OS has similar FTP software, like FileZilla.
But scp on Mac works very well.
